 08-29-2012, 11:51 PM
|
#121
|
|
Registered User
Join Date: Nov 2011
Location: Sunny Scotland
Posts: 21
|
Thanks for the update.
I seriously looked at a couple of the chinese units and went for a Kenwood too, after reading similar horror stories of poor integration, slowness, hanging, no RDs station names etc etc
I am sure they will get better but it seems its the nature of the breed - they are just not quite there yet.
My Kenwood looks very similar to yours - and if you have not yet looked around, they are quite hackable.
David
|

|

|
|
08-29-2012, 11:59 PM
|
#122
|
|
Registered User
Join Date: Nov 2011
Location: Sunny Scotland
Posts: 21
|
Quote:
Originally Posted by politby

I have ordered the Connects2 double din kit off eBay. Is this the one you referred to as "rubbish?" They say it is for cars without the cup holder but I figured I can lose the cupholder if necessary.
|
I used a Connects2 kit in mine and it fits perfectly - its all down to how you install it.
As long as you dont want a nice Porsche badge on the bezel there is nothing wrong with the Connects2 Kit.
I posted a picture of the fitted unit a few months ago on this thread so have a look if interested.
I think people dont consider how much weight a double din unit is - as with several installs (with both kits) I have seen the kit has insufficient support and the head unit ends up sagging in the dash, meaning usually the bottom of the unit sits further out than the top.
David
|
|
|
|
|
08-30-2012, 12:51 AM
|
#123
|
|
Registered User
Join Date: Jul 2012
Location: Sweden
Posts: 49
|
Quote:
Originally Posted by BestGear
I used a Connects2 kit in mine and it fits perfectly - its all down to how you install it.
As long as you dont want a nice Porsche badge on the bezel there is nothing wrong with the Connects2 Kit.
I posted a picture of the fitted unit a few months ago on this thread so have a look if interested.
I think people dont consider how much weight a double din unit is - as with several installs (with both kits) I have seen the kit has insufficient support and the head unit ends up sagging in the dash, meaning usually the bottom of the unit sits further out than the top.
David
|
Thanks for that. I have just installed the amp, routed the cables into the cabin and swapped the dash speakers. Will do the head unit over the weekend.
I have the Pio SGH-DA100 AppRadio which is quite light as it has no optical drive so I am not too worried about sagging but I will find some way to support it other than just the cage.
|
|
|
|
|
08-30-2012, 02:24 AM
|
#124
|
|
Registered User
Join Date: Nov 2011
Location: Sunny Scotland
Posts: 21
|
Quote:
Originally Posted by politby
I have the Pio SGH-DA100 AppRadio which is quite light as it has no optical drive so I am not too worried about sagging but I will find some way to support it other than just the cage.
|
The secret, (if there is one!) is to put two screws through each side (holes already in cage) and into the plastic dash part just the same as the more expensive kit.
I did this - and added a couple of washers between frame and cage to prevent distorting the plastic frame.
This makes it very rigid and will never sag nor rattle.
You just need to mount everything up on the bench to get the distances right, then fix it in place within the plastic frame.
David
|
|
|
|
|
08-30-2012, 02:30 AM
|
#125
|
|
Registered User
Join Date: Jul 2012
Location: Sweden
Posts: 49
|
Quote:
Originally Posted by BestGear
The secret, (if there is one!) is to put two screws through each side (holes already in cage) and into the plastic dash part just the same as the more expensive kit.
I did this - and added a couple of washers between frame and cage to prevent distorting the plastic frame.
This makes it very rigid and will never sag nor rattle.
You just need to mount everything up on the bench to get the distances right, then fix it in place within the plastic frame.
David
|
So did you use the cage that came with the Connects2 kit, or the one that came with the head unit?
I was thinking the Pioneer cage will fit the unit 100% but OTOH the Connects2 cage may be better adapted to the car.
My car has the one piece "horseshoe" vent frame and I am not sure what is the best way to remove it but I suspect is is just using clips.
|
|
|
|
|
08-30-2012, 03:00 AM
|
#126
|
|
Registered User
Join Date: Nov 2011
Location: Sunny Scotland
Posts: 21
|
Quote:
Originally Posted by politby
So did you use the cage that came with the Connects2 kit, or the one that came with the head unit?
.
|
Yes, I used the connects2 cage as the bezel has clips that need to fit to the cage and on my Kenwood it would not fit properly as the cut outs were not there.
You just need to juggle (on the bench) the side mounting clips so that you get the distance correct - ie the distance from front of head unit to flush with bezel.
Its easy when you see it on the bench, rather than trying to describe it.
David
|
|
|
|
|
08-30-2012, 03:20 AM
|
#127
|
|
Registered User
Join Date: Jul 2012
Location: Sweden
Posts: 49
|
Quote:
Originally Posted by BestGear
Yes, I used the connects2 cage as the bezel has clips that need to fit to the cage and on my Kenwood it would not fit properly as the cut outs were not there.
You just need to juggle (on the bench) the side mounting clips so that you get the distance correct - ie the distance from front of head unit to flush with bezel.
Its easy when you see it on the bench, rather than trying to describe it.
David
|
Got it. Final question - where did you take switched power for the head unit, and how did you connect the parking brake/reverse leads?
|
|
|
|
|
08-30-2012, 09:15 AM
|
#128
|
|
Registered User
Join Date: Apr 2012
Location: Riverside, CA
Posts: 1,666
|
Quote:
Originally Posted by Crono0001
AFTER TWO WEEKS OF WAITING!!!!
Got everything installed today. All I can say is... wow. The difference between this and the chinese unit... It's not even comparable (well... considering how this one was 3x the chinese one).
Where to begin where to begin. First, let's re-assess why I returned the chinese brand GPS:
1. The GPS was sketchy. It would take forever to load and wasn't very logical. It also lagged. You couldn't see the streets half the damn time, and if you ever exited the GPS, you couldn't get back into it.
2. The Bluetooth was murky. You couldn't hear me half the time. Phonebooks and contacts were not synced. It was basically a telephone on your car, where you'd have to memorize the number, couldn't see who was calling, and they couldn't hear you anyways.
3. The menu was slow, laggy, and un-intuitive. It also wasn't very pretty.
4. The Bluetooth music sync wasn't also very compatible with my iphone. I could play, pause, and go next track or previous track... That was about it. Perhaps the most glaring problem was the fact that the music would cut in and out, depending on where you iPhone was. If it was in your pocket, the music would lag every few seconds!
5. The included ipod cable, although allowed me to play music, didn't charge my phone.
Now let's look at the Kenwood.
1. The GPS is Garmin. It is fast, reliable, easy to use, and even has updated traffic and street view.
2. The Bluetooth is CRYSTAL CLEAR, EVEN WITH THE TOP DOWN ON THE HIGHWAY! Phonebook is synced. I can go through my contacts, recent calls, and even tells me who is calling when I'm getting a call.
3. The menu is lightning fast, beautiful, and easy to navigate. There's no lag, and no frustration trying to go through the menus.
4. The bluetooth music is complete. I can browse my playlists, songs, artists, etc. It shows my album art, and there is absolutely no lag between songs or during songs. Everything is crystal clear and perfect.
5. The ipod cable (another $30) was able to charge my iphone. Something I was very happy about.
But that's not the best part!
I can use my iphone apps through the Kenwood screen. I can even play youtube videos from my phone on the screen. How amazing is that?
Granted, you're paying 3 times as much, but it is sooooooo worth it. This is coming from someone who has tried both. I would say go for the Kenwood hands down. It's only another $400, and it is worth every penny and some.
|
I'm glad you got the unit and features you wanted in the Kenwood.
Install looks great.
I did not have the problems you experienced with your Chinese unit and honestly I'm not even using most of the features of even my unit.
Its working great for what I need it to do, GPS Navigation, Play music from DVD and USB, and the backup video.
I think if you want to use most of the functionality then the Kenwood is the right one to install.
My next upgrade will be to something more resembling an Ipad with WIFI etc as DVD's and CD are virtually obsolete now.
__________________
"It broke because it wants to be Upgraded  "
2012 Porsche Performance Driving School - SanDiego region
2001 Boxster S, Top Speed muffler, (Fred's) Mini Morimotto Projectors, Tarret UDP,
Short Shifter, Touch Screen Dual Din Radio, 03 4 Bow glass Top (DD & Auto-X since May 17,2012)
|
|
|
|
|
08-30-2012, 01:21 PM
|
#129
|
|
Registered User
Join Date: Mar 2012
Location: Arizona
Posts: 720
|
Yea, I'm quite sure I bought a faulty unit. Buyer beware.
But I'm quite happy with mine now.
|
|
|
|
|
08-31-2012, 03:03 AM
|
#130
|
|
Registered User
Join Date: Nov 2011
Location: Sunny Scotland
Posts: 21
|
Quote:
Originally Posted by politby
Got it. Final question - where did you take switched power for the head unit, and how did you connect the parking brake/reverse leads?
|
Hi
Switched power is already on the ISO block so nothing to do.
The reverse was from the rear lights as I was already running a cable for the rear camera so was zero hassle. There is reverse signal in the ECU under the passenger seat if you dont want to run a cable to the rear boot.
Handbrake - did not connect it - just earth the wire and dont view movies when driving....
David
|
|
|
|
|
08-31-2012, 06:32 AM
|
#131
|
|
Registered User
Join Date: Jul 2012
Location: Sweden
Posts: 49
|
Quote:
Originally Posted by BestGear
Hi
Switched power is already on the ISO block so nothing to do.
|
There is so much that is non standard on this car that I want to be extra careful. According to the pinout of the CDR23 ISO harness, pin 4 is constant +12V while pin 5 is labelled "Antenna 12V+" which could be either a switched 12V input or a remote/power antenna output.
Better go probe those leads with the trusty Fluke. 
My Pioneer has an orange/white lighting feed as well. Usually I would just connect it to switched power, but does anyone know a good place to connect to the instrument lighting power source?
Last edited by politby; 08-31-2012 at 06:37 AM.
|
|
|
|
|
08-31-2012, 09:22 AM
|
#132
|
|
Registered User
Join Date: Apr 2012
Location: Riverside, CA
Posts: 1,666
|
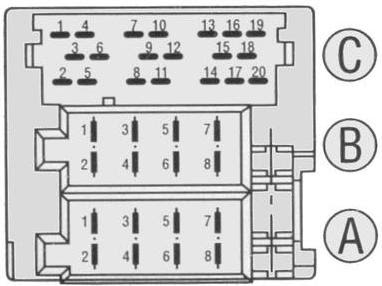
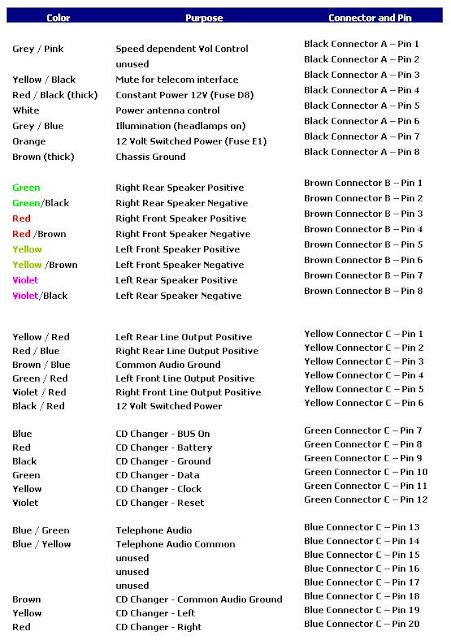
This might help from Pelican and 101projects.com
Note: Pin 6 on yellow portion of C-connector is the switched + power source.
I took mine from Pin 7 on the Black connector.
__________________
"It broke because it wants to be Upgraded "
2012 Porsche Performance Driving School - SanDiego region
2001 Boxster S, Top Speed muffler, (Fred's) Mini Morimotto Projectors, Tarret UDP,
Short Shifter, Touch Screen Dual Din Radio, 03 4 Bow glass Top (DD & Auto-X since May 17,2012)
Last edited by jb92563; 09-02-2012 at 12:16 AM.
|
|
|
|
|
09-01-2012, 03:47 AM
|
#133
|
|
Registered User
Join Date: Jul 2012
Location: Sweden
Posts: 49
|
Quote:
Originally Posted by jb92563
This might help from Pelican and 101projects.com
Note: Pin 6 on yellow portion of C-connector is the switched + power source.
|
Nope, my car has an entirely different configuration of the yellow connector - no switched power there.
I found this diagram on renntech.org - this is mostly consistent with what I found when measuring the voltages at the "A" (black) ISO connector in my car. According to this, pin 6 in the yellow connector is "Radio Code In". In the ACC ignition position, this wire is at just under 12 V, indicating I guess that the radio should ask for the code when plugged in again.
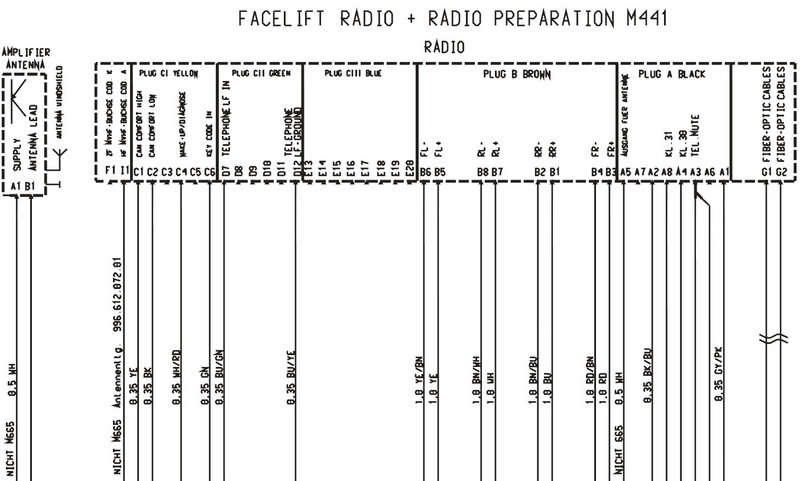
My car has the following pinout on the black ISO block:
- Gray/pink - Speedometer/speed dependent volume
- Blue/black - Reverse signal
- not used
- Red/black - Constant +12V
- White - Power to antenna
- not used
- not used
- Black - ground
Pin 7, which should be switched power, has no connection so I guess I have to get the switched power from the A/C panel as someone else suggested.
Pin 6, illumination, is not present either so I guess I'll just leave that one.
|
|
|
|
|
09-01-2012, 07:00 AM
|
#134
|
|
2001 Arctic Silver 2.7
Join Date: Jun 2012
Location: Huntington Beach,CA
Posts: 310
|
Quote:
|
According to this, pin 6 in the yellow connector is "Radio Code In". In the ACC ignition position, this wire is at just under 12 V, indicating I guess that the radio should ask for the code when plugged in again.
|
This is more than likely the switched power lead you are looking.
I don't believe it asks for a code, rather than a 12V trigger to the radio to present code on the display.
The code is internal to the radio set by Becker matching the model and serial number to the radio code.
__________________
2001 Boxster - Arctic Silver Metallic
RMS, IMS, 87.5K
|
|
|
|
|
09-02-2012, 04:01 AM
|
#135
|
|
Registered User
Join Date: Jul 2012
Location: Sweden
Posts: 49
|
Quote:
Originally Posted by tony_fury
This is more than likely the switched power lead you are looking.
I don't believe it asks for a code, rather than a 12V trigger to the radio to present code on the display.
The code is internal to the radio set by Becker matching the model and serial number to the radio code.
|
Could be, but oddly enough it reads 11.6V, not actual battery voltage (12.4V on the constant voltage lead). Probably not safe to use as switched power for a head unit.
|
|
|
|
|
09-02-2012, 08:39 AM
|
#136
|
|
2001 Arctic Silver 2.7
Join Date: Jun 2012
Location: Huntington Beach,CA
Posts: 310
|
Quote:
Originally Posted by politby
Could be, but oddly enough it reads 11.6V, not actual battery voltage (12.4V on the constant voltage lead). Probably not safe to use as switched power for a head unit.
|
Then your best bet is to obtain it off one of the AC/heating controls switched 12V leads.
__________________
2001 Boxster - Arctic Silver Metallic
RMS, IMS, 87.5K
|
|
|
|
|
09-02-2012, 10:22 AM
|
#137
|
|
Registered User
Join Date: Jul 2010
Location: Pacific Northwest
Posts: 308
|
Quote:
Originally Posted by tony_fury
Then your best bet is to obtain it off one of the AC/heating controls switched 12V leads.
|
+1 That's where I got my switched power.
__________________
Glen
|
|
|
|
|
09-02-2012, 10:53 AM
|
#138
|
|
Registered User
Join Date: Jul 2012
Location: Sweden
Posts: 49
|
I now consider that question resolved.
I am starting to have second thoughts about the double DIN thing because it requires relocating the a/c controls, causing the loss of the lower storage tray. Because I have the Boxster Red interior I don't want to just insert a black replacement where the CD storage is now, that won't look good. And the cost of a red leather tray is astronomical.
I don't really need a large display but it does update the car's look by 10 years. And I cannot find a single DIN unit that has built in BT streaming, iPhone support, USB playback and does not look like a Christmas tree.
|
|
|
|
|
09-03-2012, 08:44 AM
|
#139
|
|
Registered User
Join Date: Jul 2012
Location: Sweden
Posts: 49
|
Quote:
Originally Posted by Gforrest2
+1 That's where I got my switched power.
|
I took out the a/c unit today and there are a LOT of wires on those two connector blocks. Which one is the switched 12V supply? Green/black?
Probing them all with the ignition on and off will take ages...
Did you put a tap on the wire or did you cut and splice?
|
|
|
|
|
09-03-2012, 09:24 AM
|
#140
|
|
Registered User
Join Date: Jul 2010
Location: Pacific Northwest
Posts: 308
|
Quote:
Originally Posted by politby
I took out the a/c unit today and there are a LOT of wires on those two connector blocks. Which one is the switched 12V supply? Green/black?
Probing them all with the ignition on and off will take ages...
Did you put a tap on the wire or did you cut and splice? |
I can't remember which wire off hand. I found it someplace, just trying to remember where. I'll search around today. As for the splice. I used one of those clamps where you insert the splice wire in the clamp and close it on the wire you want to spice to. Probably should have just spliced and soldered it but I got lazy.
Glen
__________________
Glen
|
|
|
|
 Posting Rules
|
You may not post new threads
You may not post replies
You may not post attachments
You may not edit your posts
HTML code is On
|
|
|
All times are GMT -8. The time now is 06:06 AM.
| |


 Porsche Boxster Silver
 Linear Mode


