 02-21-2016, 03:30 AM
|
#121
|
|
Registered User
Join Date: Sep 2013
Location: KRK, PL, EU
Posts: 255
|
Quote:
Originally Posted by itsnotanova

The bolts are just for show and made out of a super cheap aluminum. The wheels are a one piece cast Chinese knock off.
|
Oh. Well now that they're painted you really can't tell. They do look nice. Let's see 'em mounted!
__________________
Past: 944 NA white '86
Present: 986 black '98
Future: 959 
|

|

|
|
02-22-2016, 07:10 AM
|
#122
|
|
Registered User
Join Date: Feb 2013
Location: Cranston RI
Posts: 902
|
Better to look marvelous than to feel marvelous
__________________
99 Porsche Boxster
|
|
|
|
|
02-22-2016, 04:25 PM
|
#123
|
|
Registered User
Join Date: Jul 2013
Location: Bastrop, Tx
Posts: 2,644
|
Paint day 2.5. Sorry if I'm over posting on the paint pics but I love painting. I'm hoping this is the last of paint days. I needed to repaint the trunk spoiler and roll bar. I also bought a Cayman S spoiler and needed to paint it too. I ended up saving a pair of clear headlights. They were very yellow and took lots of wet sanding. I painted over the silver eyebrow and trimmed them in black like the newer Porsches have. I then threw a coat of clear to bring them back to looking new again.

__________________
Woody
|
|
|
|
|
02-22-2016, 07:48 PM
|
#124
|
|
Registered User
Join Date: Jun 2012
Location: Bedford, TX
Posts: 2,757
|
Nice work Woody! The headlights look great! We never get tired of pics 
__________________
______________________________________________
2001 Boxster S Lapis Blue
TS Cat Bypass Pipes and exhaust
iPad Mini Dash Install
DEPO Tail Lights
|
|
|
|
|
02-22-2016, 09:20 PM
|
#125
|
|
Registered User
Join Date: May 2015
Location: Greater Seattle, WA
Posts: 534
|
The paint shots look great, Woody! What kind of paint are you using? 2 part or 1 part? Base+clear or just single stage?
The wheels look so glossy, I can't tell if you snapped it before the wet paint coat flashed dry, or if it really dried that glossy. Either way, looks great and very little orange peel from what I can tell.
I had some painting projects to do here recently out of rattle cans with my jam-packed one car garage, and I had to wait until the rain stopped and humidity wasn't "breath fog" bad, take part outside, spray, return to indoors small heated garage to cure (setup with a small electric heater and two 500 watt quartz IR heater lights), repeat next part and next coat, etc. did a bunch of interior parts in soft touch black this way, probably had to redo about half of them for various reasons. Once piece seems to have these arc-shaped crack blemishes no matter how many times I redo it. (Those reappearing blemishes are really starting to bug me, and I'm not going to reinstall the part with them!)
Another piece I refinished was an aluminum-look shift knob insert. Had some issues with the metallic base coat (I think was quick drying lacquer) being messed up some by the clear coat. Redid it and it seemed to turn out a bit better the next time, still not perfect but good enough, although the clear I used was matte, so want to to polish it a bit more as its not perfectly glossy yet. Hope I don't burn through, though, because I already did that on a previous attempt. 
It's all in good fun, but using a wadded up tape ball as a shift knob is getting a bit old. 
__________________
2001 Boxster
Last edited by jakeru; 02-22-2016 at 09:24 PM.
|
|
|
|
|
02-23-2016, 03:51 AM
|
#126
|
|
Registered User
Join Date: Feb 2013
Location: Cranston RI
Posts: 902
|
Woody should open Boxster University! Build your own! and you could clear out some Boxster stuff you don't want
__________________
99 Porsche Boxster
|
|
|
|
|
02-23-2016, 06:44 AM
|
#127
|
|
Registered User
Join Date: Jul 2013
Location: Bastrop, Tx
Posts: 2,644
|
Quote:
Originally Posted by mikesz
Woody should open Boxster University! Build your own! and you could clear out some Boxster stuff you don't want
|
Lol, I'm not sure how good of a professor I would be. I consider myself an expert on how to dismantle them but that's about it. I guess I could teach that course? lol. I'm lost when it comes to diagnosing engine and electrical problems though. I wish Jake or JFP would start teaching those kind of classes.
Thanks Jakeru. The arena red base coat is spies hecker paint ($200 a quart!), and the clear coat is Nason. I went with SH base because it's suppose to match better with the factory color. At least that's what the counter guy told me. Nason is a generic brand from Dupont. There's not a lot of choices around here. If and when I repaint the whole car, I'll probably use SH for the base and clear. It's very difficult to get a good finish spraying a one stage metallic. I've done it, but only on cars that had a small budget for paint. Base coat/clear coat is the way to go for most paint jobs that you care about. Single stage paints do have their benefits too, and that's what I used for the black. I went single stage on the black because of the headlights and grill mesh. I needed single stage because I wanted to paint and not have to worry about going over with a clear within 24 hours. With a two stage paint you need to get the clear on within 24 hours. I ended up covering the single stage black with a clear though. I did that for two reasons. Mostly because I had lots of clear paint and darker single stage paints show scratches very easy. I painted a black truck in single stage once and it would take lots of buffing/polishing to remove swirl marks. I'd have to do that every few months and it got old quick.
The pic of the wheels are after they had dried. They are very glossy but all the lights inside my shop exacerbates the glossy look. They also have 1 coat of etching primer, 1 coat of building primer, 4 coats of black and 4 coats of clear. I had to put so many coats of paint on the because of all the angles of the spokes.
__________________
Woody
|
|
|
|
|
02-23-2016, 07:02 AM
|
#128
|
|
Registered User
Join Date: Jul 2013
Location: Bastrop, Tx
Posts: 2,644
|
One more thing Jakeru, I've been painting as a hobbyist for 27 years. All those years I was using those cheap syphon spray guns. I finally upgraded to a german made Sata gun. Oh my what a difference. It really is like going from a Hyundai to a Porsche. I highly recommend a good gun if you plan on painting more.
__________________
Woody
|
|
|
|
|
02-23-2016, 03:51 PM
|
#129
|
|
Registered User
Join Date: Jul 2013
Location: Bastrop, Tx
Posts: 2,644
|

Free to a good home. Cayman S style wing. You pay shipping. I thought I would like it but I think it's too much along with the trunk wing.
__________________
Woody
|
|
|
|
|
02-23-2016, 04:48 PM
|
#130
|
|
98 Arctic silver 986
Join Date: Jul 2011
Location: Upstate, NY
Posts: 1,452
|
Wow Woody Those headlights look great 
|
|
|
|
|
02-23-2016, 05:21 PM
|
#131
|
|
Custom User Title Here
Join Date: Mar 2012
Location: Ft. Leonard Wood
Posts: 6,169
|
Quote:
Originally Posted by itsnotanova
Free to a good home. Cayman S style wing. You pay shipping. I thought I would like it but I think it's too much along with the trunk wing.
|
I'll take you up on that, Woody.
__________________
https://youtube.com/@UnwindTimeVintageWatchMuseum
Last edited by particlewave; 02-23-2016 at 05:23 PM.
|
|
|
|
|
02-24-2016, 05:05 AM
|
#132
|
|
Registered User
Join Date: Feb 2013
Location: Cranston RI
Posts: 902
|
Hey woody I am planning on the same wing setup. I have to finish painting the trunk this spring
__________________
99 Porsche Boxster
|
|
|
|
|
02-24-2016, 06:24 AM
|
#133
|
|
Registered User
Join Date: Mar 2015
Location: Santa Clara ca
Posts: 363
|
looking good Woody!
where are you putting the licence plates?
great painting.
matt
|
|
|
|
|
02-24-2016, 06:35 AM
|
#134
|
|
Registered User
Join Date: Jan 2008
Location: St Catherines, Ontario
Posts: 439
|
damn Ive been wanting a cayman wing for years
__________________
2006 Audi A4 Avant 2.0t Quattro
1997 Boxster Glacier White w/facelift(gone but not forgotten)
2004 Boxster S 550 Spyder Anniversary Edition
|
|
|
|
|
02-24-2016, 07:05 AM
|
#135
|
|
Registered User
Join Date: Jul 2013
Location: Bastrop, Tx
Posts: 2,644
|
Sorry guys, but Charles beat you to it. It was only $100 on ebay. I would like to see what the build quality and mounting design of the more expensive one's are like. This one took a lot of work to get to the point it's at and probably could use some more. It came straight from China with no mounting instruction or any plugs for the access holes. You're on your own for drilling the mounting holes and clearing an area inside it for the mounting bolts. I'll take some pics today and show you what I'm talking about later tonight.
Thank you for your compliments and opinion. I see when you guys recommend me on other threads and I very much appreciate it.
__________________
Woody
|
|
|
|
|
02-24-2016, 07:28 PM
|
#136
|
|
Registered User
Join Date: Jul 2013
Location: Bastrop, Tx
Posts: 2,644
|
Here's some pics of the Cayman S spoiler and why I wasn't too impressed with the quality. I had to dremel out the area for the mounting bolts because there was huge globs of fiberglass in both sides.

The factory bolts aren't long enough and I had to use something else. The only bolts I had that were the right size were allen head bolts. I suggest finding normal six sided bolts for your instillation.

Here's a little tip for everyone. These little trim pieces come off very easy and are only held in place by two little pegs pressed into ribbed plastic holes. I get a call every month for some of these but I think by putting a dab of caulk on them before they come off, you might save yourself some grief in the future. They're really easy to remove by prying up underneath them.

The same goes for the 03-04 rear spoiler covers. The 97-02 are held on by plastic rivets and securely snap over the aluminum frame. The 03-04 have no rivets and are not as securely attached to the aluminum frame. It's my belief that by adding some caulk to the back side of the cover, that it's less likely to come off. You might need to remove the cover in the future, so you wouldn't want to put anything that would permanently attach it to the frame.

Here's the rear with license plate. There's an aluminum bracket behind the plate and mesh that is attached to the bumper cover. I can unscrew the plate holder when I go to the track so more hot air can escape.

__________________
Woody
|
|
|
|
|
02-25-2016, 05:34 AM
|
#137
|
|
Registered User
Join Date: Feb 2013
Location: Cranston RI
Posts: 902
|
Damn! You got me thinking! I like the mesh in the rear bumper. I lost the rear spoiler on the highway calk was a good idea. Did you remove the bracing behind the bumper?
__________________
99 Porsche Boxster
Last edited by mikesz; 02-25-2016 at 09:06 AM.
|
|
|
|
|
02-25-2016, 04:23 PM
|
#138
|
|
Registered User
Join Date: Jul 2013
Location: Bastrop, Tx
Posts: 2,644
|
__________________
Woody
Last edited by itsnotanova; 02-26-2016 at 08:20 AM.
|
|
|
|
|
03-15-2016, 10:55 AM
|
#139
|
|
Registered User
Join Date: Jul 2013
Location: Bastrop, Tx
Posts: 2,644
|
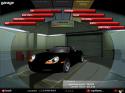
Exterior is done! I had to kick it out of the shop because I need to remove a motor from the boxster behind it. Next on the list is finishing the interior.


__________________
Woody
|
|
|
|
|
03-15-2016, 11:30 AM
|
#140
|
|
Registered User
Join Date: Sep 2014
Location: santa barbara, CA & Devon, UK
Posts: 316
|
Car is looking great! Love the wheel / tire combo.
I wonder if Boxsters are set to become the next "outlaw' porsches? Now that 911's and 356's are becoming too valuable to mess with. There seem to be more companies getting into making upgraded parts .
Now that Magnus Walker is getting into water cooled stuff - how long until he gets an old Boxster?
|
|
|
|
 Posting Rules
|
You may not post new threads
You may not post replies
You may not post attachments
You may not edit your posts
HTML code is Off
|
|
|
All times are GMT -8. The time now is 07:20 AM.
| |


 1998 Porsche Boxster
 Butzi
Butzi
 2001 Boxster S
 1998 Porsche 986


 Linear Mode


