 So the build begins...
So the project is a 1998 Boxster with a 2.5L engine. Purchased the car for a song with 88K miles on the clock December 2011 ($5000), now just running a little over 90K. Car is in immaculate condition for a car of this age. Body very straight and runs like a champ.
When I first bought Gadget (as I call her), I knew she would need new brakes and rotors and new struts (left rear had leaked out) and having built cars for many years this did not bother me. My Porsche experience was spending the better part of 4 years tearing apart a 928S4 talk about hidden issues. Note: My problem here was the mental passion for the Boxster was high and I assumed that the few mods above were all that was needed and life would be great. Saw Madmod's post and jumped headlong into the fray of getting ready to pull the trigger on a suspension.
But things were going to change.... I joined our local PCA group, started reading everything I could find on the Boxster (after the fact...of course) both here on 986, Mike's site, Pedro's site, Pelican, and Flat6's site and quickly began to uncover lots of little factoids and nuances about the Boxster I had not considered. The dreaded IMS issue, RMS, AOS, bearings, clutch, leaky coolant reservoir...the list kind of grew.
Which brings me today and this post. Realizing I was going to be doing more work then I planned, I have had to take a step back and begin assessing all issues as a system and that if I was going to go through the effort of tearing off the pieces/parts what else could I fix so as not to be repeating the process. Additionally this meant that I needed the car in a more useful position for working on her rather then sitting on jack stands. This in turn meant upgrading the garage as my wife refused to see me spend one more project on my back working on a creeper. So a new heavy duty rubber flooring system along with a mid rise lift from Gregg Smith. Cool beans and a bit of work but I still have yet to get into the car!
So here I am after having spent the better part of two evenings going through Pelican (and referencing Design911 website) for drawings, pictures and part numbers to develop a build list (along with many threads the members here have posted) and my plan as it sits today is as follows:
Suspension ROW M030 replacement (to include all rubber seals, plates and fittings)
Sway bar bushings
Brakes and Rotors
Wheel Bearings (Fronts are catching and since I'm doing the front the backs will go as well)
IMS
RMS
Cam chain tensioners (Cyl 1-3 and Cyl 4-6) harmonic testing showed excess vibration with these
Clutch kit (including flywheel)
Clutch Master Cylinder
Clutch Slave Cylinder
CV joints and boots
AOS
Spark plugs, tubes and O-rings (will test the coil packs to see performance)
Radiator reservoir tank
Left Radiator (may repair over replace as it has a small leak)
Front Engine mount
Sparco Seats with lowered mounting adjustable rails
Gahh top with soft window (modifying to make rear window replaceable without removing top)
System wide fluid flush and replacement.
Before I pull the trigger on the components above I am sending the list to Pelican to have them go through all I have indicated on my build sheet (what a cool option that is for putting a project together) and make sure if I have duplicated anything or have forgotten anything to let me know.
Well this is just the beginning and as I start removing and replacing things I will keep a photo log of the work and if I can I will gladly post pictures of other stuff as requested to help anyone else on their projects. My timeline for finishing this project will be dictated by work as I spend a lot of time traveling and that in itself can knock the wind out of you upon getting home...especially when it is long overseas trips. I hope to be done by this summer...only time will tell.
Please, I am open to helpful hints, suggestions ideas and input from anyone who has more time and experience on the Boxster then me...
__________________
When life throws you curves, aim for the apex...
|


 Esmeralda
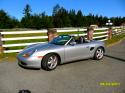 Gadget
 Sasha
Sasha Gertrude
 Bernice
 Mrs. T


 Threaded Mode


