Go Back   986 Forum - The Community for Porsche Boxster & Cayman Owners > Porsche Boxster & Cayman Forums > Performance and Technical Chat

Post Reply
 
LinkBack Thread Tools Display Modes
Old 06-11-2014, 08:39 PM   #1
Registered User
 
Join Date: May 2013
Location: Central Illinois
Posts: 403
Clutch slave cylinder install

Is there a "trick" to this? With the tranny in the car, I've removed the old slave cylinder and disconnected the hydraulic line. Then, attached the hydraulic line on to the new slave cylinder and tired to position it back into place. It is not going into the tranny far enough for the slave cylinder mounting bolt to be screwed in.

I'm wondering one of two things.
1.) Is the slave cylinder tip in the correct location meeting the clutch release lever?
2.) If so, the slave cylinder must be pushed as that depresses the tip and (I presume) creates hydraulic pressure that makes it difficult to line up bolt with hole.
Should I release pressure by opening up bleeder valve?

A tip or two to make this easier would be appreciated.

Thanks,
Joe
98 Boxster 5 speed.

Xcellr8 is offline   Reply With Quote
Old 06-12-2014, 04:06 AM   #2
1999 base
 
Meir's Avatar
 
Join Date: Dec 2011
Location: Coral Springs FL
Posts: 1,617
Garage
I have just completes a clutch job, inclueding a new slave cylinder.
Since I had the transmission out, I installed the slave cylinder outside the car just to see how it goes. I notices it is a very tight fit.
What you need to do, is clean the slave cylinder socket as best as you can.
Put some soup on the cylinder, and wiggle it in.
Connect the fluid line only after the cilinder is in place.

Hope it helps.

Last edited by Meir; 06-12-2014 at 04:08 AM.
Meir is offline   Reply With Quote
Old 06-12-2014, 10:32 AM   #3
Registered User
 
Join Date: May 2013
Location: Central Illinois
Posts: 403
Thanks for the input, but by installing the slave prior to bolting up the tranny, you weren't faced with the same "spring pressure" of the slave tip that is making it damn near impossible to install the slave. I just want to make sure I'm not missing something when depressing the tip while trying to push the slave into its hole to bolt it in.

Would appreciate anyone who has direct experience with installing the slave while tranny is in the car. Must be many of you out there, how about it?

Thanks again,
Joe
Xcellr8 is offline   Reply With Quote
Old 06-12-2014, 12:19 PM   #4
1999 base
 
Meir's Avatar
 
Join Date: Dec 2011
Location: Coral Springs FL
Posts: 1,617
Garage
sorry if i wasn't clear enough.
from my post:
"I installed the slave cylinder outside the car just to see how it goes"
when i noticed it is going in hard, i removed it and cleaned the socket.
tried again with a bit of soapy water, and it went in smooth.
i removed the slave cylinder from the trans, installed the trans on the car, installed the slave cylinder with the trans in the car with no issue, connected the fluid line, and bled the system.

good luck.
Meir is offline   Reply With Quote
Old 06-12-2014, 12:30 PM   #5
Registered User
 
Join Date: May 2013
Location: Central Illinois
Posts: 403
Thank You

Thanks, you were correct, I did not understand. Finally got it. The trick? For me there are two tips. One, opening the bleeder valve (since I already had the hydraulic line hooked up) to relieve any pressure that built up as I pushed the back of the slave toward the front of the car to depress the tip plunger. Second, using a long screwdriver braced against the heat shield that bolts to the rear cross support that held the slave in the depressed position while I tried to find the the hole to get the bolt threaded properly.

Now to bleed the system.

Thanks again, Joe
Xcellr8 is offline   Reply With Quote
Old 08-17-2014, 06:57 PM   #6
Registered User
 
flaps10's Avatar
 
Join Date: Jul 2014
Location: Tacoma
Posts: 429
I made it all the way to this step this evening.

I started earlier with removal and replacement of the clutch master cylinder- tons of fun all by itself.

Then I got the slave cylinder out and got "this close" to getting that dang bolt started.

I had mostly worn myself out before searching for a thread on it. At this point I have the bleeder valve open, white lithium grease on the tip of the pusher, uh, quick question:

We leave the rubber thing on right?

Anyway, lithium on the tip of the pusher, and around the lip of the bellows where it goes in. Seems to plug right in. There's essentially no fluid left in the system right now but bleeder is open anyway.

It's just fighting that spring pressure and getting the last little bit. Then pressure bleed and hope all is well in clutch land for a while.
flaps10 is offline   Reply With Quote
Old 08-18-2014, 10:28 AM   #7
Reebuck1
 
Join Date: May 2013
Location: Georgetown, SC
Posts: 210
Garage
White lithium grease on the black rubber protection sleeve that has a tendency to bind up where it fits tightly in the hole going into the transmission housing. Made all the difference for me, Without the grease the fit was too tight and the rubber prevented from allowing the whole unit to move forward towards the motor.
Reebuck1 is offline   Reply With Quote
Old 08-18-2014, 11:57 AM   #8
Registered User
 
flaps10's Avatar
 
Join Date: Jul 2014
Location: Tacoma
Posts: 429
Thanks.

I just wore myself out trying to compress the spring in the slave cylinder. I haven't removed the pan or anything, just trying to thread my arms through the suspension and exhaust (which puts me in a position where I can't see the bolt or bolt hole).

Going to regrease the tip and start again tonight. Hopefully I can make it work. It's the one procedure I wish the floor of the trunk came out for. It would make access to the slave cylinder stupid easy.
flaps10 is offline   Reply With Quote
Old 08-18-2014, 03:24 PM   #9
Registered User
 
Steve Tinker's Avatar
 
Join Date: Dec 2008
Location: Queensland, Australia
Posts: 1,522
Removing the triangulated alloy support tray helped me get to the slave cylinder - but then again I have short spindly arms. I couldn't get enough purchase to push the cylinder into position without removing the support tray.
Using a long screwdriver as a pry bar to push the cylinder into position is also a good move.....
__________________
2001 Boxster S (triple black). Sleeping easier with LN Engineering/Flat 6 IMS upgrade, low temp thermostat & underspeed pulley.
2001 MV Agusta F4.
Steve Tinker is offline   Reply With Quote
Old 08-19-2014, 03:55 AM   #10
Theoretical propagandist
 
Eric G's Avatar
 
Join Date: Dec 2011
Location: Pacific Northwest
Posts: 793
Garage
Maybe this might help you a bit as this was from my build project a couple years ago:

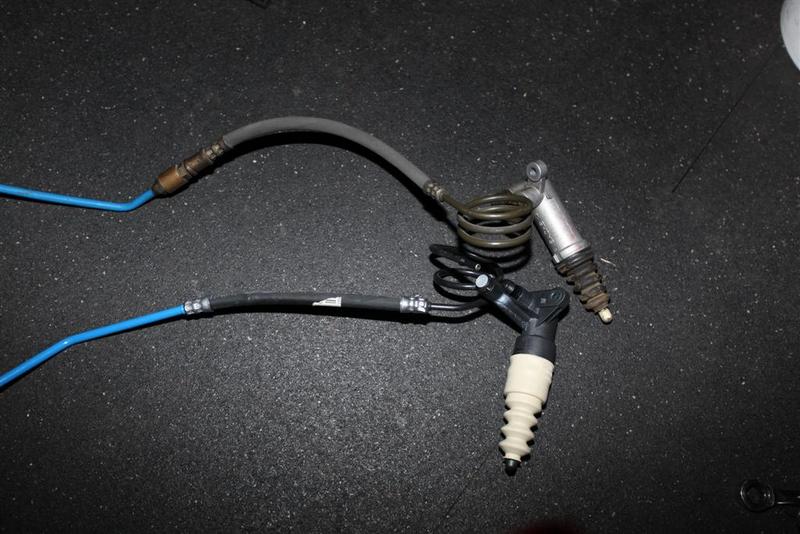
Next up, my next to last order from Pelican showed up having my new clutch slave cylinder line and connector. I had ordered the slave and master cylinder but failed to notice that you have to order two additional parts. The little connector and new line added $320.00 to the build bringing the upgrade of just the slave to over $400.00. Porsche is mighty proud of these parts. Oh well, out with the old and in with the new:


You would think this would be a simple conversion, pull the old line out, replace with the new connector, install the new line and attach the slave. Wrong. The instructions are in German with no English or French translations. So, I first translated the directions which are as follows:

überwurfmutter von kupplungsstutzen abschrauben!
überwurfmutter bis zum anschlag an den stecker schieben!
baugruppe mit montagestopfen bis zum anschlag in die!
uberwurfmutter einstecken!
überwurfmutter gemeinsam mit der baugruppe vom stecker abziehen!
überwurfmutter halterosette und baugruppe demontieren!

In English:

union nut from unscrewing clutch clip!
union nut to stop the slide connector!
subassembly mounting stuff up to the fence in the!
Insert the nut over !
union nut pull together with the subassembly from the plug!
union nut holding rosette and subassembly dismantle!

Translation to me:

Huh?

OK, I called Pelican and asked if they could simply confirm what the pictures in the instructions were indicating as it appeared that the plastic piece (see below) was being used...but I was not making sense of it.


Pelican had nothing in the books, on file or in their database to help and they were surprised as this is an upgraded piece that had a TSB on it, but could not find that either. OK, so a little brain power was needed on my end (for a Friday that's asking a bit). What is happening here is the black plastic piece is simulating the brass end of the new slave line in holding the plastic compression fitting. You attach the new connector to the existing line with the plastic piece in place, remove it before you reach a tight fit, insert you new slave line and than tighten. The whole thing is to keep parts and pieces aligned for the final assembly. Not that difficult, but going through it for the first time you do need to think about what you are doing. In the end, the slave was installed and I was happy.

Next up was the clutch master cylinder...how hard can this be? I set the car at a height I can get to the clutch peddle and into the bonnet with ease and begin the process of removing parts. If you have never done the master cylinder, the slave cylinder line is removed by pinching the protruding ends of the black fitting together while pulling at the same time. It releases the spring clip holding it. Note: put something under these lines as you will get drippedge and you don't want to ruin your paint. Now to what I hoped was the easy part, removing the master from the clutch peddle. Not! You need to be a 5' 1" contortionist to stick your fingers, arms, head, light and tools into this area to remove the two nuts and one cir clip. I was able to do it as it just took patience and a slow approach. In the end the master cylinder came out, the new one went in and this portion of the project was completed. Time to complete was about 2 hours.


__________________
When life throws you curves, aim for the apex...
Eric G is offline   Reply With Quote
Old 08-19-2014, 12:50 PM   #11
Registered User
 
flaps10's Avatar
 
Join Date: Jul 2014
Location: Tacoma
Posts: 429
Damn, I hadn't considered doing the line.

I got it all back together last night. A fresh set of arm muscles and redressing the tip with more lithium and I was able to start the bolt. For a trail of bread crumbs for anyone who follows, I was able to pull this off without removing the support tray (or anything else really). I do have some missing skin on my knuckles, some scrapes on both forearms and a bruise here and there. :ah:

I filled the system and bled it. Still feels/sounds like a little bit of air. I took it for a two block drive in the dark and the forward gears (specifically first) is easier to engage but reverse is still a challenge.

I'll re-bleed the system and then address shifter cable adjustment before I rip any hair out.

flaps10 is offline   Reply With Quote
Post Reply


Posting Rules
You may not post new threads
You may not post replies
You may not post attachments
You may not edit your posts

BB code is On
Smilies are On
[IMG] code is On
HTML code is On
Trackbacks are On
Pingbacks are On
Refbacks are On


All times are GMT -8. The time now is 11:51 AM.


Powered by vBulletin® Version 3.8.7
Copyright ©2000 - 2025, vBulletin Solutions, Inc.
Content Relevant URLs by vBSEO 3.6.0
Copyright 2024 Pelican Parts, LLC - Posts may be archived for display on the Pelican Parts Website -    DMCA Registered Agent Contact Page