 12-29-2015, 10:23 PM
|
#1
|
|
Registered User
Join Date: Feb 2006
Location: Virginia
Posts: 1,751
|
Memory Seat Retrofit
I just finished swapping 8-way power seat bases into my 2000 Boxster. This added power adjustment of the fore and aft position and seat height. You can read about it here: http://986forum.com/forums/general-discussions/58080-full-power-seat-installation.html
The driver's seat has the memory seat control box and I'm curious about installing the memory function to the seat. I've managed to source the used parts I need for a reasonable price, but before I start I'd like to be more certain of the procedure and avoid tearing the car apart. In the following paragraphs, I'll share what I've learned so far.
Here's a picture of the control box:
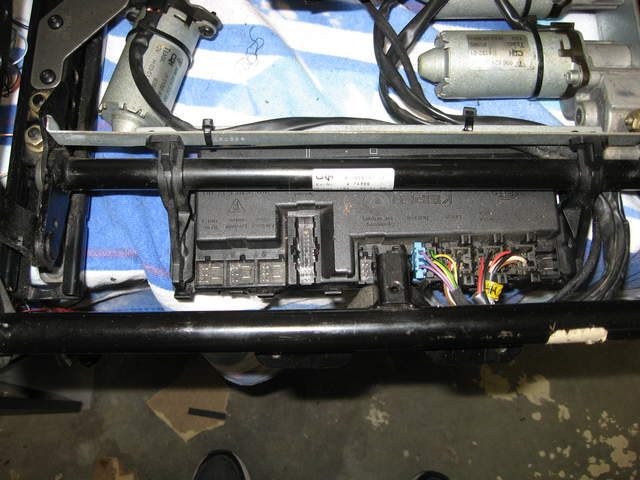
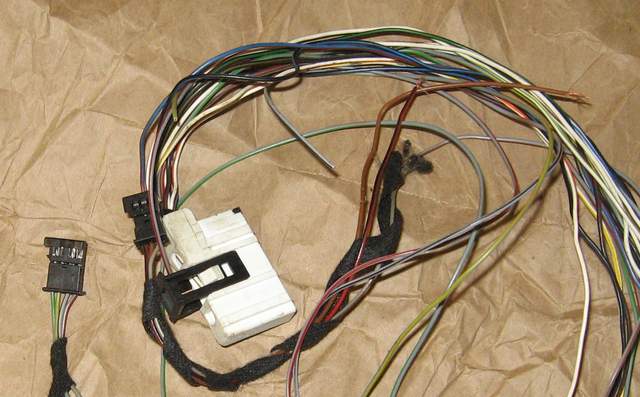
The large vertical socket (fourth from the left) is for the connector that controls the seat and mirror memory. The white connector in this picture fits in the socket:
The two smaller black connectors to the left of the white connector fit in the bottom of the trunk release panel in the driver's door sill. One of the connectors has three pins and the other has four pins. You can see where they fit in this picture:
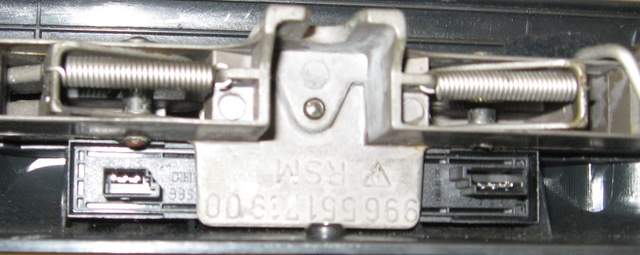
Here's a top view of the control buttons:

I think that installing the mirror control may require too much disassembly of the interior, so I think I will leave that for another time. However, based on this diagram, the seat memory looks to be almost plug and play. In this drawing, the schematic for the large white connector is on the left and the 3 and 4 pin black connectors are on the top right. I didn't show all of the connections in the white connector in order to keep the diagram simple. You can find the entire diagram on page EWD 79 of the Bentley Manual.
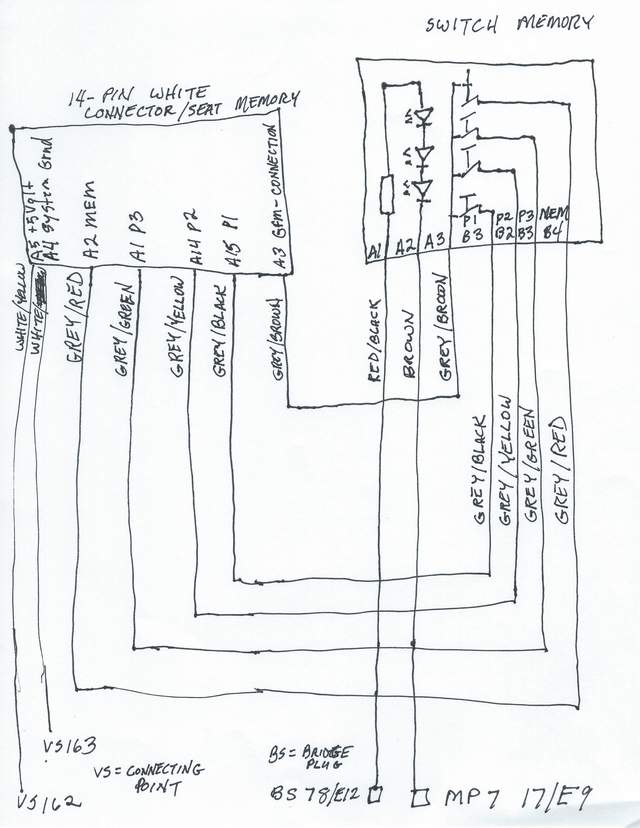
It appears that 5 of the 7 wires on the two plugs in the control module go directly to the large white connector. Of the two remaining wires, one (brown) appears to be a ground and the other (red/black) appears to be power. The red/black wire appears to go to a bridge plug (BS 7 8/E12) in relay carrier below the dash board. The ground is supposed to to to MP 7 17/E9, but I'm not sure of that nomenclature.
In addition, it appears that I may need to connect two of the wires in the white connector to power and ground. The white wire in position A4 is labeled system ground in the Bentley manual and the white/yellow wire in position A5 is labeled +5 Volts.
What I would like to do is:
1. See if anyone has done this or has an electrical background and can review my research to confirm my thinking and approach.
2. Find close sources of power and ground that will work correctly and avoid having to remove interior trim and fish wires.
If you can suggest an efficient approach to this project I will appreciate the help.
__________________
2000 Arctic Silver/Black, Hard Top, On Board Computer
PNP Rear Speakers, HAES 6-Channel Amp, Avic Z140BH,
Painted Bumperettes, 2004 (OEM) Top, Homelink integrated in dash with Targa switch, 997 Shifter, Carrera Gauge Cluster with silver gauge faces, heated 997 adaptive sports seats, Litronics, silver console
|

|

|
|
12-31-2015, 10:01 AM
|
#2
|
|
Registered User
Join Date: Feb 2006
Location: Virginia
Posts: 1,751
|
I made some progress today. I'm using an old computer power supply to test some ideas. The supply provides 12 volt, 5 volt and 3 volt power. The seat mechanism is hooked up to 12 volt and the memory function to 5 volt. I attached the red/black wire from the 3-wire plug to the 5 volt source and the brown wire to ground. As you can see in this Youtube video: https://youtu.be/LFAfb2JiGi4 the system is able to store and recall settings. (I unplugged the power source, and when I plugged it in again, the system was able to recall the settings.)
Rather than run a wire to the relay carrier to obtain 5 volt power, I'm considering the purchase of a device like this Amazon.com: KEEDOX® DC/DC Converter 12V Step Down to 5V 3A Power Supply Module: Electronics
This will convert the 12 volt power already at the seat to 5 volt power.
I still need to decide whether adding the mirror control is feasible, so any thoughts on that part of the job are welcome.
__________________
2000 Arctic Silver/Black, Hard Top, On Board Computer
PNP Rear Speakers, HAES 6-Channel Amp, Avic Z140BH,
Painted Bumperettes, 2004 (OEM) Top, Homelink integrated in dash with Targa switch, 997 Shifter, Carrera Gauge Cluster with silver gauge faces, heated 997 adaptive sports seats, Litronics, silver console
|
|
|
|
|
01-02-2016, 07:03 PM
|
#3
|
|
Registered User
Join Date: Feb 2006
Location: Virginia
Posts: 1,751
|
I will be back at work on Monday, so I'm planning to finish what I can pending more research on the mirror function.
As luck would have it, I have parts from two different harnesses. Both have the connectors for the control unit in the door sill and the big white connector that attaches under the seat. As you can see, the one on the left in this picture is more complete, but it appears to be missing some connectors and terminals required for the mirrors and other interfaces. I'm planning to save that until I determine whether I can install the mirror function.
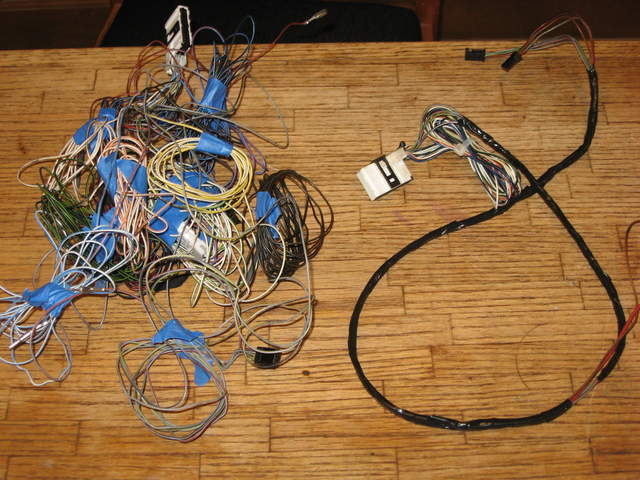
The one on the right was cut out in two parts. I pieced it back together and made the second more limited harness.
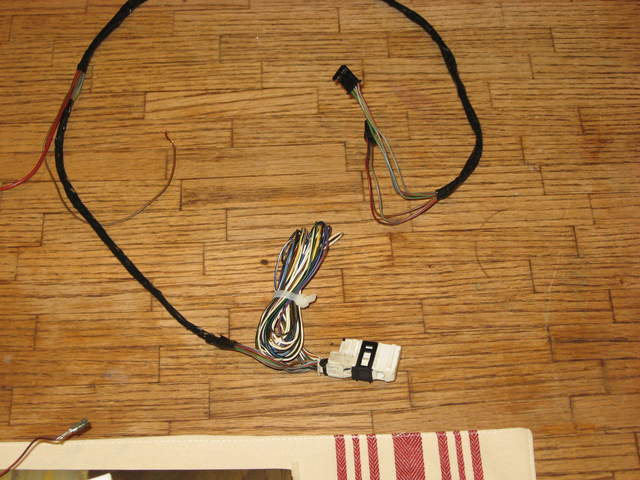
I've tested it on the bench (using 12 volt power as suggested by a Boxa.net member) and it works fine. I'm planning to install it tomorrow. I won't have 100 percent of the memory function, but it will be months before I have more time to dedicate to this project, so I may as well enjoy some of the fruits of my labor.
Thanks for the help and if you have any other insights, please share them.
__________________
2000 Arctic Silver/Black, Hard Top, On Board Computer
PNP Rear Speakers, HAES 6-Channel Amp, Avic Z140BH,
Painted Bumperettes, 2004 (OEM) Top, Homelink integrated in dash with Targa switch, 997 Shifter, Carrera Gauge Cluster with silver gauge faces, heated 997 adaptive sports seats, Litronics, silver console
|
|
|
|
|
01-03-2016, 06:59 PM
|
#4
|
|
Registered User
Join Date: Feb 2006
Location: Virginia
Posts: 1,751
|
It is installed and working. It turns out that the red wire with the black stripe (Pin A1 on the 3-wire black connector) is the power for the button illumination on the memory control. That explains why the system worked when I used both 5V and 12V power to that wire. I will need to connect it to Bridge Plug BS7. I originally connected it 12V power under the seat, but that was constantly on.
I will be coming back to this project in a few months. During my part acquisition process, I obtained these metal-plated control levers:
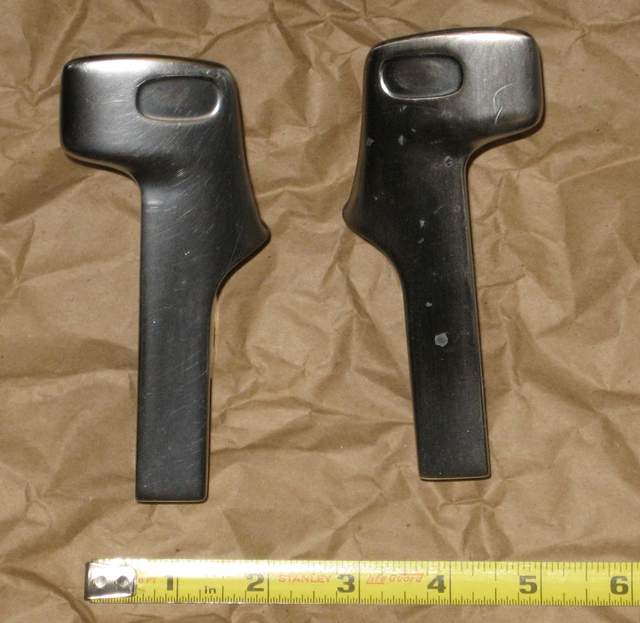 I think they may be from a 996.
I'm considering having them re-plated as I think that will look better than the silver-painted handles I'm currently using. So at a minimum I will be doing a cosmetic update and addressing the illumination issue. If I can find more information about the mirror function, I'll address that at the same time.
__________________
2000 Arctic Silver/Black, Hard Top, On Board Computer
PNP Rear Speakers, HAES 6-Channel Amp, Avic Z140BH,
Painted Bumperettes, 2004 (OEM) Top, Homelink integrated in dash with Targa switch, 997 Shifter, Carrera Gauge Cluster with silver gauge faces, heated 997 adaptive sports seats, Litronics, silver console
|
|
|
|
|
01-05-2016, 05:44 PM
|
#5
|
|
Registered User
Join Date: Feb 2006
Location: Virginia
Posts: 1,751
|
I've done some more research on this with the goal of understanding the mirror wiring. Here's the connector that attaches the wiring harness to my current non-memory mirrors:
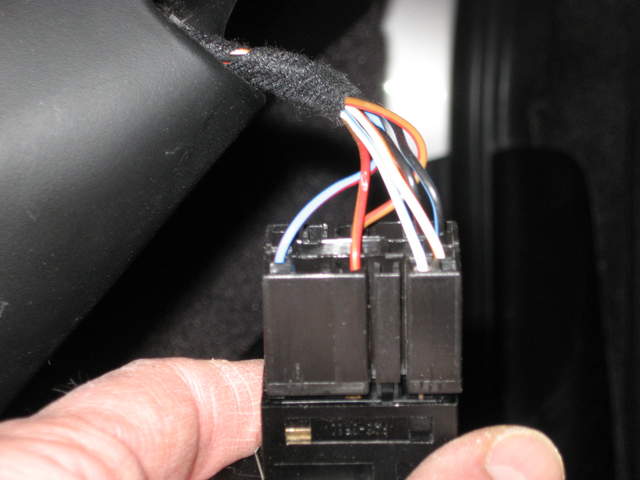
Note that there are quite a few empty sockets in the connector.
Here's a picture of one of the wires from the harness that I have:
Note that at the end of the wires there are two male terminals that appear like they will fit inside the connector of the mirror control.

I think that the way this works is that there are two possible sources for the control signal of each mirror. One is from the switch near the driver's-side window and the other is from the memory control under the seat. So, when you control the mirror manually the signal comes from the control on the drivers door. When the memory unit takes over, it comes from the control box under the seat.
Unfortunately, I do not have one complete intact harness. So, I'm going to have to scrounge for some parts before I can check my assumptions.
Also, I found out that Porsche changed the configuration of the memory control in the 2001 model year. According to my Bentley Manual (page 02-25) when Porsche added the electronic front and rear lid releases they also added the individual key programming feature. So, I don't think that feature is available in my 2000. It may be better for me to use the wiring diagram from the 1998 vehicle than for the 2002 vehicle.
__________________
2000 Arctic Silver/Black, Hard Top, On Board Computer
PNP Rear Speakers, HAES 6-Channel Amp, Avic Z140BH,
Painted Bumperettes, 2004 (OEM) Top, Homelink integrated in dash with Targa switch, 997 Shifter, Carrera Gauge Cluster with silver gauge faces, heated 997 adaptive sports seats, Litronics, silver console
|
|
|
|
|
01-09-2016, 05:17 PM
|
#6
|
|
Registered User
Join Date: Feb 2006
Location: Virginia
Posts: 1,751
|
I received some good technical information on integrating the mirror function. Unfortunately, it is not good news for my project. Here's a summary of the parts needed and the work required:
1. Replace the mirrors with ones equipped with the memory function. Standard electric mirrors are no good. You can tell by the number of pins on the connector. The memory function (and heating) requires 10 pins has. The standard electric mirror has 5 pins.
2. Install pins on the connector, get memory mirror pigtails from a breakers yard or even a whole new door loom. The big connector at the door that separates the door loom from the main loom doesn't have the pins needed either, so adding pins to that connector is needed, or you have to run the wires as one piece down to the driver seat to the control module.
3. Make the connections for the mirrors in the control module under the seat. The connections are very simple once you have the wiring from the mirrors in place.
There are 9 wires to run to the drivers side and 5 to the passenger. On the driver side you need +5v, system ground, left/right, up/down to go to the mirror. there is also left/right drivers, up/down drivers, left/right pass and up/down pass to go the the mirror control switch. There is also a common motor connection that runs to both the mirror and the switch.
On the passenger side you need +5v, system ground, left/right, up/down and the common motor connection. It may be possible to eliminate the common motor connection on the passenger side, as it is likely already there. If you want the passenger mirror to tilt when in reverse, you will also need to run a line from the 24 pin connector to the reverse lamp signal line.
At a minimum, I'll need to wait until a set of reasonably priced memory mirrors become available. If I can install the memory components in the mirrors that are already on my car, I won't need to find a set that are the same color as my car or have them painted.
I also noticed that the seat back tilt function did not respond to input from the memory module. Because I had reused the seat cushions and seat back from my two-way power seat, this would not be an issue for someone who swapped in an entire seat. It turns out that the driver's side memory seat has a different motor in the seat back. It has 4 connections. The part number for the seat back motor that is compatible with the memory module is 404.335
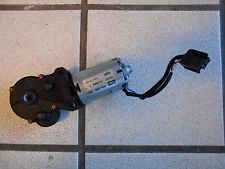
The motor for the two-way power seat and the passenger side seat is 404.334 and it has a two-wire connector.
I was able to source a motor with memory for a good price, and I will finish the seat memory part of the project when I receive it. The future of the mirror memory is dependent on the availability of reasonably priced parts and I may decide it is not a high priority.
__________________
2000 Arctic Silver/Black, Hard Top, On Board Computer
PNP Rear Speakers, HAES 6-Channel Amp, Avic Z140BH,
Painted Bumperettes, 2004 (OEM) Top, Homelink integrated in dash with Targa switch, 997 Shifter, Carrera Gauge Cluster with silver gauge faces, heated 997 adaptive sports seats, Litronics, silver console
|
|
|
|
|
01-09-2016, 07:21 PM
|
#7
|
|
Registered User
Join Date: Dec 2012
Location: FL
Posts: 4,144
|
This is a very interesting thread, I hope that you are able to get it all working. Good luck!
|

|
|
|
01-10-2016, 07:48 AM
|
#8
|
|
Registered User
Join Date: Feb 2006
Location: Virginia
Posts: 1,751
|
Thanks
A poster on another forum told me that I could use my mirror covers with the motors from mirrors with the memory function. That information will be valuable if I decide to take this project any farther.
For now, I think I will swap in the memory motor for the backrest and connect the 5V power for the seat control button illumination and declare victory.
The additional benefit to be derived from installing the memory mirrors does not appear to justify the time and expense of continuing the project past the seat-memory stage. If I happen to find the parts I need for a good price, I may reconsider my decision. It will probably be about 6 months before I will have a few days to work on a discretionary project.
__________________
2000 Arctic Silver/Black, Hard Top, On Board Computer
PNP Rear Speakers, HAES 6-Channel Amp, Avic Z140BH,
Painted Bumperettes, 2004 (OEM) Top, Homelink integrated in dash with Targa switch, 997 Shifter, Carrera Gauge Cluster with silver gauge faces, heated 997 adaptive sports seats, Litronics, silver console
|
|
|
|
|
01-10-2016, 09:05 AM
|
#9
|
|
Registered User
Join Date: May 2015
Location: Greater Seattle, WA
Posts: 534
|
Looks like a hard job to retrofit this feature. Hats off to you for all the documentation, which I'm sure will be useful to others who are considering or decide to make the same upgrade. Makes me thankful my box came with it. (Wife and I love to use it now that we've just figured it out too, by the way. With the memory adjust feature, the only thing we need to manually adjust to drive the car after the other one of us drove last is the interior rear-view mirror.) I still wouldn't mind having the electric heaters, though. 
__________________
2001 Boxster
Last edited by jakeru; 01-10-2016 at 09:07 AM.
|
|
|
|
|
01-10-2016, 07:36 PM
|
#10
|
|
Registered User
Join Date: Feb 2006
Location: Virginia
Posts: 1,751
|
Quote:
Originally Posted by jakeru

I still wouldn't mind having the electric heaters, though. |
Here you go: Dennis Vogel: Projects - Boxster Heated Seats
It looks more daunting than it is. Although I obviously haven't completed the memory seat project, I would have to say the seat heater project is probably a little easier.
Thanks for the feedback.
__________________
2000 Arctic Silver/Black, Hard Top, On Board Computer
PNP Rear Speakers, HAES 6-Channel Amp, Avic Z140BH,
Painted Bumperettes, 2004 (OEM) Top, Homelink integrated in dash with Targa switch, 997 Shifter, Carrera Gauge Cluster with silver gauge faces, heated 997 adaptive sports seats, Litronics, silver console
|
|
|
|
 Posting Rules
|
You may not post new threads
You may not post replies
You may not post attachments
You may not edit your posts
HTML code is On
|
|
|
All times are GMT -8. The time now is 12:45 AM.
| |


 Linear Mode


