 07-27-2015, 07:46 PM
|
#1
|
|
Registered User
Join Date: Feb 2006
Location: Virginia
Posts: 1,754
|
Full Power Seat Installation
I have the driver’s side seat bottom to a full power seat and I’m planning to install it in my 2000 Boxster that has the basic two-way power seat. (“Two-way” apparently means that the seat back moves forward and backward. Everything else is manual.) I decided to do this because I am regularly taking 100-mile trips in the car and I’d like to vary my seating position more frequently. I received a fair deal on the seat bottom. Unfortunately, the seat back was in bad condition so I decided to buy just the bottom and save shipping cost on the back.
Apparently the tricky part is the wiring. Here is a YouTube video I found on the subject:
https://www.youtube.com/watch?v=49ztXTTpGGo
This is pretty good information, but I have a few special problems because I don’t have the seat back or the wiring that goes to it. Also, the seller had to disassemble the seat to ship it and the connectors were not attached to the memory module when I received it. So, I have to figure where each connector goes.
Here is a picture of what I have with my best guess at connector location:
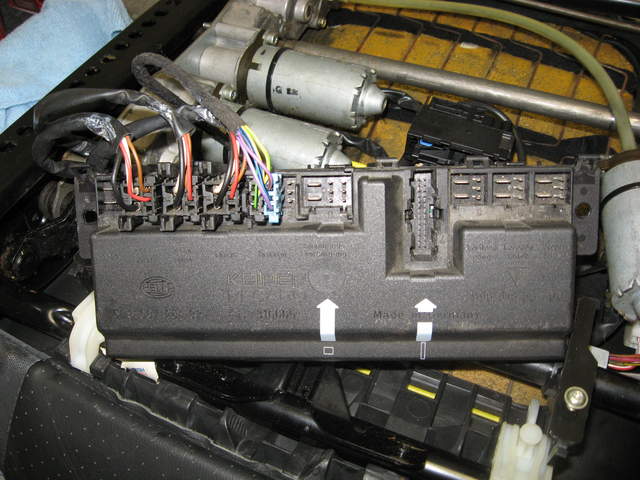
If you look closely, starting on the left, the first 6 connections are labeled in German.
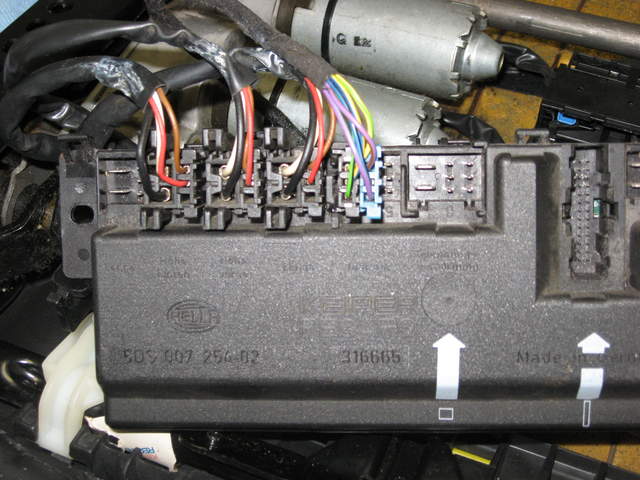
I think I have been able to translate it pretty well, but if anyone else is better at German, please feel free to correct me.
1 – Lehne – Rest (back rest) - currently not occupied because I don't have the backrest
2 - Höhe hinten – height rear
3 - Höhe vorne - height front
4 – Langs – length – (front/aft seat adjustment)
5 – Tastatur – Keypad - Blue/Black connector seems to fit here - assume it connects to the seat controls
6 – Spannungs versorgung – power supply - this seems to be the location that the tech uses in the YouTube video.
From what I have been able to gather from research on several forums, the memory controller in the driver seat is what controls the servo motors; i.e. when you push an adjustment button, the button talks to the memory controller, and the controller instructs the motor to move. So, unfortunately its not as simple as just plugging the seat into power. That is why the YouTube video shows the technician making a jumper.
So, I'm planning to hook the power up to socket #6 and then I'm going to have to figure out how to power the seat recline function. I'll probably need to look closely at the connector in my current seat and figure out how to adapt it to the memory controller. I'm assuming that the seat recline function is controlled by socket #1. Ultimately, I think I will need to hook the seat up to a power source and do some trial and error.
Here are my questions - your responses may save me some time:
1. Does anyone have a good basic diagram for wiring the seats? (The YouTube video helps a bit, but I work better from a diagram.)
2. Does anyone know what size/part number for the connectors that the tech used to make the jumper?
3. Does anyone know where the motor that controls the seat-back recline function is located on a 2-way power seat? I'm assuming it is at the base of the seat back, but I'd like to confirm this before I disassemble the two-way seat in my car.
4. Any other tips or suggestions?
Here are the other threads that I have been able to locate that touch on this topic:
Installing full power seats
http://986forum.com/forums/general-discussions/30334-full-electric-seats.html
http://986forum.com/forums/general-discussions/13933-electric-seat-retrofit-2000-3-2s.html
As you will see, some of the poster offered to post diagrams, but I haven't been able to find them.
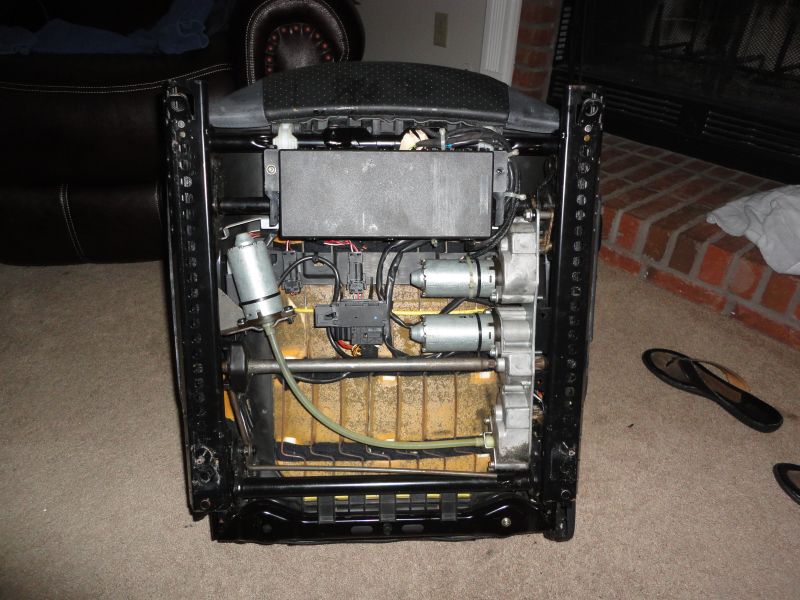
By the way, here is a picture of the seat bottom from the sellers ad. It may help someone with sharp eyes assist me:
__________________
2000 Arctic Silver/Black, Hard Top, On Board Computer
PNP Rear Speakers, HAES 6-Channel Amp, Avic Z140BH,
Painted Bumperettes, 2004 (OEM) Top, Homelink integrated in dash with Targa switch, 997 Shifter, Carrera Gauge Cluster with silver gauge faces, heated 997 adaptive sports seats, Litronics, silver console
|

|

|
 11-15-2015, 07:41 AM
|
#2
|
|
Registered User
Join Date: Feb 2006
Location: Virginia
Posts: 1,754
|
I haven't had much time to work on this, but I am finally getting back to it. I was able to source a plug to hook up the power from another board member. I'm using a computer power supply to provide 12-volt DC while I have been experimenting.
I have puzzled out most of this and have the base of the seat working. My only remaining issue is the operation the recline function of the back rest. I need to adapt the wiring from the two-way power seat to work in the full-power seat.
As I stated in my first post, the plug socket on the far left of the control box for the full power seat is for the seat back recline function. It appears that on the original installation, 4 of the 5 available connections in that socket are needed. Two of these are for power. Two would be for the control. (In this case one of the signals would be for forward movement and the other for recline.)
Based on the wiring in the other plugs, it appears that the two smaller diameter wires are for power. (The red wire brings the power from the power source and brown is ground.)
From what I can tell, the seat back motor (which is from my original two-way seat) is already powered from the existing harness in the seat, so I only need to hook up the controls.
Here's a picture of the control for the original two-way power seat:
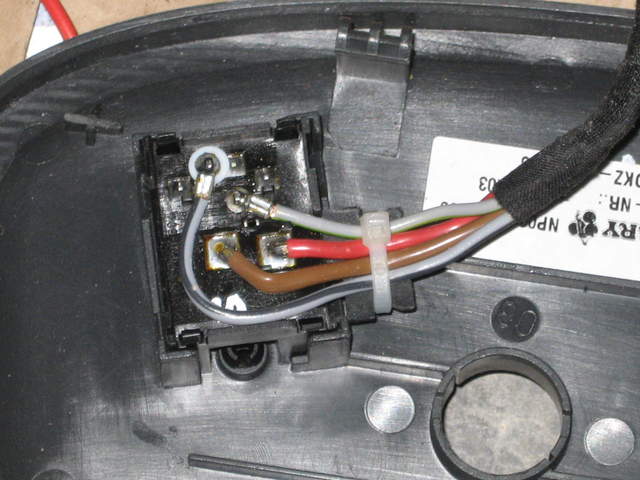
There are 4 wires which I think are:
Red - Power
Brown - Ground
Grey/Black - Control - Forward
Grey/Green - Control - Back
I think the power and ground are needed just to power the switch because the connector leaving the switch has just two wires - Grey/Black and Grey/Green. The motor power and ground must be on another circuit.
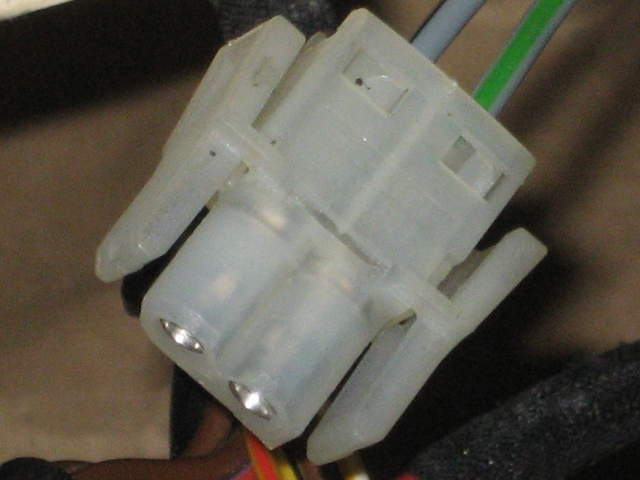
I am hoping that someone can confirm my detective work. My next step may require cutting some wires and I while I will do it in a way that would allow me to put them back together, I prefer to get it right the first time.
__________________
2000 Arctic Silver/Black, Hard Top, On Board Computer
PNP Rear Speakers, HAES 6-Channel Amp, Avic Z140BH,
Painted Bumperettes, 2004 (OEM) Top, Homelink integrated in dash with Targa switch, 997 Shifter, Carrera Gauge Cluster with silver gauge faces, heated 997 adaptive sports seats, Litronics, silver console
|

|

|
 11-15-2015, 03:08 PM
|
#3
|
|
Project Addicted
Join Date: Aug 2015
Location: Eastern Shore, MD
Posts: 623
|
I just did this!
A memory seat to a single movement seat. I have some wiring pictures I can post later.
__________________
______
Jon
1966 912, 1976 911
1986 944, 2000 Boxster
|

|

|
 11-15-2015, 08:34 PM
|
#4
|
|
Registered User
Join Date: Feb 2006
Location: Virginia
Posts: 1,754
|
Quote:
Originally Posted by jcslocum

I have some wiring pictures I can post later.
|
Thanks - I am looking forward to seeing them.
__________________
2000 Arctic Silver/Black, Hard Top, On Board Computer
PNP Rear Speakers, HAES 6-Channel Amp, Avic Z140BH,
Painted Bumperettes, 2004 (OEM) Top, Homelink integrated in dash with Targa switch, 997 Shifter, Carrera Gauge Cluster with silver gauge faces, heated 997 adaptive sports seats, Litronics, silver console
|

|

|
 11-16-2015, 05:15 AM
|
#5
|
|
Project Addicted
Join Date: Aug 2015
Location: Eastern Shore, MD
Posts: 623
|
OK, here is what I did.
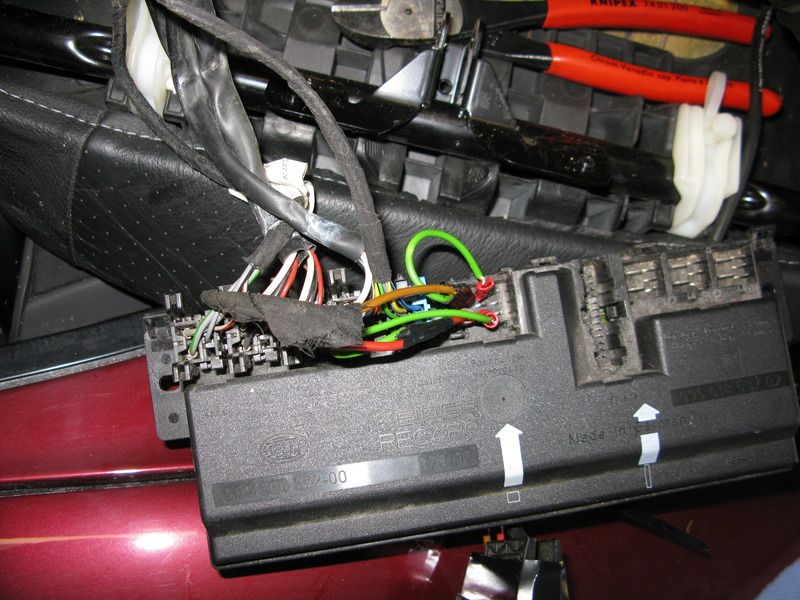
I cut the harness from my existing seat that plugs into the car wiring harness. It's a big black flat plug that also has the seatbelt plug in it. I then wired it and made some jumpers up to connect it to the #6 plug location on the seat.
It gets wired like this:

This drawing is flipped from the plug orientation above.
#1 large is a 12v from the harness.
#2 Large is a ground from the wiring harness.
Now the small pins
#1 is 12 volts jumped from large #1 above ( my pic doesn't show it.)
#2 you will need to run from the fuse box to supply a switched 12V to this pin
#3 is a ground that is jumped from large #2 above.
The large #1 and #2 are regular spade plugs that get crimped on.
#1 - #3 small pins, I used the red barrel or butt connector crimp on and gave them a squeeze until they fit snug on the pin. I trimmed off the excess insulation on one end and crimped it to the wire on the other end.
Works like a charm!!
__________________
______
Jon
1966 912, 1976 911
1986 944, 2000 Boxster
Last edited by jcslocum; 11-16-2015 at 05:18 AM.
|

|

|
 06-29-2023, 05:24 PM
|
#6
|
|
Registered User
Join Date: Jun 2023
Location: Maryland
Posts: 1
|
Quote:
Originally Posted by jcslocum

OK, here is what I did.
...Now the small pins
#1 is 12 volts jumped from large #1 above ( my pic doesn't show it.)
#2 you will need to run from the fuse box to supply a switched 12V to this pin
#3 is a ground that is jumped from large #2 above.
|
Can you explain why #2 has to be switched? In the youtube video he jumps 12v spade to both small pins 1&2.
Wiring mine now. Thx for helping...
|

|

|
 11-16-2015, 08:02 PM
|
#7
|
|
Registered User
Join Date: Feb 2006
Location: Virginia
Posts: 1,754
|
Thanks Jon. I just finished my seat tonight. You have explained the power issue much more clearly than anyone else. The YouTube video shows the same thing, but it is much easier to look at a diagram.
I took a slightly different approach by using one of the black 5-connector plugs that another board member sold me. Your wiring diagram will be a big help to those who follow us.
Your picture showed the solution to the problem I posted yesterday. If you look at the far left of your picture, you will see a plug with four wires coming out of it. That is the backrest control socket. You can see that one of the wires is gray with a green stripe.
I did not have that plug in the unit I bought. The seller left it attached to the seat back which I didn't buy. (The backrest was in very poor condition and I didn't want to pay to ship it. I also used the seat bottom from my existing seat.) I had to use the wiring that was already in the seat. I cut this connector and the two wires attached to it from the control of my two-way seat:
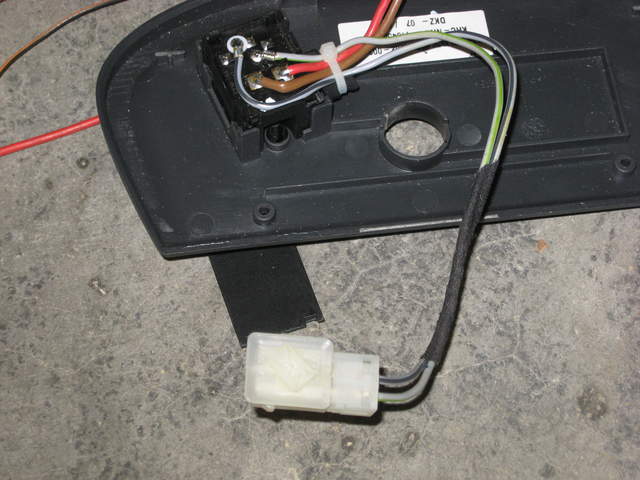
I used the red and brown wires that remained to power all of the seat motors.
I stripped about a quarter inch of insulation from the end of the wires:
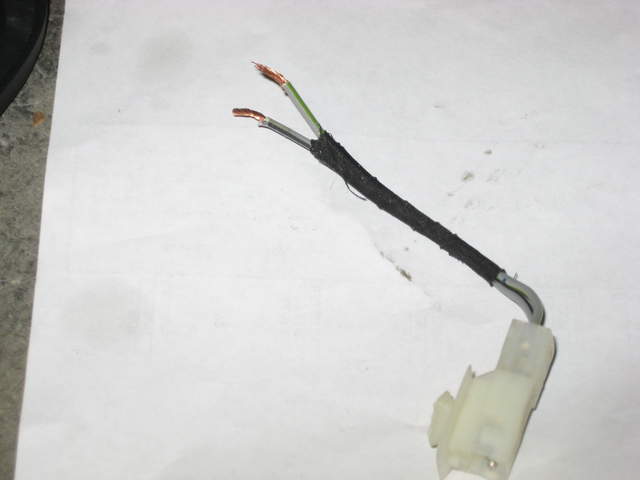
Then I crimped on two connectors:
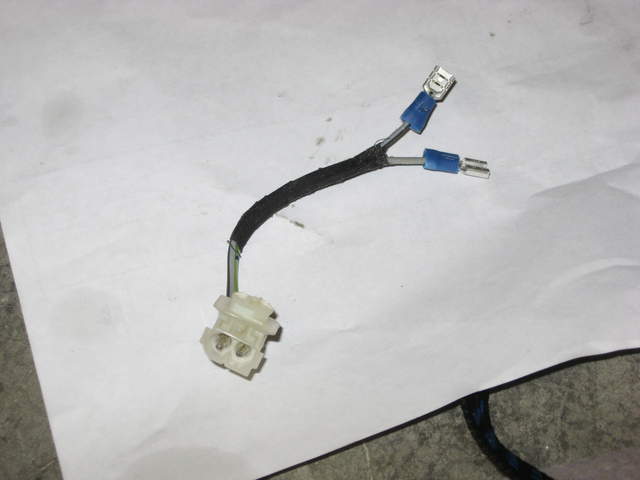
The crimp-on connectors fit on the terminals in the blank spot on the control panel:

The control unit in my photo is oriented differently than yours. The backrest control socket is on the right rather than the left. When you orient it this way, the gray wire with the green stripe is in the front and the gray wire with the black stripe is in the rear. If you put it in the opposite way, the backrest control operates in reverse of what it should.
You then just plug the connector into the existing connector in the two-way power seat bottom. The existing harness provides power for the motor, so you don't need to make any changes there.
Overall, this was a nice improvement and makes the car feel more refined. The height and distance adjustments are much easier to make than with the manual controls. (The manual height adjuster was particularly clumsy.) One oddity is that the backrest now operates in steps rather than continuously. It is not a big deal since I don't usually make big adjustments.
__________________
2000 Arctic Silver/Black, Hard Top, On Board Computer
PNP Rear Speakers, HAES 6-Channel Amp, Avic Z140BH,
Painted Bumperettes, 2004 (OEM) Top, Homelink integrated in dash with Targa switch, 997 Shifter, Carrera Gauge Cluster with silver gauge faces, heated 997 adaptive sports seats, Litronics, silver console
|

|

|
 12-29-2015, 12:41 PM
|
#8
|
|
Registered User
Join Date: Feb 2006
Location: Virginia
Posts: 1,754
|
I managed to source a passenger-side power seat base from another board member (thanks Phil C.) The wiring is much simpler on the passenger side than on the driver's side.
This photo shows the back of the control panels for the manual seat with the power backrest (left) and the full power seat (right). This was taken before I removed the control for the manual seat.
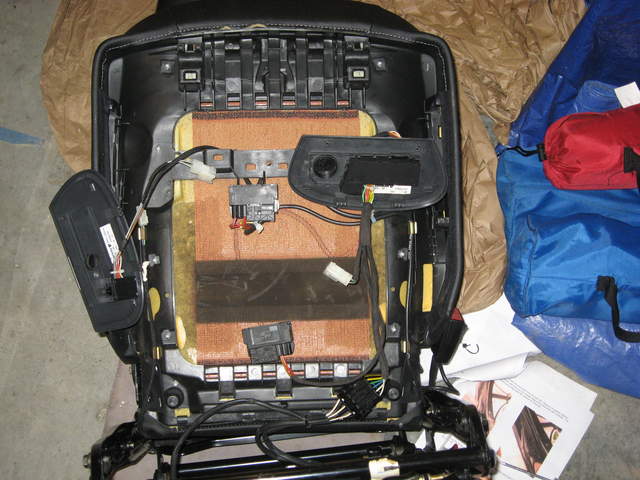
To power the seat motors, all you need to do is (1) Splice the red (power) and brown (ground) from the full-power seat into the existing harness for the manual seat and (2) Because the the connectors for the backrest motors are the same in both seats, you just plug the female connector from the full-power control unit into the existing male connector that goes to the backrest motor. You need to remove the existing female connector from the slot on the seat-bottom frame.
Because the seats that were in my car at the start of the project were heated, I did not want to make any unnecessary changes to the existing wiring.
One oddity that I noticed is that the power seat on the passenger side does appear to lower as much as the one on the driver's side. This is not a problem for me since my most frequent passenger is my wife and she is five-foot two and wants the seat higher.
I also bought a used memory seat control. I'm going to see if I can figure out how to wire that.
__________________
2000 Arctic Silver/Black, Hard Top, On Board Computer
PNP Rear Speakers, HAES 6-Channel Amp, Avic Z140BH,
Painted Bumperettes, 2004 (OEM) Top, Homelink integrated in dash with Targa switch, 997 Shifter, Carrera Gauge Cluster with silver gauge faces, heated 997 adaptive sports seats, Litronics, silver console
|

|

|
 07-01-2023, 04:43 AM
|
#9
|
|
Registered User
Join Date: Feb 2006
Location: Virginia
Posts: 1,754
|
I am not absolutely sure, but I think it needs to be switched power because a connection to unswitched power would leave the seat memory module powered at all times. This could potentially drain the battery if you didn't drive the car frequently.
Good luck with your project.
__________________
2000 Arctic Silver/Black, Hard Top, On Board Computer
PNP Rear Speakers, HAES 6-Channel Amp, Avic Z140BH,
Painted Bumperettes, 2004 (OEM) Top, Homelink integrated in dash with Targa switch, 997 Shifter, Carrera Gauge Cluster with silver gauge faces, heated 997 adaptive sports seats, Litronics, silver console
|

|

|
 Posting Rules
|
You may not post new threads
You may not post replies
You may not post attachments
You may not edit your posts
HTML code is On
|
|
|
All times are GMT -8. The time now is 08:00 AM.
| |