 11-24-2013, 03:48 AM
|
#121
|
|
Registered User
Join Date: Sep 2013
Location: Montreal, QC. (currently expat to Shanghai)
Posts: 3,249
|
<<--- see previous page for DSLR pictures of anodized colors
__________________
______________________________
'97 Boxster base model 2.5L, Guards Red/Tan leather, with a new but old Alpine am/fm radio.
|

|

|
 11-24-2013, 03:52 AM
|
#122
|
|
Registered User
Join Date: Sep 2013
Location: Montreal, QC. (currently expat to Shanghai)
Posts: 3,249
|
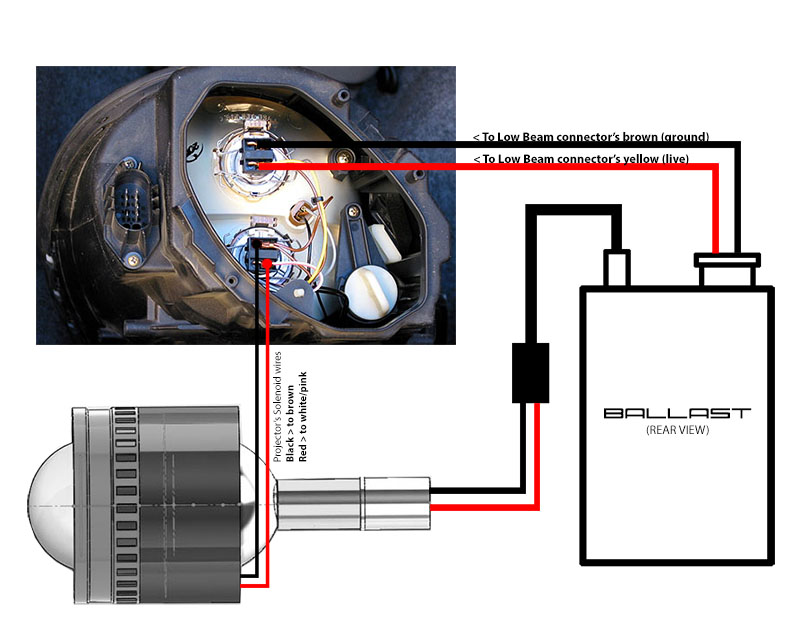
How to connect the kit to your existing headlight's circuit:

__________________
______________________________
'97 Boxster base model 2.5L, Guards Red/Tan leather, with a new but old Alpine am/fm radio.
|

|

|
 11-24-2013, 08:12 AM
|
#123
|
|
Registered User
Join Date: Jan 2007
Location: BC
Posts: 1,354
|
Fred, do the original high beams still work then after the solenoids are connected, i.e. are the solenoid wires spliced in? Or are they redundant and the only highs are from the projectors?
__________________
2001 Boxster, 5 spd, Seal Grey
|

|

|
 11-24-2013, 08:23 AM
|
#124
|
|
Custom User Title Here
Join Date: Mar 2012
Location: Ft. Leonard Wood
Posts: 6,169
|
You could, but that would be redundant...and the projector would block some of the beam anyway.
It would be similar to using a flashlight in daylight 
__________________
https://youtube.com/@UnwindTimeVintageWatchMuseum
|

|

|
 11-24-2013, 10:20 AM
|
#125
|
|
Registered User
Join Date: Sep 2013
Location: Coral Springs, FL USA
Posts: 96
|
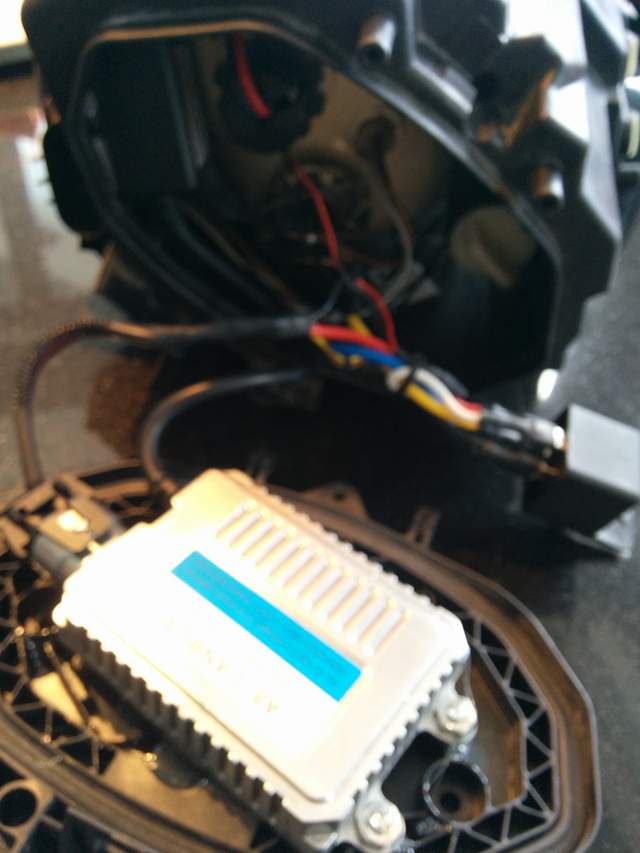
I left the chrome finish on the reflector bowls so that the halogen high beams would continue to work well. The problem with xenon is that it takes time for the bulbs to warm up, so they can't be used for flash to pass if they are off when flashed. I wanted to preserve that capability.
I wired a standard automotive relay across the low beam, with a diode across the coil as is common practice. The positive lead going to the high beam is cut and connected to the common terminal of the relay. The normally closed terminal of the relay goes to the bulb side of the high beam wire that was cut, and the normally open terminal of the relay goes to the projector coil. The other wire from the projector coil is grounded.
So it works like this - when the low beam is off and the high beam is flashed, the halogen bulb is used, as it was originally. When the xenon low beam is turned on and the high beam is flashed, the shutter is opened.
After running the low beam for 30 minutes, the ballast is at 91 degrees, and the front of the projector is at 132 degrees.
Sorry about the crummy picture. You can see the relay in the middle of the picture, on the right. It fits inside near the white adjustment knob, held in place with a small piece of industrial velcro.

Last edited by MitchSF; 11-24-2013 at 10:24 AM.
|

|

|
 11-24-2013, 10:42 AM
|
#126
|
|
Registered User
Join Date: Oct 2012
Location: Wake Forest, NC
Posts: 867
|
Quote:
Originally Posted by Nine8Six

|
Wow. Beautiful work!!! Stunning.
__________________
2000 Boxster S, 6 speed, Sport Package, Litronics, LED tail lights, LNE IMS-B, OBC, Skybreaker wind deflector, Arctic Silver/Graphite Grey
|

|

|
 11-24-2013, 10:50 AM
|
#127
|
|
Registered User
Join Date: Sep 2013
Location: Montreal, QC. (currently expat to Shanghai)
Posts: 3,249
|
Quote:
Originally Posted by clickman

Fred, do the original high beams still work then after the solenoids are connected, i.e. are the solenoid wires spliced in? Or are they redundant and the only highs are from the projectors?
|
Norm - See above post from MitchSF. Brilliant isn't it. You'll get far better advice from both Particlewave and MitchSF than I can possibly give you on the conn-wise subject.
Personally, I went to lazy route and simply left the high beam's H7 lamp in there and connected the solenoid to it. Like MitchSF mentioned, flashing during day time is required and this H7 halogen does a good job for that. However, Particlewave is pretty accurate saying it will become useless in night time.
The projector xenon's high beam is brightning up the hell out of everything when the solenoid is activated (high beams ON). Brutal. Outperforms any stock 55w halogen's high beams so you shouldn't miss it too much and very possibly, forget all about old-halogen tech for the rest of your life as well 
__________________
______________________________
'97 Boxster base model 2.5L, Guards Red/Tan leather, with a new but old Alpine am/fm radio.
|

|

|
 11-24-2013, 10:55 AM
|
#128
|
|
Registered User
Join Date: Sep 2013
Location: Montreal, QC. (currently expat to Shanghai)
Posts: 3,249
|
Quote:
Originally Posted by kjc2050

Wow. Beautiful work!!! Stunning.
|
MitchSF's idea, not mine. And Yes I agree it looks good.
Soon a lot of owners will have better looking shinners than mine  unfair
__________________
______________________________
'97 Boxster base model 2.5L, Guards Red/Tan leather, with a new but old Alpine am/fm radio.
|

|

|
 11-24-2013, 11:03 AM
|
#129
|
|
Registered User
Join Date: Sep 2013
Location: Coral Springs, FL USA
Posts: 96
|
Projectors are brilliant! Wiring is high school electricity 101.
Mitch
|

|

|
 11-24-2013, 12:45 PM
|
#130
|
|
Custom User Title Here
Join Date: Mar 2012
Location: Ft. Leonard Wood
Posts: 6,169
|
Simple, yet elegant solution Mitch! Love it! 
Fred...sorry for the build delay. Finals at school and holiday prep has been killing my free time 
Build starts in 6 hours! 
Shouldn't take too long since most of the work is already done.
__________________
https://youtube.com/@UnwindTimeVintageWatchMuseum
|

|

|
 11-24-2013, 12:59 PM
|
#131
|
|
Registered User
Join Date: Sep 2013
Location: Montreal, QC. (currently expat to Shanghai)
Posts: 3,249
|
Quote:
Originally Posted by particlewave

Simple, yet elegant solution Mitch! Love it! 
Fred...sorry for the build delay. Finals at school and holiday prep has been killing my free time 
Build starts in 6 hours! 
Shouldn't take too long since most of the work is already done. |
Uh-oh. I was hoping you'd take your time.... sort of letting me think that my-kit-is-cool-looking for a few more weeks.
Seriously, I can't wait to see how the green devil eyes turns out. Knowing your skills and creativity, I believe you'll have a few more surprises as well 
__________________
______________________________
'97 Boxster base model 2.5L, Guards Red/Tan leather, with a new but old Alpine am/fm radio.
|

|

|
 11-24-2013, 01:07 PM
|
#132
|
|
Registered User
Join Date: Jan 2007
Location: BC
Posts: 1,354
|
As usual it's not that easy for us Canadians. We need the daytime running lights. I get the feeling I'm the first one of us to try to do this. If not, the rest of you Canuckleheads, please let me know!!
__________________
2001 Boxster, 5 spd, Seal Grey
|

|

|
 11-24-2013, 03:39 PM
|
#133
|
|
Custom User Title Here
Join Date: Mar 2012
Location: Ft. Leonard Wood
Posts: 6,169
|
I have something in the works click 
I don't have DRLs, but wanted some form of running light, so I'm doing something completely unique. Mock ups of the idea look pretty sweet! 
Stay tuned 
__________________
https://youtube.com/@UnwindTimeVintageWatchMuseum
Last edited by particlewave; 11-24-2013 at 04:07 PM.
|

|

|
 11-24-2013, 03:45 PM
|
#134
|
|
Registered User
Join Date: Jan 2007
Location: BC
Posts: 1,354
|
OK particle, you've got my attention!!
In the meantime, I'll get Fred working on my kit!
How does quasi gun metal grey sound on a Seal Grey Boxster, instead of the standard silver?
__________________
2001 Boxster, 5 spd, Seal Grey
Last edited by clickman; 11-24-2013 at 09:07 PM.
|

|

|
 11-25-2013, 02:05 AM
|
#135
|
|
Registered User
Join Date: Sep 2013
Location: KRK, PL, EU
Posts: 255
|
Here (in Poland) daytime running lights are required year-round. Most people just drive with their low beams on all the time.
How would your projectors work in a situation like that? Any overheating?
I have a set of clear lights that I have to polish up and was thinking of retrofitting your kit at the same time. I'm still not 100% clear on the procedure, though, so if you can please PM with the instructions.
|

|

|
 11-25-2013, 06:43 AM
|
#136
|
|
Registered User
Join Date: Sep 2013
Location: Montreal, QC. (currently expat to Shanghai)
Posts: 3,249
|
Quote:
Originally Posted by PaulDash

Here (in Poland) daytime running lights are required year-round. Most people just drive with their low beams on all the time.
How would your projectors work in a situation like that? Any overheating?
I have a set of clear lights that I have to polish up and was thinking of retrofitting your kit at the same time. I'm still not 100% clear on the procedure, though, so if you can please PM with the instructions.
|
Nice! Greetings from Shanghai Paul
Changing the xenon bulbs regularly will be your main concern. The manufacturer of the xenon bulb I am including in the kit rates them @ 2,000hrs. That said if you use your car 2 hrs per day, you are likely to need a xenon bulb refresh every two years (according to the manufacturer). In your case, I'd say changing them annually and they should perform at peak efficiency all the time. A pair of H1 Xenon bulbs (35watts ) will cost you a huge $20 each year. Not a crisis!
Bear in mind the complete assembly is made of aerospace 6061 T6 grade aluminum. That type of aluminum conducts heat about 2000 times faster than plastic (PE). The heat generated from the xenon bulb is not a problem and dissipated across the bowl (cast aluminum), the skirt and the bezel evenly. The whole thing effectively acts as a massive heat sink. The assembly runs at 45°C(min) 55°C (max) @ 60min operation. In Fahrenheit that would be 113°F(min) 130°F (max).
Ballasts can sustain the heat they are rated at which is between -40°C ~ 105°C (or 220°F). I've toasted a pair overnight in a enclosed environment (4"X6"X2" toolbox) and picked them up in the morning @ 54°C (130°F). So those passes my quality standards and comply with what the manufacturer swears by. A bad quality ballast can, and will, go up to 80°C ~90°C (175~200).
Regarding the DIY steps required to get this done, please let me know what procedure(s) you are not clear on and I'll do my best to explain in details.
__________________
______________________________
'97 Boxster base model 2.5L, Guards Red/Tan leather, with a new but old Alpine am/fm radio.
|

|

|
 11-25-2013, 06:59 AM
|
#137
|
|
Registered User
Join Date: Sep 2013
Location: Montreal, QC. (currently expat to Shanghai)
Posts: 3,249
|
Quote:
Originally Posted by clickman

OK particle, you've got my attention!!
In the meantime, I'll get Fred working on my kit!
How does quasi gun metal grey sound on a Seal Grey Boxster, instead of the standard silver?
|
PM sent Norm. Incl gunmetal light grey color visual.... essentially the same as seal grey (very close if not a perfect match).
You get to make the hard decisions 
__________________
______________________________
'97 Boxster base model 2.5L, Guards Red/Tan leather, with a new but old Alpine am/fm radio.
|

|

|
 11-25-2013, 07:05 PM
|
#138
|
|
Custom User Title Here
Join Date: Mar 2012
Location: Ft. Leonard Wood
Posts: 6,169
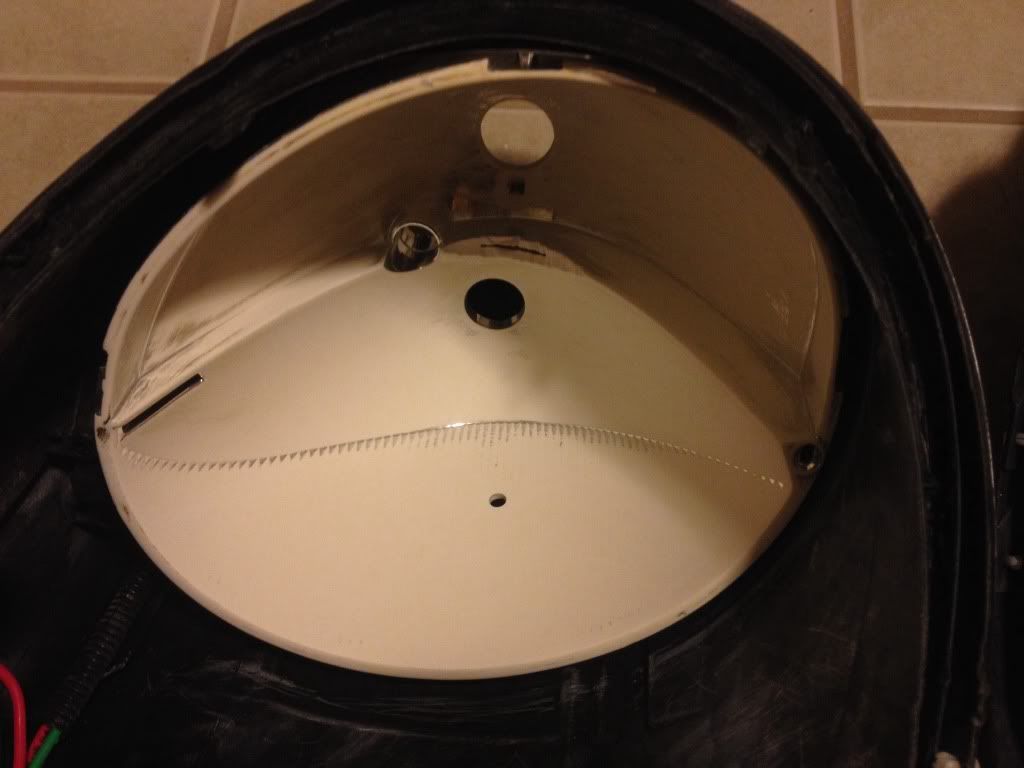
|
Sanding, sanding, sanding...
Those ridges in the bottom of the reflector are a PITA. 60 grit sandpaper speeds it up some, but I still wound up with 4 bloody knuckles. 

Almost there.
__________________
https://youtube.com/@UnwindTimeVintageWatchMuseum
|

|

|
 11-26-2013, 04:36 PM
|
#139
|
|
Beginner
Join Date: Mar 2013
Location: Houston
Posts: 1,659
|
My headlights stink. They are yellowed, burned, dead halogens. even after polishing the outside, which was a vast improvement, the best thing that can be said about them is "disappointing". This is a super interesting thread, and everyone posting on the thread knows whats going on. As an outsider looking in, can you tell me what the heck are your plans for the headlights your sanding? Oh yeah, sorry about the knuckles.
|

|

|
 11-26-2013, 04:50 PM
|
#140
|
|
Custom User Title Here
Join Date: Mar 2012
Location: Ft. Leonard Wood
Posts: 6,169
|
Haha! Thanks, the knuckles are recovering.
I'm sanding the reflective chrome finish off of the reflectors because I'm going to paint them black. Paint doesn't stick real well to that shiny stuff 
It looks pretty slick all black with these projectors installed (see pg 3-4 of this thread). I'm hoping to be done by tomorrow, but holiday prep may cut into the project. Definitely will be done by Sunday...
Are the outer lenses on your halogens ruined also? The inner lens can be ditched with this upgrade 
__________________
https://youtube.com/@UnwindTimeVintageWatchMuseum
|

|

|
 Posting Rules
|
You may not post new threads
You may not post replies
You may not post attachments
You may not edit your posts
HTML code is On
|
|
|
All times are GMT -8. The time now is 08:49 PM.
| |