 11-05-2014, 08:36 PM
|
#1
|
|
Registered User
Join Date: Feb 2006
Location: Virginia
Posts: 1,754
|
Advice on Used Litronics
I bought a set of used litronics that I knew were not in very good shape. My plan is to refurbish them if possible and install them on my 2000 Boxster.
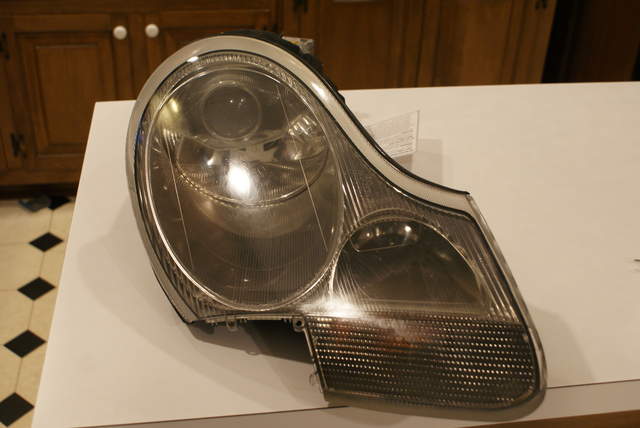
The passenger-side headlight appears to be in decent shape. I'm planning to use the Sylvania headlight restoration kit on it to take the discoloration off the outside of the lens and just clean it up. I'll check to be sure it works before I expend the elbow grease. Here are some pictures:
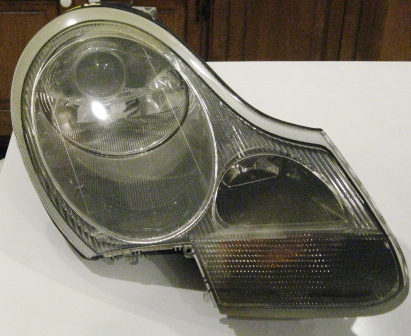
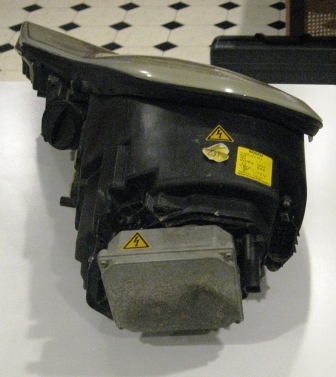
You can see the oxidation at the top of the lens here:
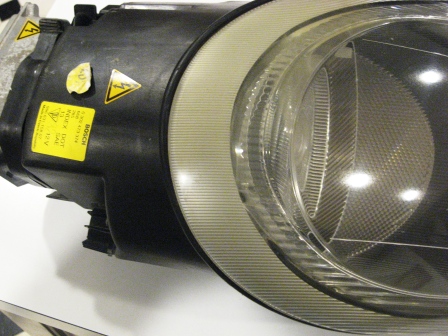
The driver-side headlight is a little rougher. The lens needs more restoration than the passenger lens:

The more significant problem is that the back side is broken and many of the internal components are rattling around loose. The litronic bulb (D2S) is broken and the reflector behind it just slides around:
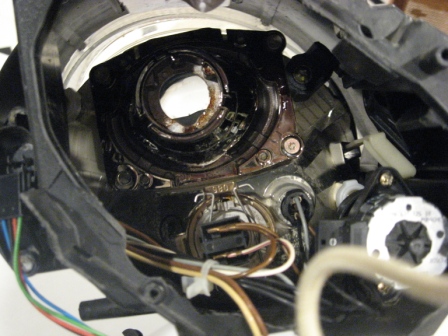
Does anyone have experience with repairing the internal components of a litronic headlight? Can you suggest how to fix this? For example, should I consider heating the unit and removing the lens so that I can work inside the bucket? Can I use the bucket from a non-litronic lens and fit the litronic components inside.
Would it be better for me to find another driver-side lens and just use the components in this one for spares?
If anyone has a litronic with a broke lens to sell and everything else is intact, I'd be interested.
__________________
2000 Arctic Silver/Black, Hard Top, On Board Computer
PNP Rear Speakers, HAES 6-Channel Amp, Avic Z140BH,
Painted Bumperettes, 2004 (OEM) Top, Homelink integrated in dash with Targa switch, 997 Shifter, Carrera Gauge Cluster with silver gauge faces, heated 997 adaptive sports seats, Litronics, silver console
|

|

|
 11-05-2014, 10:07 PM
|
#2
|
|
Custom User Title Here
Join Date: Mar 2012
Location: Ft. Leonard Wood
Posts: 6,169
|
That headlight will most likely need to come apart for repair (would be much easier, anyway).
There's a seller on ebay that always has parts bundles for Lits.  http://www.ebay.com/itm/271552593304 http://www.ebay.com/itm/271552593304
They always have a lot of parts. Just be sure you get the correct parts as there are at least 2 types of Lits that I'm aware of.
I recommend Meguiars Plast-X with a foam polisher to remove mild discoloration. It's an easy, one-step solution.
Scratches or heavy oxidation will require wet sanding, polish and new UV coat for future protection.
__________________
https://youtube.com/@UnwindTimeVintageWatchMuseum
Last edited by particlewave; 11-05-2014 at 10:23 PM.
|

|

|
 11-06-2014, 03:35 AM
|
#3
|
|
I am my own mechanic....
Join Date: Feb 2013
Location: Salt Lake City, UT
Posts: 3,432
|
When I had my old set polished by a pro, he buffed and buffed but the yellowing / foggy look was 'in' the plastic, or on the inside. My car was from the desert region outside LA and took heat and sandblasting while driving. They came out very smooth, but nothing like new units. Not close. Since the headlights really do make the look up front, spend cash there. Well worth it.
__________________
'04 Boxster S 50 Jahre 550 Spyder Anniversary Special Edition, 851 of 1953, 6-sp, IMS/RMS, GT Metallic silver, cocoa brown leather SOLD to member Broken Linkage.
'08 VW Touareg T-3 wife's car
'13 F150 Super Crew long bed 4x4 w/ Ego Boost
|

|

|
 11-06-2014, 08:11 PM
|
#4
|
|
Registered User
Join Date: Mar 2014
Location: Eastern NC
Posts: 701
|
Is there a difference in the clear lenses on the standard lights verses the litronics? If not, why not pull the lense from the old style and place ir on the litronics? That is - if the litronic lense cnnot be polished.
|

|

|
 11-07-2014, 07:32 PM
|
#5
|
|
Registered User
Join Date: Feb 2006
Location: Virginia
Posts: 1,754
|
Quote:
Originally Posted by BFeller

Is there a difference in the clear lenses on the standard lights verses the litronics? If not, why not pull the lense from the old style and place ir on the litronics? That is - if the litronic lense cnnot be polished.
|
I thought about that. The process for opening the headlight:
How to open sealed headlights, Porsche 996 986 - YouTube
appears to be a little risky. Too much force at the wrong time might result in a broken cover.
I would also like to "de-amber" as a side benefit of the litronic upgrade. Using a cover from the old-style lens wouldn't benefit me in that regard. I think that I will try polishing first. If that doesn't work I'll look at other options.
The polishing process seems to work well. The person in this video used the Turtle Wax kit on an old-style headlight.
http://www.youtube.com/watch?v=93EilTta1OY
Consumer Reports indicated that the Sylvania system was better, so that is what I plan to use.
http://www.consumerreports.org/cro/headlight-restoration-kits/buying-guide.htm
I tested the passenger side light tonight. It worked except for the turn signal. I suspect that the bulb is burnt out or broken. It was nice to see that I didn't have to replace the D2S litronic bulb. There appear to be some inexpensive generic xenon bulbs, but the brand name units are expensive. The light from the litronic bulb is noticeably whiter and brighter than that from the halogen.
I did find a driver's side assembly at a salvage yard. It does not include the control unit, but I can take that off of my broken light.
__________________
2000 Arctic Silver/Black, Hard Top, On Board Computer
PNP Rear Speakers, HAES 6-Channel Amp, Avic Z140BH,
Painted Bumperettes, 2004 (OEM) Top, Homelink integrated in dash with Targa switch, 997 Shifter, Carrera Gauge Cluster with silver gauge faces, heated 997 adaptive sports seats, Litronics, silver console
Last edited by KevinH1990; 11-07-2014 at 07:41 PM.
|

|

|
 11-07-2014, 11:28 PM
|
#6
|
|
Registered User
Join Date: Sep 2013
Location: Montreal, QC. (currently expat to Shanghai)
Posts: 3,249
|
Quote:
Originally Posted by KevinH1990

|
Kevin - huge thanks to fella member Charles (Particlewave) for putting up this Youtube vid for us.
RE the broken cover comment. Believe me, those headlights are bullet proof. You have to ask yourself... highways & highways & highways and they still look good after 10~15 years. That polycarbonate material Porsche is using is something I've never seen before (I think you guys in the states also make jet fighter canopy out of that same stuff).
Pry mate, you can bend them, twist them, throw them in the wall as hard as you want and they'll live another life I promise. Until today I've never heard of anyone braking a lens. The lip under is what you need to take care of... it may crack or bend a little but who cares... it won't interfere with remounting the lens perfectly back on the headlight housing - it will hide itself in the silicon you'll use to re-seal the thing.
Hope this was inspirational! Best of luck with the rest, you appear to be on the good track mate
__________________
______________________________
'97 Boxster base model 2.5L, Guards Red/Tan leather, with a new but old Alpine am/fm radio.
|

|

|
 11-08-2014, 06:05 AM
|
#7
|
|
Registered User
Join Date: Feb 2006
Location: Virginia
Posts: 1,754
|
Thanks for the words of encouragement. I assumed that anything that looks like a big piece of glass will be fragile. Using excessive force during automotive work is usually something I do with extreme caution.
Right now, it looks like I have enough parts from the three lights I mentioned in my previous posts (two that I own and one that is on its way from the salvage yard) to make two good lights.
I still need to find a set of clear corners, but for now my total cost for upgrading to litronics and "de-ambering" is reasonable.
__________________
2000 Arctic Silver/Black, Hard Top, On Board Computer
PNP Rear Speakers, HAES 6-Channel Amp, Avic Z140BH,
Painted Bumperettes, 2004 (OEM) Top, Homelink integrated in dash with Targa switch, 997 Shifter, Carrera Gauge Cluster with silver gauge faces, heated 997 adaptive sports seats, Litronics, silver console
|

|

|
 11-08-2014, 07:22 AM
|
#8
|
|
Registered User
Join Date: Mar 2014
Location: Eastern NC
Posts: 701
|
The lenses aren't glass. Plastic has a bend and forgiveness to it. I only opened one set of lights. What found interesting in the process and light design was that you pry up on the top of the lens, - the headlight bucket area - but when you get down towards the turn signal and fog light - you really need to slide the lens forward. It is detailed in Particlewaves video.
Edit: Not that I am trying to second guess your decision to polish the lenses. Just trying to add more information about the lenses.
|

|

|
 11-08-2014, 07:32 AM
|
#9
|
|
Registered User
Join Date: Jan 2007
Location: BC
Posts: 1,354
|
Quote:
Originally Posted by Nine8Six

RE the broken cover comment. Believe me, those headlights are bullet proof. You have to ask yourself... highways & highways & highways and they still look good after 10~15 years. That polycarbonate material Porsche is using is something I've never seen before (I think you guys in the states also make jet fighter canopy out of that same stuff).
Pry mate, you can bend them, twist them, throw them in the wall as hard as you want and they'll live another life I promise. Until today I've never heard of anyone braking a lens. The lip under is what you need to take care of... it may crack or bend a little but who cares... it won't interfere with remounting the lens perfectly back on the headlight housing - it will hide itself in the silicon you'll use to re-seal the thing.
|
I hate to be a downer on this, but I managed to slightly crack the surface of one of my lenses. And took chips of the unreplaceable paint off the serrated edge surface. If I was to do it again, I'd send the assembly to Charles to take apart.
__________________
2001 Boxster, 5 spd, Seal Grey
|

|

|
 11-08-2014, 08:22 AM
|
#10
|
|
Registered User
Join Date: Feb 2006
Location: Virginia
Posts: 1,754
|
__________________
2000 Arctic Silver/Black, Hard Top, On Board Computer
PNP Rear Speakers, HAES 6-Channel Amp, Avic Z140BH,
Painted Bumperettes, 2004 (OEM) Top, Homelink integrated in dash with Targa switch, 997 Shifter, Carrera Gauge Cluster with silver gauge faces, heated 997 adaptive sports seats, Litronics, silver console
|

|

|
 11-14-2014, 06:11 PM
|
#11
|
|
Registered User
Join Date: Feb 2006
Location: Virginia
Posts: 1,754
|
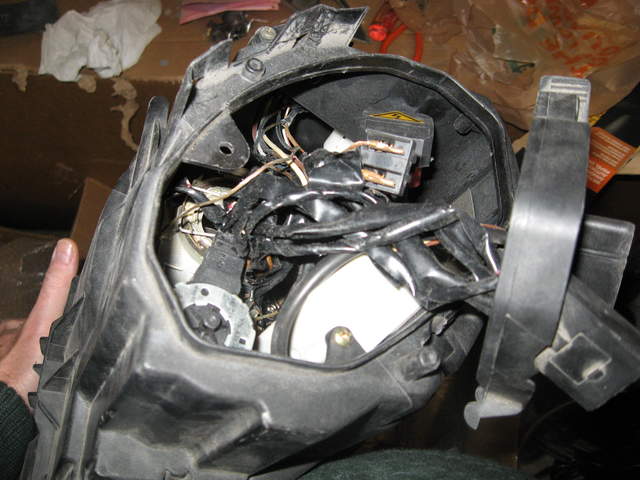
My driver's side headlight arrived yesterday. Unfortunately, the wiring inside is a mess. You can see all of the electrical tape wrapped around the wiring. There is a lot of missing insulation and broken wires. I negotiated a price reduction with the salvage yard that sold it to me.
Fortunately, the wiring in my broken driver's side litronic is in good shape:
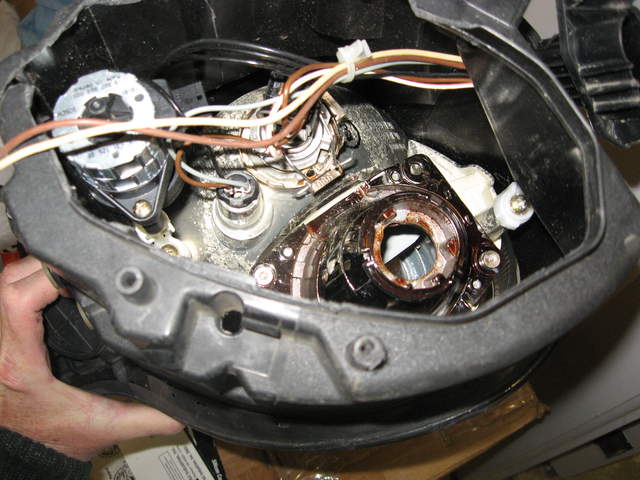
I'm planning to transplant my good wiring from the broken headlight into the unbroken headlight with the bad wiring. It all looks pretty straightforward except for the wiring for the foglight and the turn signal. The turn signal looks particularly difficult since the wire runs the length of the headlight assembly and it will be difficult to get in there.
Does anybody have a suggestion for doing this? For example, could I gain access by removing the clear plastic cover? Or should I cut a small hole in the bucket near the connector for the turn signal.
__________________
2000 Arctic Silver/Black, Hard Top, On Board Computer
PNP Rear Speakers, HAES 6-Channel Amp, Avic Z140BH,
Painted Bumperettes, 2004 (OEM) Top, Homelink integrated in dash with Targa switch, 997 Shifter, Carrera Gauge Cluster with silver gauge faces, heated 997 adaptive sports seats, Litronics, silver console
|

|

|
 11-14-2014, 06:46 PM
|
#12
|
|
Custom User Title Here
Join Date: Mar 2012
Location: Ft. Leonard Wood
Posts: 6,169
|
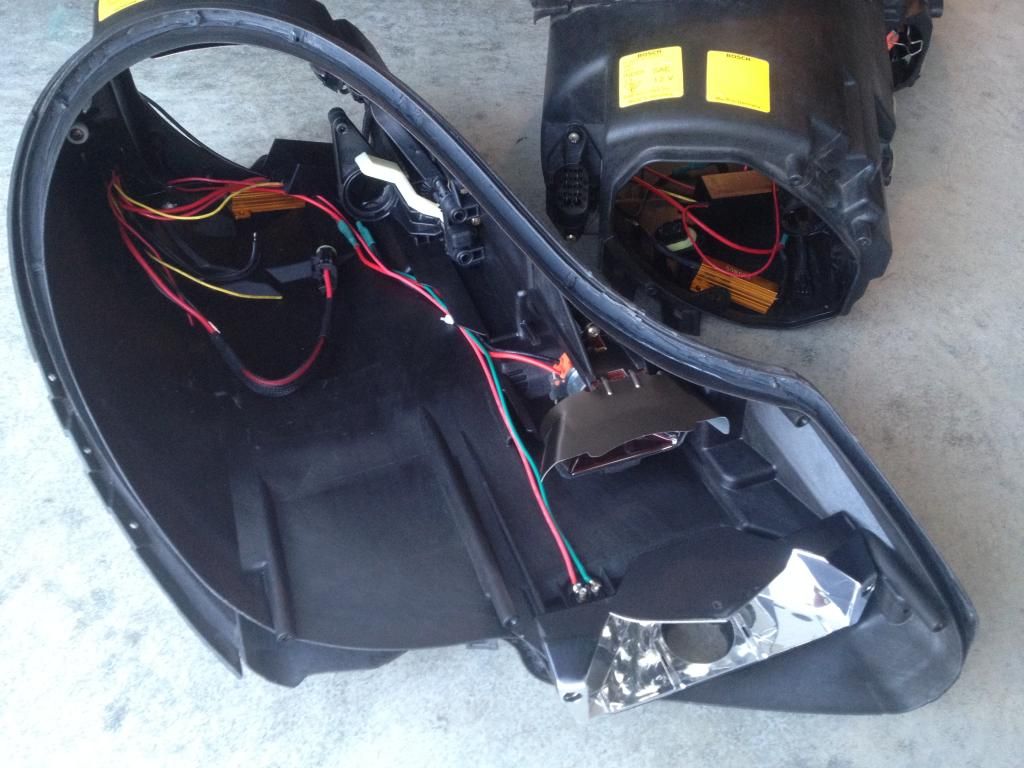
I would remove the lens and do it. It's really not too difficult 
__________________
https://youtube.com/@UnwindTimeVintageWatchMuseum
Last edited by particlewave; 11-14-2014 at 06:51 PM.
|

|

|
 11-14-2014, 06:57 PM
|
#13
|
|
Registered User
Join Date: Feb 2006
Location: Virginia
Posts: 1,754
|
Thanks - The more I look at it, the more I'm inclined to agree.
What do you use to glue it back together?
__________________
2000 Arctic Silver/Black, Hard Top, On Board Computer
PNP Rear Speakers, HAES 6-Channel Amp, Avic Z140BH,
Painted Bumperettes, 2004 (OEM) Top, Homelink integrated in dash with Targa switch, 997 Shifter, Carrera Gauge Cluster with silver gauge faces, heated 997 adaptive sports seats, Litronics, silver console
|

|

|
 11-14-2014, 07:05 PM
|
#14
|
|
Registered User
Join Date: Oct 2014
Location: Long Island, NY
Posts: 154
|
What a great project! I would remove the lenses to access and refurbish, take your time and take a ton of pics along the way so you know where everything goes. I'm sure it will all pay off in the end.
__________________
Defectfully
Patrick
|

|

|
 11-14-2014, 07:05 PM
|
#15
|
|
Custom User Title Here
Join Date: Mar 2012
Location: Ft. Leonard Wood
Posts: 6,169
|
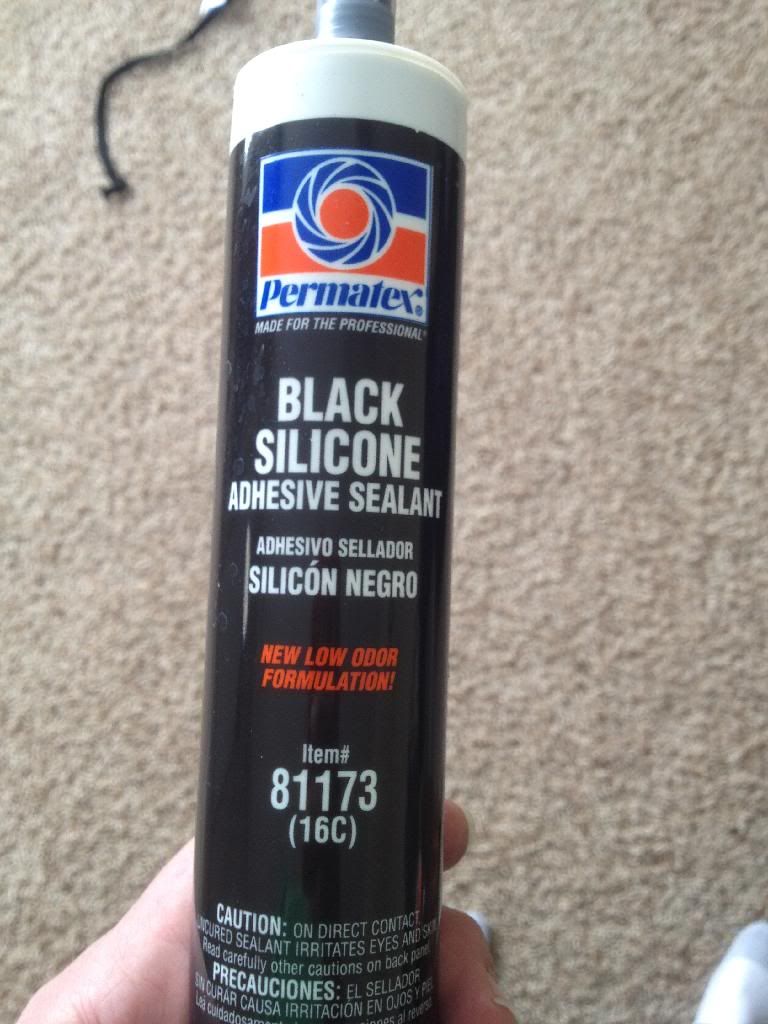
Permatex Black Silicone Adhesive Sealant.
It can be found at places like AutoZone for around $10.
Side note: iphone sucks since ios8. Took me 6 tries to copy and paste that image link 
__________________
https://youtube.com/@UnwindTimeVintageWatchMuseum
Last edited by particlewave; 11-14-2014 at 07:11 PM.
|

|

|
 11-14-2014, 07:34 PM
|
#16
|
|
Registered User
Join Date: Feb 2006
Location: Virginia
Posts: 1,754
|
Quote:
Originally Posted by Hogosha

What a great project! I would remove the lenses to access and refurbish, take your time and take a ton of pics along the way so you know where everything goes. I'm sure it will all pay off in the end.
|
I think that is going to be the key. I was planning to work on it tonight, but I was tired from working all day. I have some vacation days that I need to take before the middle of January, so I may just take a day off and work on it. I find that fatigue leads to mistakes so I might as well start fresh.
I'll probably watch particleweave's disassembly video 10 times and then start heating up some headlights.
Right now, my total spend on the project is relatively low, so I think I owe the project some sweat equity.
__________________
2000 Arctic Silver/Black, Hard Top, On Board Computer
PNP Rear Speakers, HAES 6-Channel Amp, Avic Z140BH,
Painted Bumperettes, 2004 (OEM) Top, Homelink integrated in dash with Targa switch, 997 Shifter, Carrera Gauge Cluster with silver gauge faces, heated 997 adaptive sports seats, Litronics, silver console
|

|

|
 11-17-2014, 05:36 PM
|
#17
|
|
Registered User
Join Date: Feb 2006
Location: Virginia
Posts: 1,754
|
I had a busy weekend and I only had a few hours on Sunday afternoon to work on the lights. I used the Sylvania restoration kit on the good working headlight. It did a great job taking off the oxidation on the outside of the lens.
Before:


After:

I think that I may do it again in a year or two. I thought I had sanded very thoroughly, but I think there were some areas where I did not remove all of the factory coating on the headlight and I can see some imperfections in those areas. It is particularly noticeable near the turn signal. However, from about 5 feet it looks like new.
I plan to bake and open the broken headlights on Saturday. I want to set aside about 4 hours of time so I'm not rushed. If it takes less time, that's fine but I plan to be methodical and take a lot of pictures.
__________________
2000 Arctic Silver/Black, Hard Top, On Board Computer
PNP Rear Speakers, HAES 6-Channel Amp, Avic Z140BH,
Painted Bumperettes, 2004 (OEM) Top, Homelink integrated in dash with Targa switch, 997 Shifter, Carrera Gauge Cluster with silver gauge faces, heated 997 adaptive sports seats, Litronics, silver console
|

|

|
 11-22-2014, 09:41 AM
|
#18
|
|
Registered User
Join Date: Feb 2006
Location: Virginia
Posts: 1,754
|
I used particleweave's instructions to open the headlights. It was actually as easy as he said it was. I have transferred the good wiring harness from the broken headlight to the good headlight with the bad wiring harness.
I have to go and clean up the yard right now, but I'll complete the report and post some pictures tonight or tomorrow.
If anyone else is faced with this task, opening the headlight is clearly the best option.
__________________
2000 Arctic Silver/Black, Hard Top, On Board Computer
PNP Rear Speakers, HAES 6-Channel Amp, Avic Z140BH,
Painted Bumperettes, 2004 (OEM) Top, Homelink integrated in dash with Targa switch, 997 Shifter, Carrera Gauge Cluster with silver gauge faces, heated 997 adaptive sports seats, Litronics, silver console
|

|

|
 11-30-2014, 08:12 AM
|
#19
|
|
Registered User
Join Date: Feb 2006
Location: Virginia
Posts: 1,754
|
I ran into a few issues, so my project still isn't complete. One of the headlight ballasts (the one from the broken headlight) had water in it. I opened it up and rinsed it with distilled water and then dried it out. However, it wouldn't work so I bought a replacement on ebay for $40. That arrived yesterday and it worked fine.
Also, when I tested the lights, none of the parking light bulbs worked. The litronic headlights use a different bulb (H6W) then the non-litronics and I couldn't find them in a couple of local auto parts stores that I checked. So, I ordered a pair from Rockauto and they are scheduled to arrive tomorrow.
Finally, I decided to change to clear corner trim. The least expensive available are on ebay, but they ship from Latvia. So, it will be mid December before they arrive.
Today, I'm going to spend more time polishing the headlights. I'll install them with amber corners tomorrow night.
I'm also going to look for the harness and control unit that allow the litronics to rotate up when the high beams go on. If anyone has the following parts laying around, please let me know.
Control unit: 00004490038
Small plugs 2 needed 99965256822
Wiring harness: 99661298800
__________________
2000 Arctic Silver/Black, Hard Top, On Board Computer
PNP Rear Speakers, HAES 6-Channel Amp, Avic Z140BH,
Painted Bumperettes, 2004 (OEM) Top, Homelink integrated in dash with Targa switch, 997 Shifter, Carrera Gauge Cluster with silver gauge faces, heated 997 adaptive sports seats, Litronics, silver console
|

|

|
 11-30-2014, 09:41 AM
|
#20
|
|
Custom User Title Here
Join Date: Mar 2012
Location: Ft. Leonard Wood
Posts: 6,169
|
I guess mid December isn't too long to wait, but some medium tint film on the amber corner trims will darken them up and hide the orange nicely.
__________________
https://youtube.com/@UnwindTimeVintageWatchMuseum
|

|

|
 Posting Rules
|
You may not post new threads
You may not post replies
You may not post attachments
You may not edit your posts
HTML code is On
|
|
|
All times are GMT -8. The time now is 04:03 AM.
| |