 12-01-2014, 06:32 PM
|
#21
|
|
Registered User
Join Date: Feb 2006
Location: Virginia
Posts: 1,754
|
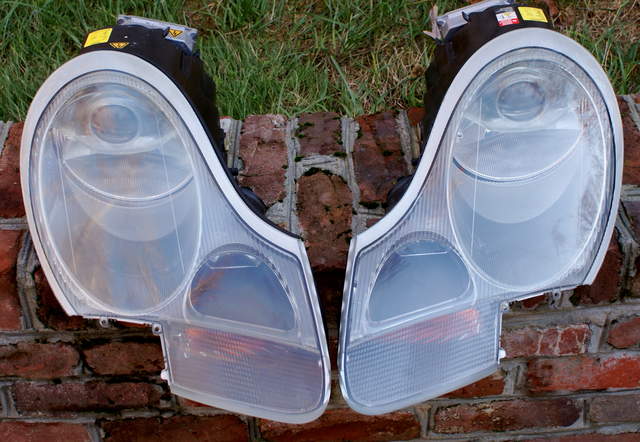
When I arrived home from work tonight, my H6W bulbs were waiting for me. I put the lights together and tested them. All bulbs are working, so I consider this project a functional success.
Now I'm ready to work some more on the cosmetic side. I'm not sure whether it shows in these photos, but I still need to do some polishing before I install them. There are a lot of light surface scratches and pits. I had previously done the passenger side, but the result was not as good as I wanted.
Together:
Passenger's side close up:
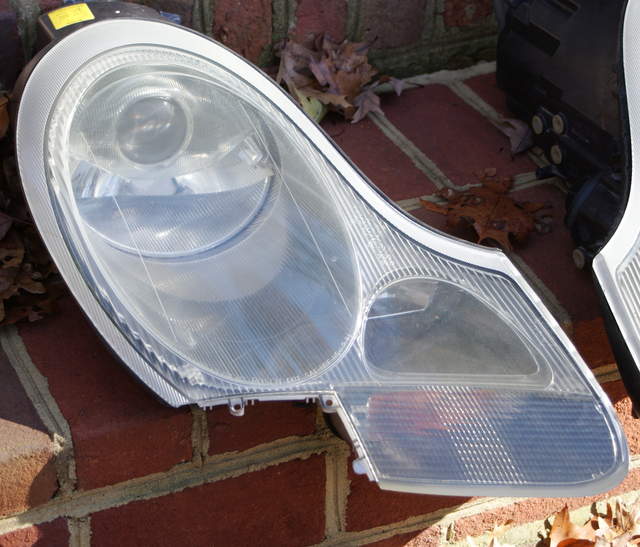
Driver's side close up:

Once I finish the polishing, I'll just need to wait until the Latvians deliver my clear corners. If I get impatient, I'll try Particleweave's suggestion and use some smoke tint film.
__________________
2000 Arctic Silver/Black, Hard Top, On Board Computer
PNP Rear Speakers, HAES 6-Channel Amp, Avic Z140BH,
Painted Bumperettes, 2004 (OEM) Top, Homelink integrated in dash with Targa switch, 997 Shifter, Carrera Gauge Cluster with silver gauge faces, heated 997 adaptive sports seats, Litronics, silver console
Last edited by KevinH1990; 12-02-2014 at 05:49 PM.
|

|

|
|
12-09-2014, 07:27 PM
|
#22
|
|
Registered User
Join Date: Feb 2006
Location: Virginia
Posts: 1,754
|
Project Complete
Well, the Latvians came through and my clear corners arrived yesterday-several days ahead of schedule. Here are some pictures of the results:
Off the car with flash
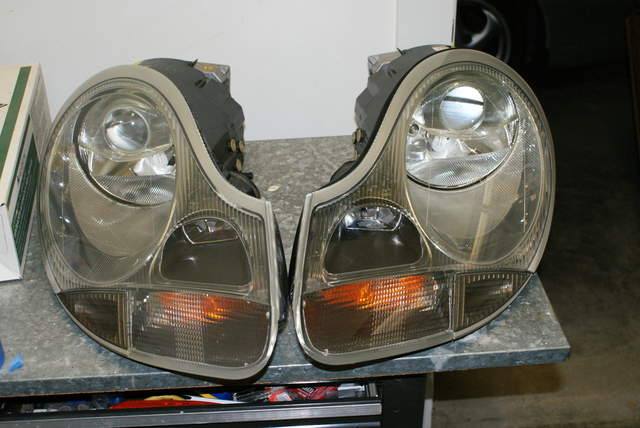
Off the car without flash

On the car with flash

On the car without flash

The flash photos make the amber appear more prominent than it is. In the words of Ed China on Wheeler Dealers - I'm chuffed at the results.
Here are some conclusions that I reached regarding restoring the headlight covers:
1. The instructional videos that the kit makers put on Youtube imply that a few minutes of sanding is all that is needed. In my experience, quite a bit of sanding was necessary. I eventually decided to use a quarter-sheet finishing sander and started with 320 grit. I progressed through 600, 1000 and 2000. Then I used a 3000 grit finishing disk in the 3M kit and then polished with the 3M compound.
2. The headlight covers are tough. Don't be afraid to open them or sand them.
3. The Sylvania UV coating gives a nice shine to the finished product and is reputed to be very durable.
Thanks to everyone who provided suggestions and encouragement.
Also, how much do you think a pair halogen headlights with amber are worth? They are in good shape except that the passenger side has some internal discoloration.
__________________
2000 Arctic Silver/Black, Hard Top, On Board Computer
PNP Rear Speakers, HAES 6-Channel Amp, Avic Z140BH,
Painted Bumperettes, 2004 (OEM) Top, Homelink integrated in dash with Targa switch, 997 Shifter, Carrera Gauge Cluster with silver gauge faces, heated 997 adaptive sports seats, Litronics, silver console
|
|
|
|
|
12-10-2014, 06:50 AM
|
#23
|
|
Registered User
Join Date: Aug 2014
Location: Oklahoma
Posts: 156
|
I haven't read the entire thread so sorry if someone has already said this, but take them to a paint shop and have them wet sanded and clear coated. This is the only permanent solution. with a simple rub on polish they will return to the way they were before in as little as a week or two.
|

|
|
|
12-10-2014, 09:19 AM
|
#24
|
|
Registered User
Join Date: Sep 2013
Location: Montreal, QC. (currently expat to Shanghai)
Posts: 3,249
|
Amazing results Kevin, pays off pretty good... brand spanking NEW lights!
Nice
ps. you could have save you the 320grit. Those will go as deep as 0.1mm... that is a hell of a job if you have to pick up with a #600. That is possibly why it took you a tad longer than advertised. But that doesn't matter today does it - they're beautiful regardless 
I did my 'mild-scratched' headlights once and started at #600 and up to wet 2000 then buffing wheel/compound (2.5~3hrs per headlight total). I got the surface really hot while buffing. Came out better than new lol
well done again mate
__________________
______________________________
'97 Boxster base model 2.5L, Guards Red/Tan leather, with a new but old Alpine am/fm radio.
|
|
|
|
|
12-10-2014, 05:09 PM
|
#25
|
|
Registered User
Join Date: Feb 2006
Location: Virginia
Posts: 1,754
|
Quote:
Originally Posted by OklahomaBoxster

I haven't read the entire thread so sorry if someone has already said this, but take them to a paint shop and have them wet sanded and clear coated. This is the only permanent solution. with a simple rub on polish they will return to the way they were before in as little as a week or two.
|
I considered having them clear coated and there is actually a Youtube video showing this done. However, I couldn't find much information on durability or whether it caused a long-term problem with the headlight material. So I decided to go with the Sylvania UV protectant. Consumer Reports tested it and found it durable. Time will tell. If if doesn't work out, I'll try clear coat the next time.
Nine8Six - thanks for all your feedback and encouragement. It made me believe this was possible. Do you think I should sand off the amber on my current headlights before I put them up for sale? I've seen a few threads on this and it looks like a fairly straightforward process.
It is getting dark around 5:00 pm here in the northern hemisphere. The litronics look better on the car and provide much more light. A real win-win situation.
__________________
2000 Arctic Silver/Black, Hard Top, On Board Computer
PNP Rear Speakers, HAES 6-Channel Amp, Avic Z140BH,
Painted Bumperettes, 2004 (OEM) Top, Homelink integrated in dash with Targa switch, 997 Shifter, Carrera Gauge Cluster with silver gauge faces, heated 997 adaptive sports seats, Litronics, silver console
|
|
|
|
|
12-11-2014, 07:03 AM
|
#26
|
|
Registered User
Join Date: Oct 2014
Location: Long Island, NY
Posts: 154
|
 Kevin,
I hate to be the one who has to say it, but i think they came out like crap. Please send them to me for proper disposal. I will even pay for shipping.
__________________
Defectfully
Patrick
|
|
|
|
|
12-11-2014, 07:15 AM
|
#27
|
|
Registered User
Join Date: Dec 2012
Location: FL
Posts: 4,145
|
Quote:
Originally Posted by KevinH1990
Do you think I should sand off the amber on my current headlights before I put them up for sale? I've seen a few threads on this and it looks like a fairly straightforward process.
|
I think that with the current amber you could probably get $200 on eBay pretty easily but if you could get that amber off they might be worth more to someone here that wanted to do the retrofit. A new set of Halos with clear is around $700 on eBay so you could probably sell a used pair with no amber for $350 maybe?
|
|
|
|
|
12-11-2014, 05:25 PM
|
#28
|
|
Registered User
Join Date: Feb 2006
Location: Virginia
Posts: 1,754
|
Quote:
Originally Posted by Hogosha
Kevin,
I hate to be the one who has to say it, but i think they came out like crap. Please send them to me for proper disposal. I will even pay for shipping. |
Sure using television marketing techniques my ad would read
Free Litronics
Shipping and Handling - $1000 - No local pick up available
These were made in Germany and you know the Germans make good stuff.
__________________
2000 Arctic Silver/Black, Hard Top, On Board Computer
PNP Rear Speakers, HAES 6-Channel Amp, Avic Z140BH,
Painted Bumperettes, 2004 (OEM) Top, Homelink integrated in dash with Targa switch, 997 Shifter, Carrera Gauge Cluster with silver gauge faces, heated 997 adaptive sports seats, Litronics, silver console
|
|
|
|
|
01-05-2015, 12:39 PM
|
#29
|
|
Registered User
Join Date: Dec 2014
Posts: 51
|
Wow, thanks for all the info guys. I'm going to have to catch up on all this.
|
|
|
|
|
06-16-2018, 02:52 PM
|
#30
|
|
Registered User
Join Date: Mar 2007
Location: Ohio
Posts: 2,031
|
So Kevin...3 1/2 years later, I have to ask.
How long did the lenses continue to look as good as they did when you first finished working on them? Regarding sanding, polishing, etc, would you recommend doing anything differently at this point?
|
|
|
|
|
06-17-2018, 05:40 AM
|
#31
|
|
Registered User
Join Date: Feb 2006
Location: Virginia
Posts: 1,754
|
The driver's side has held up well with a small amount of yellowing in the UV coating. As you can see in the attached photo, the passenger side has yellowed significantly. I think I would use the process I followed previously with the exception of the final step. The UV coating seems to have been the weak link. I plan to remove the UV coating from both lights and replace it with something stronger. In this thread: Headlight Restore Jakeru recommends the product I plan to use. I need to purchase a respirator since it appears to be hazardous if you inhale it.
__________________
2000 Arctic Silver/Black, Hard Top, On Board Computer
PNP Rear Speakers, HAES 6-Channel Amp, Avic Z140BH,
Painted Bumperettes, 2004 (OEM) Top, Homelink integrated in dash with Targa switch, 997 Shifter, Carrera Gauge Cluster with silver gauge faces, heated 997 adaptive sports seats, Litronics, silver console
Last edited by KevinH1990; 06-17-2018 at 05:43 AM.
|
|
|
|
|
06-17-2018, 09:27 AM
|
#32
|
|
Custom User Title Here
Join Date: Mar 2012
Location: Ft. Leonard Wood
Posts: 6,169
|
You need to use real UV resistant automotive clear coat, not some off the shelf product.
|
|
|
|
|
06-17-2018, 11:19 AM
|
#33
|
|
Registered User
Join Date: Mar 2007
Location: Ohio
Posts: 2,031
|
Quote:
Originally Posted by particlewave
You need to use real UV resistant automotive clear coat, not some off the shelf product. |
So you don't think anything out of a spray can is a good option? Not even the (somewhat highly touted) Spray Max products? ( https://www.spraymax.com/en-us/products/product/clear-coats-and-spot-blender/headlight-restoration-kit-1/)
Supposedly the clear coat in the Sylvania kit is guaranteed "for life." Sounds like that assurance is not worth the paper it's printed on, eh? :troll:
|
|
|
|
|
06-17-2018, 08:52 PM
|
#34
|
|
Registered User
Join Date: Feb 2017
Location: North Eastern US
Posts: 646
|
Quote:
Originally Posted by particlewave
You need to use real UV resistant automotive clear coat, not some off the shelf product. |
Ive had great success with SprayMax Headlight Primer and 2 stage catalyst finish coat for headlights:
What's the generally accepted best headlight clear coat?
Its highly toxic, so be sure you have the correct respirator and you are working in a properly ventilated space.
__________________
Rgds, Fred
#317 550 Spyder Anniversary Edition 2004 Boxster S, 3.8L Flat Six Innovations engine, PSS9s, etc, etc . . .
The contents of my posts are for entertainment only. As confirmed by my many motor sports fails, I am not qualified to give product endorsements or mechanical advice 
|
|
|
|
|
06-17-2018, 08:55 PM
|
#35
|
|
Custom User Title Here
Join Date: Mar 2012
Location: Ft. Leonard Wood
Posts: 6,169
|
You may have heard good things about this, or had good luck with that, but nothing will be as good as real automotive clear coat sprayed on by a pro. Period.
|
|
|
|
|
06-17-2018, 09:15 PM
|
#36
|
|
Registered User
Join Date: Feb 2017
Location: North Eastern US
Posts: 646
|
Quote:
Originally Posted by particlewave
You may have heard good things about this, or had good luck with that, but nothing will be as good as real automotive clear coat sprayed on by a pro. Period. |
Maybe so, but the SprayMax 1k primer/2k catalyst clearcoat solution is light years beyond what you can typically buy off the shelf in a store. Im a year in with my refinished 986 headlights and they still look like new.
__________________
Rgds, Fred
#317 550 Spyder Anniversary Edition 2004 Boxster S, 3.8L Flat Six Innovations engine, PSS9s, etc, etc . . .
The contents of my posts are for entertainment only. As confirmed by my many motor sports fails, I am not qualified to give product endorsements or mechanical advice
|
|
|
|
|
06-18-2018, 01:45 AM
|
#37
|
|
Registered User
Join Date: Jul 2013
Location: Bastrop, Tx
Posts: 2,644
|
Quote:
Originally Posted by particlewave
You may have heard good things about this, or had good luck with that, but nothing will be as good as real automotive clear coat sprayed on by a pro. Period. |
X2. I sprayed my headlights with a clear automotive paint when I was painting some other parts and they still look like brand new two years later. The front of my car gets a daily dose of Texas sun every day too. The spray can stuff doesn't have a hardner in it and they''ll go dull after some time. Not as quick as polishing, but eventually.
__________________
Woody
|
|
|
|
|
06-18-2018, 05:20 AM
|
#38
|
|
Registered User
Join Date: Mar 2007
Location: Ohio
Posts: 2,031
|
Quote:
Originally Posted by particlewave
You may have heard good things about this, or had good luck with that, but nothing will be as good as real automotive clear coat sprayed on by a pro. Period. |
Yeah, we can probably agree on that. Some of us are just looking for the best of the almost-as-good-as-professional approach. I read in some post somewhere (I can't seem to find it anymore) the idea about prepping the headlight, then taking it into a body shop and having them do a quick spray at the end of spraying another vehicle. That actually seemed like a pretty good idea, and one that probably wouldn't be that costly.
My question, though, is the prepping. The whole reason I'm messing with this at all is that I replaced the passenger side headlamp last September following a fender-bender (a monumentally stupid moment on my part--I THOUGHT the guy in front of me at a busy intersection had committed to go...he hadn't) in which the light was damaged. Now the passenger-side lamp is brand new (no scratches, no yellowing) and the driver side one (which had looked pretty decent to me previously) now looks horrible. Relatively speaking. I don't think there's any way I'm going to get the one looking anything like the other at this point. Even if you sand the hell out of them, do you ever really get all that yellowing out? (The older one has virtually no scratches or cloudiness--it's just yellowed with time.) I think this is all the more true in that I think some of the yellowing is of components on the inside and, despite all your helpful instructions and video, Charles, I'm not sure I want to tackle opening this thing up for purely cosmetic reasons.
Woody, I had pressed the body shop guy to let me obtain a gently-used headlamp from you (remember us talking? I was afraid that with the cost of these lights they were gonna end up totalling the car?) He was not flexible on the issue. I hadn't really thought about this angle: not only could I get a second-hand light cheaper from you, but the car actually would have cosmetically tooked better with two headlamps that had seen a few years in the sun instead of having an old one side-by-side with a new.
Quote:
Originally Posted by itsnotanova
X2. The spray can stuff doesn't have a hardner in it and they''ll go dull after some time.
|
I'm not sure that's true. Correct me if I'm wrong, OCG, but isn't that what that circular red thing is for, the one on the top of the 2k clearcoat? You pull it off, affix it onto the little rod at the bottom of the can, and whack it, to open up a smaller canister inside, releasing a hardener?
Anyway, my question remains as before. My "bad" light is about as yellowed as your passenger-side one, Kevin. Even with aggressive sanding, I don't think it's realistic to think it'll ever look even close to the driver-side one. Maybe I should pick up a used one and sell the hardly-used new one for good money
|
|
|
|
|
06-18-2018, 02:32 PM
|
#39
|
|
Registered User
Join Date: Feb 2017
Location: North Eastern US
Posts: 646
|
Quote:
Originally Posted by itsnotanova
X2. I sprayed my headlights with a clear automotive paint when I was painting some other parts and they still look like brand new two years later. The front of my car gets a daily dose of Texas sun every day too. The spray can stuff doesn't have a hardner in it and they''ll go dull after some time. Not as quick as polishing, but eventually.
|
Ok, one more time - the SprayMax Headlight System clear coat is a two stage catalyst paint (2k), it does have a separate hardener that is released into the paint at application time by puncturing the hardener container that is within the clear coat can. It has a pot life of a hour or so.. Additionally, the SprayMax system requires use of two different products, a 1k primer paint and the 2k catalyst paint. They are bundled together by shrink wrap and cannot be purchased separately.
The SprayMax system cannot be purchased just anywhere. I found mine at an auto paint shop through one of the online stores like EBay or Walmart Online.
I don’t care one way or the other if anyone uses this system, I just want people who come here looking for information to have all the info possible. There are details of using this product in the link I posted earlier in this thread.
__________________
Rgds, Fred
#317 550 Spyder Anniversary Edition 2004 Boxster S, 3.8L Flat Six Innovations engine, PSS9s, etc, etc . . .
The contents of my posts are for entertainment only. As confirmed by my many motor sports fails, I am not qualified to give product endorsements or mechanical advice
Last edited by Oldcarguy; 06-18-2018 at 02:53 PM.
|
|
|
|
|
06-18-2018, 03:12 PM
|
#40
|
|
Custom User Title Here
Join Date: Mar 2012
Location: Ft. Leonard Wood
Posts: 6,169
|
Quote:
Originally Posted by Oldcarguy
Ok, one more time - the SprayMax Headlight System clear coat is a two stage catalyst paint (2k), it does have a separate hardener that is released into the paint at application time by puncturing the hardener container that is within the clear coat can. It has a pot life of a hour or so.. Additionally, the SprayMax system requires use of two different products, a 1k primer paint and the 2k catalyst paint. They are bundled together by shrink wrap and cannot be purchased separately.
The SprayMax system cannot be purchased just anywhere. I found mine at an auto paint shop through one of the online stores like EBay or Walmart Online.
I don’t care one way or the other if anyone uses this system, I just want people who come here looking for information to have all the info possible. There are details of using this product in the link I posted earlier in this thread.
|
Write back in 5 years and let us know if it holds up.
You still have to worry about finish quality (runs, orange peel and dust/hair contaminants).
Better to just pay a pro $50 to spray them when they're doing a car or something.
Spraymax runs $30-$40 by itself and you still have to worry about contaminants and finish quality.
Automotive clear coat is proven and will look like glass for years.
Having worked with hundreds of headlights over the years, I have to say that a pro is the best route if you can get it done for less than $100.
It's just not worth the headache.
Last edited by particlewave; 06-18-2018 at 03:20 PM.
|
|
|
|
 Posting Rules
|
You may not post new threads
You may not post replies
You may not post attachments
You may not edit your posts
HTML code is On
|
|
|
All times are GMT -8. The time now is 06:29 PM.
| |


 Linear Mode


