Go Back   986 Forum - The Community for Porsche Boxster & Cayman Owners > Porsche Boxster & Cayman Forums > Boxster General Discussions

Post Reply
 
LinkBack Thread Tools Display Modes
Old 02-17-2017, 09:09 AM   #1
Registered User
 
kk2002s's Avatar
 
Join Date: Sep 2012
Location: S. New Jersey
Posts: 1,239
Garage
Headlight Restore

So this is my experience with restoring my headlights, Sylvania Restore Kit. Not a how to as I followed the instructions and video.
The Sylvania kit is highly rated but wasn't available in any local auto parts store so I had to Amazon it.
Will there ever be a time I don't have to buy something for this car that isn't only online????????
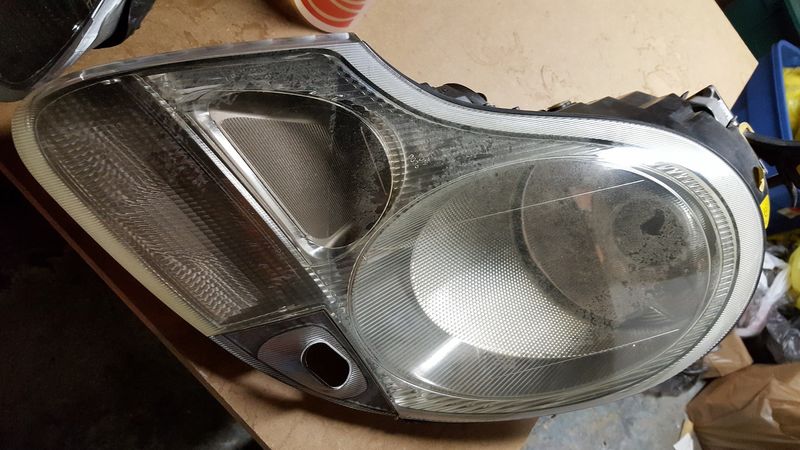
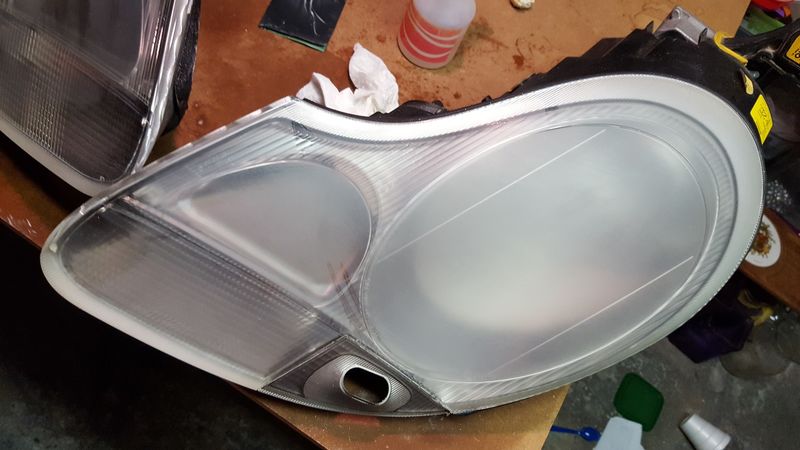
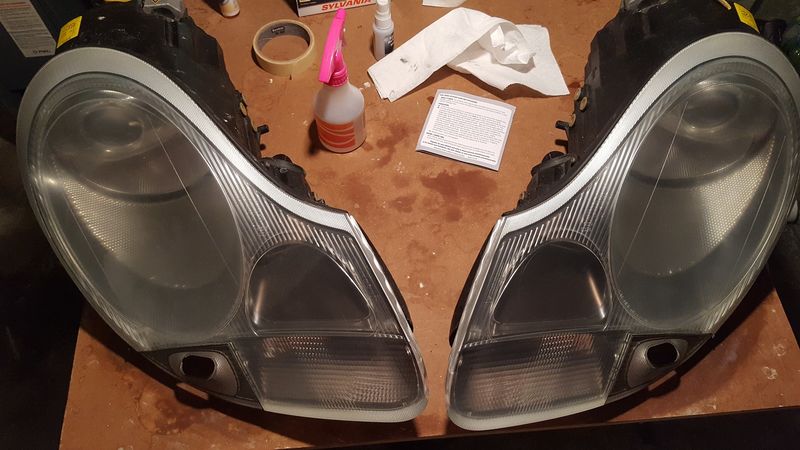
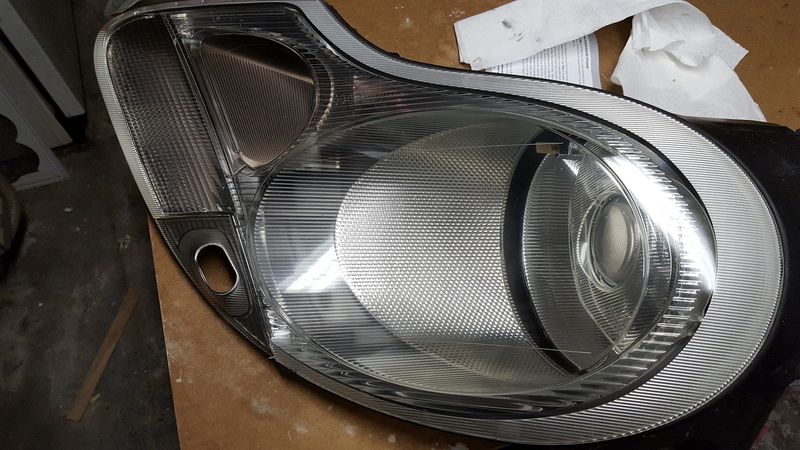
So pics are before, aft. first 400 grit sand, aft. compound paste and Finished light
There are 3 sanding phases, 400, 1000 and 2000. Pretty scary completely destroying expensive headlights. My shoulder is still aching
Pic is of worst but it came out the best. The other light I could not sand to the complete haze. I'm guessing the coating was in much better shape so I couldn't get it completely off.
The last phase is applying the UV protective coating that clarifies all the haze. I'm happy with the results


__________________
2002 S - old school third pedal
Seal Grey
kk2002s is offline   Reply With Quote
Old 02-17-2017, 09:39 AM   #2
Registered User
 
Nine8Six's Avatar
 
Join Date: Sep 2013
Location: Montreal, QC. (currently expat to Shanghai)
Posts: 3,249
Amazing result.

Those headlights have a lot of surface area, considering there are two of them. So yes, nasty elbow/shoulder job but the results are extremely rewarding, clearly. They look as-NEW!

Nearly impossible to ruin those porsche lense... made of excellent quality (dense) lexan. Just got to be extra careful not to drop one on a solid floor, the corner easily chips, I've heard lolll. Handle with care!

Thanks for the quick write-up and pics, inspiring
__________________
______________________________
'97 Boxster base model 2.5L, Guards Red/Tan leather, with a new but old Alpine am/fm radio.
Nine8Six is offline   Reply With Quote
Old 02-17-2017, 09:54 AM   #3
1997 Tip, 2018 Macan
 
rexcramer's Avatar
 
Join Date: Aug 2015
Location: Upland, CA
Posts: 1,338
Garage
Excellent job sir.
rexcramer is offline   Reply With Quote
Old 02-17-2017, 10:42 AM   #4
Multi-Boxer Driver
 
Deserion's Avatar
 
Join Date: Nov 2010
Location: Orange Park, FL
Posts: 1,408
Garage
I used the Meguiar's Heavy Duty kit on mom's '06, supplemented of course.

In this order: 200, 400, 800, 1000, 1500, 2000, 2500, 3000 - then polish, and UV coat. Used 3M paper. I could've done better on a few spots, but they look great. Now to find a good long-lasting UV coating...
__________________
-Chris
2004 Porsche Boxster 2.7
1991 Porsche 911 C2 Targa 3.6
2017 Subaru Outback 3.6R
Deserion is offline   Reply With Quote
Old 02-18-2017, 12:02 AM   #5
Registered User
 
Join Date: May 2015
Location: Greater Seattle, WA
Posts: 534
Anyone used a rattlecan 2-part clearcoat for UV coat?

I've used spraymax 2-part clear, and it was a joy. Spraymax makes products and a kit (primer and 2-part UV clear) marketed just for headlights:
Spraymax: Headlight Restoration Kit

Not sure how the headlight-specific clearcoat product differs from the general purpose "glamour" clearcoat.
__________________
2001 Boxster
jakeru is offline   Reply With Quote
Old 02-18-2017, 04:01 AM   #6
Registered User
 
KevinH1990's Avatar
 
Join Date: Feb 2006
Location: Virginia
Posts: 1,659
I also used the Sylvania kit along with some sandpaper and the 3M kit. http://986forum.com/forums/general-discussions/54697-advice-used-litronics.html

I have noticed some yellowing on one of the headlights so I'd be interested in seeing if the clear coat in jakeru's post would work better than the product in the Sylvania kit.
__________________
2000 Arctic Silver/Black, Hard Top, On Board Computer
PNP Rear Speakers, HAES 6-Channel Amp, Avic Z140BH,
Painted Bumperettes, 2004 (OEM) Top, Homelink integrated in dash with Targa switch, 997 Shifter, Carrera Gauge Cluster with silver gauge faces, heated 12-way driver & 8-way passenger seats, Litronics, silver console
KevinH1990 is offline   Reply With Quote
Old 02-18-2017, 07:04 AM   #7
Registered User
 
WillH's Avatar
 
Join Date: Feb 2015
Location: QC
Posts: 412
Quote:
Originally Posted by jakeru View Post
Anyone used a rattlecan 2-part clearcoat for UV coat?

I've used spraymax 2-part clear, and it was a joy. Spraymax makes products and a kit (primer and 2-part UV clear) marketed just for headlights:
Spraymax: Headlight Restoration Kit

Not sure how the headlight-specific clearcoat product differs from the general purpose "glamour" clearcoat.
Did you use the kit in the link or just the regular 2k clear? I have a can of the regular 2k sitting on the shelf but worried about the solvents reacting...
WillH is offline   Reply With Quote
Old 02-18-2017, 08:15 AM   #8
Registered User
 
Join Date: Dec 2014
Location: Pasadena
Posts: 261
Looks excellent going the sanding/polishing route but my personal experience with VW headlights was that after this procedure they tend to start hazing quicker all over again within 3-6 mo. I think it's cause the UV protectant has been sanded off. My next attempt at thus would be sanding/2k clear coat method with a bit of water sanding and then polishing. Many Youtube vids on this
Lapister is offline   Reply With Quote
Old 02-18-2017, 08:24 AM   #9
Registered User
 
steved0x's Avatar
 
Join Date: Dec 2012
Location: FL
Posts: 4,143
Ihave heard that the mines urethane clear gloss spar varnish has UV protector and is very good for this, lots of folks on rennlist use it for headlights and also wheels.
steved0x is offline   Reply With Quote
Old 02-18-2017, 09:22 AM   #10
Registered User
 
Join Date: May 2015
Location: Greater Seattle, WA
Posts: 534
Quote:
Originally Posted by WillH View Post
Did you use the kit in the link or just the regular 2k clear? I have a can of the regular 2k sitting on the shelf but worried about the solvents reacting...
Here's the one I've used:

(Just pulled it out my my freezer, which extends the pot life after activating)

I haven't tried it on headlights. Used it to restore shift knob trim piece (polishing this matte-finished one afterwards because I needed gloss) and it's some AMAZINGLY good stuff. It sprays on really nicely (nicest spraying rattlecan I've ever used), can build super-thick film, and really durable (can't dig in with fingernail!), and it's amazingly solvent resistant (acetone-laden brake parts cleaner won't touch the stuff!). In fact, it's so durable and so solvent resistant, it could be a big problem to remove the stuff if it got where you don't want it.

I wonder if the headlight-specific product might somehow adhere better (manufacturer says it's designed to work with their proprietary primer, which is included in the headlights UV protecting kit), and also wonder if it might have more UV blocking pigment than the standard clearcoat?

I'm sure a 2-part urethane like these much better than a 1-part product like the spar varnish. 2-part urethane is an entirely different animal than 1-part.

I've also had the experience of mechanically polishing off the uv coating on the headlights of one of my car's, and although it looked really good initially, I was also disappointed to find that didn't last at all. It now looks worse than before I started! I think due to the UV degradation. I did apply some automotive finish sealer immediately after I polished, but it apparently wasn't long-lasting or effective enough at blocking UV to give good result.
__________________
2001 Boxster

Last edited by jakeru; 02-18-2017 at 09:26 AM.
jakeru is offline   Reply With Quote
Old 02-18-2017, 11:40 AM   #11
Registered User
 
geraintthomas's Avatar
 
Join Date: Nov 2015
Location: South Wales, UK
Posts: 852
Wow!

Mine aren't in bad condition, but they're certainly no where near yours. I'm definitely doing this to mine!

So it's 400, 1000, then 2000, and polish afterwards? I've got a DA with Meguiars PlastX and lots of different polishing compounds, so that won't be the problem. Must have been scary as hell sanding it with 400!
__________________
Porsche Boxster S Type 986

Bi-xenon Headlight Upgrade | 987 S 18" Anthracite Alloys | Android Head Unit | 5000k 55w HID's | 5000k Cree DRL's | 5000k Cree number plate lights | Cree LED Indicators | One-touch roof operation | Bypass exhaust pipes | Parking sensors | Ambient footwell lighting
geraintthomas is offline   Reply With Quote
Old 02-18-2017, 11:43 AM   #12
Registered User
 
WillH's Avatar
 
Join Date: Feb 2015
Location: QC
Posts: 412
Thank you jakeru.
Good to hear, my can is the full gloss. I'll be giving it a try in a few weeks.
Did you use a respirator or just do it outside?
WillH is offline   Reply With Quote
Old 02-18-2017, 08:17 PM   #13
Registered User
 
Join Date: May 2015
Location: Greater Seattle, WA
Posts: 534
I both used a respirator, and sprayed it outside. This one was inexpensive, easy to find locally for me, and worked well.
__________________
2001 Boxster
jakeru is offline   Reply With Quote
Old 02-19-2017, 05:57 AM   #14
Registered User
 
WillH's Avatar
 
Join Date: Feb 2015
Location: QC
Posts: 412
Nice find. I think I'll go the same route but will have to wait until until the outside temps cooperate.
WillH is offline   Reply With Quote
Old 02-19-2017, 01:39 PM   #15
Registered User
 
kk2002s's Avatar
 
Join Date: Sep 2012
Location: S. New Jersey
Posts: 1,239
Garage
Quote:
Originally Posted by geraintthomas View Post
Wow!

Mine aren't in bad condition, but they're certainly no where near yours. I'm definitely doing this to mine!

So it's 400, 1000, then 2000, and polish afterwards? I've got a DA with Meguiars PlastX and lots of different polishing compounds, so that won't be the problem. Must have been scary as hell sanding it with 400!
The process also uses an activator that helps break down and softens the original UV coating.
Since my car spends it's off time in the garage with a cover, I may see a better long term result with the UV coating that came with it. This UV coating is potent stuff. I got a bit on my fingers and it started to harden and was tough to get off. The $18 kit online is pretty comprehensive and has really everything you need. I suspect that's why auto parts stores don't stock it.
__________________
2002 S - old school third pedal
Seal Grey
kk2002s is offline   Reply With Quote
Old 07-14-2017, 11:04 AM   #16
Registered User
 
petronas44's Avatar
 
Join Date: May 2017
Location: New mexico
Posts: 3
From hazy to like new in 10 minutes, great product

petronas44 is offline   Reply With Quote
Post Reply


Posting Rules
You may not post new threads
You may not post replies
You may not post attachments
You may not edit your posts

BB code is On
Smilies are On
[IMG] code is On
HTML code is On
Trackbacks are On
Pingbacks are On
Refbacks are On


All times are GMT -8. The time now is 09:01 PM.


Powered by vBulletin® Version 3.8.7
Copyright ©2000 - 2024, vBulletin Solutions, Inc.
Content Relevant URLs by vBSEO 3.6.0
Copyright 2024 Pelican Parts, LLC - Posts may be archived for display on the Pelican Parts Website -    DMCA Registered Agent Contact Page