Location: Montreal, QC. (currently expat to Shanghai)
Posts: 3,249
Quote:
Originally Posted by jakeru
Now that's very counter-intuitive to me that on a perfectly symmetric looking object, that the lightening relief would be positioned off the line of symmetry. Any explanation as to why, Fred?
Also, I find it interesting that you've modeled a balancing apparatus. Wouldn't it be just as easy to assume the piece is sitting there in space and rotating by some strictly defined (assumed unmoveable) axis? I suppose with your method, you could model flexibility and oscillations of the testing jig, but I'm not sure why that would be useful, unless you were doing real-world testing on the same exact jig and wanted to somehow model very similar predicted results. At some point, the model needs to assume things are fixed. Would this simulation assume the base feet of the testing jig are fixed?
I remember getting some unversity mechanical engineering grad student to help do some FEA simulation work on designing a lightened version of wheel centers for an autocross race car I was running. This was at least 10 years ago, so the tools were a bit more rudimentary to what you seem to have access to. I don't remember using using any solvers, but rather, just manually iterated the design a few times until we were happy. The machined weight of those wheel center came out just as predicted! Very cool and memorable experience for me. So thanks for sharing your fascinating techniques.
Thanks Jake
RE modern solvers; the owner and its backend software engineers claims that this is what puts on the Mars Rover (Curiosity) where it is today and also what makes most of today’s jet planes takeoff and land safely. I’d love to challenge these statements but dare lolll
The jig’s base is indeed ‘fixed’ with 9806.65mm/sec2 gravity acting on it – not floating bud. The shaft/bushings also needs mu-static, dynamic and stiction velocity/deformation (aka friction) properly defined and enabled otherwise nothing works…. the shaft will bounce passed the 500rpm. Real-life no, I agree, but certainly real-world multiphysics (well, this world anyway).
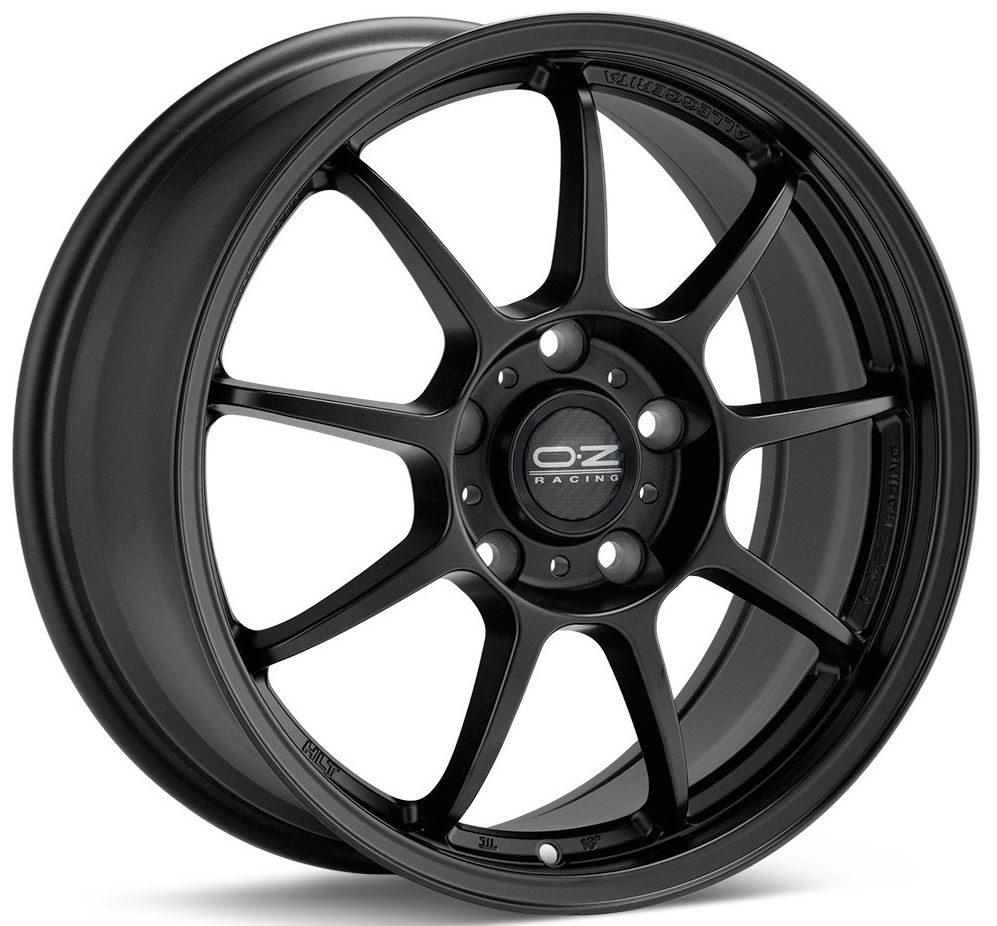
RE Center caps, they are ‘visually’ symmetric yes but as you saw in the vid, the center (p badge) is not 100% aligned with the center of mass (taking gravity into account here). That is due to the non-symetric feature/pocket for the badge. Anyhow, it is very unlikely that a perfectly symmetric center cap (center of rot) are going to throw your wheel out of wack however best practices force me to ensure that the design is meeting ‘base line’ quality. I am sure that potential buyer will appreciate this.
OT; a year ago I’ve designed a special tool holder that had to mount into a 40,000RPM spindle. The tool was designed and meant at machining a part within 2micron tolerance using a carbide endmill of 0.2mm diameter – read very (very) small. It was for a medical device/part, something that brother in law here specialize into. Multiphysics balancing in this case greatly help i.e. less material had to be removed once the tool was dynamically balanced (real-life) afterward. We’ve seen ‘dust’ amount of material removal to get it balanced in the 4DOF. That said it does serve a purpose, in some more extreme cases, but perhaps not so much for center caps that only spin <3k rpm lollll
All good fun bud!
__________________
______________________________
'97 Boxster base model 2.5L, Guards Red/Tan leather, with a new but old Alpine am/fm radio.
Location: Montreal, QC. (currently expat to Shanghai)
Posts: 3,249
Material sourcing and CAM
Soon off to the manufacturing finally. I've already ordered the material so I should be getting this hopefully latest tomorrow afternoon. Once I have the size of the stock material I'll trow all of this in the CAM processing.
That should be a bit more interesting, and much less geaky I promisse. Personally, that is my favorite part... shaping hard metal, making chips fly everywhere, noises, bad burning smells, etc lollll
__________________
______________________________
'97 Boxster base model 2.5L, Guards Red/Tan leather, with a new but old Alpine am/fm radio.
Location: Montreal, QC. (currently expat to Shanghai)
Posts: 3,249
Pre-prototype on the way
Right... so this is what we're going to do.
I've just received the material that I've ordered y'day an hour ago (yey!). So we got a few pucks of Acetal, plenty of AL6061 (I think loll) and also found the few badges I had left in stock.
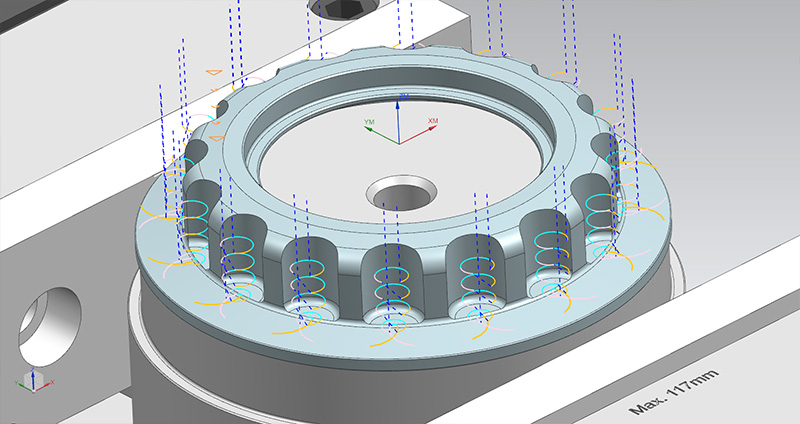
I'll run this quick and dirty in the R&D machines first, get a sample part anodized and assembled in-hands, and if all goes well (i.e. looks good, feel good, and fit/clamp well) I'll do the cam online with you guys for the shop floor's production machines (you'll see my little shopl). No point launching full-scale into making custom fixtures, softjaws, and all the other 'expansive' stuff required to get a small production run going. Besides the CAM work for those prod machines needs proven simulation before even starting-up and cutting anything. You'll get to see this as well but before - let's see this super duper center cap first.
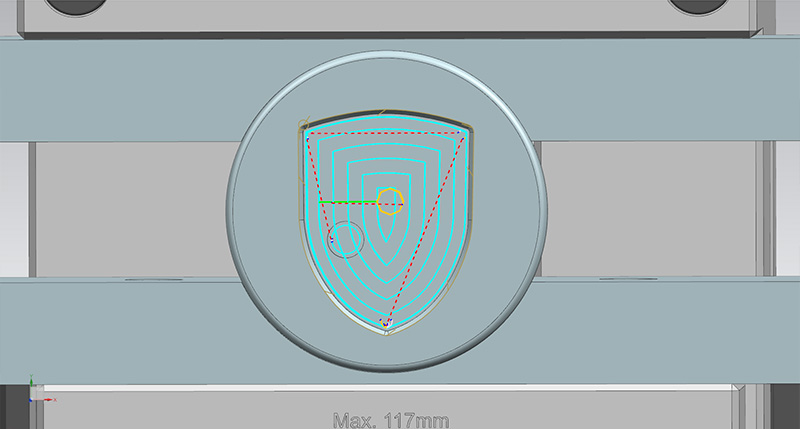
Some grabs below of the 'quick & dirty' CAM work I've done yesterday evening. All I need left to do is adjusting the stock size in each part models and off we go - let's do a quick one (or two, we'll see how it goes). Estimate 1.5 ~ 2 days work.
Toolpaths and toolpaths only toolpaths. Finally we can cut something.
__________________
______________________________
'97 Boxster base model 2.5L, Guards Red/Tan leather, with a new but old Alpine am/fm radio.
Location: Montreal, QC. (currently expat to Shanghai)
Posts: 3,249
Porsche wheel hub adapter - SUCCESS!
Some pretty good progress to share with you guys!
Besides the amazingly sunny and warm weather of today, I am very (very) happy about the result of this part. This goes to show how important proof of concept and part validation work are. Without CAE it wouldn’t have been half-possible to make this part successfully at first attempt. I would have had to blindly machine 5~10 different parts with different thickness, hoping it doesn’t fail, and worst… hoping for it to be clamping properly. Think about the time it would have taken without CAE lolll e.g. Model mods X10, CAM mods X10 and machining a prototype part X10 (ouch).
CAE add-ons are not cheap but do save a considerable amount of time/pain and most importantly; “add peace of mind”. We are now 100% certain this part will not fail when repeatedly inserted into the wheel hub, it will hold well and tight, and perform in temperatures ranging between -50 up to +50 Celsius.
Ladies and gent, I present you The Great, official and most advanced Center Cap wheel adapter In-The-World
^ (LOLL jeezzz… side effects of smoking CNC machine coolant fumes)
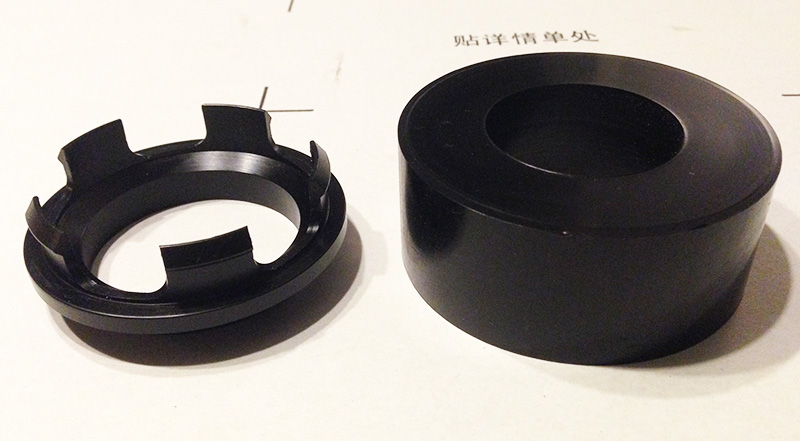
^ Some may find it interesting to see what was once a raw stock of Acetal, converted into a fully functional car part!
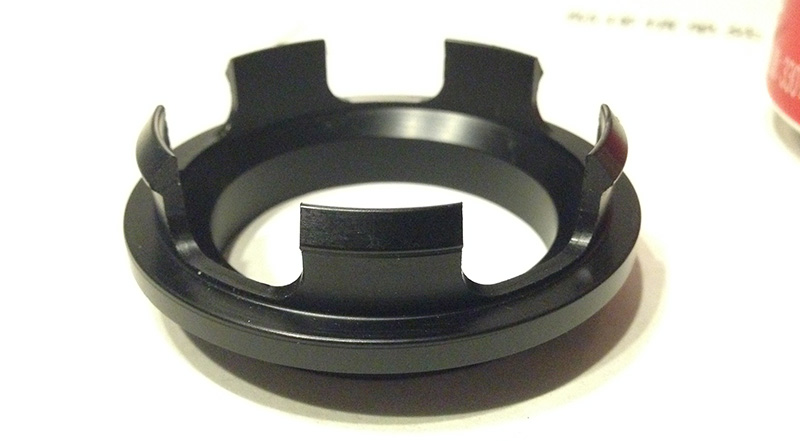
^ Here goes the final product (involves 2 turning operations + 1 multiaxis milling operation). Also showing in this pic is the precision thread required to mate with the main cap (I'll explain later how this 'permanently' thread locks)
^ Same part, upside down, showing the 5 clips.
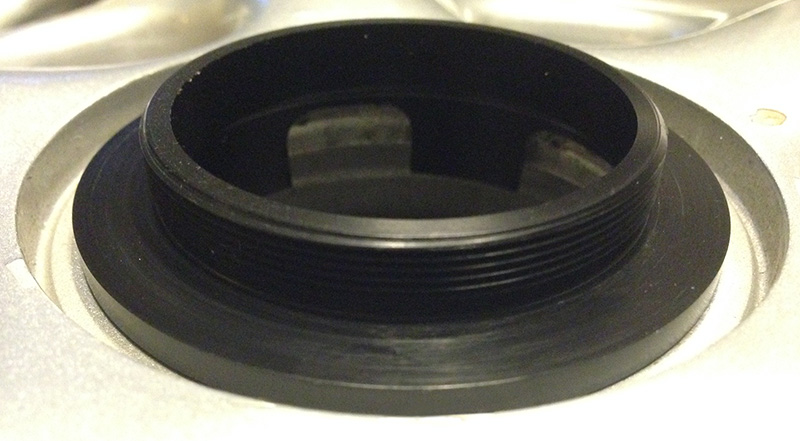
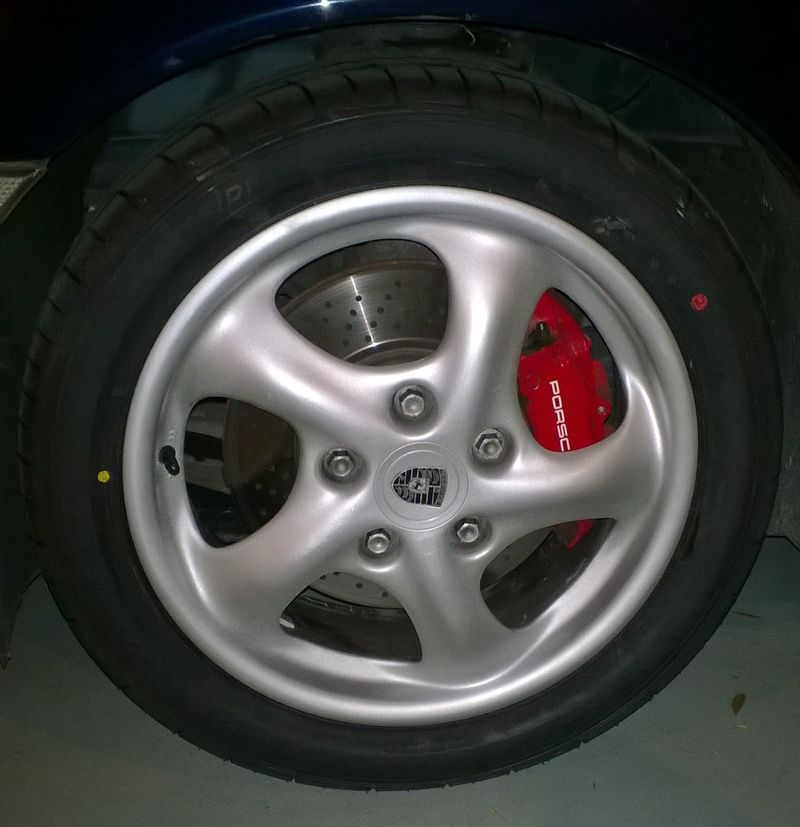
^ View from inside a Porsche wheel (sorry for the messy pic!). The clamping is phenomenally accurate and amazingly strong. It does snap nasty in there and its goes in with a loud and clear “SNAP” noise. Absolutely love Acetal. Nothing better (dare to challenge me here). The bad news: the wheel will need to be removed off the car if you plan on removing your center cap. It just won't come out without a good push from behind the hub. Call it "Anti-Thief System"
^ Quickly snapped in my old Twisties wheel hub. Again, flawless. Sits flat and pressed onto the edge of the hub by-pressure as intended and not moving in any direction. Unlike the CGT style cap, this Acetal adapter concept will ensure that when you install your center cap, you'll be dead sure it is concentric to the hub and not offset. Something that was hard to acheive, but not impossible, with the previous CGT style design.
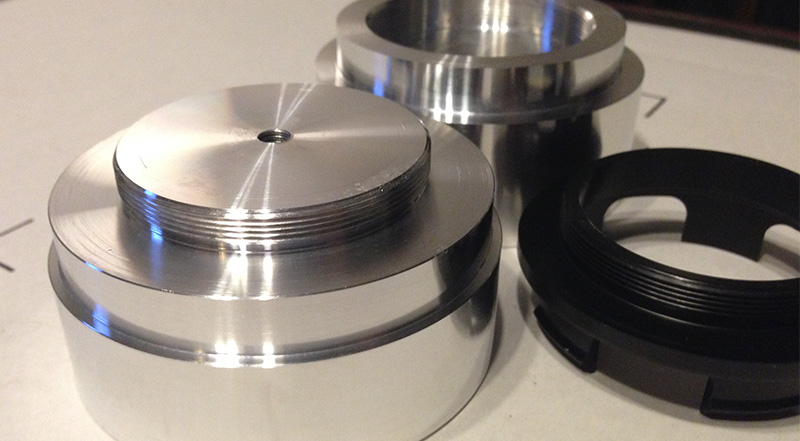
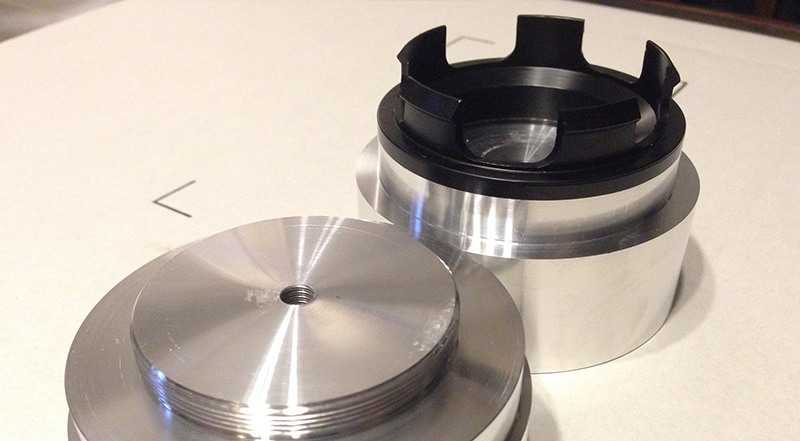
^ Here goes the two fixtures I ended up having to machine to hold the workpiece for the various CAM operations involved. The first fixture (nearest) will in use later this evening to machine the main aluminum cap.
^ Same fixtures. This one showing how I mount the hub adapter so I can machine/turn the OD profile and also this is how it mounts into the 4th axis rotary to mill the clip using the multiaxis toolpaths you’ve seen in the toolpath pic4 (previous post).
Enjoy!
__________________
______________________________
'97 Boxster base model 2.5L, Guards Red/Tan leather, with a new but old Alpine am/fm radio.
Location: Montreal, QC. (currently expat to Shanghai)
Posts: 3,249
Off to machining the Main Center Cap and Center's center (aluminum)
The last fixture I'll have to do later this evening (finally). Shows how I'll clamp the disk shape center between my vice jaws (they are in fact softjaws, made out of aluminum). You can see the CAM toolpath work on those for the milling operations.
If all goes well I'll be able to start anodizing this tomorrow late afternoon (shoulder hurt like crap though :/). We'll see, might have a fully functional prototype to play with this weekend!
__________________
______________________________
'97 Boxster base model 2.5L, Guards Red/Tan leather, with a new but old Alpine am/fm radio.
Location: Montreal, QC. (currently expat to Shanghai)
Posts: 3,249
Quote:
Originally Posted by fridsten
This is absolutely brilliant! I need a price and colour options immediately!
haha thanks bud
RE colors, have a quick look at post#1. Expect the same line... gun metal, blue, red, black(my fav!), etc. Not sure I'll do the orange ever again as this never really turns out good anyway.
RE price, well you guessed: US$16,499 (each). Seriously, and until we've finished machining all of this, we won't know. We'll calculate the time it takes (in CNC minutes), calc the material cost for a kit, and figure out a end price for the kit based on this (add 5% for the machine electricity). Sincerely hope to get them cheaper than what a 'cheap plastic' OEM Porsche cap kits goes for wish me luck man
__________________
______________________________
'97 Boxster base model 2.5L, Guards Red/Tan leather, with a new but old Alpine am/fm radio.
LOVE YOUR SKILLS !!!! Keep up the good work . As soon as you can come up with your color offerings get them on here so people can start thinking about what to order .
I have some aftermarket wheels and I " think " the center cap hole is different than Porsche OEM . Will you be able to alter the diameter of the locking portion and maintain all the other dimensions ?
__________________
2002 Boxster S Arctic Silver with black top with glass window and black leather interior. Jake Raby 3.6 SS ( the beast ) with IMS Solution. 996 GT3 front bumper , GT3 rocker covers and GT3TEK rear diffuser and Joe Toth composites rear ducktail spoiler .
Location: Montreal, QC. (currently expat to Shanghai)
Posts: 3,249
Quote:
Originally Posted by rfuerst911sc
LOVE YOUR SKILLS !!!! Keep up the good work . As soon as you can come up with your color offerings get them on here so people can start thinking about what to order .
I have some aftermarket wheels and I " think " the center cap hole is different than Porsche OEM . Will you be able to alter the diameter of the locking portion and maintain all the other dimensions ?
Thanks Rick! Tell you how I managed to get the standard Porsche wheel center/hub accuracy to 0.01mm tolerance (keep secret loll)
1. Fill/compress the wheel center with clay (or anything that doesn't shrink when drying)
2. Let dry overnight in a dry and warm room
3. Hammer it out from the back/rotor side of the wheel, so to keep the chamfer relief
4. Measure with a precision/metric vernier (caliper?)
If you can do this then I think I can help you out with custom. If not then based on luck bud
__________________
______________________________
'97 Boxster base model 2.5L, Guards Red/Tan leather, with a new but old Alpine am/fm radio.
Location: Montreal, QC. (currently expat to Shanghai)
Posts: 3,249
Happy Chinese New Year!!!
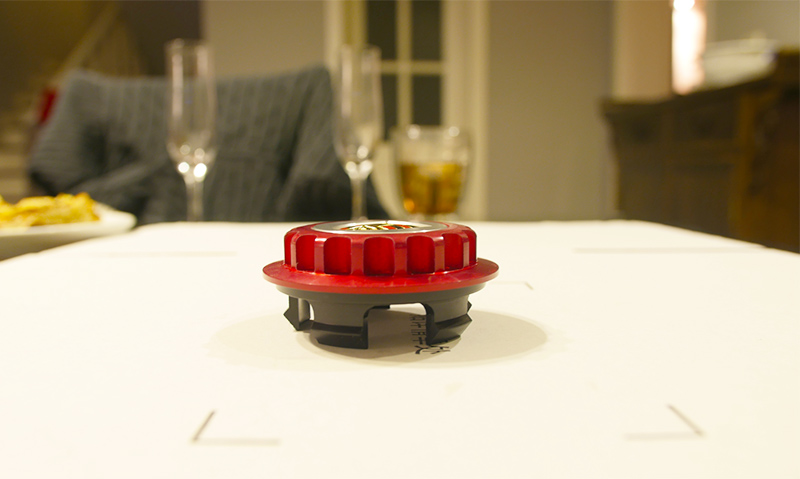
And that is how one is spending his Chinese New Year eve! Making some cool car parts and drinking Champagne (Chinese version of it, of course )
In fear to destroy this masterpiece's reputation, I'll wait for tomorrow's day light to take much better pictures. No idea how to set a DSLR camera for a dark evening dinner table shot and photoshop just can't fix a drama like that. Oh, I've anodized a blue one also. Both look absolutely majestic.... wait and see!
Total happiness. Look & feel is surprisingly everything I was aiming for; low profile, perfect fit, humble but looking very expansive
__________________
______________________________
'97 Boxster base model 2.5L, Guards Red/Tan leather, with a new but old Alpine am/fm radio.
Do you have any other color options for the center cap crest?
I have a black/silver crest and am currently running black/silver wheel crests, and I am thinking the gunmetal center caps with a black/silver crest would be a good match for me. Although the colored Porsche crest is classic and goes with everything...
Here is what I am talking about.
My hood crest:
My current wheel crests (made by stripping an old set of metal colored crests, then painting silver, then a very light covering of black that I then sanded off to reveal the silver underneath.


![Custom Center Caps for Porsche Wheel [from CAD, prototyping to finish]](/forums/iconimages/diy-project-guides/custom-center-caps-porsche-wheel-%5B-cad-prototyping-finish%5D_ltr.gif)


 2001 Porsche Boxster S
 Porsche 996 GT3
 Porsche 996 GT3
 Porsche 996 GT3
 My car
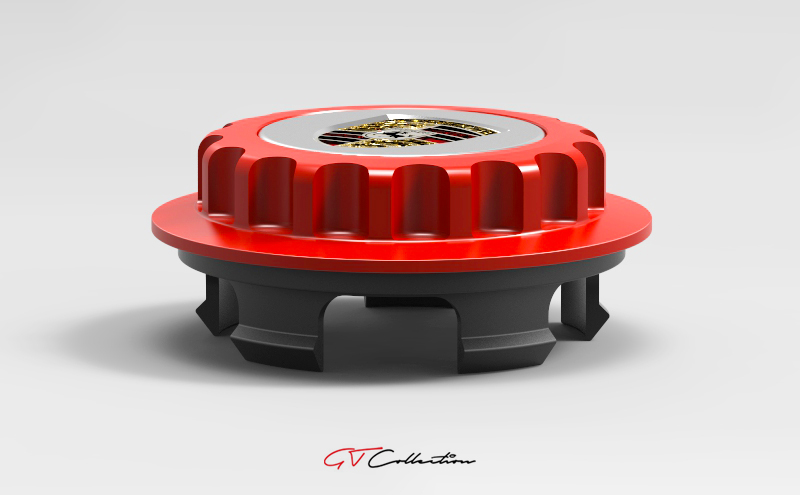


 FunToy
 We'll do this correctly onto the prod machines later (coming week let's hope).


 )
)

 Linear Mode


