Go Back   986 Forum - The Community for Porsche Boxster & Cayman Owners > Porsche Boxster & Cayman Forums > Boxster General Discussions

Post Reply
 
LinkBack Thread Tools Display Modes
Old 06-30-2022, 09:14 AM   #1
Registered User
 
Join Date: Mar 2007
Location: Ohio
Posts: 1,999
Coolant tank replacement questions

With a fair amount of trepidation I was getting ready to tackle the dreaded coolant tank replacement project and had some questions. This is on an ‘01S with 109k miles on the clock.

For starters, do most people just routinely do this at this age and mileage? Or does it sometimes happen that people inspect them and find that they look pretty good and just leave them alone? I’m inclined to just go ahead and replace it, but was curious what people thought.

The terribly difficult to reach hose connections: Are they easier to reach from below, ie from a standing position (I have access to a lift)? Or is that equally difficult as compared with reaching down from the top with the car in service position?

For those who have done this project, what are your thoughts on the Dremel-the-old-tank out approach? http://986forum.com/forums/boxster-general-discussions/56326-how-replace-coolant-tank-under-2-hours.html

It’s funny: in the 101 Projects book I have, for this project under “Tools” they say “None.” I understand my task will be made much easier if I pick up one of those cable-driven hose clamp pliers. My problem is that there’s lots of them available on Amazon, eBay, etc, and I’m trying to decide on just ONE. As is so typically the case, for most of them they have lots of 4 & 5 star ratings, but then always the handful of 1 stars as well. You know, the “Don’t buy! This is junk. Broke the first time I used it” testimonials. I don’t want to spend $180 on a Snap-On version, but I’d like to get something that is highly unlikely to break the first time or two I use it. Anybody have a shout-out recommendation for the one they have? Also, have any of you had good luck with the boxed sets of hose clamp tools? Here’s an example:
https://www.amazon.com/gp/product/B082PVWSV3/ref=as_li_tl?ie=UTF8&tag=vs-autoguide-hose-clamp-pliers-20&camp=1789&creative=9325&linkCode=as2&creativeASIN=B082PVWSV3&linkId=482127a22fe9fc05926fa19b93419796

Finally, when it comes to clamps, both 101 and Bentley point out that we should not reuse them. Problem is, until I get in there and pull some of this apart I don’t even know what I need clamp-wise. I’ve read (and tend to believe) that using the hardware store-sourced worm-drive clamps isn’t the best solution on coolant hoses. I’ve seen some clamp sources online that would seem to be more suitable/reliable (examples: https://store.pyiinc.com/products/worm-gear-hose-clamp?variant=28648814706748
and https://www.amazon.com/PEROMI-32-35mm-Stainless-Intercooler-Adjustable/dp/B09NCYZWYT/ref=sr_1_4?c=ts&keywords=T-Bolt+Hose+Clamps&qid=1656603300&s=industrial&sr=1-4&ts_id=979131011

But again, what to buy? It would be helpful if the shop manuals would tell you right there in the description (right after the advice to “Use new hose clamps on coolant lines”) what size clamps are called for. Don’t think the nicer versions of these kinds of clamps are easily found locally, and I don’t really want to wait a week for shipment in the middle of a project..

TIA.

Frodo is offline   Reply With Quote
Old 06-30-2022, 10:39 AM   #2
Registered User
 
Join Date: Jan 2007
Location: BC
Posts: 1,312
My experience: http://986forum.com/forums/diy-project-guides/50261-another-coolant-tank-replacement-diy.html"]here. FWIW.
__________________
2001 Boxster, 5 spd, Seal Grey
clickman is offline   Reply With Quote
Old 06-30-2022, 10:42 AM   #3
Registered User
 
Join Date: Sep 2018
Location: Illinois
Posts: 190
Garage
That's not a fun job anytime, but if you have access to a lift, it's a little easier.
No, you don't want to use screw-type clamps. Just order the original spring-style when you get the tank. They apparently put a more even pressure around the hose. It's even relatively easy to put on, as it comes with a little pull ring so that when placed in position, you just yank it off and it is clamped.
And there are many threads out here advising getting only an original tank. The Chinese copies apparently die quickly, and having had one go, it does not make for a fun journey. Mine was original on my 99 and expired at about 18 years, so you are right there for replacement.

I can't really advise you on the tool, as I was in a hurry and just grabbed one at the local parts store. I will say it won't stay locked, so though a Snap-On is probably overkill, you don't want to go too cheap, either.

I would like to say 'have fun," but in fact, it is nearly as amusing at torqueing the axle to the trans or changing the air box.
__________________
A cynic is a man who, when he smells flowers, looks around for a coffin.
-H. L. Mencken
Newsguy is offline   Reply With Quote
Old 06-30-2022, 10:48 AM   #4
Registered User
 
Join Date: Feb 2016
Location: SE USA
Posts: 317
I replaced mine about 6 months ago and honestly, I did not find that it was that terrible of a job. It is a little frustrating operating blind to find some of the clamps but a little patience goes a long way. I picked up a fairly inexpensive remote clamp on Amazon which worked well and I would recommend one. I did not dremel the tank and i reused the existing clamps I found it comparable to replacing the top in difficulty. Again, patience is your friend here. Lastly, if i can do it ANYBODY can do it. Best of luck and let us know how it turns out.
Jgkram is offline   Reply With Quote
Old 06-30-2022, 12:04 PM   #5
Multi-Boxer Driver
 
Deserion's Avatar
 
Join Date: Nov 2010
Location: Orange Park, FL
Posts: 1,406
Garage
I did one on a friend’s ‘01 2.7 a few years ago. Had it on stands as it was helpful to be above and below the car to work on it. Remote hose clamp pliers (locking!) are a necessity and made the job a relative breeze compared to trying it work standard pliers.
__________________
-Chris
2004 Porsche Boxster 2.7
1991 Porsche 911 C2 Targa 3.6
2017 Subaru Outback 3.6R
Deserion is offline   Reply With Quote
Old 06-30-2022, 06:59 PM   #6
Registered User
 
elgyqc's Avatar
 
Join Date: Sep 2018
Location: Laval QC
Posts: 682
Garage
Here's my experience
http://986forum.com/forums/performance-technical-chat/82251-another-diy-thread-changing-coolant-reservoir.html
__________________
Grant
Arctic Silver 2000 Boxster S - bought with a broken engine, back on the road with the engine replaced
Green 2000 Boxster 5-speed and 1978 928 auto
1987 924S 5-speed (Sold) - Blue 2000 Boxster 5 spd (Sold)
elgyqc is offline   Reply With Quote
Old 07-01-2022, 01:38 PM   #7
Registered User
 
Join Date: May 2018
Location: Seattle
Posts: 44
Here's another post of how to do it.

http://986forum.com/forums/boxster-general-discussions/72900-coolant-tank-replacement-post-replacement-observations.html

Like Clickman I removed the hoses in the engine compartment from the metal lines instead of the tank manifold.

I also used screw down clamps for easy of installation. I know some don't like it, but I'm not here to debate it. Additionally my cheapish clamp pliers broke from squeezing too hard on a clamp.

I don't think having the car in the air would help. I did all the work from the top side.
Lowski is offline   Reply With Quote
Old 07-01-2022, 02:21 PM   #8
Registered User
 
Join Date: Aug 2018
Location: Woodland Wa
Posts: 1,291
On pulling the tank into the trunk to get to the hose clamps.

What I did was pull the rubber grommet on the main wiring harness. That wiring harness goes through the fire wall close to the coolant tank. There is a big rubber grommet where the harness passes through the firewall. I Just pulled the grommet up the wiring harness. I maybe even unplugged the harness and moved things to my advantage. this gives some room to reach in with needle nose pliers and grip the hose clamps as you pull the tank towards the trunk.
There is a video on youtube somewhere of a person using that method.

The oil fill tube is two piece I disconnected it in the middle (Engine bay).
Disconnect your hoses at the easiest end to get to.
From the top from below from the trunk what ever is easiest.
There is an over flow tube... it is only connected at the tank..the free end is held in a small plastic clip to a wiring harness if I remember correctly. Identify it. No reason to struggle trying to disconnect it from the tank. It can be removed after you have the tank out.
blue62 is offline   Reply With Quote
Old 07-05-2022, 06:26 AM   #9
Registered User
 
Rob175's Avatar
 
Join Date: Apr 2013
Location: Lincolnshire, IL
Posts: 444
My tank replacement was super easy.....took it to my "indi" Porsche shop and in about 2 hours and $750 later I drove off to dinner.......lol.
__________________
98' Boxster
Rob175 is offline   Reply With Quote
Old 07-05-2022, 08:26 AM   #10
Perhaps the worst example
 
LincolnPeters's Avatar
 
Join Date: Feb 2021
Location: Redlands, CA
Posts: 38
Finished this yesterday after three days of fussing with it off and on. Reading through the comments—everyone here is spot on.
My 2 cents, Blue and Rob175 nailed it in the comments. Starting from scratch, I’d totally spend $750 for an indie to handle this…but having done it once I think I could do it again in a couple-3 or four hours hours over two days.

Highlighting from below: No problem for me reusing the hose clamps.
You absolutely want the cable actuated hose clamp tool, and I’d get one shaped like a needle-nose that works at right-angle when I do this again…which I’ll have to do because—-
I couldn’t get the coolant level sensor back in after replacing the tank. There must be a molding blemish blocking the slot it slides in it that I should have checked before remounting the tank. Using it without the coolant level sensor for now…

My takeaway: This was all kinds of frustrating and F’d off. Glad I did it at home? Yeah, but it was dicey at points and scary that I might not get everything back together.
Peace and good luck.
__________________
‘97 986 with ‘00 2.7, 5M
“Were most of your stars out?”
LincolnPeters is offline   Reply With Quote
Old 07-05-2022, 12:53 PM   #11
Registered User
 
Join Date: Mar 2007
Location: Ohio
Posts: 1,999
Another couple of questions have popped up.

I've got 2 gallons of Porsche coolant from years back. Actually, it was from July, 2011, the last time I had the coolant out. See why I'm doing a R/R on the water pump? It's not leaking, but it's just gotta be time.

Q1: The info on the 2 gal of antifreeze includes: On the front - Formula G-30-91-EF
and on the back is the part number, 000 043 301 05.

Just picking one supplier (Pelican), the part number they list is 000 043 305 75 M100. (I can't read the Formula number on the Pelican page.)

I need to pick up another gallon. Can I assume my old (but unopened) stuff is the same (or at least compatible with) the currently available stuff?


Q2: This one just popped into my head. With Porsche saying (I think) that this is forever coolant, I've never all that closely kept track of how old mine was. Clearly I change it every time I do a WP/t'stat, but (just as clearly) I probably go too long on that procedure. Is it recommended to flush the coolant more frequently than what I've been doing?
Frodo is offline   Reply With Quote
Old 07-05-2022, 01:55 PM   #12
Registered User
 
Join Date: Feb 2005
Location: It's a kind of magic.....
Posts: 6,277
000 043 301 05 is an old part number that has been superseded. Porsche coolant updates have been backwards compatible in the past.

Realistically, if the factory coolant is mixed 50/50 with distilled water, you should be checking its freeze point and pH annually, but plan on replacing it every 5-6 years (nothing is lifetime).
__________________
Anything really new is invented only in one’s youth. Later, one becomes more experienced, more famous – and more stupid.” - Albert Einstein
JFP in PA is offline   Reply With Quote
Old 07-06-2022, 08:56 AM   #13
Registered User
 
Join Date: Jan 2007
Location: BC
Posts: 1,312
How long do unopened big jugs of Porsche coolant last?
000 043 301 49
__________________
2001 Boxster, 5 spd, Seal Grey

Last edited by clickman; 07-06-2022 at 08:59 AM.
clickman is offline   Reply With Quote
Old 07-06-2022, 11:13 AM   #14
Registered User
 
Join Date: Feb 2005
Location: It's a kind of magic.....
Posts: 6,277
Quote:
Originally Posted by clickman View Post
How long do unopened big jugs of Porsche coolant last?
000 043 301 49
Years in a sealed container.
__________________
Anything really new is invented only in one’s youth. Later, one becomes more experienced, more famous – and more stupid.” - Albert Einstein
JFP in PA is offline   Reply With Quote
Old 07-06-2022, 02:26 PM   #15
Registered User
 
Join Date: Mar 2007
Location: Ohio
Posts: 1,999
Talking

Quote:
Originally Posted by JFP in PA View Post
Years in a sealed container.
Not only sealed...the gallon jugs are still in the sealed clear plastic bags!
Frodo is offline   Reply With Quote
Old 07-11-2022, 01:13 PM   #16
2001 Boxster S 6sp
 
Chboro's Avatar
 
Join Date: Nov 2015
Location: Green Valley, AZ
Posts: 62
I have a 01 S also. My tank just started leaking so I'm on the hunt for parts and will be doing this real soon.
__________________
2001 Porsche Boxster S
2022 Hyundai Santa Cruz
1983 Alfa Romeo Spider (PO)
1969 Morgan 4/4 1600 (PO)
Chboro is offline   Reply With Quote
Old 07-11-2022, 02:53 PM   #17
Registered User
 
Join Date: Mar 2007
Location: Ohio
Posts: 1,999
Quote:
Originally Posted by Chboro View Post
I have a 01 S also. My tank just started leaking so I'm on the hunt for parts and will be doing this real soon.
Yeah, I was afraid I'd end up in your situation real soon, so I (uncharacteristically) decided to be proactive and get it out before that happened. Cleanup is no fun.

So far I've only gotten the coolant drained and the carpeting out of the trunk. (I'm still waiting on the replacement tank—any day now they tell me). The trunk's still dry as a bone...but the tank's pretty yellowed and tired looking. I think it's a good move to get a new one in.

How many miles on your '01?
Frodo is offline   Reply With Quote
Old 07-18-2022, 10:59 AM   #18
2001 Boxster S 6sp
 
Chboro's Avatar
 
Join Date: Nov 2015
Location: Green Valley, AZ
Posts: 62
Finished the install of the Coolant Tank in my 01 S

Finished up the tank install. I was in no rush so every time I lost patience I took a break. I decided to cut mine out like someone had done. I had a small recip saw and cut up from the bottom. Then I used a type of soldering iron to melt through the white plastic from the top down to meet up with the saw cuts. Even though I did need those long reach hose clamp pliers I found a small pair of needle nose vise grips to probably be the most used tool. I did open up the plug where the wire harness comes through and it helped visually.


Now I'm ready to add coolant and start driving again!
__________________
2001 Porsche Boxster S
2022 Hyundai Santa Cruz
1983 Alfa Romeo Spider (PO)
1969 Morgan 4/4 1600 (PO)
Chboro is offline   Reply With Quote
Old 07-30-2022, 09:57 AM   #19
Registered User
 
Join Date: Mar 2007
Location: Ohio
Posts: 1,999
Well, looking back on the project, it wasn’t quite as bad as I had expected. It’s hard to say how long it took us. We were working around my schedule, and my son’s schedule, and we weren’t killing ourselves to go fast. As pointed out earlier, we did have the advantage of having access to a lift…and that virtually always seems to help. (Honestly, at 67 years of age, I really can’t envision myself crawling under a car on jack stands anymore. Not for any prolonged job, anyway. I did it before, it was my only choice, and I made it work. And I’m kinda glad I did have to do projects that way for a time—it’s made me appreciate having this luxury of being able to ‘magically’ put the car 6 ft up in the air.)

So, anyway, what follows is, at least to some extent, largely for those who tackle this project with a lift. That’s not to say the following couldn’t be achieved without the lift. It’s just always easier (and probably more productive) to be standing, reaching up, as compared to lying on your back, on the driveway, under a car a couple feet off the ground. In my discussion, I make reference to TTGator’s “Help Me DIY” vid which, while tedious to watch at times (since at times the project itself can be tedious!), is pretty good. I’ll put the video times in green. It’s viewable at https://www.youtube.com/watch?v=4ZtFxmF5YyI&t=1020s

To keep them straight, I numbered the lines the same way that Clickman did in his DIY, referenced in his post above:

#1: The line coming directly out of the tank itself (ie the light colored plastic, the one that does not go through, but rather alongside, the black plate that’s bolted onto the bulkhead between the trunk and engine compartment).

The rest do go through that black plate.

#2: The oil cooler coolant hose. It’s the top of the group-of-three just below the big oil fill tube. This is the one with the easy quick-disconnect a short distance away from the plate on the engine side.

#3: The radiator vent hose, the next one down.

#4: The bottom of the three. This is the one that’s just a passive overflow tubing for coolant spilled above.

The oil fill tubing. Clickman called these #5, but I just followed elgyqc’s lead (referenced in his post above) and called them the oil fill tube (I’ll abbreviate as OFT) ie that rigid portion on the trunk side; and the oil fill hose (OFH) ie that somewhat flexible/accordioned portion on the engine side. Probably obvious, but these are the fat ones mounted above the group-of-three (#2 through #4).
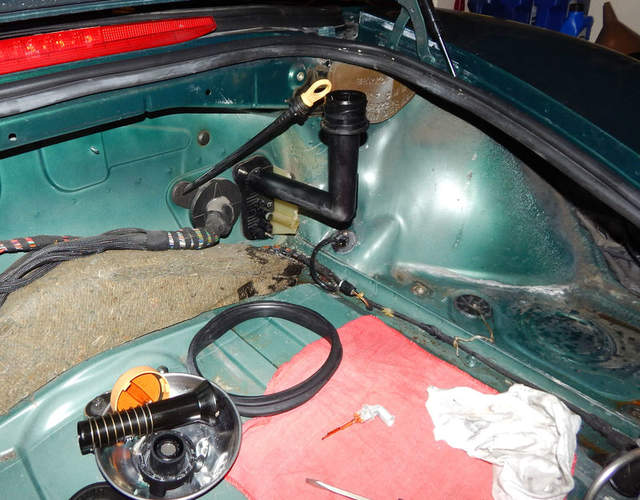
What Pedro calls the “plastic distributor,” and Wayne in 101 Projects variously calls an “integrated manifold” or “oil filler tube/bulkhead manifold” I am, for simplicity’s sake, just calling “the plate.” As mentioned above, it’s the black plastic piece that’s bolted onto the bulkhead and has the nipples onto which the various hoses are clamped on each side.

Borrowing the pic from DavesBoxster DIY, looking from the trunk side, the plate (with hoses/tube numbered) looks like this:


It, of course, won’t look exactly like this unless you’ve dremeled away the old tank the way Dave did.

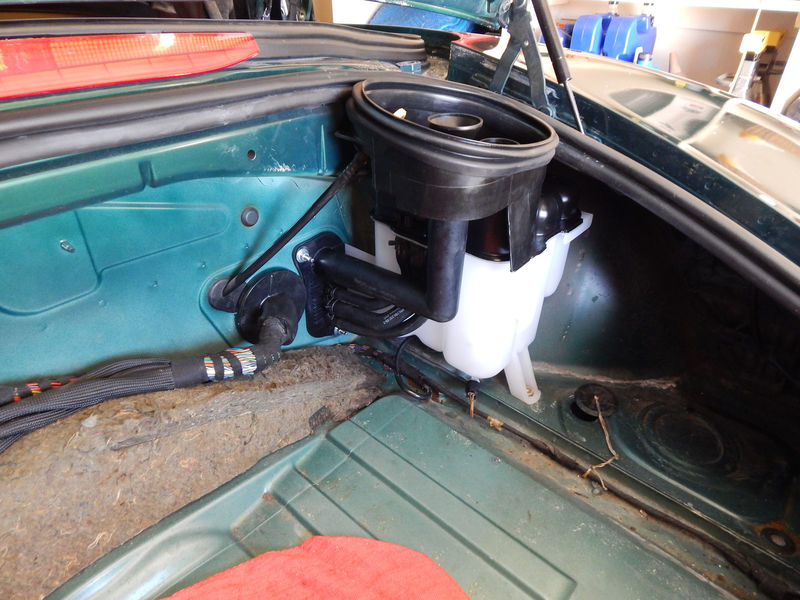
GETTING THE TANK OUT
What we did from the top (ie engine-side, working behind the raised clamshell):
(1) disconnected the OFH at the engine end of it, held on by a spring clamp; the process can be seen at 17:20 on Gator’s vid; my hose (unlike Gator’s) didn’t have that mesh material around it. (2) disconnected the quick-disconnect of #2, also a ways distant from the plate and therefore easily reachable; can be seen at 20:20. (3) The #4 we didn’t really have to do anything with: it just sort of dangles below. As was Gator’s experience, the clip holding it in place below was broken; I don’t think it was much of a big deal—it could later be zip tied I suppose, but I didn’t even bother with that. Btw, some folks temporarily removed a non-involved hose or two in the engine compartment to gain better access, but we didn’t really find that necessary. In my case they were all easily worked around. It may depend on your model year.

What we did from below (engine-side, vehicle lifted to standing height): Here’s where we addressed “the hard ones” ie #1 and #3. Don’t know if this is universally true or not, but in my case both of them, where the hoses were connected to the metal hard piping (a few inches away from the plate), had spring clamps with the tabs facing downward. So, working from below they were not too terribly difficult to grasp, open and move aside. We didn’t, however, have any luck breaking the hoses themselves loose from below—it is a bit of a reach.

Back on top: I hadn’t picked up any hose release tools, but I did have a set of these from way back:


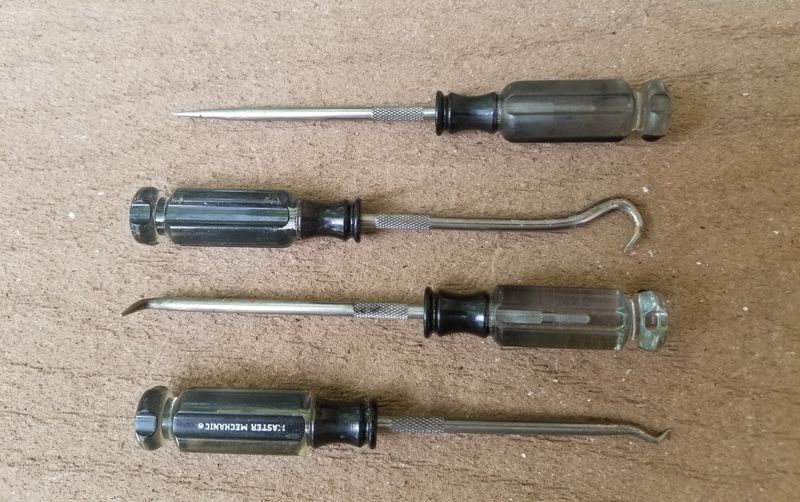
Using the straight one, I inserted it between the hose and metal piping, being careful to not punch any holes through the hose. Basically I’d insert with the point angled toward the metal and, once I’d gotten it in 1-2 cm I’d start to rotate it, going first one way then the other around the metal pipe, always keeping the point angled away from the hose. Did this for both #1 and #3. Once I was sure I’d busted loose the crud that over time had glued the hoses to the metal, I set the tool aside and just worked with my hands.

It took a few minutes and was mildly painful, but for both hoses, while holding the metal piping I was able to push hard with my thumb and slowly move the hoses off the pipes. As I recall I got the smaller of the two (#3) completely loose, and then (when #1 was mostly off) had my son help: at that point there was virtually nothing else holding the tank in place (we’d removed the 4 fasteners in the trunk), so (as Clickman describes in his DIY) while I held onto the #1 hard piping, my son pulled firmly on the tank and the #1 hose popped off. At this point the tank was free.

GETTING THE TANK BACK ON:
Gator’s assistant did a pretty good job showing the preparatory work on the new tank (gasket removal, hose transfers, etc.). Start at about 44:47 on his vid.

Reassembling, everything fell into place nicely, then we realized our one dummkopt move for the project, and it was kind of a doozy (there’s always one, right?) I had attached all the hoses to the plate, but hadn’t attached the new OFH onto the engine side of the plate. So we backed up, unbolted the tank, loosened the clamps on #1 and #3, and backed the tank into the trunk again. Attached the OFH and re-did all the steps we'd just done.

When reattaching the two difficult ones (#1 and #3), with my son working in the trunk and me reaching in from next to the clamshell, I’d lube the hard piping (I’d just dab a little spit onto my finger and then smear it onto them) and then try to get the hoses just started. You can’t get far, because the tank is still a bit too far inside the trunk and it's not like the hoses can be stretched toward the metal piping, so it became a coordinated effort: he’d push the tank toward the bulkhead and I’d twist & push the hoses onto the pipes. It takes both actions at the same time—seems to me that it would be really difficult to do solo.
Once the hoses were on the metal piping, we stopped, lifted the car to standing height again, then reattached the 2 clamps from below. I have to admit, my son was better at this process (clamp attachment) than I; he used a nice German-made tool I had picked up and concentrated on choosing the right plier orientation (jaws up vs jaws down) AND tried to always grasp the tabs on the clamp so that the pliers were in the same plane as the clamp—ie, not angled one way or the other. There's not a lot of room to work, and it takes some patience.

This is the tool I was referring to. It’s a bit pricey (what specialty tools aren't?)—I sorta impulsively purchased them online after having downed a couple of IPAs one evening. But I ended up being glad I did: IMHO it was worth the investment:


Interestingly, I had picked up one of the remote, cable-driven clamp pliers but hardly used it at all. In fact, we only used it once, and that was largely just out of curiosity.

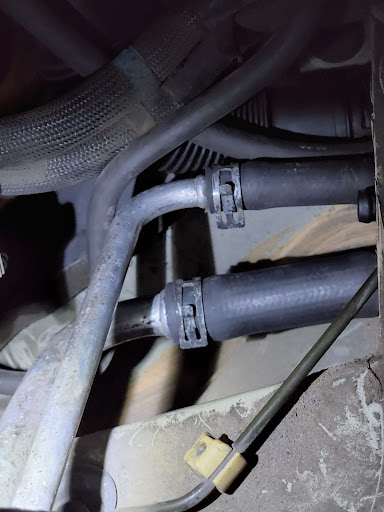
With the car lifted, looking up the #1 and #3 hoses looked like this:


A few Supplemental Notes:

If you want to get a good look at what’s so hard to reach, look at 23:06 on Gator’s vid. This is from the engine side. Incorporating the above-described numbering system, the hoses are (moving from Left to Right): #1, #4, #3, #2 and OFH.
I'll save you the trouble, here it is:


With the exception of the OFH, we didn’t disconnect any engine-side clamps/hoses while working from within the trunk. As we pulled the tank into the trunk, the OFH gave us some resistance to further progress—so, once the tank was a few inches into the trunk, I did go ahead and release that hose clamp and removed the OFH from the back of the plate. At this point, the OFH was totally freed up and was removed from the engine side. (This was a no-brainer for me since my OFH was leaking a little oil and I’d picked up a replacement.) The tank itself was now totally freed up as well, and easily removed.

I also did not disconnect anything from the old tank itself until the tank out of the car and sitting in my lap. I saw no need to do so earlier. But at this point it was necessary because the hoses needed to be transferred from the old tank to the new one, AND it was necessary to remove those hoses to separate the old tank (yellowed white plastic) from the black hard plastic OFT and the plate that it’s connected to. Though he removed the hoses from the tank earlier than we did, Gator’s vid shows basically how everything fits together. For this I'd recommend watching starting around 44:40.

As others have mentioned, remember there are notches to line up when reconnecting the OFH, this to help orient it properly in the engine compartment.
The quick disconnect goes back together pretty easily, and the overflow hose is simple—reaching up from below, I reattached it after the new tank was bolted in place and everything else was already reattached.

Though I see how it could be helpful in some cases, with the above approach we found no need or benefit to dremel off the old tank.

I think everybody does this job a little different. The whole project (like most) is largely a matter of trying something one way and, if that's not working, trying it another way. You eventually stumble your way through..

Thanks a bunch to all who provided guidance for me
Frodo is offline   Reply With Quote
Old 10-02-2022, 02:47 PM   #20
Registered User
 
piper6909's Avatar
 
Join Date: Jan 2019
Location: PA
Posts: 1,531
I have a question for anyone who has done this: Would the tank replacement be much easier with the tranny out? Same goes for the AOS. I ask because I'm having my tranny fixed after the TC toasted the front seal.

I'm already planning on doing the IMS and RMS while the tranny is out and was wondering if I would benefit from doing the tank and AOS too.

Thanks in advance!!

__________________
2002 Boxster Base - Arctic Silver - Tiptronic
2010 Subaru Forester
1980 Ford C-8000 Custom Cab Emergency-One Fire Truck
__________________
"I never lose. I either win or I learn." -Nelson Mandela
piper6909 is offline   Reply With Quote
Post Reply


Thread Tools
Display Modes

Posting Rules
You may not post new threads
You may not post replies
You may not post attachments
You may not edit your posts

BB code is On
Smilies are On
[IMG] code is On
HTML code is On
Trackbacks are On
Pingbacks are On
Refbacks are On


All times are GMT -8. The time now is 07:17 AM.


Powered by vBulletin® Version 3.8.7
Copyright ©2000 - 2024, vBulletin Solutions, Inc.
Content Relevant URLs by vBSEO 3.6.0
Copyright 2024 Pelican Parts, LLC - Posts may be archived for display on the Pelican Parts Website -    DMCA Registered Agent Contact Page