Well, looking back on the project, it wasnít quite as bad as I had expected. Itís hard to say how long it took us. We were working around my schedule, and my sonís schedule, and we werenít killing ourselves to go fast. As pointed out earlier, we did have the advantage of having access to a liftÖand that virtually always seems to help. (Honestly, at 67 years of age, I really canít envision myself crawling under a car on jack stands anymore. Not for any prolonged job, anyway. I did it before, it was my only choice, and I made it work. And Iím kinda glad I did have to do projects that way for a timeóitís made me appreciate having this luxury of being able to Ďmagicallyí put the car 6 ft up in the air.)
So, anyway, what follows is, at least to some extent, largely for those who tackle this project with a lift. Thatís not to say the following couldnít be achieved without the lift. Itís just always easier (and probably more productive) to be standing, reaching up, as compared to lying on your back, on the driveway, under a car a couple feet off the ground. In my discussion, I make reference to
TTGatorís ďHelp Me DIYĒ vid which, while tedious to watch at times (since at times the project itself can be tedious!), is pretty good. Iíll put the video times in green. Itís viewable at
https://www.youtube.com/watch?v=4ZtFxmF5YyI&t=1020s
To keep them straight, I numbered the lines the same way that
Clickman did in his DIY, referenced in his post above:
#1: The line coming directly out of the tank itself (ie the light colored plastic, the one that does not go through, but rather alongside, the black plate thatís bolted onto the bulkhead between the trunk and engine compartment).
The rest do go through that black plate.
#2: The oil cooler coolant hose. Itís the top of the group-of-three just below the big oil fill tube. This is the one with the easy quick-disconnect a short distance away from the plate on the engine side.
#3: The radiator vent hose, the next one down.
#4: The bottom of the three. This is the one thatís just a passive overflow tubing for coolant spilled above.
The oil fill tubing. Clickman called these #5, but I just followed
elgyqcís lead (referenced in his post above) and called them the oil fill tube (Iíll abbreviate as OFT) ie that rigid portion on the trunk side; and the oil fill hose (OFH) ie that somewhat flexible/accordioned portion on the engine side. Probably obvious, but these are the fat ones mounted above the group-of-three (#2 through #4).
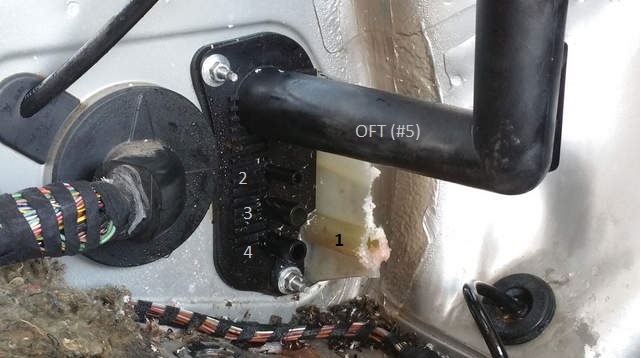
What Pedro calls the ďplastic distributor,Ē and Wayne in 101 Projects variously calls an ďintegrated manifoldĒ or ďoil filler tube/bulkhead manifoldĒ I am, for simplicityís sake, just calling ďthe plate.Ē As mentioned above, itís the black plastic piece thatís bolted onto the bulkhead and has the nipples onto which the various hoses are clamped on each side.
Borrowing the pic from
DavesBoxster DIY, looking from the trunk side, the plate (with hoses/tube numbered) looks like this:

It, of course, wonít look exactly like this unless youíve dremeled away the old tank the way Dave did.
GETTING THE TANK OUT
What we did
from the top (ie engine-side, working behind the raised clamshell):
(1) disconnected the OFH at the engine end of it, held on by a spring clamp; the process can be seen at
17:20 on Gatorís vid; my hose (unlike Gatorís) didnít have that mesh material around it. (2) disconnected the quick-disconnect of #2, also a ways distant from the plate and therefore easily reachable; can be seen at
20:20. (3) The #4 we didnít really have to do anything with: it just sort of dangles below. As was Gatorís experience, the clip holding it in place below was broken; I donít think it was much of a big dealóit could later be zip tied I suppose, but I didnít even bother with that. Btw, some folks temporarily removed a non-involved hose or two in the engine compartment to gain better access, but we didnít really find that necessary. In my case they were all easily worked around. It may depend on your model year.
What we did
from below (engine-side, vehicle lifted to standing height): Hereís where we addressed ďthe hard onesĒ ie #1 and #3. Donít know if this is universally true or not, but in my case both of them, where the hoses were connected to the metal hard piping (a few inches away from the plate), had spring clamps with the tabs facing downward. So, working from below they were not too terribly difficult to grasp, open and move aside. We didnít, however, have any luck breaking the hoses themselves loose from belowóit is a bit of a reach.
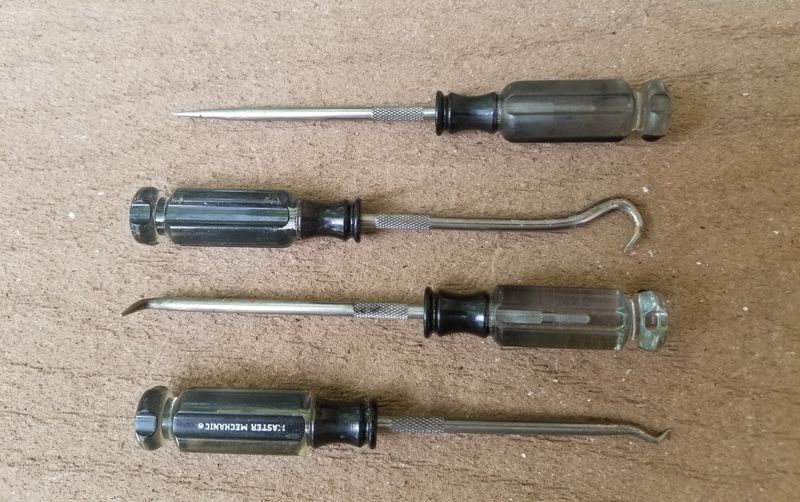
Back on top: I hadnít picked up any hose release tools, but I did have a set of these from way back:

Using the straight one, I inserted it between the hose and metal piping, being careful to not punch any holes through the hose. Basically Iíd insert with the point angled toward the metal and, once Iíd gotten it in 1-2 cm Iíd start to rotate it, going first one way then the other around the metal pipe, always keeping the point angled away from the hose. Did this for both #1 and #3. Once I was sure Iíd busted loose the crud that over time had glued the hoses to the metal, I set the tool aside and just worked with my hands.
It took a few minutes and was mildly painful, but for both hoses, while holding the metal piping I was able to push hard with my thumb and slowly move the hoses off the pipes. As I recall I got the smaller of the two (#3) completely loose, and then (when #1 was mostly off) had my son help: at that point there was virtually nothing else holding the tank in place (weíd removed the 4 fasteners in the trunk), so (as
Clickman describes in his DIY) while I held onto the #1 hard piping, my son pulled firmly on the tank and the #1 hose popped off. At this point the tank was free.
GETTING THE TANK BACK ON:
Gatorís assistant did a pretty good job showing the preparatory work on the new tank (gasket removal, hose transfers, etc.). Start at about
44:47 on his vid.
Reassembling, everything fell into place nicely, then we realized our one
dummkopt move for the project, and it was kind of a doozy (thereís always one, right?) I had attached all the hoses to the plate, but hadnít attached the new OFH onto the engine side of the plate. So we backed up, unbolted the tank, loosened the clamps on #1 and #3, and backed the tank into the trunk again. Attached the OFH and re-did all the steps we'd just done.
When reattaching the two difficult ones (#1 and #3), with my son working in the trunk and me reaching in from next to the clamshell, Iíd lube the hard piping (Iíd just dab a little spit onto my finger and then smear it onto them) and then try to get the hoses just started. You canít get far, because the tank is still a bit too far inside the trunk and it's not like the hoses can be stretched toward the metal piping, so it became a coordinated effort: heíd push the tank toward the bulkhead and Iíd twist & push the hoses onto the pipes. It takes both actions at the same timeóseems to me that it would be really difficult to do solo.
Once the hoses were on the metal piping, we stopped, lifted the car to standing height again, then reattached the 2 clamps from below. I have to admit, my son was better at this process (clamp attachment) than I; he used a nice German-made tool I had picked up and concentrated on choosing the right plier orientation (jaws up vs jaws down) AND tried to always grasp the tabs on the clamp so that the pliers were in the same plane as the clampóie, not angled one way or the other. There's not a lot of room to work, and it takes some patience.
This is the tool I was referring to. Itís a bit pricey (what specialty tools aren't?)óI sorta impulsively purchased them online after having downed a couple of IPAs one evening. But I ended up being glad I did: IMHO it was worth the investment:

Interestingly, I had picked up one of the remote, cable-driven clamp pliers but hardly used it at all. In fact, we only used it once, and that was largely just out of curiosity.
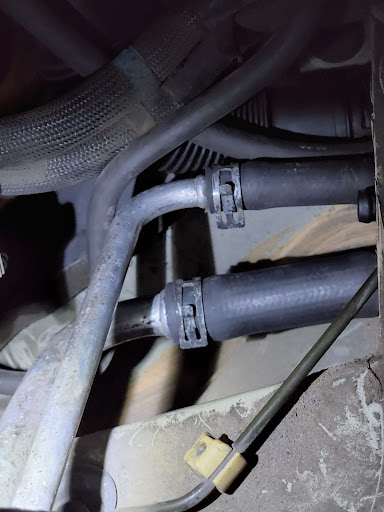
With the car lifted, looking up the #1 and #3 hoses looked like this:

A few Supplemental Notes:
If you want to get a good look at whatís so hard to reach, look at
23:06 on Gatorís vid. This is from the engine side. Incorporating the above-described numbering system, the hoses are (moving from Left to Right): #1, #4, #3, #2 and OFH.
I'll save you the trouble, here it is:

With the exception of the OFH, we didnít disconnect any engine-side clamps/hoses
while working from within the trunk. As we pulled the tank into the trunk, the OFH gave us some resistance to further progressóso, once the tank was a few inches into the trunk, I did go ahead and release that hose clamp and removed the OFH from the back of the plate. At this point, the OFH was totally freed up and was removed from the engine side. (This was a no-brainer for me since my OFH was leaking a little oil and Iíd picked up a replacement.) The tank itself was now totally freed up as well, and easily removed.
I also did not disconnect anything from the old tank itself until the tank out of the car and sitting in my lap. I saw no need to do so earlier. But at this point it was necessary because the hoses needed to be transferred from the old tank to the new one, AND it was necessary to remove those hoses to separate the old tank (yellowed white plastic) from the black hard plastic OFT and the plate that itís connected to. Though he removed the hoses from the tank earlier than we did, Gatorís vid shows basically how everything fits together. For this I'd recommend watching starting around
44:40.
As others have mentioned, remember there are notches to line up when reconnecting the OFH, this to help orient it properly in the engine compartment.
The quick disconnect goes back together pretty easily, and the overflow hose is simpleóreaching up from below, I reattached it after the new tank was bolted in place and everything else was already reattached.
Though I see how it could be helpful in some cases, with the above approach we found no need or benefit to dremel off the old tank.
I think everybody does this job a little different. The whole project (like most) is largely a matter of trying something one way and, if that's not working, trying it another way. You eventually stumble your way through..
Thanks a bunch to all who provided guidance for me
