03-28-2016, 05:37 AM
|
#1
|
Santa Barbara, CA
Join Date: Mar 2016
Posts: 38
|
Vario Cam Adjuster Plunger question re: P1324 code
Re: Recently-acquired (and first) 1998 Boxster 2.5L w/135k miles.
I am in the middle of repairing error code P1324 (Timing chain out of position Bank2) and have removed the Bank 2 cams and cam adjuster, found the problem (damaged and worn pads on the adjuster) and am ready to reassemble the unit with new pads and a new solenoid for good measure.
Can someone please confirm that the Cam Tension Adjuster Plunger goes into the adjuster block with the smooth end facing the solenoid as in the photo? I'm pretty certain that's the way it goes, but wanted a second, more experienced opinion. The engine's still in the car and I unfortunately did not photograph the plunger when I removed the solenoid & cams.
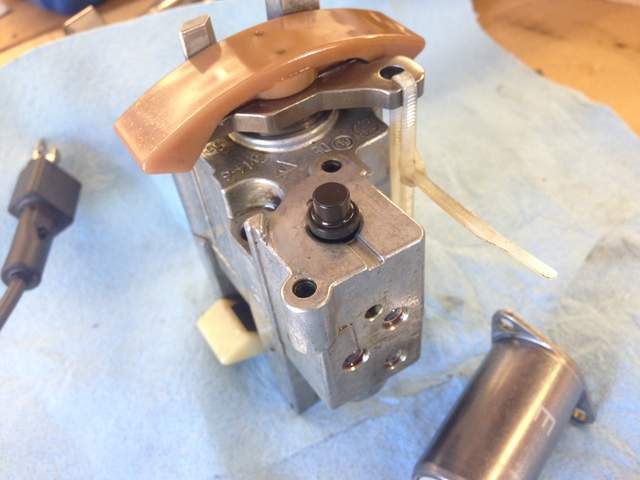
Thank you! This is an incredibly helpful forum.
|
|
|
04-02-2016, 06:01 PM
|
#2
|
Santa Barbara, CA
Join Date: Mar 2016
Posts: 38
|
Follow up to my previous post: just finished installing the valve adjuster and left side cam shafts and the engine fired up and runs fine and now has no codes. So the answer to my question is that the plunger inside the Vario valve adjuster is correct as pictured, in case anyone is actually interested.
At $150 per hour for car repair in So. Cal. I'm grateful that I can do some car repairs myself.
|
|
|
04-02-2016, 07:06 PM
|
#3
|
Porsche "Purist"
Join Date: Aug 2003
Location: Wisconsin
Posts: 2,123
|
Nicely done, that job is a PITA with the engine in the car.
__________________
1998 Boxster with 7.8 DME, 2005 3.6 liter/325 hp, Variocam Plus, 996 Instrument panel
2001 Boxster original owner. I installed used motor at 89k.
1987 924S. 2002 996TT. PST-2
Owned and repaired Porsches since 1974. Porsche: It's not driving, it's therapy.
|
|
|
04-02-2016, 07:11 PM
|
#4
|
Artist, 986S tinkerer
Join Date: Aug 2013
Location: Montreal, Canada
Posts: 1,821
|
Having done mine with the engine out, I say kudos to you for doing it with the engine still in the car!
__________________
James now has: 2008 987S 6 speed
Crashed: 2010 987.2 pdk in speed yellow!
Sold to a cool racer chick: 2004 986 S
YouTube channel: the PORSCHE as seen by NewArt
www.youtube.com/channel/UCohdrH2xHTklM1thxk0KKOQ?
|
|
|
04-04-2016, 10:19 AM
|
#5
|
Santa Barbara, CA
Join Date: Mar 2016
Posts: 38
|
It was a Royal PITA to change out the Cam Adjuster but I kept thinking that pulling the engine was much worse.
Since some may consider doing the RandR of the Camshafts and the Vario Adjuster in the car, let me share how it went.
The removal is pretty simple. Drive pulley at TDC and a 5/16 x 4" bolt in to keep it there. I removed the coils and valve cover and followed the steps in the excellent Pelican DIY ( Camshaft Upgrade / Chain Tensioner Replacement by Wayne Dempsey) I took the two cams with the adjuster and timing chain attached onto a workbench and there removed the adjuster assy from the timing chain and cams by compressing it with a bar clamp. The Vario Adjuster in my 1998 986 2.5L has a 10-32 Righthand thread hole at the bottom, so a 4" x 10-32 SAE bolt will hold the adjuster in the "compressed" position when you install it back under the timing chain. If you can't find one, like I couldn't, a 6-32 threaded rod with nuts and washers will do the trick. $1.00 at the local hardware store.
After cleaning and installing the two plastic pads, new solenoid and a new timing chain it was time to put the cam assembly back into the head, which is the tricky part. You're fighting gravity and can't really see what you're doing. (I've heard this before...) Line up the sprocket end of the cams with their respective bearing cut outs in the head and hold them in place. It is hard to push the cams in by hand since you are pushing against the valve springs while lying on your back. I have the locator tool P253 from Pelican that holds the Exhaust cam in the TDC position, but it doesn't push the Intake Cam into place against the valve springs, so I bought a 5" turn buckle (see photo) and ground grooves* in each end to get it to seat and exert enough force to put on the Intake bearing cap next to the sprocket.
I kept the three long bolts that mount the Adjuster, the Exhaust bearing cap bolts and the expensive Cam locator tool loose until I had seated the top (Intake) bearing cap. Then I tightened everything all up, removed my turnbuckle and replaced the valve cover etc.
*There is a ledge on the car's frame that you can use to push against with the turn buckle to force the cam nearly all the way into the bearing cutouts in the head. Somewhere I read that people have snapped their camshafts, which seems a bit dubious, but I hand tightened the turnbuckle and got the cam to go far enough in to attach the bearing cap.
I believe there is a tool set for $350 that has two tools to hold the cams in place, or if you have two extra bearing caps, they'd do so as well, but in my case, I'd already bought the Pelican camshaft securing tool for $185, so I thought I'd improvise and in this case it worked.
Hope that's helpful. As stated in my first post I'd gotten a P1324 error code that the cam on bank 2 was out of position. As I discovered, I caught it just in time as the timing chain was rubbing on the adjuster and the plastic pad that the chain normally rides on was in tiny pieces in the oil pan.
Here's the turnbuckle, $1.50 at the local hardware store.
|
|
|
04-02-2017, 08:29 PM
|
#6
|
Registered User
Join Date: May 2014
Location: S.California
Posts: 2,029
|
Brilliant work ! Love the turnbuckle.
Later cars are different :
1. Beware of changes to Variocam Actuator internals according to year
2. in 2000 (?) the r.h. 10-32 thread was changed to 5mmx 0.8 LEFT hand ! You can find 5mm brass rod, M5x0.8 L.H. die and steel nuts on EBay but from China ! I do not think there is enough material on the Variocam to enlarge to M6x1.0, Right Hand.
3,Make sure the pad with the 'o' ring and 2 holes is correctly oriented .It will fit in the wrong position very well ! Note the OP's photo that shows this well.
4. Check many times that the "7 link" spacing has not slipped or you will be chasing ghosts and doing over eventually . A dot on the two chosen links from a paint pen is helpful.
5. Consider temporarily screwing in some aluminum rod into the lower cam cap/cam cover holes to support the cams when positioning them
6. Beware of falling exhaust lifters
7. Apply Assembly Grease to the cam bearings, cam caps and lifter tops to avoid a 'dry' start.
8. Apply the 1mm bead of 3Bond or similar to the cam cover, not the cyl head.
9. Consider applying just a little thread sealant(not locker !) under the heads of the cam cover bolts to prevent leakage. Torque down in stages and use a click/beep t.wrench for the final.You can not see the wrench
10. Look carefully at the bolts . Those that thread into steel are 10.9. Those that thread into aluminum are 8.8. That is a huge clue to the correct torque.
10.9 grade 6mm bolts are torqued to 10 ft/lbs = 13Nm. -only in to steel not aluminum !!
* 8.8 grade 6mm bolts are torqued to 7.5 ft/lbs =10Nm* . For aluminum. Don't muddle the steel vs. aluminum or you will be Helicoiling. For both, tighten in at least 3 progressive stages.
11. If you use a zip tie - beware that the entire force of the big spring in The Actuator is trying to bend the tint plastic tang that engages on the little ribs of the plastic zip tie. When that inevitably fails....be ready or use a threaded rod as described above.
I'll do a write up for the later cars when I get mine fixed.
Last edited by Gelbster; 04-12-2017 at 02:34 PM.
|
|
|
04-03-2017, 03:54 AM
|
#7
|
Registered User
Join Date: Feb 2005
Location: It's a kind of magic.....
Posts: 6,457
|
Quote:
Originally Posted by jvfante
Re: Recently-acquired (and first) 1998 Boxster 2.5L w/135k miles.
I am in the middle of repairing error code P1324 (Timing chain out of position Bank2) and have removed the Bank 2 cams and cam adjuster, found the problem (damaged and worn pads on the adjuster) and am ready to reassemble the unit with new pads and a new solenoid for good measure.
Can someone please confirm that the Cam Tension Adjuster Plunger goes into the adjuster block with the smooth end facing the solenoid as in the photo? I'm pretty certain that's the way it goes, but wanted a second, more experienced opinion. The engine's still in the car and I unfortunately did not photograph the plunger when I removed the solenoid & cams.
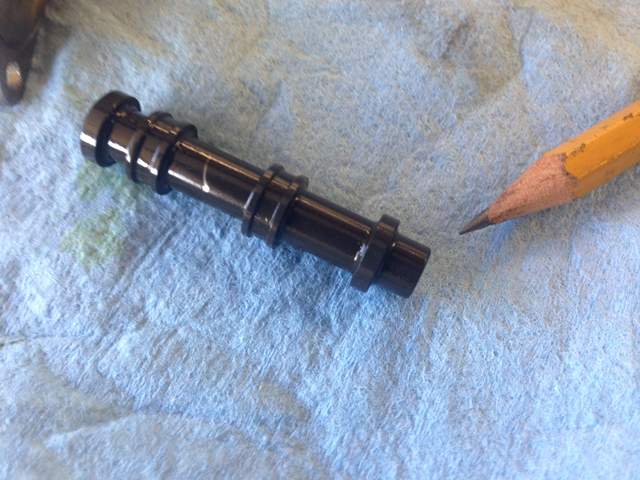
Thank you! This is an incredibly helpful forum.
|
That plunger/piston is not symmetrical. One end is pretty much flat, the other has a small recess into where a small spring sits which pushes it upwards. Make sure you have it correctly oriented, and that the spring is also installed. Flipping the plunger over, or leaving the spring out will lead to problems as the VarioCam will not operate properly.
__________________
“Anything really new is invented only in one’s youth. Later, one becomes more experienced, more famous – and more stupid.” - Albert Einstein
|
|
|
04-03-2017, 07:19 AM
|
#8
|
Santa Barbara, CA
Join Date: Mar 2016
Posts: 38
|
Thanks, JFP & Gelbster for your insight. Some of these details are just impossible to find and I hope this is helpful to others.
I was able to correctly assemble the Variocam plunger with the spring and my '98 base is now running like a Swiss watch.
|
|
|
04-10-2017, 06:54 PM
|
#9
|
Registered User
Join Date: May 2014
Location: S.California
Posts: 2,029
|
Quote:
Originally Posted by jvfante
Thanks, JFP & Gelbster for your insight. Some of these details are just impossible to find and I hope this is helpful to others.
I was able to correctly assemble the Variocam plunger with the spring and my '98 base is now running like a Swiss watch.
|
I have just learned that the "plunger" refereed to above is different in the Bank 2 Actuator compared to Bank 1. So they are NOT interchangeable.
Btw if you loose the little Torx20 head screws that hold the Solenoid onto the Actuator, they are 5mm x 0.7 pitch
|
|
|
05-28-2018, 06:34 PM
|
#10
|
Registered User
Join Date: May 2018
Location: New Jersey
Posts: 2
|
P1324 code
Okay Guys, I need a little help and advice with my 2000 Boxster, 2.7L (which I just purchased - 147K miles).
I checked the car with (Durametric) and received a P1324 code. I wasn't sure what maintenance or upgrades were performed so when I replaced the clutch, I performed a fluid change on the transmission and I figured I'd check if the IMS bearing was also replaced - it was upgraded to a cylindrical bearing and is in excellent condition (European Parts Solution). I did not remove it, I just buttoned everything up (Main seal was also upgraded and wasn't leaking so I left that alone too). Of course, before I did this, I locked the the engine TDC and locked the cams. I checked the timing several times before putting the trans back in the car. Everything lined up as found and as expected (vertical, inline with the engine case) for correct timing.
I started the car and still sounds like something is rattling and P1324 was still there. I ran durametric software and displayed the Cam positions angles. they are:
cam1 deviation = 16.44, cam 1 angle -0.22
cam2 deviation = 22.30, cam 2 angle +1.03
(These were steady after car was running for a few minutes.)
What do you think is next step? Any advice would be greeat. Thanks in advance!
Last edited by Tanz65; 05-29-2018 at 01:21 PM.
|
|
|
08-06-2018, 02:58 PM
|
#11
|
Santa Barbara, CA
Join Date: Mar 2016
Posts: 38
|
P1324 indicates "Timing chain out of position on Bank 2" (Driver's side in US). As it is what I mentioned earlier in this thread, I think you have the same problem, i.e. the brown plastic pad has worn beyond permissible limits, or it has broken into many pieces. The noise you hear may be the timing chain hitting against the valve cover. Check the oil for bits of plastic and metal shavings (aluminum). If you're going to do this yourself, then check both the Bentley and Pelican books for details as well as this forum and Youtube to decide it is something you can do.
__________________
'98 986 Arctic Silver
|
|
|
08-06-2018, 03:38 PM
|
#12
|
Registered User
Join Date: May 2014
Location: S.California
Posts: 2,029
|
And if one side is worn, the other side......
|
|
|
04-21-2020, 11:37 AM
|
#13
|
Registered User
Join Date: May 2018
Location: New Jersey
Posts: 2
|
P1324 follow up
sorry for not responding to your reply. I put that project on hold but will be doing this in a few weeks. Thanks for the great write-up.
|
|
|
07-31-2024, 06:22 AM
|
#14
|
Registered User
Join Date: Jul 2024
Location: Cambridge Ontario
Posts: 81
|
This is a great write up and plan on using it in a couple of weeks. I have never done it in a car but i did do it on a bench on a 996 Engine.
The two questions i have i hope the OP can answer , but you all may know by now .
1. To do dit in the car , how far does the car have to be off the ground to do it comfortably ? i get it would vary if Santa clause was doing it vs a Tim Burton character, but thought you guys might have some idea.
2. the turnbuckle looks interesting, where exactly are you bracing it on the cams ? would that be against the lock tool at the far end after fastening them to the cams ? i just am having trouble picturing it and how its used... I understand the principle as you have essentially built a press. just not sure where you are presing exactly.
Hopefully i have expressed my questions clearly, and since this is my first real post, i hope I have not broken any protocols.
cheers all .
|
|
|
09-23-2024, 01:00 PM
|
#15
|
Registered User
Join Date: Jul 2024
Location: Cambridge Ontario
Posts: 81
|
Quote:
Originally Posted by theiceman
This is a great write up and plan on using it in a couple of weeks. I have never done it in a car but i did do it on a bench on a 996 Engine.
The two questions i have i hope the OP can answer , but you all may know by now .
1. To do dit in the car , how far does the car have to be off the ground to do it comfortably ? i get it would vary if Santa clause was doing it vs a Tim Burton character, but thought you guys might have some idea.
2. the turnbuckle looks interesting, where exactly are you bracing it on the cams ? would that be against the lock tool at the far end after fastening them to the cams ? i just am having trouble picturing it and how its used... I understand the principle as you have essentially built a press. just not sure where you are presing exactly.
Hopefully i have expressed my questions clearly, and since this is my first real post, i hope I have not broken any protocols.
cheers all .
|
well since no one responded i may as well wrap this up. I had the car about 17 inches off the ground from the bottom of the car to the ground. This was plenty of room and i was able to work comfortably.
I was able to replace variocam pads on both sides.. interestingly on my P1324, it was the exhaust cam that was off, so not the worn pads as that cam is driven by a chain.
reset timing and replaced tensioners with upgraded ones.
|
|
|
09-23-2024, 11:57 PM
|
#16
|
Registered User
Join Date: Jul 2024
Location: Western Europe
Posts: 81
|
Did you notice that the engine ran better in terms of performance after replacement of the pads? I have read this, but i cannot see any connection between fresh pads and performance.
|
|
|
09-24-2024, 09:50 AM
|
#17
|
Registered User
Join Date: Jul 2024
Location: Cambridge Ontario
Posts: 81
|
Quote:
Originally Posted by 997_986
Did you notice that the engine ran better in terms of performance after replacement of the pads? I have read this, but i cannot see any connection between fresh pads and performance.
|
I have not started it yet ...but there is definitely a difference in performance as valve timing is different than what is expected given the pads are worn. On mine it had a very rough idle. this is common when valve timing is off.
to be honest my p1324 was not due to these pads as they were not terrible. but the exhaust cam was definitely out of spec which can only mean the chain skipped. it had original non upgraded tensioners .
car is outside and I have A few minor things to finish off before cranking it. it's currently raining and I have to lift the Ac comp. so I can get final torque on the upper tensioner.
the real reason for the replacement of those pads is if they break after getting too thin a piece can get jammed between the sprocket and chain and your engine is toast
|
|
|
10-07-2024, 07:23 AM
|
#18
|
Registered User
Join Date: Jul 2024
Location: Cambridge Ontario
Posts: 81
|
All done ,, got a few miles on it and it runs great .. small vibration coming through the stick at idle but nothing like before. car runs smooth and pulls fine ,,, the vario cam pad work with the engine still in the car i would say is a 7 out of 10 for difficulty on the home mechanic scale.. not particularly difficult if you have all the right tools , but can be tedious for sure.
Local indy quoted around 5G for this work which i thought was eye watering for what it is . did this work for a couple hundred in parts and borrowed the tools. to be fair i did a lot more work that just this , but car was off the road for 7 weeks. Far too long for some people, but i was okay with it. A lot of it was waiting for parts deliveries and such.
Also did
coolant flush
new stat
new water pump
new oil pressure relief valve
new oil filter housing
replaced missing skid plate
cleaned rads and condensers and repositioned front bumper
new battery
rerouted emergency pulls for front and rear openings
new frunk struts
new trunk struts
removed centre console and seats for deep cleaning of interior and carpet.
replaced 3 chain tensioners.
new air filter
new cabin filter
changed oil
retorqued loose spark plugs
now a month of driving before winter storage.
.
|
|
|
Posting Rules
|
You may not post new threads
You may not post replies
You may not post attachments
You may not edit your posts
HTML code is On
|
|
|
All times are GMT -8. The time now is 03:09 AM.
| |