 03-17-2016, 11:49 AM
|
#1
|
|
WALDMEISTER
Join Date: Sep 2013
Location: Germany
Posts: 1,378
|
Fantastic build! Nicely balanced design... love those painted headlights. 
__________________
Original Owner | PORSCHE Boxster 2.7L (MY01) | Seal Gray
|

|

|
|
03-25-2016, 05:46 PM
|
#2
|
|
Registered User
Join Date: Jul 2013
Location: Bastrop, Tx
Posts: 2,644
|
Quote:
Originally Posted by BRAN

Fantastic build! Nicely balanced design... love those painted headlights. |
Thanks. The headlights are one of my favorite mods' I've done so far.
A little update on progress. Re-greased the axles and put new boots on too. Boy that's a messy job! I also installed the 4 stalk and ran wiring for the OBC and oil pressure to the 996 cluster. Nothing too exciting so I didn't take pics. I did take pics of my 987 airbox install though. I kept hearing how the 987 airbox was so much better than anything aftermarket. So I decided to install one instead of using an aftermarket air filter that I had bought from a fellow member. The 987 airbox is far from a bolt in and probably should have read up on it more before going that route.
Here's the 987 airbox before modification.

It wouldn't fit without notching the bottom and trimming the intake horn. After some trimming and fiberglass/JBWeld/screws and gasket maker, the three bolt holes line up perfectly.

Not the prettiest, but won't be seen once mounted


__________________
Woody
|
|
|
|
|
04-03-2016, 04:56 PM
|
#3
|
|
Registered User
Join Date: Jul 2013
Location: Bastrop, Tx
Posts: 2,644
|
I worked on getting the 3.4 ready to be installed in the boxster and I also performed some preventive maintenance. I mostly followed the instructions from "101 boxster projects" on swapping a motor. The only thing I differed from so far was the instillation of the vacuum hoses. I didn't like Wayne's plumbing on the vacuum hose for the brake booster, so I'm going to attempt a different way. I kept the connection in the rear and used the 996 hose that connects to it. I plan on cutting off the 986 fitting and connecting a hose to it.

I have some other ideas if it turns out that there's not enough room for my way. I also used the 996 gas tank vent valve, which seemed to fit better to me. I used some extra hose to protect the line from chafing against the A/C compressor.

Everything else was pretty accurate and helpful on preforming the swap. I don't like the way he plumbed his fuel lines though, and have ideas to improve on what he did.
This is what you get with cheap Chinese headers. Otherwise they fit ok once I ground down the bolt head.

Here I am so far. Needs a little bath but otherwise ready to install once I get the LN IMS pro installed. I also replaced the water pump, sparkplug tubes, spark plugs and 160 thermostat.

__________________
Woody
|
|
|
|
|
04-03-2016, 07:04 PM
|
#4
|
|
Certified Boxster Addict
Join Date: Nov 2010
Location: Los Angeles
Posts: 7,669
|
Great thread! I've been following along and its been a great journey!
__________________
1999 996 C2 - sold - bought back - sold for more
1997 Spec Boxster BSR #254
1979 911 SC
POC Licensed DE/TT Instructor
|
|
|
|
|
04-04-2016, 04:02 AM
|
#5
|
|
Registered User
Join Date: Jul 2013
Location: Bastrop, Tx
Posts: 2,644
|
Quote:
Originally Posted by thstone
Great thread! I've been following along and its been a great journey!
|
Thanks Tom. I've been following yours too, but haven't had much to say. Silent admirer
__________________
Woody
|
|
|
|
|
04-08-2016, 12:51 PM
|
#6
|
|
Registered User
Join Date: Jul 2013
Location: Bastrop, Tx
Posts: 2,644
|
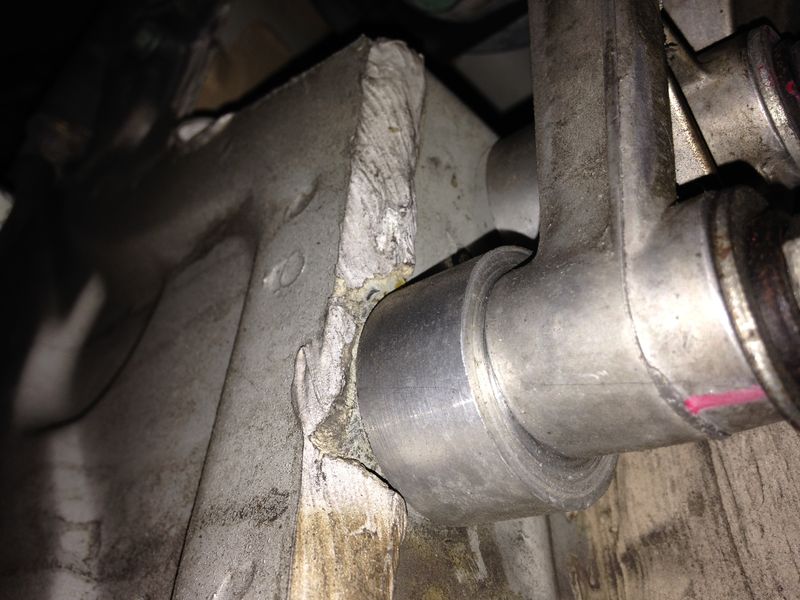
Earlier in the thread I posted some pictures of the aftermarket front caster control arms I was using. I had one break on me very easily and I rewelded it back together. I had a friend who has used these on his race car tell me I should also drill the back side and weld there too. It sounds like a good idea so I followed his advice. I first drilled out until I reached the shaft.

I then turned up the mig and laid some deep penetrating welds.

I spent today loading my truck and trailer full of boxster parts. I'm taking my 3.4 to a friend of mine up in Dallas to install the IMS Pro. I believe he's the only person in Texas who's certified to be an installer for the LN IMS Solution. He can do the IMS in his sleep so I'll let him do it. I work on these things because I have to but I don't enjoy the mechanical side as much. I'd rather paint a car than rebuild a motor.
I let it be known in the racing community that I was coming up there and I got swamped with orders. This is going to be a big Saturday for me. I have three shops and my friends mancave to deliver parts to . One shop is at a race track and I was told if I get there early enough, he would take me out on it.:dance: I'll take some pic.

__________________
Woody
Last edited by itsnotanova; 04-08-2016 at 02:03 PM.
|
|
|
|
|
04-11-2016, 05:22 PM
|
#7
|
|
Registered User
Join Date: Jul 2013
Location: Bastrop, Tx
Posts: 2,644
|
The first stop was my friend's place where we replaced the ims with a LN IMS Pro. For those who have the single row ims, you're not going to replace that bearing with the pro unless you have the special tool created by LN engineering! While there my friend sold me a 4 inch under drive pulley that is suppose to give you back 10 hp(tested by Jake Raby on his dyno). It also slows down the power steering pump which is known to overheat and boil the fluid.

I had to grind down the block a little for it to fit

Here's a the factory and aftermarket comparison. Behind that you will notice the arena red hardtop I traded with Rick.

We met at the shop that was getting the red boxster body to fix two spec boxsters. Here's Rick on the right talking to the owner of the shop. I only got this one shot but there's more to the left.

A real 914-6 straight out of the 70-80's

__________________
Woody
|
|
|
|
|
04-13-2016, 01:27 PM
|
#8
|
|
Registered User
Join Date: Jul 2013
Location: Bastrop, Tx
Posts: 2,644
|
I think I win today's redneck engineering award. I normally don't have to get the car this high to get the motor out. My table lift has an engine and transmission on it so I used my transmission jack instead. It looks scarier than it really is.

Then I lower the car and raise the jack.

This is where I'm curious what other people have done when using aftermarket headers. On the 1997-99 boxsters and the 996's, the O2 sensors are connected to the secondary pipe. One is before the cat and the other O2 is after the cat. The 2000-04 have the O2's on the exhaust manifold/pre-cat. These exhaust headers give you two O2 bungs per side, but one has a horrible angle. What I did was I used the secondary pipe from a 99 and used the first bung for the second O2 sensor. Curious for opinions?

__________________
Woody
|
|
|
|
|
04-14-2016, 03:25 AM
|
#9
|
|
Project Addicted
Join Date: Aug 2015
Location: Eastern Shore, MD
Posts: 623
|
That os most definitely a bubba setup you got going on there. A real "Hold my beer" moment :-)
So, no cats?? With no cat there is no way the ECU won't throw codes unless you use a fooler to make the o2 sensors read differently... I think. That all I got.
Please start to wear gloves. I hated them in the beginning but now I can't work without them. I will send you a box if you want.
__________________
______
Jon
1966 912, 1976 911
1986 944, 2000 Boxster
|
|
|
|
|
04-14-2016, 05:31 PM
|
#10
|
|
Registered User
Join Date: Oct 2012
Location: Cincinnati, Ohio
Posts: 373
|
Woody,
Go here 90 degree offsets for sensors.
Check Engine Light Eliminator
There is another place that sells them but I can't find the site.
I used them on my car with headers
Van
|
|
|
|
|
04-14-2016, 06:26 PM
|
#11
|
|
2003 S, Arctic Silver, M6
Join Date: Oct 2014
Location: Winnipeg, MB, Canada
Posts: 1,346
|
Looking at that rear end suspended out there made me cringe a little, but hey, it's Woody, things are cool. Now where is that beer.
|
|
|
|
|
04-15-2016, 04:09 AM
|
#12
|
|
Registered User
Join Date: Jul 2013
Location: Bastrop, Tx
Posts: 2,644
|
The "two post lift guys" have a winning argument when it comes to removing and installing a motor on a Porsche, but I still wouldn't give up my four post over a two post. I've yet to come across anything that a two post can do that I couldn't do with mine too.
As for the O2 sensors. I moved the last two to behind the cat on the secondary pipe by making an extension wire harness out of two old O2 sensors and the connections from an old engine harness. I'll probably need to use those O2 foolers when I switch to bypass pipes. The headers are huge but those secondary pipes look so small and restrictive. I'm also thinking about making my own exhaust system at a later date. I'm not a fan of the factory system. Mostly because of the weight, but because it looks overly restrictive too.
If everything goes together fine and I get a thermostat gasket in today, I should have it running this weekend.:dance: Too bad we're getting 3-6 inches of rain over the next week though.  . I'm dialing in the ride height of the motor. Even after notching the engine bay, I still have to lower the motor 1 inch. The flapper valve can't tilt forward anymore because of the AC lines.

__________________
Woody
|
|
|
|
|
04-15-2016, 06:02 AM
|
#13
|
|
2003 S, Arctic Silver, M6
Join Date: Oct 2014
Location: Winnipeg, MB, Canada
Posts: 1,346
|
Quote:
Originally Posted by itsnotanova
I'm dialing in the ride height of the motor. Even after notching the engine bay, I still have to lower the motor 1 inch. The flapper valve can't tilt forward anymore because of the AC lines.
|
Shoehorned!
|
|
|
|
|
04-15-2016, 10:08 AM
|
#14
|
|
Registered User
Join Date: Jul 2013
Location: Bastrop, Tx
Posts: 2,644
|
Quote:
Originally Posted by paulofto
Shoehorned!
|
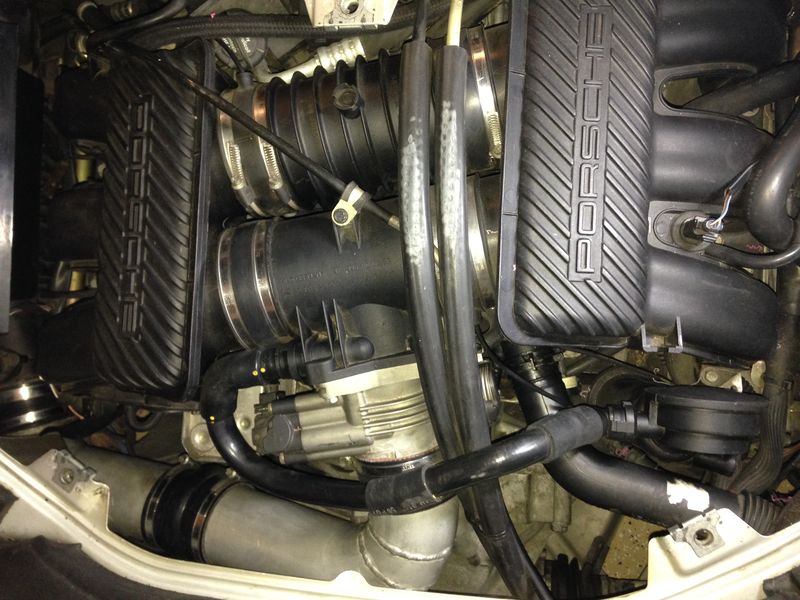
There's about a 1/2 inch gap between the flapper valve and the sheet metal after finding the right spacer to bring the motor down. I used a discarded engine mount brace for my spacers.

This thing barely fits in there. Even the headers are about 1/2 inch from hitting the aluminum bracing. It' good that I bought a semi-solid engine mount, because there's no room for it to wiggle around(Thanks Steve!).I had to notch the back sheet metal close to the intake tube for the tube to clear. I combined an intake tube from a 996 and a 1/3 of a 986. You also will notice I changed the brake vacuum attachment. The previous design wouldn't clear the 987 engine cover. I used the 986 attachment but extended it a few inches.

__________________
Woody
|
|
|
|
|
04-15-2016, 04:36 PM
|
#15
|
|
Registered User
Join Date: Jun 2014
Location: LB, Germany
Posts: 1,515
|
Did you use the stock transmission mounts or did you user lower mounts? Some years ago FVD Brombacher (German Porsche tuner) had a 3.4 conversion kit for the 986. They used a different front mount - kind of subframe and other transmission mounts. I think the transmission mounts where from a 993. They hadn't clearance problems like you - nothing had to be cut out. I think the 3.4 engine was dropped about 1 inch or so compared to the 3.2 engine. Also you should check if the engine has enough clearance if it moves. This looks very tight.
Regards, Markus
|
|
|
|
|
04-16-2016, 08:21 AM
|
#16
|
|
Registered User
Join Date: May 2015
Location: So Cal
Posts: 42
|
__________________
99 Box 3.4, PSS9's
|
|
|
|
|
04-19-2016, 04:27 PM
|
#17
|
|
Registered User
Join Date: Jul 2013
Location: Bastrop, Tx
Posts: 2,644
|
When looking to do this swap, I only found two sources for step by step procedures on swapping the 3.4 into a boxster. Both had the flapper valve towards the front and top. I just assumed that's how it had to be. Going that direction does not leave you much room at all and that's why I decided to notch the area around it. I really have to thank cbadbox for the pic. I tried it like yours, and there's soo much more room flipping it over like yours. I didn't need to notch that area but I'm glad I notched the area by the intake runner and intake horn. I like having the extra space if need be. My Chinese headers hit the aluminum brace a little, so I'll notch that a little too.

Another bad idea was trying to bring the shifter cables under the intake. I thought I read somewhere that was better than going over everything. It's not! I had to take everything apart and bring them back over the intake. Another great tip. Make sure you connect all your electrical connectors correctly and securely. I had the cam position sensor and the crank position sensor switched. I also didn't have 4 & 6 injectors fully connected.
It's alive!!!!!
https://www.youtube.com/watch?v=8OiUb9IOMj4
My oil pressure gauge works but I had it disconnected at the time I was taping. My water temp does not work though and I'm betting that's because the 996 I pulled the motor and DME had the 4 post temp gauge and my 3.2 engine wiring harness used the 2 post water temp gauge sender.
I'm using the factory trans mounts because the one's I had were good and I was too cheap to buy new mounts.
__________________
Woody
Last edited by itsnotanova; 04-19-2016 at 04:49 PM.
|
|
|
|
|
04-19-2016, 07:05 PM
|
#18
|
|
Registered User
Join Date: May 2015
Location: So Cal
Posts: 42
|
Woody I am glad the pic help out, more dumb luck versus technical knowledge on my part.
Mario
__________________
99 Box 3.4, PSS9's
|
|
|
|
|
04-19-2016, 07:13 PM
|
#19
|
|
Registered User
Join Date: May 2015
Location: So Cal
Posts: 42
|
Woody I am glad the pic help out, more dumb luck versus technical knowledge on my part.
Mario
Oops double post, looks like I need some technical work on posting as well!
__________________
99 Box 3.4, PSS9's
Last edited by cbadbox; 04-19-2016 at 07:17 PM.
|
|
|
|
|
04-19-2016, 08:24 PM
|
#20
|
|
Registered User
Join Date: Oct 2014
Location: California Central Coast
Posts: 1,476
|
Must feel great resurrecting one from the dead. Congrats
|
|
|
|
 Posting Rules
|
You may not post new threads
You may not post replies
You may not post attachments
You may not edit your posts
HTML code is Off
|
|
|
All times are GMT -8. The time now is 05:01 PM.
| |


 "GRAY"


 1998 Porsche Boxster
 Hybrid Mode


