 12-16-2015, 12:21 PM
|
#1
|
|
1999 base
Join Date: Dec 2011
Location: Coral Springs FL
Posts: 1,617
|
rear wheel bearing
Hello guys.
in the middle of replacing rear wheel bearings on 01S.
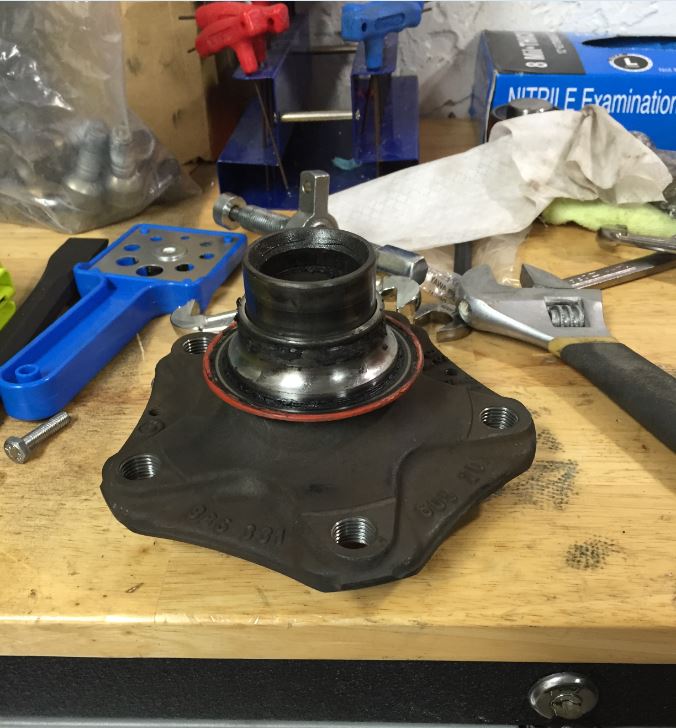
using the sir tool to remove the hub, the hub came out with the inner race of the bearing still attached to it.
not sure if i did something wrong, or the bearing was so bad that it fall apart.
anyway, i'm on my way now to the local autozone or HF to look for a puller that might help. i noticed two grooves on the hub so i assume some sort of a puller will fit in there.
if you got any ideas how to remove it, it will be appreciated.
thanks in advance.
Meir.
Last edited by Meir; 12-16-2015 at 12:58 PM.
|

|

|
|
12-16-2015, 02:19 PM
|
#2
|
|
Registered User
Join Date: Sep 2012
Location: UK
Posts: 140
|
 Rear wheel bearing replacement
Quote:
Originally Posted by Meir

Hello guys.
in the middle of replacing rear wheel bearings on 01S.
using the sir tool to remove the hub, the hub came out with the inner race of the bearing still attached to it.
not sure if i did something wrong, or the bearing was so bad that it fall apart.
anyway, I'm on my way now to the local autozone or HF to look for a puller that might help. i noticed two grooves on the hub so i assume some sort of a puller will fit in there.
if you got any ideas how to remove it, it will be appreciated.
thanks in advance.
Meir.
|
Hello Meir
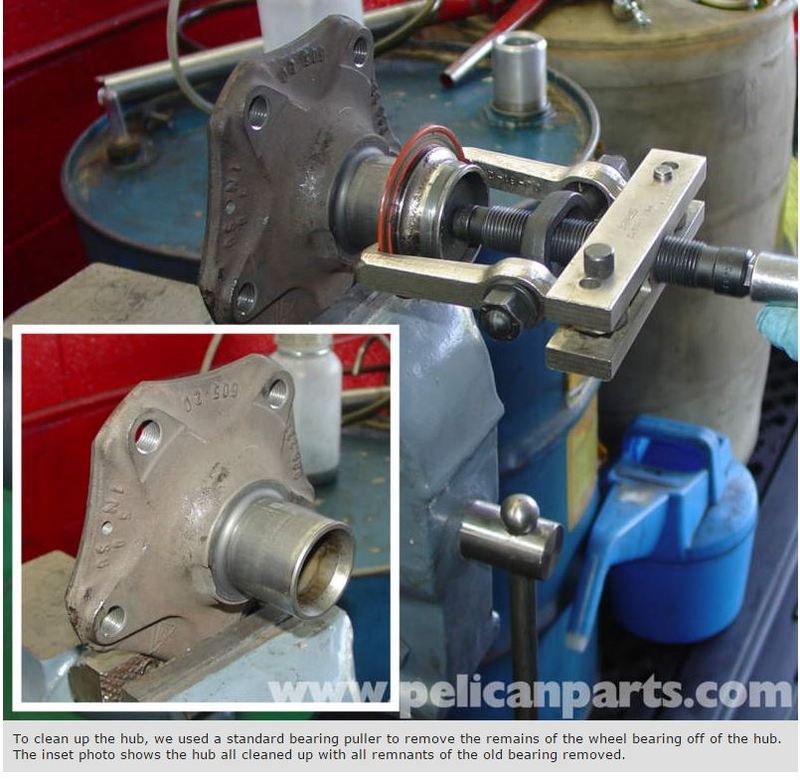
I just seen your post. One place you could have a look is Pelican Parts. I went to their site and they have it all explained there. They have one photo showing the bearing just how yours is with a two prong puller dragging it off.
|
|
|
|
|
12-16-2015, 02:43 PM
|
#3
|
|
1999 base
Join Date: Dec 2011
Location: Coral Springs FL
Posts: 1,617
|
Quote:
Originally Posted by derfo
Hello Meir
I just seen your post. One place you could have a look is Pelican Parts. I went to their site and they have it all explained there. They have one photo showing the bearing just how yours is with a two prong puller dragging it off.
|
yes.
thank you very much for the reply.
you are probably referring to this picture:
i was kind of hoping to pick something local and finish it today. 
i got few generic pullers, butt none of them worked.
i have a transmissions rebuild shop close to my office. i will probably stop there tomorrow, and see if they could pull it out for me.
|
|
|
|
|
12-16-2015, 02:49 PM
|
#4
|
|
1999 base
Join Date: Dec 2011
Location: Coral Springs FL
Posts: 1,617
|
|
|
|
|
|
12-16-2015, 03:06 PM
|
#5
|
|
Registered User
Join Date: Sep 2012
Location: UK
Posts: 140
|
Puller
Quote:
Originally Posted by Meir
|
It looks to me like there are no hooks. I don't think those round disc's would be up to it, also don't think they would fit either and it all looks a bit lightweight as well. Take your hub to the place near you and see what they have got first.
|
|
|
|
|
12-16-2015, 03:10 PM
|
#6
|
|
Registered User
Join Date: Oct 2014
Location: SE Ma
Posts: 261
|
Quote:
Originally Posted by Meir
|
The tool pictured in this post is what you need to start the race off. Then a 2 or 3 arm puller or a press to finish the job.
|
|
|
|
|
12-16-2015, 04:16 PM
|
#7
|
|
1998 Boxster
Join Date: Aug 2012
Location: Lakewood, Ohio
Posts: 110
|
I replaced the front bearings last week on my Honda Odyssey. Both hubs came off with the inner race, just like yours. I found a tip that suggested to use a dermal tool with a metal cutting wheel and make a cut across the race about an eighth of an inch deep, in two or three places. Try to cut as deep as you can without cutting through to the hub. Once you have scored the race, take a chisel, setting it into the groove that you have cut. A couple good wacks with a hammer will break it through completely. In my case, one groove was enough to loosen the bearing enough to slide it off. If necessary, you may have to cut a second or third groove. This technique was easy and worked like a charm.
|
|
|
|
|
12-16-2015, 04:27 PM
|
#8
|
|
1998 Boxster
Join Date: Aug 2012
Location: Lakewood, Ohio
Posts: 110
|
Here is what the cut should look like 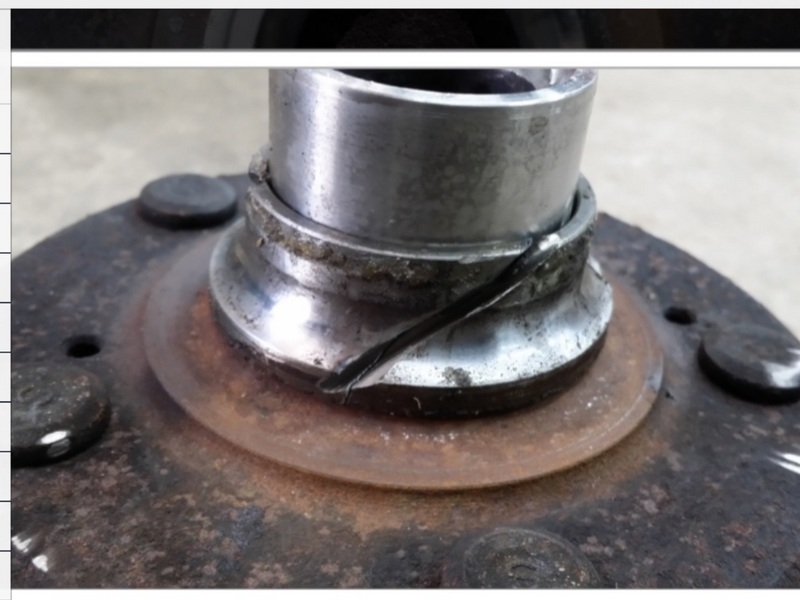
|
|
|
|
|
12-16-2015, 04:41 PM
|
#9
|
|
1999 base
Join Date: Dec 2011
Location: Coral Springs FL
Posts: 1,617
|
Success!
guys, thank you very much for your comments.
after posting my comments, and having a cold drink (it's 87 degrees today), i went back to the shop, and try something else.
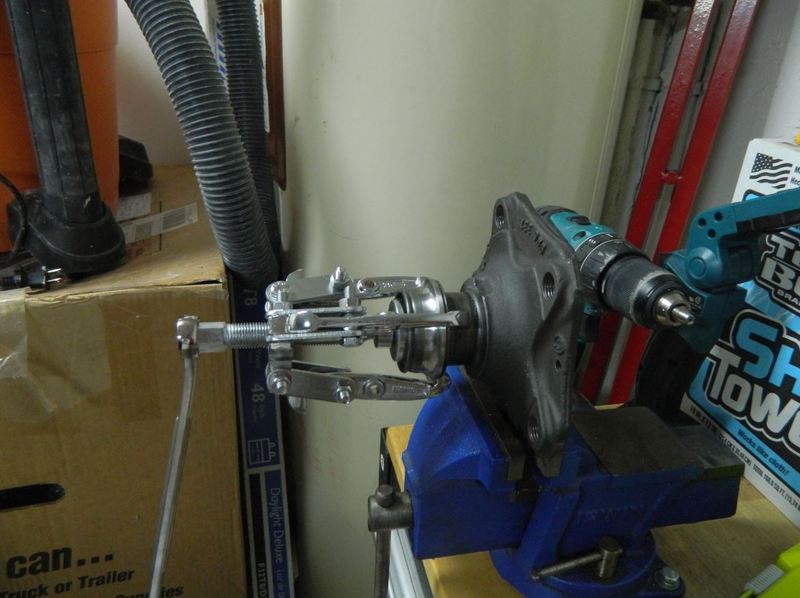
i took parts from two different pullers, and created a new one.
i had to modify it a bit, by grinding the arms.
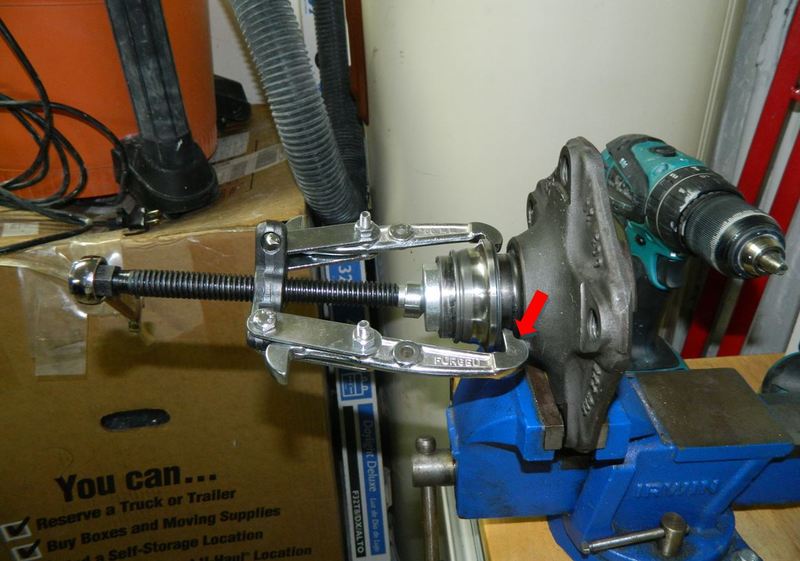
once i got it moving, i had the space to go in with the 3 hands puller, just like Deadeye suggested.
|
|
|
|
|
12-16-2015, 04:43 PM
|
#10
|
|
1999 base
Join Date: Dec 2011
Location: Coral Springs FL
Posts: 1,617
|
Quote:
Originally Posted by derfo
It looks to me like there are no hooks. I don't think those round disc's would be up to it, also don't think they would fit either and it all looks a bit lightweight as well. Take your hub to the place near you and see what they have got first.
|
you are probably right.
i think this one will make a better fit for this job.
http://www.amazon.com/OTC-4534-Multipurpose-Bearing-Pulley/dp/B00061SM9E/ref=pd_bxgy_263_img_2?ie=UTF8&refRID=1FERVKZW75R1XCQ0RGE4
added to my amzon wishlist, as im sure i will have to do this job again one day 
|
|
|
|
|
12-16-2015, 04:46 PM
|
#11
|
|
1999 base
Join Date: Dec 2011
Location: Coral Springs FL
Posts: 1,617
|
Quote:
Originally Posted by rah rah 986
Here is what the cut should look like |
that is a very good idea.
|
|
|
|
|
12-17-2015, 09:16 AM
|
#12
|
|
Registered User
Join Date: May 2014
Location: S.California
Posts: 2,029
|
Meir,
You seem to be getting deeper into the mechanical bowels of the Boxster with each post !Well done and thanks for sharing.
So let me anticipate one of your future posts and suggest a better puller ?
Eventually you are going to need to replace a bearing and maybe 2nd gear in the 6 speed gearbox. For that you need a puller that coincidentally would work on the hub but is also about the only one that fits for the gearbox.It is a Kukko slender arm puller KK 20-10-S
http://www.amazon.com/Kukko-KK20-10-Slender-Adjusting-Puller/dp/B00D8VL11A
A cheaper alternative that may work is:
 12 PC New Car Repair Tools Universal Puller Set Two Arms Pulley Remover N008341 | eBay 12 PC New Car Repair Tools Universal Puller Set Two Arms Pulley Remover N008341 | eBay
The 'dremel-tool' technique mentioned earlier certainly works but requires great care.
When fitting the new bearing, remember the freezer/oven technique to avoid damage.
Are you doing the CV boots also?
Keep us posted.
|
|
|
|
|
12-17-2015, 09:46 AM
|
#13
|
|
1999 base
Join Date: Dec 2011
Location: Coral Springs FL
Posts: 1,617
|
Quote:
Originally Posted by Gelbster
Meir,
You seem to be getting deeper into the mechanical bowels of the Boxster with each post !Well done and thanks for sharing.
So let me anticipate one of your future posts and suggest a better puller ?
Eventually you are going to need to replace a bearing and maybe 2nd gear in the 6 speed gearbox. For that you need a puller that coincidentally would work on the hub but is also about the only one that fits for the gearbox.It is a Kukko slender arm puller KK 20-10-S
http://www.amazon.com/Kukko-KK20-10-Slender-Adjusting-Puller/dp/B00D8VL11A
A cheaper alternative that may work is:
12 PC New Car Repair Tools Universal Puller Set Two Arms Pulley Remover N008341 | eBay
The 'dremel-tool' technique mentioned earlier certainly works but requires great care.
When fitting the new bearing, remember the freezer/oven technique to avoid damage.
Are you doing the CV boots also?
Keep us posted. |
thank you very much Gelbster.
added the tool to my wish list.
bearing are seating in the freezer for few days now
i rebuilt the axles (boots and joints) about 15k miles ago, and they still look good.
i hope to finish it tomorrow, and find the time to make a nice write up.
i was very surprised to see that there is no instructions or videos online for this procedure, using the SIR tool.
its very easy once you figure it out, but it is some what of a jigsaw Puzzle.
|
|
|
|
|
04-09-2016, 07:07 PM
|
#14
|
|
1999 base
Join Date: Dec 2011
Location: Coral Springs FL
Posts: 1,617
|
Hello guys.
due to lack of time, i never got around to update this thread, and do the write-up as i wanted to.
i will try to add some pictures and explanation to the thread, and maybe one day will find the time to make a PDF document of the full procedure.
|
|
|
|
|
04-09-2016, 08:57 PM
|
#15
|
|
1999 base
Join Date: Dec 2011
Location: Coral Springs FL
Posts: 1,617
|
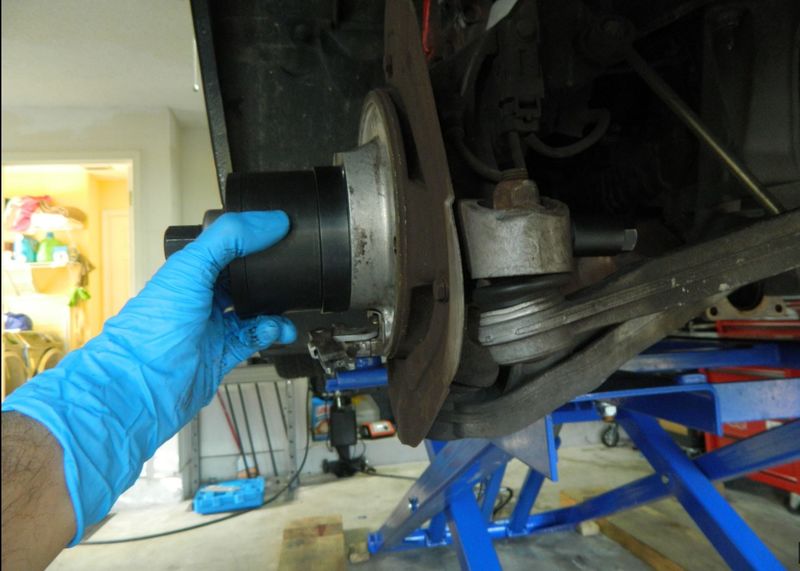
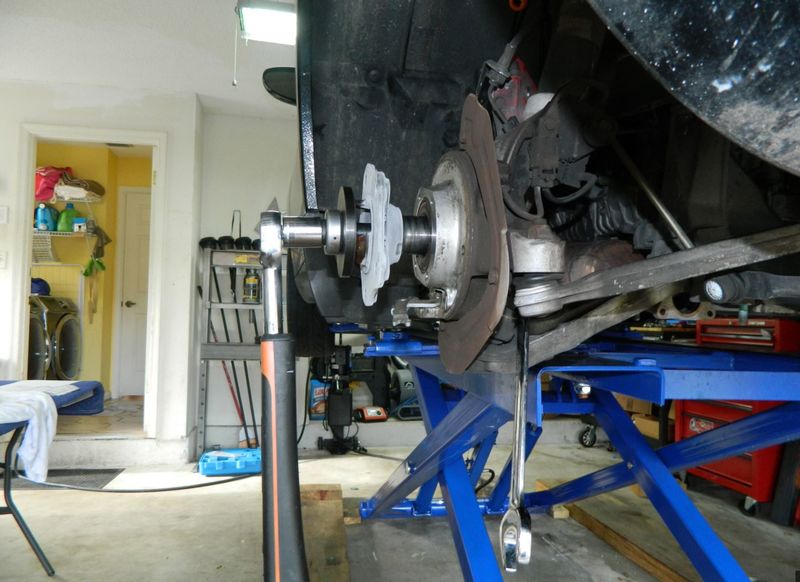
the first step after removing the axle, is to remove the hub.
use the SIR tool as described in page #1 in the manual.
i know that some succeeded in installing the "horseshoe" part without removing the e-brake pads. didn't work for me.
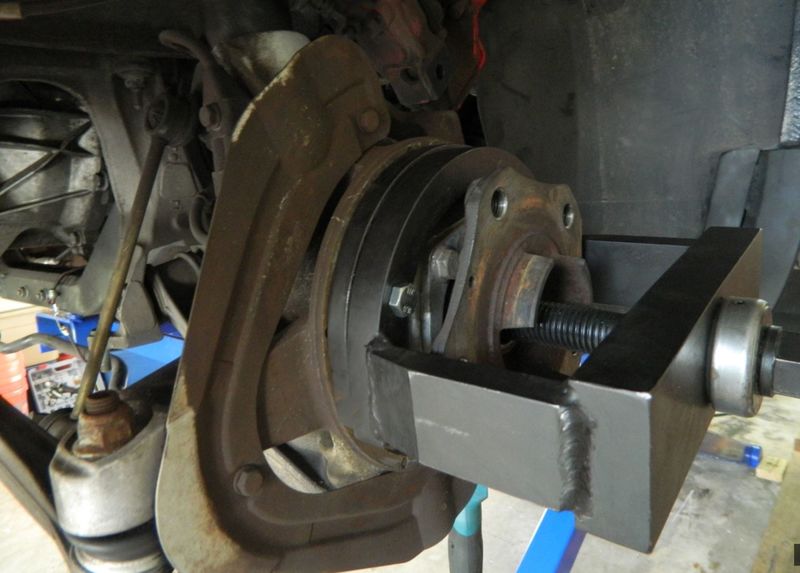
this is the setup from the front.
and from the back
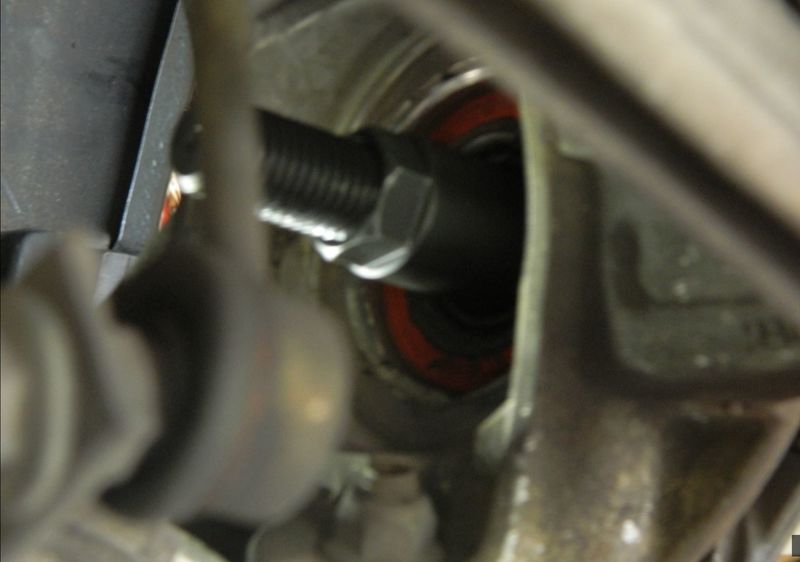
when the hub comes out, the bearing will brake apart and the inner race will stay on the bearing.
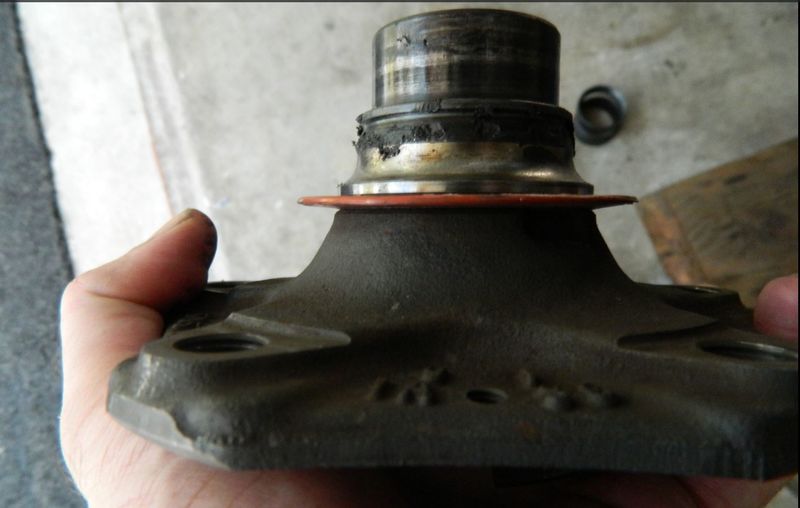
the hub has to grooves in it, that will allow you to insert the hands of the bearing puller, as described in earlier posts in this thread.
once removing the inner race of the bearing from the hubs, i placed the hubs in the freezer.
Last edited by Meir; 04-09-2016 at 09:56 PM.
|
|
|
|
|
04-09-2016, 09:10 PM
|
#16
|
|
1999 base
Join Date: Dec 2011
Location: Coral Springs FL
Posts: 1,617
|
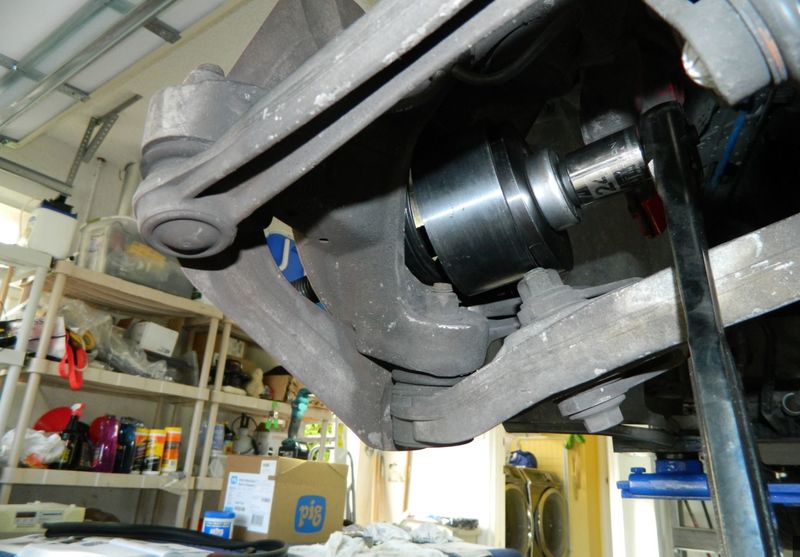
this is how it looks with the hub removed.
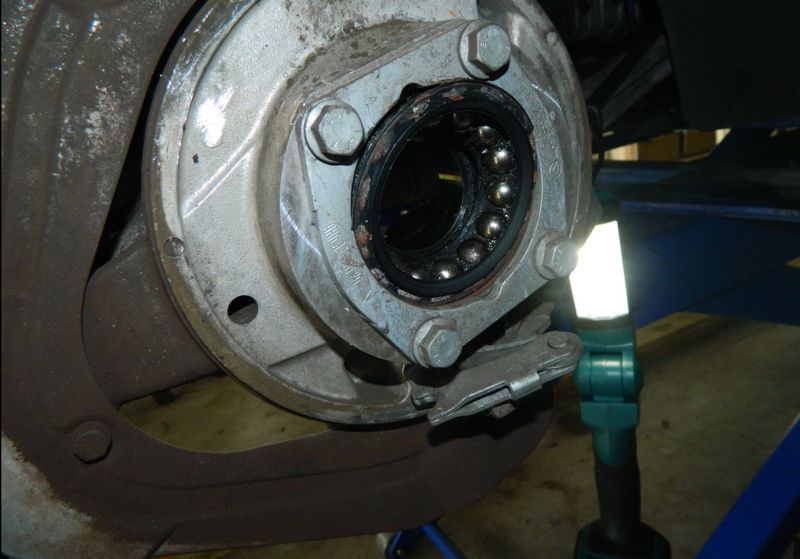
remove the 4 screws and the retaining plate, and continue to bearing removal.
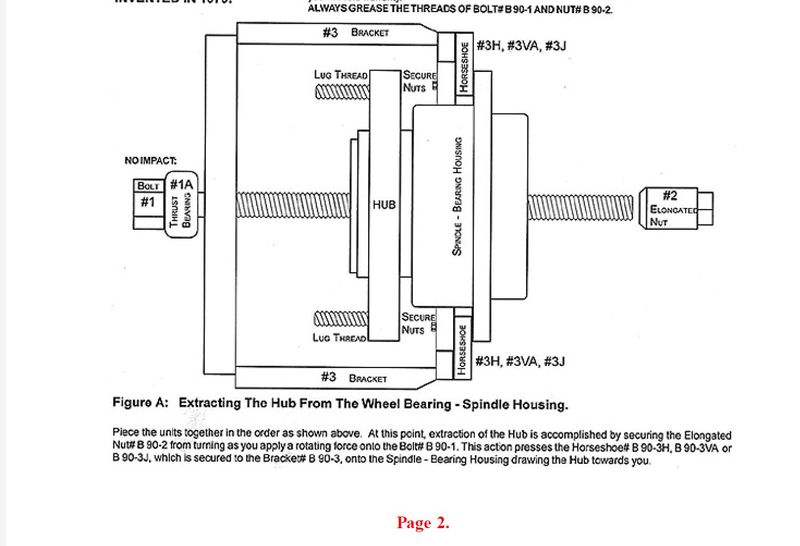
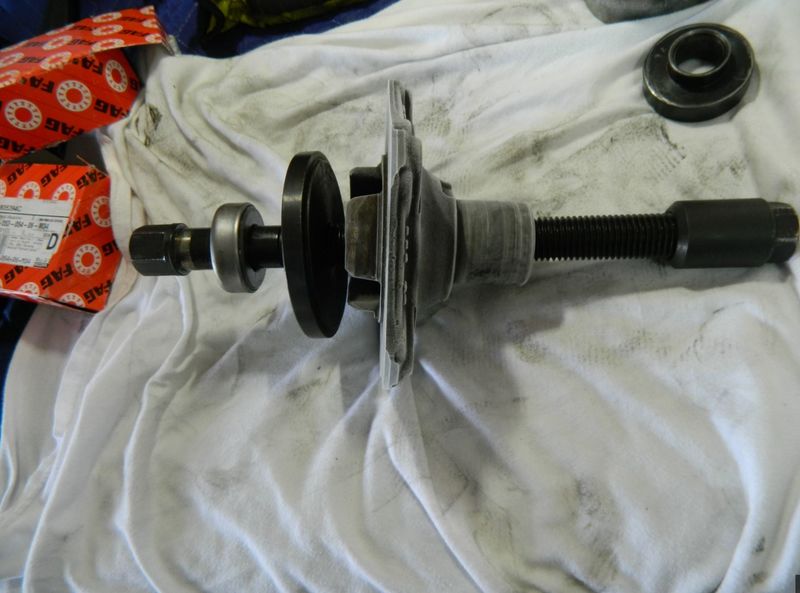
this is the setup of the tool for bearing removal.
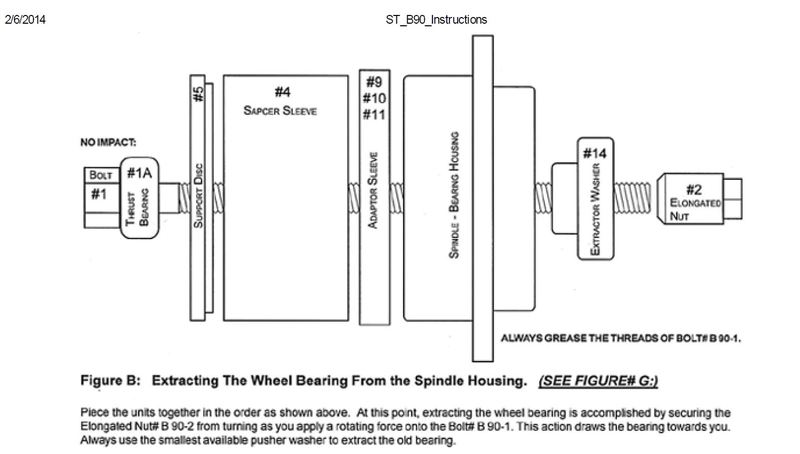
this is to illustrate the order of the parts with relation to the bearing. picture was taken after the bereang was already
removed.
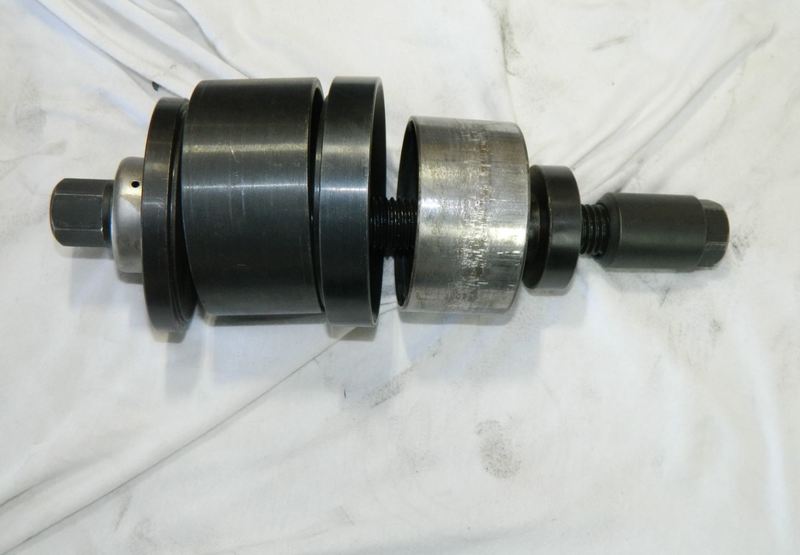
this is how the setup looks from the front
and from the back
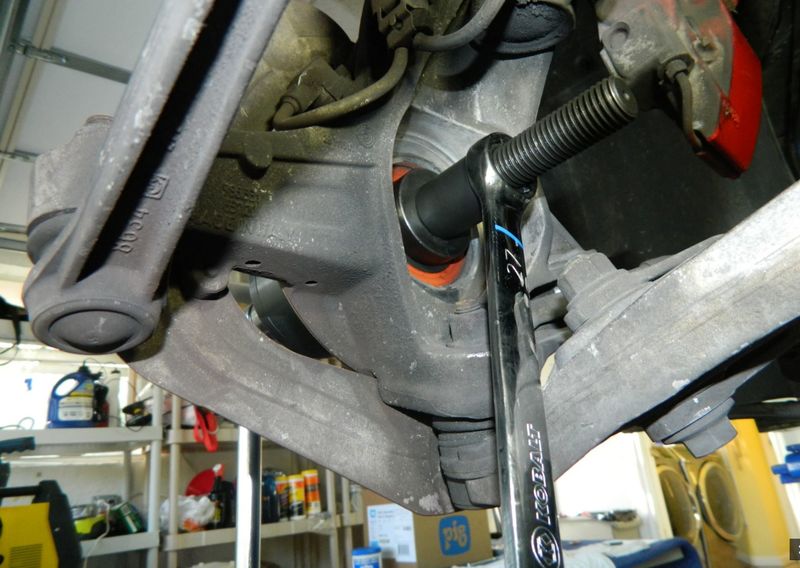
VERY IMPORTANT! make sure all parts of the tool are perfectly aligned with the outer and inner races of the bearing respectively, before you start wrenching. not easy when you need to hold all the parts and wrench on both sides. the tool is also pretty heavy.
if you have someone who can help you, that will be great. this is one of these projects where another set of hands is a bless.
Last edited by Meir; 04-09-2016 at 09:20 PM.
|
|
|
|
|
04-09-2016, 09:51 PM
|
#17
|
|
1999 base
Join Date: Dec 2011
Location: Coral Springs FL
Posts: 1,617
|
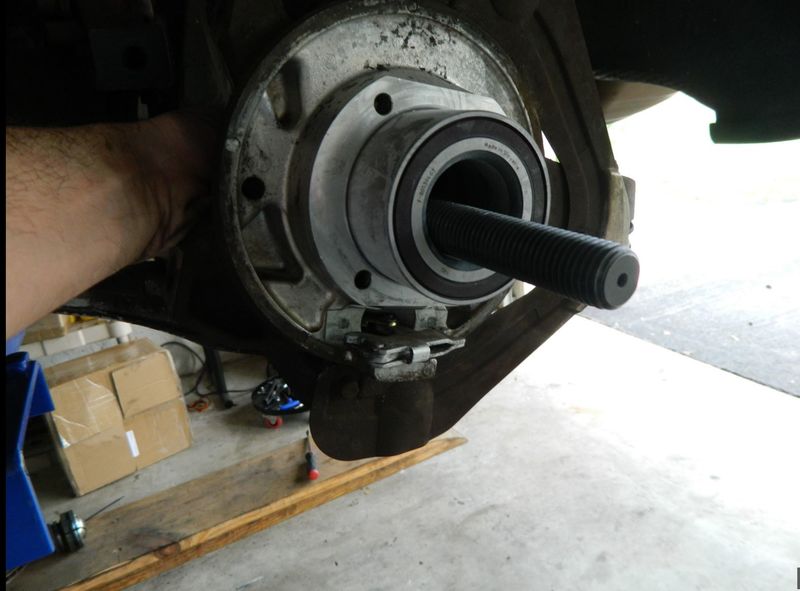
this is the setup for installing the new bearing.
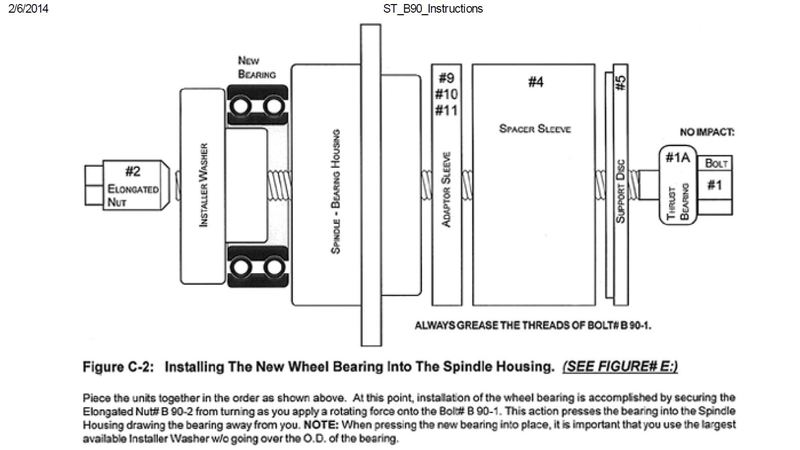
the setup of the tool is very similar to the removing setup, but part #14 is replaced by the installation washer and the orientation of the tool is reversed.
this is how it looks from the front
and this is from the back
before i started wrenching, i made sure the bearing is totally squarer with the bearing housing.
i took the bearing out of the freezer and lightly taped it with a rubber mallet, before i put the tool over it, so basically the bearing was slightly inserted, and hanging by itself in the housing.
i made sure the plate is touching the housing, and the bearing is totally inserted and flush with the surface.
|
|
|
|
|
04-09-2016, 10:02 PM
|
#18
|
|
1999 base
Join Date: Dec 2011
Location: Coral Springs FL
Posts: 1,617
|
after having the first bearing in, that was the point i made a horrible mistake.
the next step after inserting the bearing should be to reinstall the retaining plate. i forgot to do that, and continued with installing the hub.
i ended up repeating the whole process from the beginning 
removing the hub, removing the inner race from the hub and removing the bearing from the housing.
boy. that was a long day.
obviously, i also needed a new bearing.
lucky for me, i live 2 minutes drive from tuneRS (literally)so i gave the call.
they didn't have the bearing in hand, but was kind enough to order it for me.
the guy gave me a call in about an hour, and i picked it up.
so its good opportunity to thank the guys at tuneRS, for saving me the trip to the stealership.
Last edited by Meir; 04-09-2016 at 10:37 PM.
|
|
|
|
|
04-09-2016, 10:48 PM
|
#19
|
|
1999 base
Join Date: Dec 2011
Location: Coral Springs FL
Posts: 1,617
|
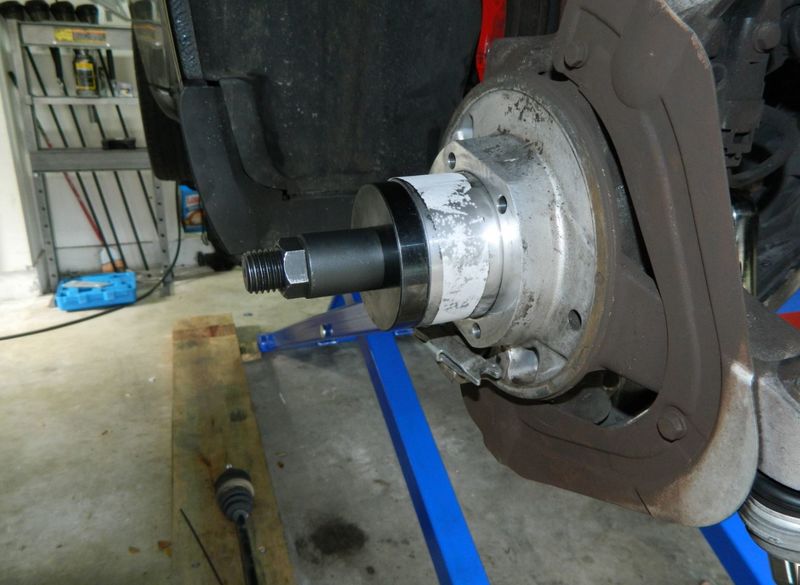
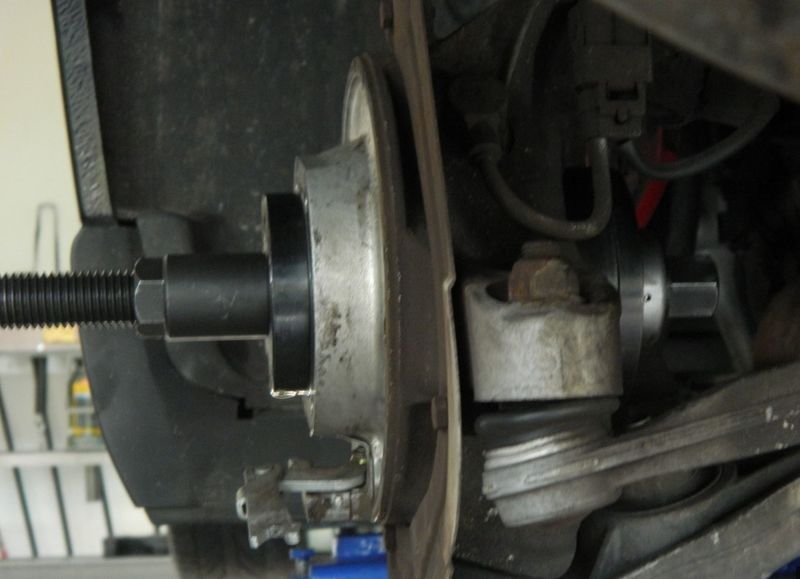
installing the hub tool setup.
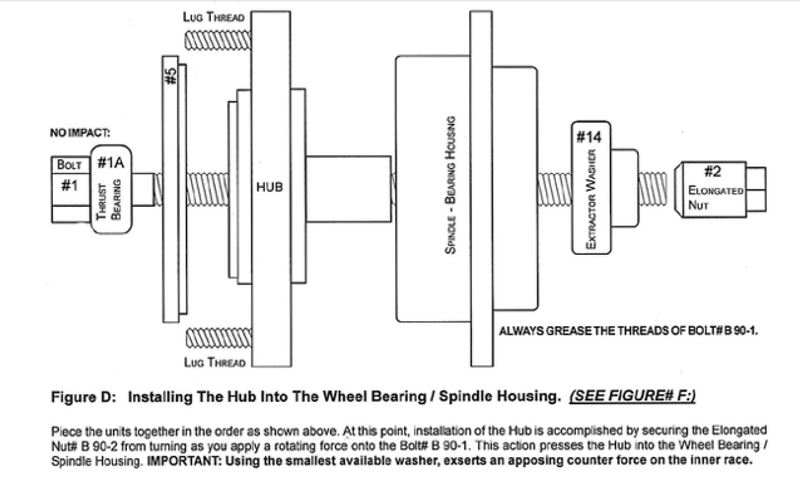
pretty straight foreword.
from the front
from the back

|
|
|
|
|
04-09-2016, 11:04 PM
|
#20
|
|
1999 base
Join Date: Dec 2011
Location: Coral Springs FL
Posts: 1,617
|
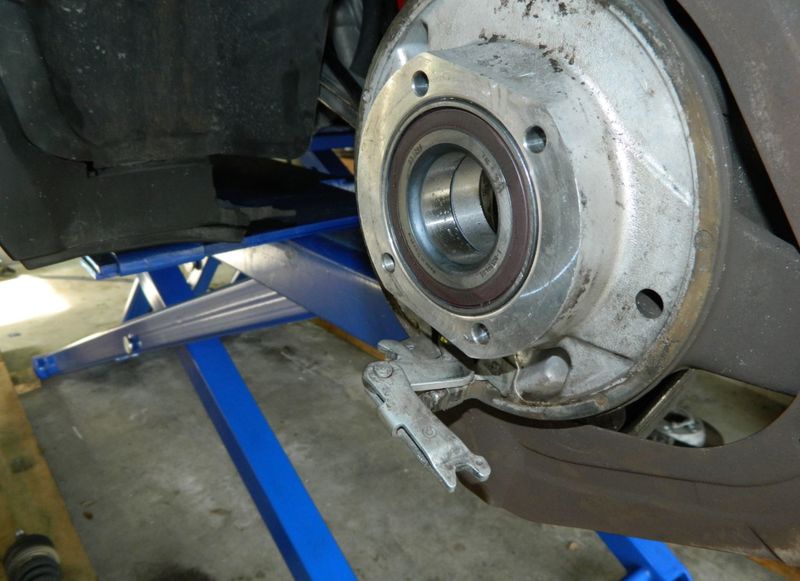
that's about it.
let me know if you have any questions.
for me, this project was most challenging due to the fact i wasn't 100 percent prepared.
pulling the inner race of the bearing without the right tool was probably the hardest part, and having to repeat it because i forgot to install the retraining plate, was very frustrating.
took me couple of days to recover from all that heavy wrenching, but after all (and like always) it was another good learning experience that i enjoyed very much.
|
|
|
|
 Posting Rules
|
You may not post new threads
You may not post replies
You may not post attachments
You may not edit your posts
HTML code is On
|
|
|
All times are GMT -8. The time now is 12:56 AM.
| |


 boxster S
 Linear Mode


