 06-15-2017, 07:51 AM
|
#1
|
|
Registered User
Join Date: Apr 2013
Location: Lincolnshire, IL
Posts: 576
|
Small foam pieces blowing from vents
My (otherwise perfect) 1998 Boxster with 80M miles occasionally blows out small pieces of dark grey foam from the vents (dashboard and floor). Its not an everyday occurrence but still it happens from time to time. The heat and the AC both work fine and the fan blows perfectly at all levels. The pieces range in size from pea size to nickel size with the larger size sometimes getting stuck in the vent louvers so I remove those with a tweezers. I'm wondering if on a car this age it's not uncommon or if it's something that I should have looked at?? Everything else is fine.
|

|

|
|
06-15-2017, 08:06 AM
|
#2
|
|
Registered User
Join Date: Nov 2012
Location: SW Okla
Posts: 1,117
|
It's pretty common.
Read this: Interior vent debris
__________________
I think I have a Porsche problem...
|

|
|
|
06-16-2017, 05:42 AM
|
#3
|
|
Registered User
Join Date: Apr 2013
Location: Lincolnshire, IL
Posts: 576
|
Thanks.....looks like a BIG job if a DIY....and a costly job if you hire a shop. I think I'll just monitor it. I seldom drive my Boxster in the winter except to exercise the engine for 15 minutes on ice/snow free sunny days. So most all of my driving is in the summer with the top down and the AC off......... I think I'll let this go for now and just drive the car. I suppose its a good sign that the pieces blow out rather than collect in the vent system.
|
|
|
|
|
06-16-2017, 11:44 AM
|
#4
|
|
Luckyed
Join Date: Apr 2014
Location: Florida
Posts: 253
|
My 2001 started puking foam a year and a half ago and now I only see a small piece every now and then. I expect there is not too much of it left in there.
Besides, I don't think I have turned on the heater since I bought the car 3 years ago........lol
__________________
2001 Base 2.7 - Arctic Silver - 5 speed - Comfort Top -
3-4 Stalk OBC Upgrade - Double DIN Head Unit
|
|
|
|
|
06-16-2017, 02:16 PM
|
#5
|
|
Motorist & Coffee Drinker
Join Date: Jul 2014
Location: Oklahoma
Posts: 3,955
|
Quote:
Originally Posted by Rob175

Thanks.....looks like a BIG job if a DIY....and a costly job if you hire a shop. I think I'll just monitor it. I seldom drive my Boxster in the winter except to exercise the engine for 15 minutes on ice/snow free sunny days. So most all of my driving is in the summer with the top down and the AC off......... I think I'll let this go for now and just drive the car. I suppose its a good sign that the pieces blow out rather than collect in the vent system.
|
It can be a big job, or a fairly quick and easy job. Did you read the whole thread that Redtele58 linked? This is from the 38th post:
__________________
I am not an attorney, mechanic, or member of the clergy. Following any advice given in my posts is done at your own peril.
|
|
|
|
|
06-16-2017, 02:18 PM
|
#6
|
|
Registered User
Join Date: May 2017
Location: SoCal
Posts: 63
|
Has anyone else used the method show in the post above? I asked in the other thread and got no response. Is this now the best and easiest method.
|
|
|
|
|
06-16-2017, 02:55 PM
|
#7
|
|
Motorist & Coffee Drinker
Join Date: Jul 2014
Location: Oklahoma
Posts: 3,955
|
Quote:
Originally Posted by ExplorerLyon
Has anyone else used the method show in the post above? I asked in the other thread and got no response. Is this now the best and easiest method.
|
I don't know how many others have done it, but mine is still working flawlessly.
__________________
I am not an attorney, mechanic, or member of the clergy. Following any advice given in my posts is done at your own peril.
|
|
|
|
|
06-19-2017, 03:20 AM
|
#8
|
|
Custom User Title Here
Join Date: Mar 2012
Location: Ft. Leonard Wood
Posts: 6,169
|
Quote:
Originally Posted by ExplorerLyon
Has anyone else used the method show in the post above? I asked in the other thread and got no response. Is this now the best and easiest method.
|
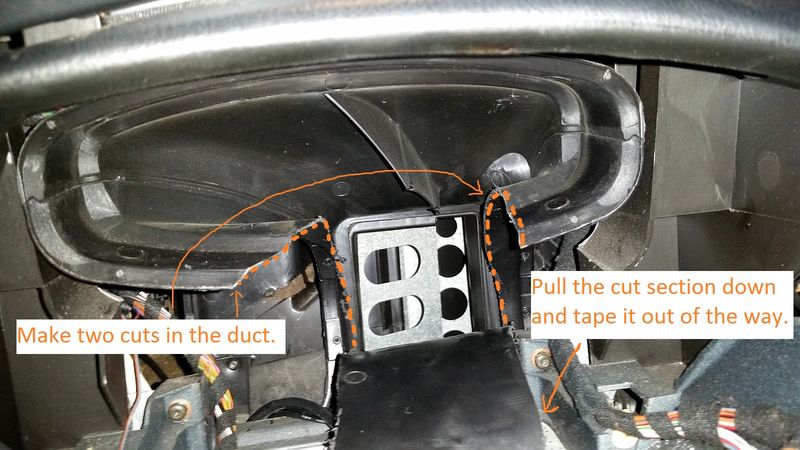
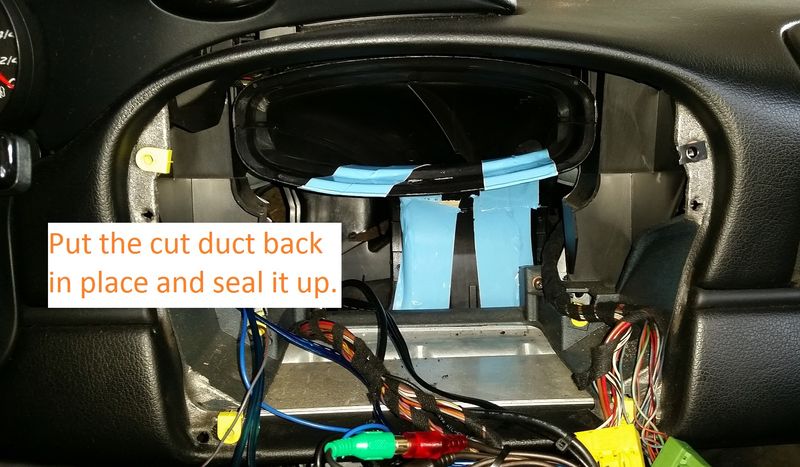
Yes. I split the upper duct at the seam, though.
It was a pain getting all of the old foam and its backing material out, and getting the flaps covered, but a lot easier and more thorough than the other method that requires removal of the heater core and does not address the other flap.
Last edited by particlewave; 07-06-2017 at 11:29 AM.
|
|
|
|
|
06-16-2017, 04:20 PM
|
#9
|
|
Registered User
Join Date: Jan 2013
Location: Houston
Posts: 370
|
Does that cover the entire flapper? I thought it's longer than that? That method definitely beats every other method if it gets the job done! Mine has also spit out all the foam. A/C is fine but heat doesn't get too hot. Thankful for seat warmers.
__________________
DD summer/winter: 2000 Boxster S
DD spring/fall: 914-6 w/ 3.0L SC Dual Webers
http://imgur.com/a/k0Wtl - My 914-6 Build/Project Story
|
|
|
|
|
06-16-2017, 05:13 PM
|
#10
|
|
Registered User
Join Date: Apr 2016
Location: SE Michigan
Posts: 496
|
Quote:
Originally Posted by patssle
Does that cover the entire flapper? I thought it's longer than that? That method definitely beats every other method if it gets the job done! Mine has also spit out all the foam. A/C is fine but heat doesn't get too hot. Thankful for seat warmers.
|
With the way you cut it up open, can you get to the bottom of two flaps to tape up holes all the way down? From pics it looks as if only top half of those flaps are exposed and accessible.
__________________
1997 Boxster arctic silver/ red, XNE riveted mahogany/ leather steering wheel & 917-style wood shift knob, Bens short shifter, PSE, 996 TB, UDP, stereo/ center console delete, hardtop and speedster humps, daily driver rain or shine or snow!
|
|
|
|
|
06-16-2017, 05:47 PM
|
#11
|
|
Motorist & Coffee Drinker
Join Date: Jul 2014
Location: Oklahoma
Posts: 3,955
|
Quote:
Originally Posted by Boxstard
With the way you cut it up open, can you get to the bottom of two flaps to tape up holes all the way down? From pics it looks as if only top half of those flaps are exposed and accessible.
|
The whole flap is accessible (both flaps). Small hands or a tool make it easier.
Quote:
Originally Posted by 78F350
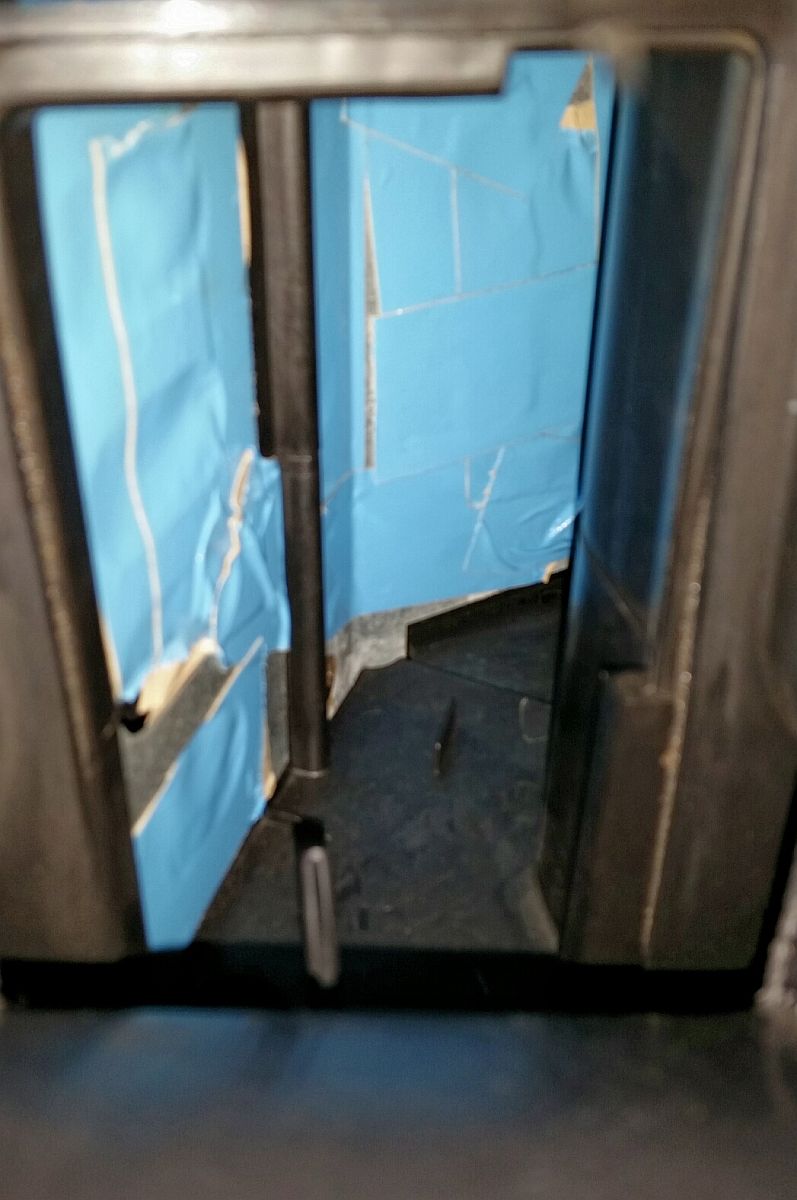
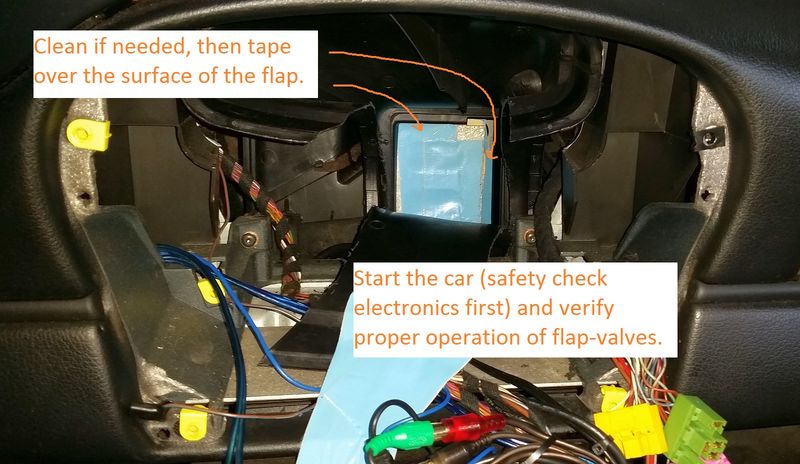
I used strips of tape that were between two and four inches long. At first I tried poking them in with a trim tool, but using my hand worked best. With the flaps in the resting position, it was difficult, but doable. I think that the best access was with the AC running and the fan on low. I poked my camera in for this shot, then put on one more piece of tape to caver a gap:
 |
Quote:
Originally Posted by Vidyashankara
78F350: Freaking awesome!
I just did this. When I opened up the console and all my foam was gone. I used a standard cutting blade to make the cuts on the vent. I used masking tape to tape up the holes. Took me totally 15 minutes in total. It was very easy to tape the vents with my hands. I did not need to use any tools
Thanks for the innovative process  |
__________________
I am not an attorney, mechanic, or member of the clergy. Following any advice given in my posts is done at your own peril.
|
|
|
|
|
06-18-2017, 04:07 PM
|
#12
|
|
Registered User
Join Date: Jul 2008
Location: austin
Posts: 825
|
Quote:
Originally Posted by patssle
Does that cover the entire flapper? I thought it's longer than that? That method definitely beats every other method if it gets the job done! Mine has also spit out all the foam. A/C is fine but heat doesn't get too hot. Thankful for seat warmers.
|
I was like -- ohh, no heat -- then I saw your Houston tag on your profile --
seriously :-)
Melting in Austin,
Mike
__________________
Drivers: '15 Panamera Hybrid (wife's), ' 01 996 GT2, 00 Boxster S, '96 993 Çab/Tip (wife's)
Race Cars: '75 911 RSR Replica & '99 Spec Boxster
mike@lonestarrpm.com
|
|
|
|
|
06-18-2017, 06:11 AM
|
#13
|
|
Registered User
Join Date: Apr 2016
Location: SE Michigan
Posts: 496
|
Oh wow, great access and I got small hands! Is this pic taken from the center stereo/ climate control opening, though? From other pics it did look like that only top half of flaps were expose, maybe the cut section was not peeled back all the way down?
__________________
1997 Boxster arctic silver/ red, XNE riveted mahogany/ leather steering wheel & 917-style wood shift knob, Bens short shifter, PSE, 996 TB, UDP, stereo/ center console delete, hardtop and speedster humps, daily driver rain or shine or snow!
|
|
|
|
|
06-18-2017, 07:47 PM
|
#14
|
|
Motorist & Coffee Drinker
Join Date: Jul 2014
Location: Oklahoma
Posts: 3,955
|
Quote:
Originally Posted by Boxstard
...From other pics it did look like that only top half of flaps were expose, maybe the cut section was not peeled back all the way down?
|
The cut section was not peeled as far is it can be. All of both flaps can be reached, but seeing them completely may be difficult due to the angle and depth behind the dashboard.
Back to my original posts in the other thread, here's a pic that I posted showing the back side of the duct that you are cutting for access.
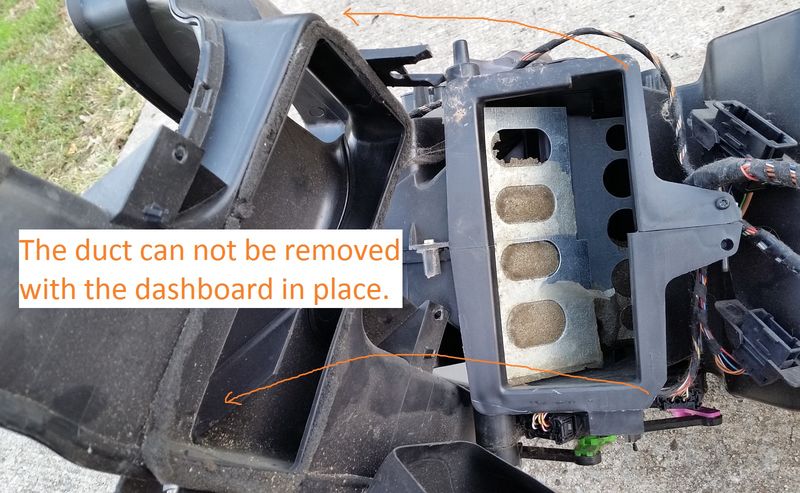
Or perhaps read the entire post where I introduced the concept:
Interior vent debris
__________________
I am not an attorney, mechanic, or member of the clergy. Following any advice given in my posts is done at your own peril.
|
|
|
|
|
06-19-2017, 06:44 AM
|
#15
|
|
Registered User
Join Date: Apr 2016
Location: SE Michigan
Posts: 496
|
Okay thanks for additional pictures for further clarity. This is going to be my project in near future.
I'm thinking of using aluminum duct tape but any potential issues? I wonder why they used foam to plug those holes in the first place that can not be air-tight, just for muffling and noise dampening? Will blocking holes with solid tape create hissing noise?
__________________
1997 Boxster arctic silver/ red, XNE riveted mahogany/ leather steering wheel & 917-style wood shift knob, Bens short shifter, PSE, 996 TB, UDP, stereo/ center console delete, hardtop and speedster humps, daily driver rain or shine or snow!
Last edited by Boxstard; 06-19-2017 at 08:06 AM.
|
|
|
|
|
06-19-2017, 09:18 AM
|
#16
|
|
Registered User
Join Date: Aug 2012
Location: Miramar, FL
Posts: 163
|
Vent foam
I have almost eliminated this issue by doing the following.
1. Close all A/C vents
2. Turn A/C on HIGH with air direction straight out (no upper or lower stream)
3. Turn vacuum cleaner on and place nozzle brush against each vent, opening only that vent.
4. Close vent and repeat with other dash vents.
The air pressure forced the foam pieces to come out of each vent. I did this over a year ago and have had only a couple of small pieces come out since. I may need to do this again at some point, depending on how much foam was left behind and when it deteriorates.
|
|
|
|
|
06-19-2017, 04:43 PM
|
#17
|
|
Custom User Title Here
Join Date: Mar 2012
Location: Ft. Leonard Wood
Posts: 6,169
|
Quote:
Originally Posted by Alfieg23
I have almost eliminated this issue by doing the following.
1. Close all A/C vents
2. Turn A/C on HIGH with air direction straight out (no upper or lower stream)
3. Turn vacuum cleaner on and place nozzle brush against each vent, opening only that vent.
4. Close vent and repeat with other dash vents.
The air pressure forced the foam pieces to come out of each vent. I did this over a year ago and have had only a couple of small pieces come out since. I may need to do this again at some point, depending on how much foam was left behind and when it deteriorates.
|
The problem with this is that the flaps have holes.
Last edited by particlewave; 06-21-2017 at 10:10 PM.
|
|
|
|
|
06-21-2017, 08:37 AM
|
#18
|
|
Registered User
Join Date: May 2014
Location: S.California
Posts: 2,029
|
Quote:
Originally Posted by Alfieg23
I have almost eliminated this issue by doing the following.
1. Close all A/C vents
2. Turn A/C on HIGH with air direction straight out (no upper or lower stream)
3. Turn vacuum cleaner on and place nozzle brush against each vent, opening only that vent.
4. Close vent and repeat with other dash vents.
The air pressure forced the foam pieces to come out of each vent. I did this over a year ago and have had only a couple of small pieces come out since. I may need to do this again at some point, depending on how much foam was left behind and when it deteriorates.
|
What pity this does not work well ! Particlewave explained why .
But suppose you install a simple,direct,hand operated valve on the hot coolant inlet hose to the heater core .That would prevent warming of the a/c air. Anyone tried this? Where is the best location for such a valve ? It should be simple to just use a Home Depot valve with a hose barb at each side.
This one even has some bling ! Would tke 20 mins max to do
SharkBite 3/8 in. Chrome-Plated Brass PEX Barb Quarter-Turn Straight Stop-23382LF - The Home Depot
or search AmaZon for "3/8 barb x barb valve" Maybe 1/2" is the correct size? It is easy to just rummage at H.D.Plumbing Dept with a sample of your heater hose in hand and get separate barb fittings to connect to a standard,straight brass valve.
If this would work it would be a good interim fix because the procedures described above would take many hours of careful work.
While you are in there jobs? - the horn ring fix !
Feel free to improve on the suggestion
Last edited by Gelbster; 06-21-2017 at 05:38 PM.
|
|
|
|
|
06-21-2017, 03:02 PM
|
#19
|
|
Registered User
Join Date: Aug 2012
Location: Miramar, FL
Posts: 163
|
Vent foam
The process I suggested is not to be done while driving so it does not affect the air temperature while driving. I did it to see if it resolved the frequent pieces of foam from shooting out the vents. I open each vent with the A/C on full blast for maybe 5 minutes each with the vacuum on and its nozzle brush flush against the open vent (and the other vents closed). After I repeat this with each vent, I then open all the vents and resume using the A/C as usual. I have only had a couple of small pieces of foam come out in over a year which I think is pretty good.
|
|
|
|
|
06-21-2017, 03:45 PM
|
#20
|
|
Custom User Title Here
Join Date: Mar 2012
Location: Ft. Leonard Wood
Posts: 6,169
|
Quote:
Originally Posted by Alfieg23
The process I suggested is not to be done while driving so it does not affect the air temperature while driving. I did it to see if it resolved the frequent pieces of foam from shooting out the vents. I open each vent with the A/C on full blast for maybe 5 minutes each with the vacuum on and its nozzle brush flush against the open vent (and the other vents closed). After I repeat this with each vent, I then open all the vents and resume using the A/C as usual. I have only had a couple of small pieces of foam come out in over a year which I think is pretty good.
|
I think you missed the point.
Without installing new material on the flaps to replace the lost foam, the diverter flaps won't divert correctly.
Your AC will be blowing over the hot heater core, at least partially, making the AC not as cold as it could/should be.
Last edited by particlewave; 06-22-2017 at 12:21 PM.
|
|
|
|
 Posting Rules
|
You may not post new threads
You may not post replies
You may not post attachments
You may not edit your posts
HTML code is On
|
|
|
All times are GMT -8. The time now is 08:02 AM.
| |


 2002 Porsche Boxter S
 2001 Porsche Boxster S
 1999 Porsche Boxster
 1999 Porsche Boxster
 1999 Porsche Boxster
 1999 Porsche Boxster
 2000 Porsche Boxster
 1999 Porsche 996 C4
 1972 Porsche 914
 1984 Porsche 928S
 1984 Porsche 928S
 1985 BMW 635 Csi
 2001 Porsche 986 Base
 2007 Porsche Cayman S
 Softail Custom
 Parts Car, car parts
 Honda Del Sol(s)
 "Hers"
 My Original '99
 The 78 F350
 This
This That
That The S 2.5
 Other
Other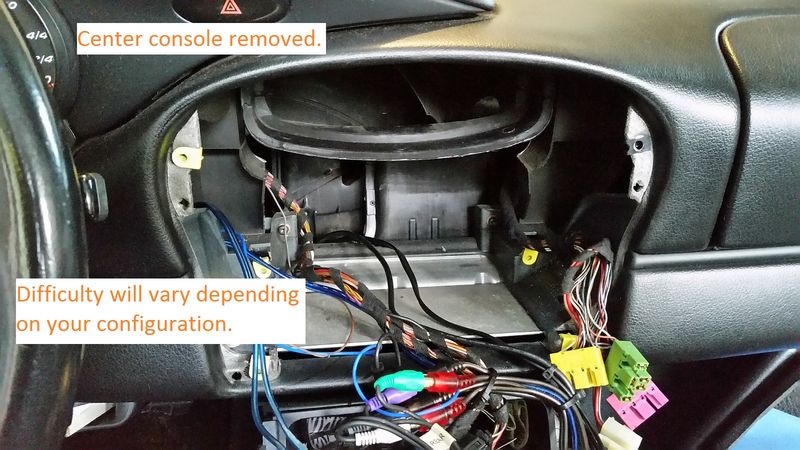

 Hybrid Mode


