 07-22-2016, 01:25 PM
|
#1
|
|
Registered User
Join Date: Oct 2014
Location: California Central Coast
Posts: 1,476
|
Transmission gear oil change made easy.
I have not found this in any searches so thought I'd share here for anyone that has this on their to do list. I just couldn't see having to remove underbody components for a routine job, so this is what I did.
First I rounded up a 1.750" hole saw. I used this size hole so my Porsche required 16mm triple square tamper proof socket would fit.
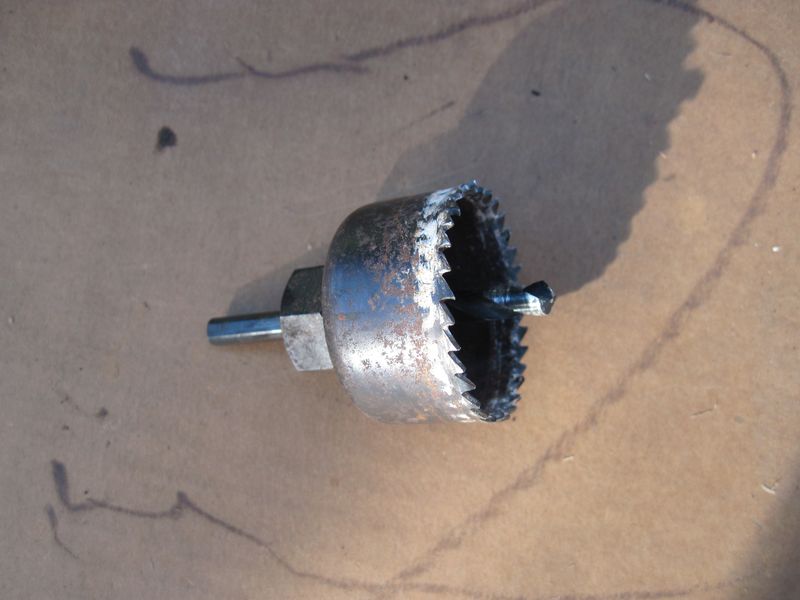
Placed car on ramps and eyeballed the point for the pilot hole. Drilled small 3/16" hole and checked for plug center using a small screwdriver. Move and redrill pilot hole as necessary. With drill on slow speed bore hole in pan.
To prevent any mess while draining I cut the top 2 inches off an empty gallon milk container and shoved in below the trans with the mouth through the hole in the brace.
The Bit I used is 1/2" drive and fits up through the makeshift funnel with lots of room. Now just remove the drain plug and Voila done without removing any lower components. This way there is no potential alignment changes. Hope this helps.
|

|

|
|
07-22-2016, 02:00 PM
|
#2
|
|
Registered User
Join Date: Feb 2005
Location: It's a kind of magic.....
Posts: 6,659
|
Use a 2 1/2 hole saw and lose the milk jug bit; we do this all the time on customer's cars to allow future service. With the larger opening, the oil drains out cleanly without any assistance.
__________________
Anything really new is invented only in ones youth. Later, one becomes more experienced, more famous and more stupid. - Albert Einstein
|

|
|
|
07-22-2016, 02:23 PM
|
#3
|
|
Registered User
Join Date: Oct 2014
Location: California Central Coast
Posts: 1,476
|
Quote:
Originally Posted by JFP in PA

Use a 2 1/2 hole saw and lose the milk jug bit; we do this all the time on customer's cars to allow future service. With the larger opening, the oil drains out cleanly without any assistance.
|
Thanks! Good info. I was using a 3/8" battery powered drill and didn't want to overload it with a larger hole saw. I know I could have used a larger drill........ 
|
|
|
|
|
07-22-2016, 02:54 PM
|
#4
|
|
Registered User
Join Date: Dec 2012
Location: FL
Posts: 4,145
|
I saw a remote clutch bleed kit for 987 once, it extended down to where it was a lot easier to get to it. I think that would be pretty cool and it could be accessed through a hole like this. I think I might drill a hole on mine...
|
|
|
|
|
07-22-2016, 03:07 PM
|
#5
|
|
Registered User
Join Date: Feb 2005
Location: It's a kind of magic.....
Posts: 6,659
|
Quote:
Originally Posted by steved0x
I saw a remote clutch bleed kit for 987 once, it extended down to where it was a lot easier to get to it. I think that would be pretty cool and it could be accessed through a hole like this. I think I might drill a hole on mine...
|
Do it, we have done this on many customer's cars and it makes future oil changes a snap instead of a chore.
I also really do not understand people's issues with bleeding the clutch. I'm a pretty large person and I get my hand in there with a stubby metric box wrench and a drain line with no problems. If you really wanted to be cute, you could mount a right hand bulkhead fitting on the tray with a remote bleeder screw with some effort using a small braided brake line running up to the slave cylinder. Just a matter of how much time and effort you want to put into it.
__________________
Anything really new is invented only in ones youth. Later, one becomes more experienced, more famous and more stupid. - Albert Einstein
Last edited by JFP in PA; 07-22-2016 at 03:13 PM.
|
|
|
|
|
07-23-2016, 10:59 AM
|
#6
|
|
Registered User
Join Date: Dec 2014
Location: Pasadena
Posts: 261
|
Very ingenious! This forum is great.
|
|
|
|
|
08-30-2016, 05:03 PM
|
#7
|
|
Registered User
Join Date: May 2014
Location: S.California
Posts: 2,029
|
For noobs at gearbox oil changing on the Boxster - FIRST loosen the Fill plug because if you can't remove it, you'll be real mad when you have already drained every drop of oil from the gearbox but can't re-fill it !
The fill plug can be very tight on both the 5 spd and 6 spd!
Last edited by Gelbster; 09-11-2016 at 07:51 PM.
|
|
|
|
|
12-30-2016, 09:26 AM
|
#8
|
|
Registered User
Join Date: Nov 2016
Location: Johannesburg
Posts: 10
|
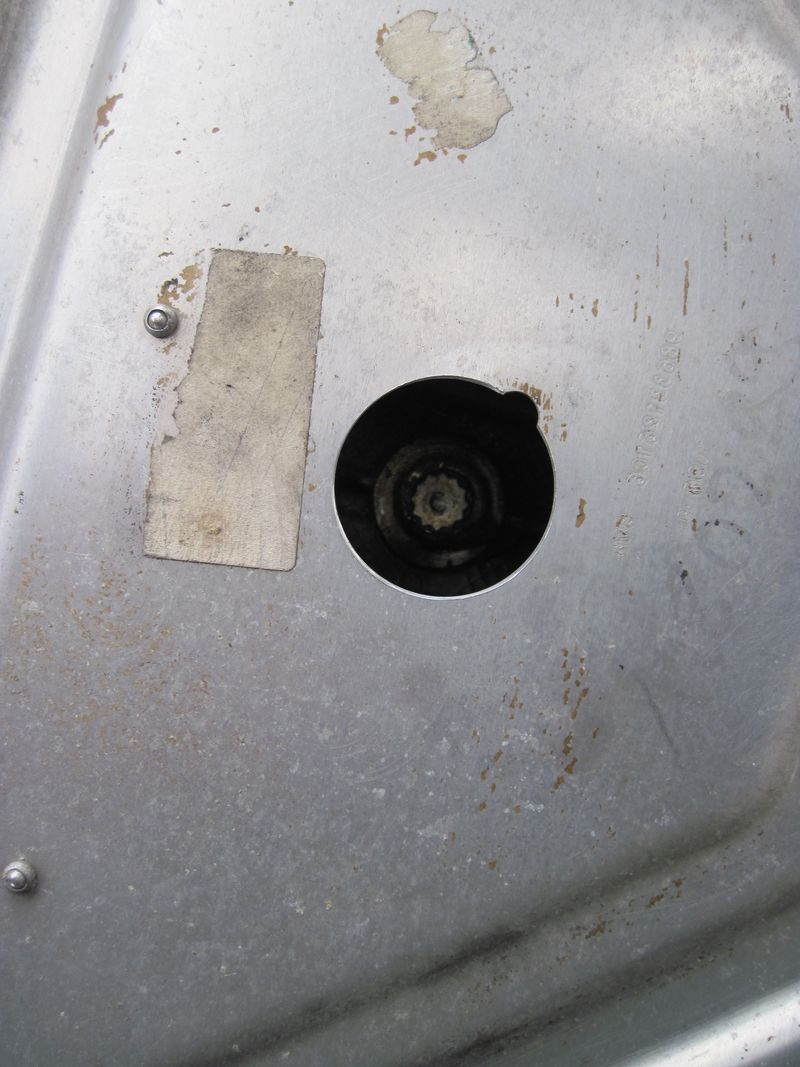
I did the transmission oil change today. Opted for drilling a hole rather than remove the plate.
For those who consider doing this too, there is a very small hole in the plate close to the drain plug, use this to gauge where to drill. This small hole is visible on the attached photo, which is just below the hole I drilled. 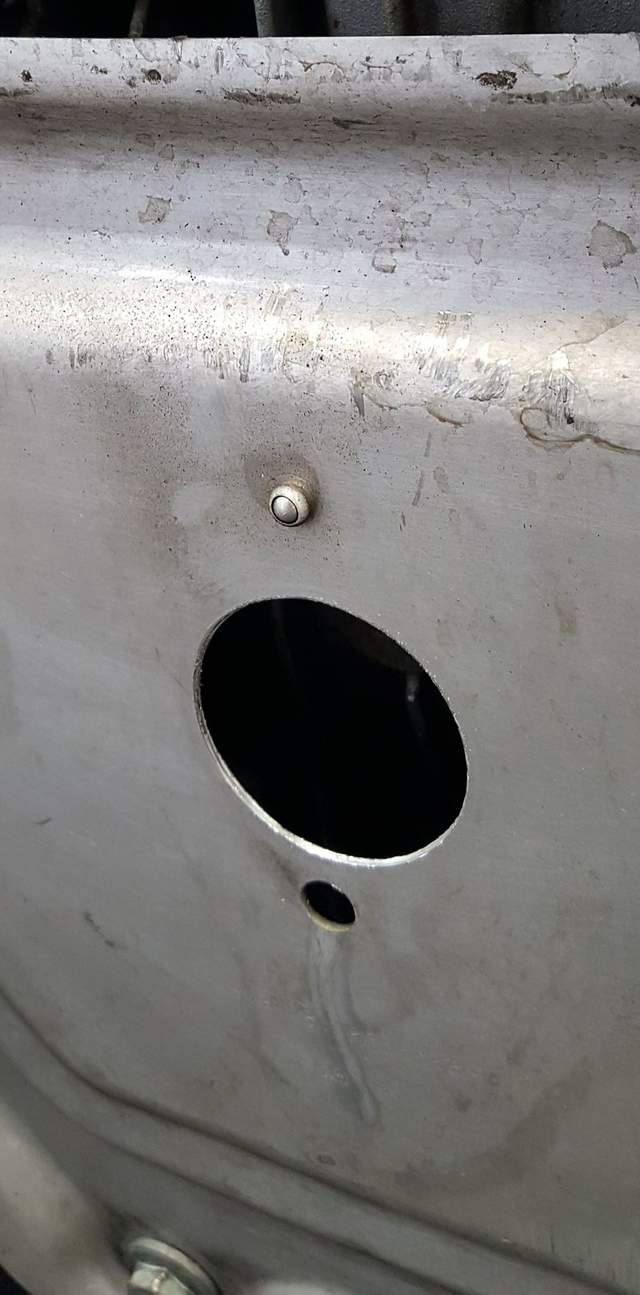
|
|
|
|
|
01-03-2017, 03:31 PM
|
#9
|
|
Registered User
Join Date: Sep 2016
Location: Central Ohio
Posts: 415
|
OK, I am puzzled here ...
My 2000 6-speed does not have a low centered drain plug as others here seem to have.
Rather, mine has what appears to be drain plug with an Allen head on the side of the trans casing (circled in blue). But it looks to be a bit too high to me to serve well as a proper drain plug, as there would seem to be a lot of oil left behind once drained.
Further, what I assume to be the fill plug (circled in yellow) has a conventional bolt hex head, and is mounted way up there. If I were to fill the tranny up with oil to this level, it seems (based upon past experience) that it could be way too much oil.
What obvious (to others!) point am I missing here?
Thanks - DM 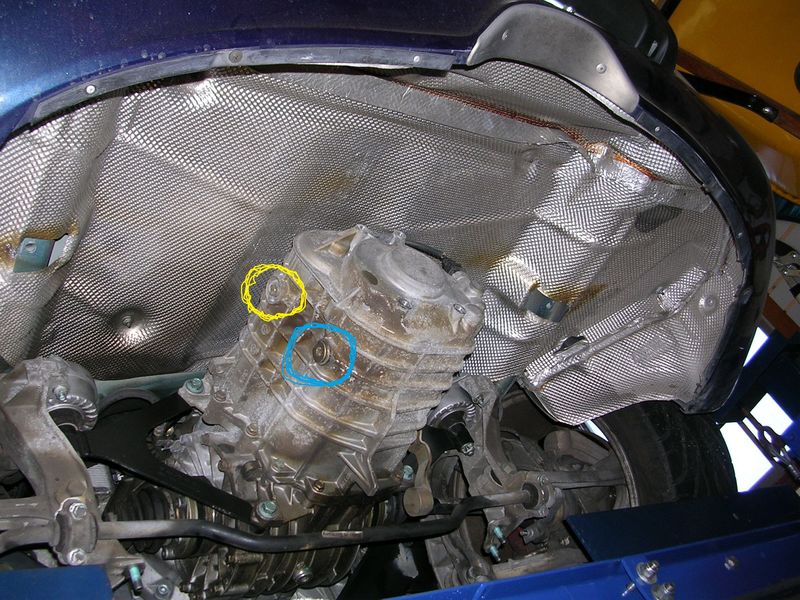
__________________
2000 Ocean Blue Boxster S
1980 Ferrari 308 GTSi
2019 Alfa Romeo Giulia Ti Sport AWD
|
|
|
|
|
01-03-2017, 04:19 PM
|
#10
|
|
Registered User
Join Date: Oct 2014
Location: California Central Coast
Posts: 1,476
|
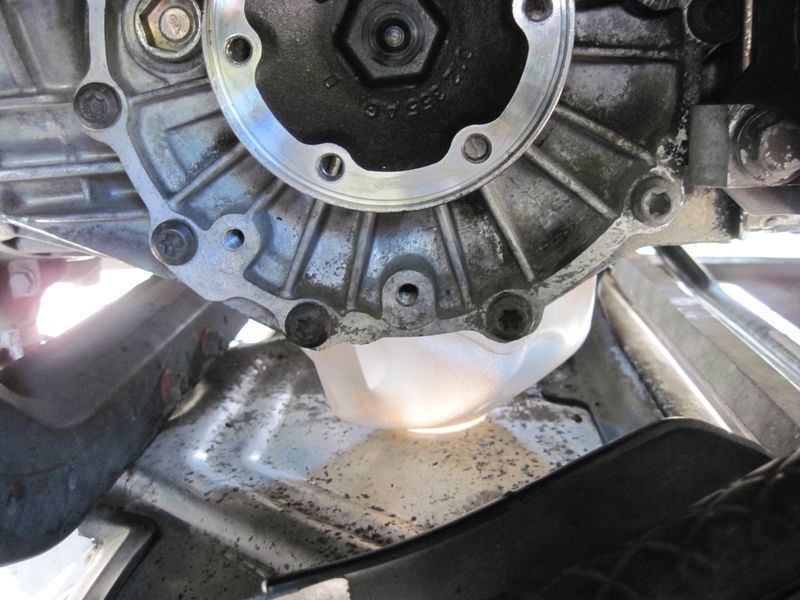
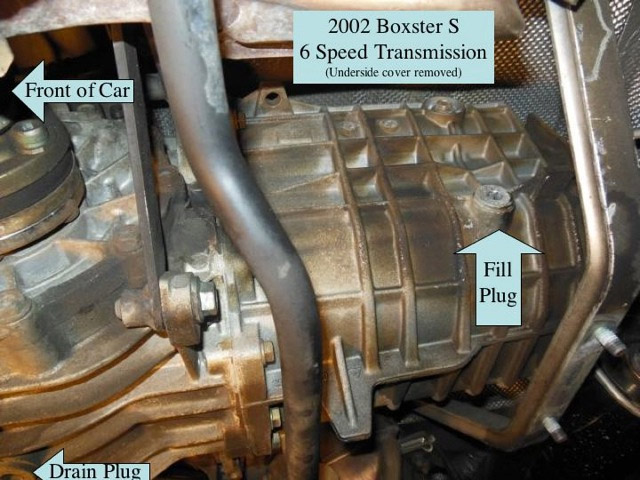
Look at my first post, 3rd picture. You can see the fill plug left of the axle flange. The drain plug is where the plastic jug is, below the axle shafts. You are looking on the gearbox, the drain and fill are on the differential. You can see your drain plug in your last photo, it is just forward of the sway bar.
Last edited by 911monty; 01-03-2017 at 04:37 PM.
|
|
|
|
|
01-03-2017, 06:20 PM
|
#11
|
|
Registered User
Join Date: Sep 2016
Location: Central Ohio
Posts: 415
|
Aha! Still learning ...
Found a couple of web pictures which seem to show the fill plug. Is the new picture below labeled wrong?
Which begs the next newbie-level question: what purpose is served by the yellow circled bolt in my earlier picture?
I removed it to see what I could see, and it is surprisingly long in length.
Thanks - DM
__________________
2000 Ocean Blue Boxster S
1980 Ferrari 308 GTSi
2019 Alfa Romeo Giulia Ti Sport AWD
|
|
|
|
|
01-03-2017, 06:24 PM
|
#12
|
|
Registered User
Join Date: Dec 2012
Location: FL
Posts: 4,145
|
One of those bolts (and I hope I am thinking Miata) holds something inside the transmission, and removing it requires opening the transmission to reinstall. I sincerely hope that is not the case here. But if it isn't holding something to the outside, it must be doing something inside. Did it go back in and tighten down same as it came out?
|
|
|
|
|
01-03-2017, 07:00 PM
|
#13
|
|
Registered User
Join Date: Oct 2014
Location: California Central Coast
Posts: 1,476
|
Man......This was supposed to be made easy.... 
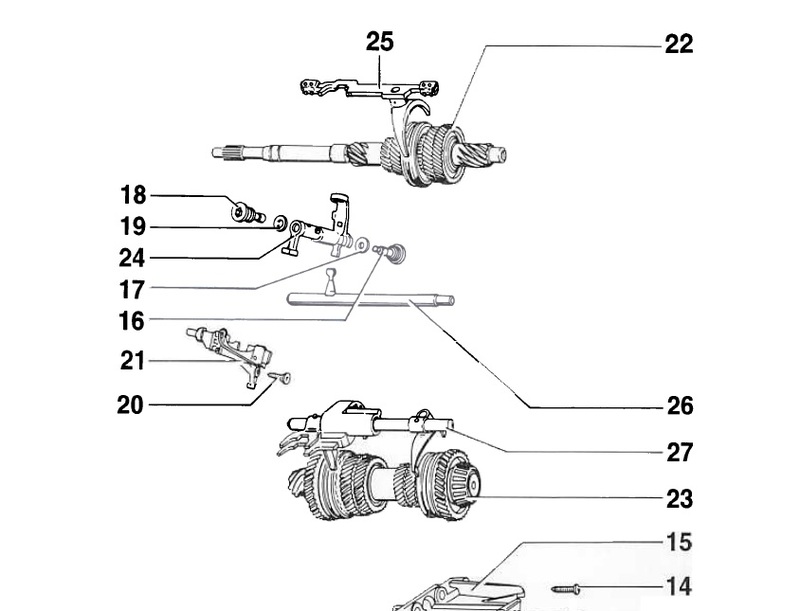
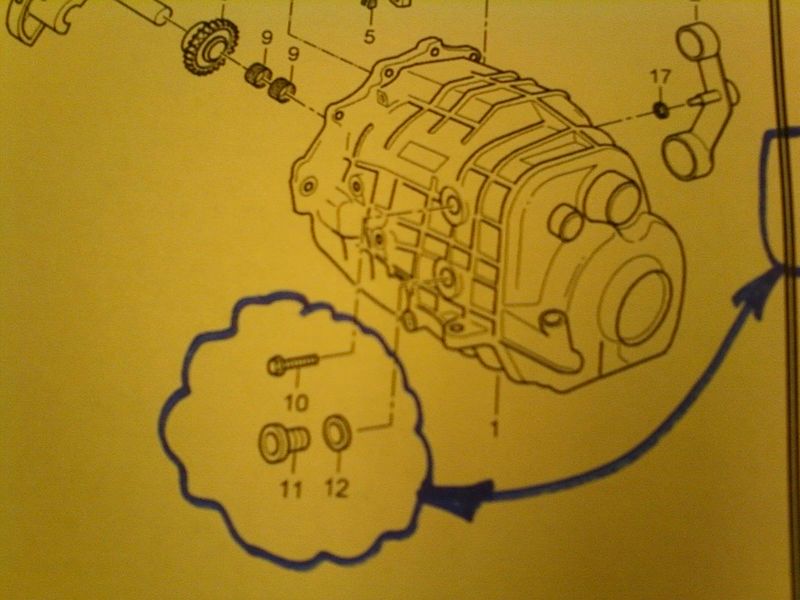
I attached a picture of what I believe you have pulled. I think it is part #18 which holds the relay shaft (#24) for the shift fork (#25). Does part #16 look familiar? If it is and I am pretty sure it is what you pulled, there is a probability that the spacer (#19) could have fallen into the transmission. Wish I had better news but you're either going to have to trust luck or as Steve pointed out, will need to pull the trans.
Last edited by 911monty; 01-03-2017 at 08:34 PM.
|
|
|
|
|
01-03-2017, 07:16 PM
|
#14
|
|
Registered User
Join Date: Oct 2014
Location: California Central Coast
Posts: 1,476
|
Quote:
Originally Posted by Dave80GTSi
Found a couple of web pictures which seem to show the fill plug. Is the new picture below labeled wrong?
Which begs the next newbie-level question: what purpose is served by the yellow circled bolt in my earlier picture?
I removed it to see what I could see, and it is surprisingly long in length.
Thanks - DM
|
The upper is the torque screw for the relay rods for the shift forks. The one labeled fill could be but it is too low for the upper gears. I think it is part #20 in the above diagram.
Last edited by 911monty; 01-03-2017 at 08:35 PM.
|
|
|
|
|
01-03-2017, 07:38 PM
|
#15
|
|
Registered User
Join Date: Oct 2014
Location: California Central Coast
Posts: 1,476
|
Didn't attach pic.
Last edited by 911monty; 01-03-2017 at 07:40 PM.
|
|
|
|
|
01-03-2017, 07:40 PM
|
#16
|
|
Registered User
Join Date: Oct 2014
Location: California Central Coast
Posts: 1,476
|
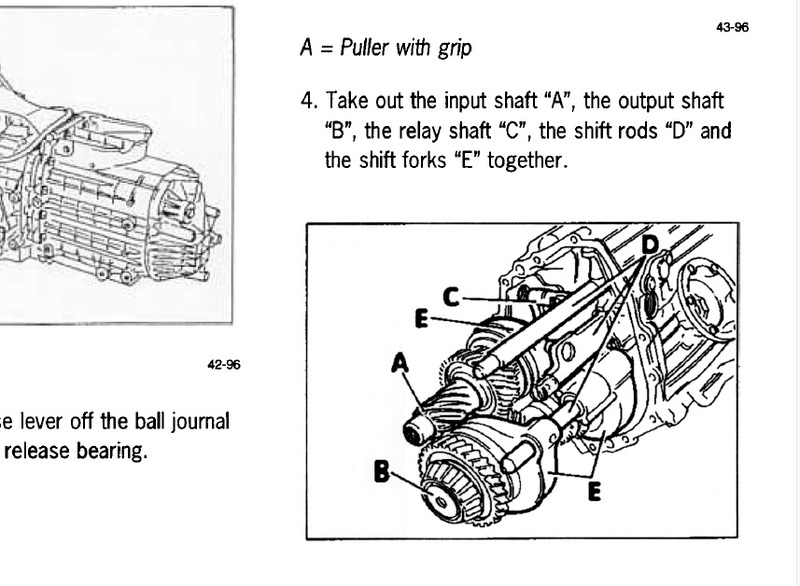
The relay shaft is "C" in this diagram.
|
|
|
|
|
01-04-2017, 06:02 AM
|
#17
|
|
Registered User
Join Date: Dec 2012
Location: FL
Posts: 4,145
|
|
|
|
|
|
01-04-2017, 06:06 AM
|
#18
|
|
Registered User
Join Date: Sep 2016
Location: Central Ohio
Posts: 415
|
First off, my sincere thanks for everyone who has taken their time to respond on this one. Its been a bit of a puzzle to me, as you can easily see!
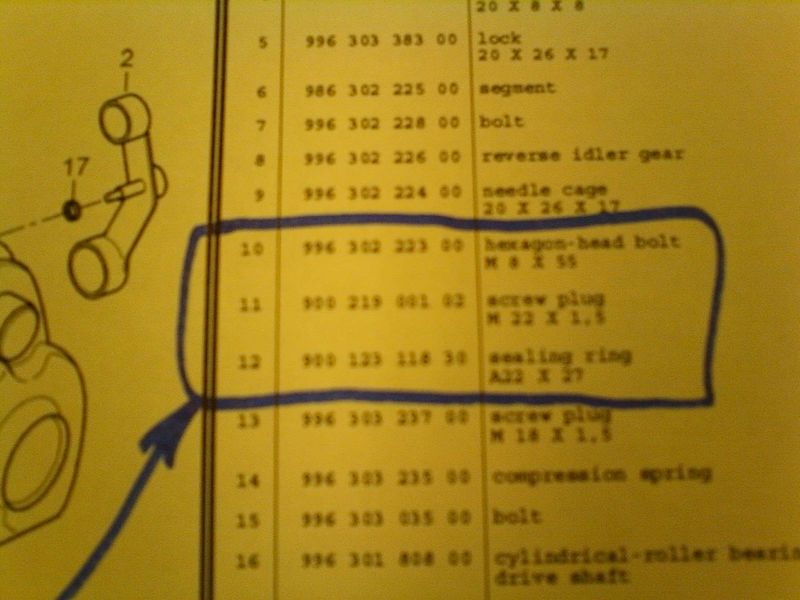
Referencing the 986 Parts Catalog, I have identified the items in question as nos. 10 to 12 in the enclosed picture.
In case the photographed text is not clear:
Item 10 is labeled as Hexagon-head bolt M8 x 55
Item 11 is labeled as Screw plug M22 x 1.5
Item 12 is labeled as Sealing ring A22 x 27.
Based upon this, it seems quite apparent to me that items 11 and 12 are intended to be used as an oil drain and/or fill plug.
It would seem at first glance that item no. 10 could perhaps be intended for use as a fill plug, so thats why I removed it for a look.
And when I removed item no. 10, I can confirm that it was a standard partial thread hex head bolt, a bit more than 2 inches long (their 55 mm length sounds right) with threads over only the final ¾ / 20 mm or thereabouts. It removed very easily, and likewise I was able to reinsert it without any drama or difficulty. No sounds of anything dropping into the tranny, nor indications of cross-threading, nor anything else ominous like that.
Thinking about this further, 8 mm does indeed seem like a very small diameter hole to be primarily used for a fluid fill port.
I would certainly like to believe that, if the casual removal of bolt no. 10 resulted in critical internal bits being dislodged with the potential for catastrophic consequences, they would not have used a standard hex head bolt for this function, but instead perhaps some sort of a fancy tamper-proof bolt so to discourage the casually curious folks like myself.
Thanks - DM
__________________
2000 Ocean Blue Boxster S
1980 Ferrari 308 GTSi
2019 Alfa Romeo Giulia Ti Sport AWD
|
|
|
|
|
01-04-2017, 07:04 AM
|
#19
|
|
Motorist & Coffee Drinker
Join Date: Jul 2014
Location: Oklahoma
Posts: 3,955
|
Quote:
Originally Posted by Dave80GTSi
...Based upon this, it seems quite apparent to me that items 11 and 12 are intended to be used as an oil drain and/or fill plug.
It would seem at first glance that item no. 10 could perhaps be intended for use as a fill plug, so thats why I removed it for a look.
... they would not have used a standard hex head bolt for this function, but instead perhaps some sort of a fancy tamper-proof bolt so to discourage the casually curious folks like myself.
|
The Drain plug is on the bottom of the differential.
The Fill plug is on the side of the differential
Quote:
Originally Posted by 911monty
Look at my first post, 3rd picture. You can see the fill plug left of the axle flange. The drain plug is where the plastic jug is, below the axle shafts. You are looking on the gearbox, the drain and fill are on the differential. ...
|
Fill Plug(Make sure that you can loosen it before you drain the old oil):

Drain Plug:

Those bolts on the side of the transmission that Dave80GTSi is playing with are obviously just shills to discourage people who don't read directions from tampering with the important stuff. ")
I think that the intent of this thread was to point out that drilling a hole in the pan beneath the drain plug makes servicing the transmission a lot easier. (Thanks Monty)
__________________
I am not an attorney, mechanic, or member of the clergy. Following any advice given in my posts is done at your own peril.
|
|
|
|
|
01-04-2017, 07:24 AM
|
#20
|
|
Registered User
Join Date: Dec 2012
Location: FL
Posts: 4,145
|
Deleted wrong information/bad idea I posted 
Last edited by steved0x; 01-10-2017 at 12:25 PM.
|
|
|
|
 Posting Rules
|
You may not post new threads
You may not post replies
You may not post attachments
You may not edit your posts
HTML code is On
|
|
|
All times are GMT -8. The time now is 01:53 AM.
| |


 1998 Porsche Boxster
 Parts Car, car parts
 Honda Del Sol(s)
 "Hers"
 My Original '99
 The 78 F350
 This
This That
That The S 2.5
 Other
Other Linear Mode


