Go Back   986 Forum - The Community for Porsche Boxster & Cayman Owners > Porsche Boxster & Cayman Forums > DIY Project Guides

Post Reply
 
LinkBack Thread Tools Display Modes
Old 01-04-2017, 07:34 AM   #21
Registered User
 
Join Date: Sep 2016
Location: Stow, MA
Posts: 918
Garage
This is a perfect example of why anyone who wants to do DIY service on a Boxster should at a minimum purchase the "101 Projects" and the Bentley Service Manual. Ideally you should also purchase the Porsche Boxster Repair manuals, but they are both expensive and hard to come by unless you go to copyright infringement route and purchase one of the "scan for pdf" offers on eBay.

Without these you are likely to damage your Boxster because of incorrect torquing of fasteners and plugs.

__________________
2004 Boxster S Silver - FUNTOY
2002 Boxster Base Guardsy Red - FUNBOX
1987 Caterham Super 7 1700 Supersprint
2009 Mercedes Benz CLK 350 convertible
1941 Dodge Luxury Liner Coupe
Anker is offline   Reply With Quote
Old 01-04-2017, 08:39 AM   #22
Registered User
 
911monty's Avatar
 
Join Date: Oct 2014
Location: California Central Coast
Posts: 1,476
Garage
Quote:
Originally Posted by steved0x View Post
And Maybe 10 11 12 could be used as part of a transmission cooler scheme for racers, gives an extra place to use for either pulling fluid (since it is low) or for returning the cooled fluid (since it is also kind of high?)
To be clear for future reference, Do not remove #10, (part #18 in my exploded parts diagram) This is the relay shaft pivot point bolt and can ruin your day.

Last edited by 911monty; 01-04-2017 at 08:49 AM.
911monty is offline   Reply With Quote
Old 01-04-2017, 09:27 AM   #23
Registered User
 
Dave80GTSi's Avatar
 
Join Date: Sep 2016
Location: Central Ohio
Posts: 404
Quote:
Originally Posted by 911monty View Post
To be clear for future reference, Do not remove #10, (part #18 in my exploded parts diagram) This is the relay shaft pivot point bolt and can ruin your day.
Seems to me that the bolt in your earlier post is no. 14 in the enclosed parts catalog below, which is a "Stop screw M26 x 1.5" and which does not appear to be the same item as the one which I brought up for discussion.

Nevertheless, I think that I have already beat this horse to death by now, so with thanks to all and with apologies to the OP for steering off their original topic, now signing off this thread.

Thanks- DM.


__________________
2000 Ocean Blue Boxster S
1980 Ferrari 308 GTSi
2019 Alfa Romeo Giulia Ti Sport AWD
Dave80GTSi is online now   Reply With Quote
Old 01-04-2017, 11:44 AM   #24
Registered User
 
911monty's Avatar
 
Join Date: Oct 2014
Location: California Central Coast
Posts: 1,476
Garage
deleted post

Last edited by 911monty; 01-04-2017 at 03:10 PM.
911monty is offline   Reply With Quote
Old 01-04-2017, 03:04 PM   #25
Registered User
 
911monty's Avatar
 
Join Date: Oct 2014
Location: California Central Coast
Posts: 1,476
Garage
Since I am unable to find a 6 speed repair manual, I thought the next best thing would be a photo. On the left bottom is the drain/fill hole. Directly to the right you can see the reverse gear with it's shaft and what appears to be a hole through the shaft just behind the mounting boss. The bolt in question appears to penetrate this hole to stop the shaft from sliding out. Unfortunately I had a 5 speed only manual. My apologies and Sorry for the confusion.


Last edited by 911monty; 01-04-2017 at 03:12 PM.
911monty is offline   Reply With Quote
Old 01-10-2017, 11:47 AM   #26
Registered User
 
Join Date: Apr 2016
Location: UK
Posts: 90
Quote:
Originally Posted by Dave80GTSi View Post
Found a couple of web pictures which seem to show the fill plug. Is the new picture below labeled wrong?

Which begs the next newbie-level question: what purpose is served by the yellow circled bolt in my earlier picture?

I removed it to see what I could see, and it is surprisingly long in length.

Thanks - DM

So, not been answered yet?

Is the 101 Projects manual photo definitely wrote?

It's the way I did my oil change and now I'm worrying I might not have the correct level of oil in even though it took just under 3 litres, which I understand is the correct capacity for the transmission.


Sent from my ONE A2003 using Tapatalk
RichRobby is offline   Reply With Quote
Old 01-10-2017, 12:08 PM   #27
Registered User
 
steved0x's Avatar
 
Join Date: Dec 2012
Location: FL
Posts: 4,144
Quote:
Originally Posted by RichRobby View Post
So, not been answered yet?

Is the 101 Projects manual photo definitely wrote?

It's the way I did my oil change and now I'm worrying I might not have the correct level of oil in even though it took just under 3 litres, which I understand is the correct capacity for the transmission.


Sent from my ONE A2003 using Tapatalk
I have a 2000S with 6 speed and I looked under there last night and where it says "Fill plug" in this picture is where (99% sure since it has been 2 years) I changed my Transmission oil, and in fact I don't even think I have the other plug that is by the inner CV joint, I looked on both sides. My view could have been blocked (car is up on jackstands with wheels off but none of the underbody stuff is off so I was peeking in through the sides)

steved0x is offline   Reply With Quote
Old 01-16-2017, 01:22 PM   #28
Registered User
 
fishski's Avatar
 
Join Date: Nov 2009
Location: Milford, CT
Posts: 55
So to add to the confusion even more I am going to attempt to do this trans fluid replacement on my 01 S with 24k. It appears to be that much of the info and pictures are for a 5 spd. transmission and not a 6 spd. I have a 6 spd. in my car. My goal is to gather the correct info and make a post for 6 spd. trans cars only because I can't find a post the specifies for 6 spd. only. Maybe I'm making a mountain out of a mole hill. I hope not. Can some confirm the following please.

1. Regardless of 5 or 6 speed trans the drain hole plug is in the same spot (bottom of the differential case) and can be made to have easy access with the use of the 1.75" - 2.25" hole saw to gain access to the plug?

2. The fill hole plug regardless of 5 or 6 speed transmission is on the side of the differential case.

3. Without removing the access panel you can get a breaker bar with correct socket in both drain and fill holes.

4. Loosen the fill plug before you drain the trans fluid out.
__________________
2001 Boxster S Artric Silver with 21k, speedster humps, 030 & 1966 ERA Shelby Cobra 427 Street car
fishski is offline   Reply With Quote
Old 01-16-2017, 01:59 PM   #29
Registered User
 
fishski's Avatar
 
Join Date: Nov 2009
Location: Milford, CT
Posts: 55
I might have found some pics to help the 6 speed guys out..these were from an ad on ebay clearly labeled 986 6 speed transmission...again, just need clarification from the experts and i will put something together.


Drain plug location

__________________
2001 Boxster S Artric Silver with 21k, speedster humps, 030 & 1966 ERA Shelby Cobra 427 Street car

Last edited by fishski; 01-17-2017 at 06:56 PM.
fishski is offline   Reply With Quote
Old 01-17-2017, 04:42 PM   #30
Registered User
 
barkinfool's Avatar
 
Join Date: Oct 2009
Location: Pittsburgh, PA
Posts: 153
Garage
FYI - I am just seeing this discussion and I am the original poster of this picture. The reason I made this was because I own a 6 speed transmission ('02S) and the pictures on the Pelican website / 101 projects book were only for the 5 speed trans. I made the pic to help other people. I stand behind the accuracy of the photo for 6 speed transmission (S models) in the spirit provided. I hope that this clears up the confusion that came from folks grabbing this from google without the benefit of my post on the Pelican site.


[/QUOTE]
__________________
Barkinfool
'02 Boxster S
barkinfool is offline   Reply With Quote
Old 01-17-2017, 06:55 PM   #31
Registered User
 
fishski's Avatar
 
Join Date: Nov 2009
Location: Milford, CT
Posts: 55
Thanks barkinfool. So both plugs are 10 mm sockets as well. The initial message of this post was the ability to drill an oversized hole in the bottom of the plate thus avoiding taking the plate off when servicing the transmission. Did you find it worthwhile taking the plate off to allow better access to the plugs. The drain plug seems to make sense and easy to service because of drilling the hole. The fill plug seems like a real PITA without removing the plate.
__________________
2001 Boxster S Artric Silver with 21k, speedster humps, 030 & 1966 ERA Shelby Cobra 427 Street car
fishski is offline   Reply With Quote
Old 01-18-2017, 09:18 AM   #32
Registered User
 
barkinfool's Avatar
 
Join Date: Oct 2009
Location: Pittsburgh, PA
Posts: 153
Garage
I haven't drilled a hole on mine, but I would almost always side with JFP's advice!

Even though the fill hole is a little ways, given you are using a filler tube, I still think it should be doable. It is a job I've only done once as my use is light / I don't race, so for me removing the plate is the best choice vs drilling.
__________________
Barkinfool
'02 Boxster S
barkinfool is offline   Reply With Quote
Old 01-19-2017, 03:34 AM   #33
Registered User
 
fishski's Avatar
 
Join Date: Nov 2009
Location: Milford, CT
Posts: 55
Thanks barkinfool...I assume the plate removal is straight forward? I have read were taking it off can result in alignment problems but I think the alignment problems come if you take the support bars off which I have no plans on doing.
__________________
2001 Boxster S Artric Silver with 21k, speedster humps, 030 & 1966 ERA Shelby Cobra 427 Street car
fishski is offline   Reply With Quote
Old 01-19-2017, 09:20 AM   #34
Registered User
 
Join Date: Feb 2005
Location: It's a kind of magic.....
Posts: 6,484
Quote:
Originally Posted by fishski View Post
Thanks barkinfool...I assume the plate removal is straight forward? I have read were taking it off can result in alignment problems but I think the alignment problems come if you take the support bars off which I have no plans on doing.
As the support bars are underneath the pan, I'd like to see how you are going to do that:


Removing the pan does not cause alignment issues, but putting it back often does require "encouraging" the uprights into position with a small ratcheting tie down strap.
__________________
Anything really new is invented only in one’s youth. Later, one becomes more experienced, more famous – and more stupid.” - Albert Einstein
JFP in PA is online now   Reply With Quote
Old 01-20-2017, 03:09 AM   #35
Registered User
 
fishski's Avatar
 
Join Date: Nov 2009
Location: Milford, CT
Posts: 55
JFP, I mistyped/misspoke. I understand the support bars are on top of the plate and you have to take them off before you can take the plate off. My question which i was not clear about is this. If the purpose of drilling the hole is so you don't have to drop the plate to access the drain plug and the support bars are on top of the plate, can you access the fill plug without taking either the bars or the plate off? Or, do you have to take the bars off either way but can levee the plate on? Obviously I have never done this before so if my question seems stupid (and it might be) thats why. I've done a bunch of stuff on the car myself (plugs, AOS, bleed brakes, belt, pulleys, alternator, etc.) with no issues to give you a gauge of my abilities. I am absolutely not a professional mechanic. I am probably over cautious. If I had someone close and not have to drive 30-45 minutes I would use an indie for a lot of this stuff.
__________________
2001 Boxster S Artric Silver with 21k, speedster humps, 030 & 1966 ERA Shelby Cobra 427 Street car
fishski is offline   Reply With Quote
Old 01-20-2017, 06:02 AM   #36
Registered User
 
Join Date: Feb 2005
Location: It's a kind of magic.....
Posts: 6,484
Quote:
Originally Posted by fishski View Post
JFP, I mistyped/misspoke. I understand the support bars are on top of the plate and you have to take them off before you can take the plate off. My question which i was not clear about is this. If the purpose of drilling the hole is so you don't have to drop the plate to access the drain plug and the support bars are on top of the plate, can you access the fill plug without taking either the bars or the plate off? Or, do you have to take the bars off either way but can levee the plate on? Obviously I have never done this before so if my question seems stupid (and it might be) thats why. I've done a bunch of stuff on the car myself (plugs, AOS, bleed brakes, belt, pulleys, alternator, etc.) with no issues to give you a gauge of my abilities. I am absolutely not a professional mechanic. I am probably over cautious. If I had someone close and not have to drive 30-45 minutes I would use an indie for a lot of this stuff.
Yes, you can access the fill plug from two different directions:
  1. Some techs like to snake a fill tube line in from underneath the car
  2. Other techs like to gravity feed the lube from above, running a tube down from the engine bay.

All a matter of what floats your boat. But wither way, the plate remains in place. the total objective of adding the 21/2 hole in the plate is to not have to take the time, or charge the labor, for future maintenance. Done properly, adding the hole will be the last time you need to remove the plate unless you are taking the gear box out.
__________________
Anything really new is invented only in one’s youth. Later, one becomes more experienced, more famous – and more stupid.” - Albert Einstein

Last edited by JFP in PA; 01-20-2017 at 06:04 AM.
JFP in PA is online now   Reply With Quote
Old 01-20-2017, 04:33 PM   #37
Registered User
 
fishski's Avatar
 
Join Date: Nov 2009
Location: Milford, CT
Posts: 55
OK, makes sense. My question last question/concern is about access to the fill plug without taking the supports or plate off. Reading between the lines you can do it or someone would have stated you can't - take the drain plug out with both the support bars and plate in place.
__________________
2001 Boxster S Artric Silver with 21k, speedster humps, 030 & 1966 ERA Shelby Cobra 427 Street car
fishski is offline   Reply With Quote
Old 01-21-2017, 08:37 AM   #38
2003 S, Arctic Silver, M6
 
paulofto's Avatar
 
Join Date: Oct 2014
Location: Winnipeg, MB, Canada
Posts: 1,346
Garage
Quote:
Originally Posted by fishski View Post
OK, makes sense. My question last question/concern is about access to the fill plug without taking the supports or plate off. Reading between the lines you can do it or someone would have stated you can't - take the drain plug out with both the support bars and plate in place.
With the 2 1/2" drilled hole for access to the drain plug you don't have to remove anything to access the drain or the fill plug. I used a small plunger type pump from below to pump in the fluid. On a level surface just pump the fluid until it starts to seep out the hole. That is it. One thing; make sure you remove the fill plug before you remove the drain plug because it the fill plug is stuck you will not want to drain the fluid until you are sure you can put fresh fluid in. This job is very easy if you have the hole drilled for the drain. Easier than an engine oil change since the added job of a filter change is not involved and the whole thing is right at the rear of the car.
paulofto is offline   Reply With Quote
Old 11-01-2017, 08:06 PM   #39
Registered User
 
Join Date: May 2015
Location: Greater Seattle, WA
Posts: 534
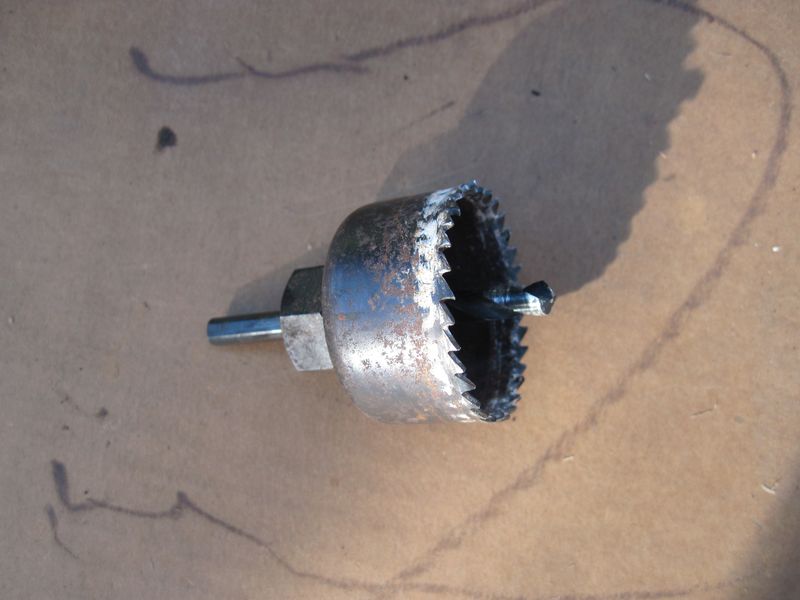
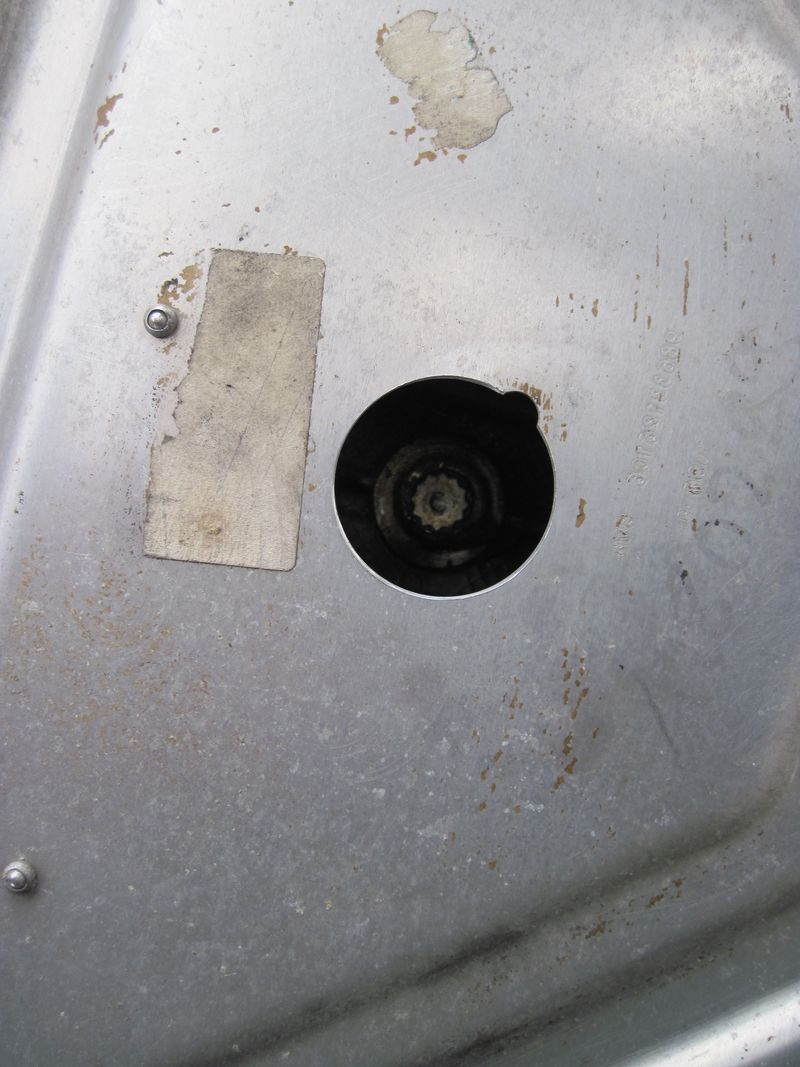
I recently did this hole-drilling modification when changing the transmission fluid in my 2001 2.7 / 5-speed. I found it so much easier than removing that huge structural/transmission cooling baffle plate!


Location where I drilled mine was 18mm to left (and a little bit foreward) of the pictured reference hole for this 2001 5-speed:


...it ended up coming out "spot-on", but I imagine the 6-speed (and possibly even the early 5-speed) may require a different hole location):


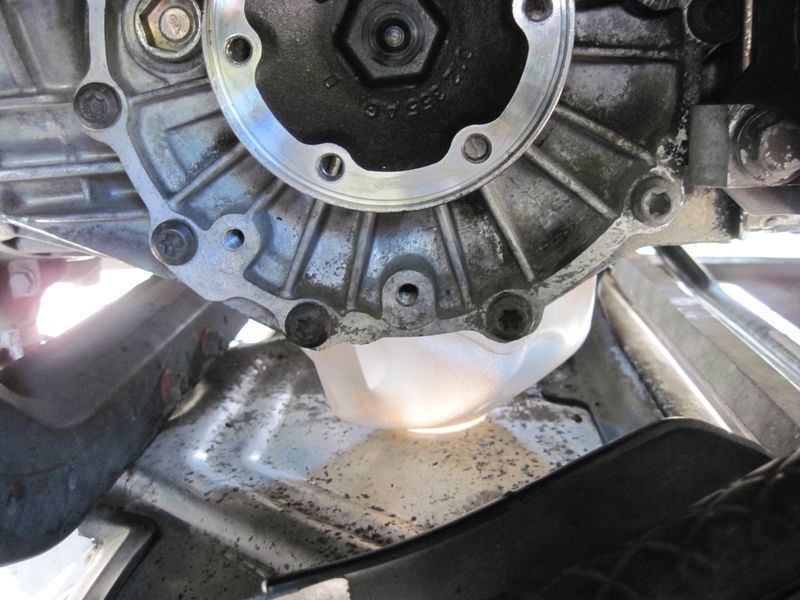
One thing I struggled with was removing the filler plug without going to dramatic measures, like putting the car on a lift. I found it's accessible leaving vehicle on the ground, by using the following tool setup: (17mm hex bit driver, universal joint, socket extension, and large 1/2"-drive breaker bar)...


...and accessing it from behind the left rear wheel (although one detail not visible in the below photo is the socket extension reaches across in front of the half-shaft):


I was unable to remove the plug when engine was cold, (even with the huge breaker bar!) but getting the driveline up to full operating temperature did the trick for allowing the plug to break free. (Also the hot transmission temperature when draining also helped that fluid come roaring out of there!)

When the fluid came out, it kind of made a mess as the fluid seemed to drain out in various sideways directions. If doing it over, I'd use the milk container funnel shown in the 3rd picture of the original post of this thread. I personally feel that the 2" hole I drilled is plenty big for this.

I fashioned an 11mm "dipstick" out of a paperclip, and used it through the filler port to set the fluid level, as suggested in the 101 projects book, and got lucky with not having much problem filling to the correct amount. I pumped fluid up from below. Initially pumping fluid in with the rear of the car jacked up a bit, until it overflowed (then lowering to flat on the ground), put the level very close to perfect.

Bottom line: the improvement in reduced shift effort with this service work is huge! I'd say subjectively, there is only 20-25% of the effort in getting into gears as there was before! I can feel the difference in most operating conditions, hot and cold, although it's most noticeable in 1st-3rd gears and most needed when very cold, but nice improvement even warmed up. I find myself "rowing the gears" more now, and not coasting in neutral, or skipping over gears as much as I used to with this car. Heel-and-toe is more effortless, enjoyable and reliable, as is double-clutch downshifting!!

The car has about 120k miles on it, and I have no idea if the old fluid was original, or had ever been replaced. I used the special 5-speed genuine Porsche fluid, part number 000-043-304-71, sourced in 1-qt bottles from Sunset Porsche. It took less fluid than I was expecting... not even 2 quart bottles, although the repackaged quart-sized bottles Sunset provided were filled abnormally high. I was surprised that I didn't need to even crack open a 3rd bottle which I also had ready to go...
__________________
2001 Boxster

Last edited by jakeru; 11-01-2017 at 09:02 PM.
jakeru is offline   Reply With Quote
Old 07-30-2020, 07:03 AM   #40
Registered User
 
elgyqc's Avatar
 
Join Date: Sep 2018
Location: Laval QC
Posts: 786
Garage
I drilled the hole to do the fluid change on my 2000 5-speed. I am going to have to do this to a friends Boxster so I took the following measurements. I take no responsability if it doesn't work, so drill a pilot hole and verify that you are in the right place.
The 7 3/4 in. measurement is from the left side of the car (driver's side in North America).

__________________
Grant
Arctic Silver 2000 Boxster S - bought with a broken engine, back on the road with the engine replaced
Green 2000 Boxster 5-speed and 1978 928 auto
1987 924S 5-speed (Sold) - Blue 2000 Boxster 5 spd (Sold)
elgyqc is online now   Reply With Quote
Post Reply


Posting Rules
You may not post new threads
You may not post replies
You may not post attachments
You may not edit your posts

BB code is On
Smilies are On
[IMG] code is On
HTML code is On
Trackbacks are On
Pingbacks are On
Refbacks are On


All times are GMT -8. The time now is 01:10 AM.


Powered by vBulletin® Version 3.8.7
Copyright ©2000 - 2025, vBulletin Solutions, Inc.
Content Relevant URLs by vBSEO 3.6.0
Copyright 2024 Pelican Parts, LLC - Posts may be archived for display on the Pelican Parts Website -    DMCA Registered Agent Contact Page