 08-05-2017, 03:05 AM
|
#141
|
|
Registered User
Join Date: Jul 2015
Location: Perth, Western Australia
Posts: 38
|
This looks truly amazing. Dying to see the finished product.
__________________
'99 base Boxster (Arena Red Metallic/Savanna Beige)
'02 911 Carerra Cabriolet (Arctic Silver/Metropole Blue)
|

|

|
 08-05-2017, 06:52 AM
|
#142
|
|
Registered User
Join Date: Sep 2013
Location: Montreal, QC. (currently expat to Shanghai)
Posts: 3,249
|
Very kind, thank you Sir 
Dunno ab being amazing but surely a cool little project, glad you like it already. Hope to be sending the (prototype) enclosure to mfg in a week. Not rushing; but almost lolll
Quick Update
Think I got all of the components modeled. Those I'll using for the prototype anyway. Connectors pin'ed and labelled also, ready to be registered and passed over the Electrical Routing model. So much more to be done before however but all quite elementary stuff, as you can see.
Currently designing the individual compartments for each areas of the kit (cooling, usb hub, inputs/outputs, etc). The hardest part is trying to design this as 'simple' as it possibly can, keeping the cost of manufacturing at its bare minimum, placing and grooving material so to make it all easy for the end user to swap any part anywhere in the kit shall one fail.
Nothing really interesting atm, e-routing will be tough! I'll be starting-up on the simulation models this coming Friday also, that will be a tad more relaxing (for me anyway).
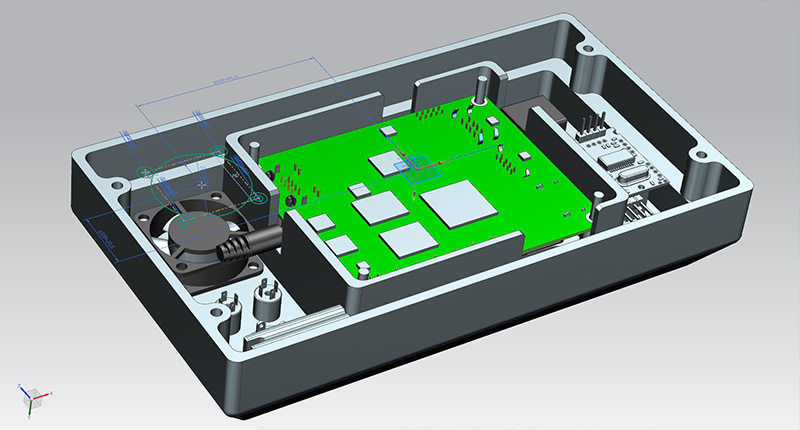
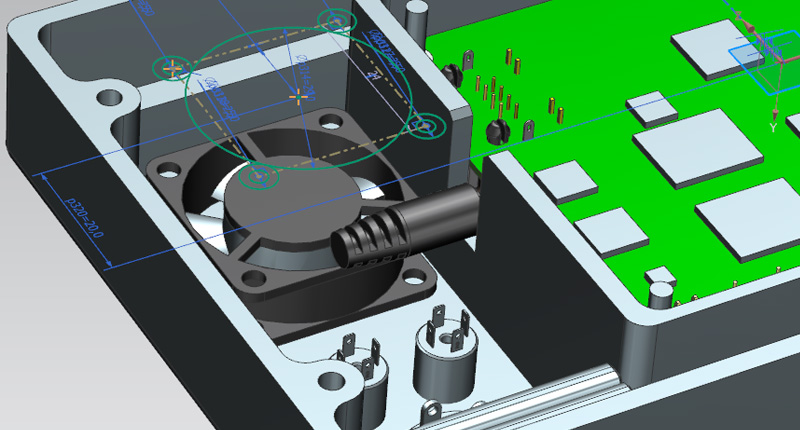
^ This really gives you an idea of how minuscule this thing is. Look at the audio jack lolll
__________________
______________________________
'97 Boxster base model 2.5L, Guards Red/Tan leather, with a new but old Alpine am/fm radio.
|

|

|
 08-06-2017, 05:57 PM
|
#143
|
|
Registered User
Join Date: Jun 2014
Location: Dacula, Georgia
Posts: 264
|
WOW Fred. You really give me inspiration for attempting all kinds of things. And what I love best is your willingness to share. If we had a MOTY, it would definitely be you in my opinion. I like tweaking with car audio so this is up my ally. Can't wait to see production.
|

|

|
 08-09-2017, 07:51 AM
|
#144
|
|
Registered User
Join Date: Sep 2013
Location: Montreal, QC. (currently expat to Shanghai)
Posts: 3,249
|
The Great USB hub Story (loll)
 MOTY ; Most Obsolete Talented Yawny!
To bore you all more... here goes a Quick Update and more funny pics 
Was struggling with the little four USB dip thingies I previously sourced online (seen in previous screen grabs; little independent pcb holding a single usb port). Wiggly stuff, and it needed a pretty complex system just to hold that stack-of-stuff together. Too many screws also and sure it would have needed bubble gum to patch things up loll
So I just tossed away that old stuff and went custom, again. Why making a fuss ab it and where does this leaves us?! Nowhere, just a week behind/late as we now need to wait for the parts to show up and test out okay :/
All better stuff tough… TE Connectivity /AMP only, a whooping $0.8cents/connectorX4 onto a $0.25 PCB. We’re so awll ruined
I’ll update nx week when things are working again.

^ Talking about this little 4 ports connector pack. Present itself on the ‘back’ panel (not the front, no worries loll)
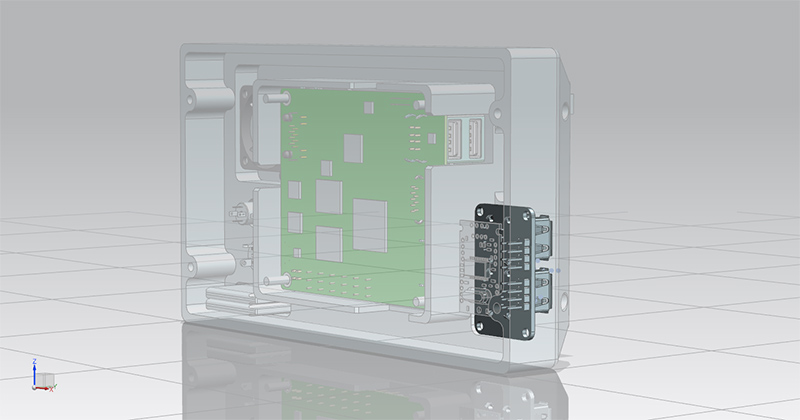
^ Goes here, there, somewhere in that lower back corner.
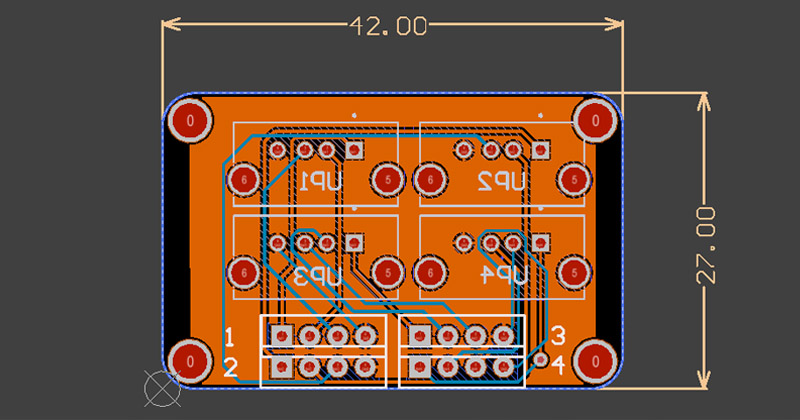
^ As shown above, even the most advanced circuit board known to human (and other races) can take up to 5hrs to measure and put together in a CAD assembly. Thankfully, FREE software like Circuit Maker does it so well. So easy you could ask your sister to do those PCB for you 
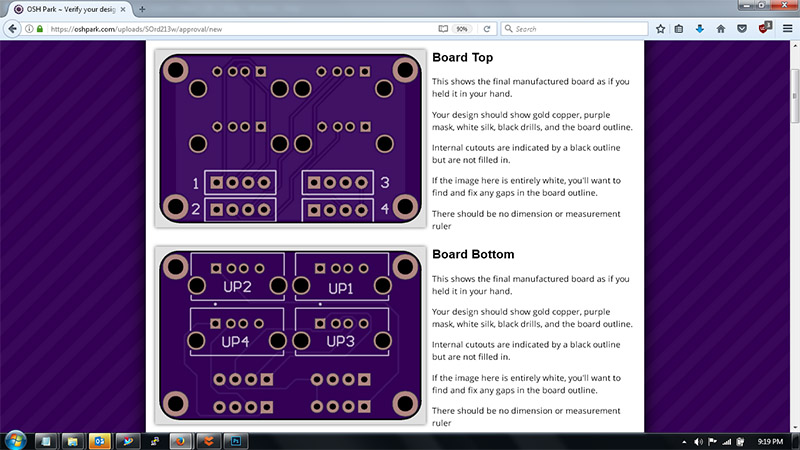
^ Once you've toasted this in C.Maker, aligned everything and made the current traces thick enough to cope with 500ma, you then shoot this over a PCB Printing Co in Gerber format and they'll do the rest for you. Example of this same PCB loaded onto OSH Park's backend.
And that is how its done, basically! Lucky for me, the pcb printing companies here does it in 24hrs (+1 day shipping). Hehhehheh 
And $4 dollars later LOL (all very important Quick Updates fellas)
__________________
______________________________
'97 Boxster base model 2.5L, Guards Red/Tan leather, with a new but old Alpine am/fm radio.
|

|

|
 08-10-2017, 02:35 AM
|
#145
|
|
Registered User
Join Date: Sep 2013
Location: Montreal, QC. (currently expat to Shanghai)
Posts: 3,249
|
Yayyy we have USB x4!!!
Hrrr.. that was hard for some freakin weird reason, for me anyway. Partly because I wasted so many hours trying to fit in those previous pcb/usb parts I got at a dollar each. Glad those are in my Royal Rubbish Bin now. See... trying to cut corners to get things done quick and dirty just never works :/ Oh well, at least I've tried lolll
Anyway, happy with below CAD fitment and look & feel. Solid kit; TE Conn/genuine connectors, all fun stuff!
Thank you very much for listening(reading), almost feeling better now 

__________________
______________________________
'97 Boxster base model 2.5L, Guards Red/Tan leather, with a new but old Alpine am/fm radio.
|

|

|
 08-10-2017, 05:09 AM
|
#146
|
|
Registered User
Join Date: Aug 2015
Location: Brandon MB
Posts: 51
|
Amazing stuff Fred! First thing I look at when I open my computer in the morning!
|

|

|
 08-10-2017, 06:27 AM
|
#147
|
|
Registered User
Join Date: Nov 2014
Location: Wallace, Nova Scotia, CANADA
Posts: 182
|
My chequebook has one cheque set aside 
__________________
The name's Ian....now a former owner.....sold my 2000 Speed Yellow Base to its new owner in Nova Scotia.
|

|

|
 08-10-2017, 08:49 AM
|
#148
|
|
I am No. 1348
Join Date: Dec 2016
Location: Tampa/FL
Posts: 340
|
Wow Fred, if you are supplying 4 USB you must have quite a power capacity for that voltage. Are these USB 2 or 3?
__________________
Current: 2004 Boxster S 550 Spyder Anniversary Edition (BSSE)
|

|

|
 08-10-2017, 10:04 AM
|
#149
|
|
Registered User
Join Date: Sep 2013
Location: Montreal, QC. (currently expat to Shanghai)
Posts: 3,249
|
Quote:
Originally Posted by CdnRD

Amazing stuff Fred! First thing I look at when I open my computer in the morning!
|
Oh man, that is so cool to hear. I'll try my best to detail the steps the best I can and update as often as I can. Unfortunately I have to leave a lot of stuff out as it would just bury the whole "car related" thing under a ton of technical rumble. I'd get bored myself loll I'll try my best to entertain more! Thanks for the encouragement bud 
Quote:
Originally Posted by Wallace River

My chequebook has one cheque set aside  |
Cheques are for important stuff my friend! Trying to built this kit in a way that we can pay them off with our spare change  Already reached the $250 mark. Goes fast :/ (sukx, this world needs rebooting man)
Quote:
Originally Posted by algiorda

Wow Fred, if you are supplying 4 USB you must have quite a power capacity for that voltage. Are these USB 2 or 3?
|
The whole system is rated at 5AMP. Runs both 12VDC and 5VDC independently and managed/filtered by a uninterrupted power supply (UPS) over a MODBUS logic. (Spanish for good stuff)
5AMP = 0.4amp for the whole system itself. Very energy/efficient. Intel Corp… pffff. That means it leaves you with little over 4 amps for your USB hub. Unseen yet in the screen grabs is a Hub Controller (pic below) which is rated at 1 amp per channel (has 4Ch).
Unless your GF decide to retrofit her hair dryer to USB one day or you plan on powering your HID lighting off the back of a Car PC, then we need to talk man loll As of most of today’s commercially available USB devices, we should have more than enough overhead with that 4amp  Man that’s a lots of webcams lollll
USB 2.0 of course! Compatible to literally everything. If really you need the 3.0 digital signals (or xfer rate), something tells me this is something that normally doesn’t happen in a Car. Regardless, the mainboard already has 1 (one) built-in 3.0 port, few ways for you to access it if really (really really) you need that 
Hope that answers your Qs bud. Feel free to ask any other questions (other than USB related LOLLL… man almost hate the thing now)
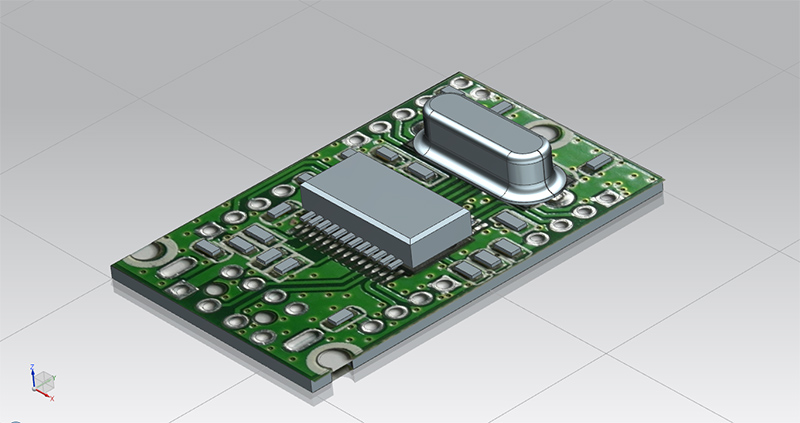
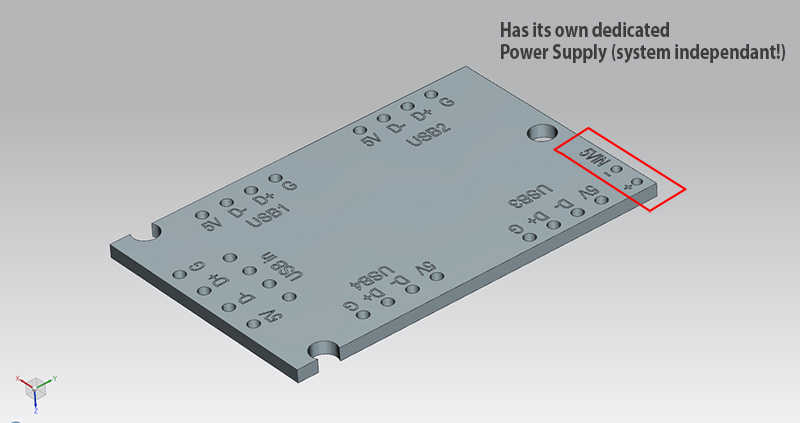
^ Spanish for S.M.A.R.T lolll
__________________
______________________________
'97 Boxster base model 2.5L, Guards Red/Tan leather, with a new but old Alpine am/fm radio.
|

|

|
 08-11-2017, 01:04 AM
|
#150
|
|
Registered User
Join Date: Sep 2013
Location: Montreal, QC. (currently expat to Shanghai)
Posts: 3,249
|
*Quick Update*
The Great (great) f n USB Hub! Completed, routed and space reservation allocated.
/End of update. Don't want to have to do this ever again lol
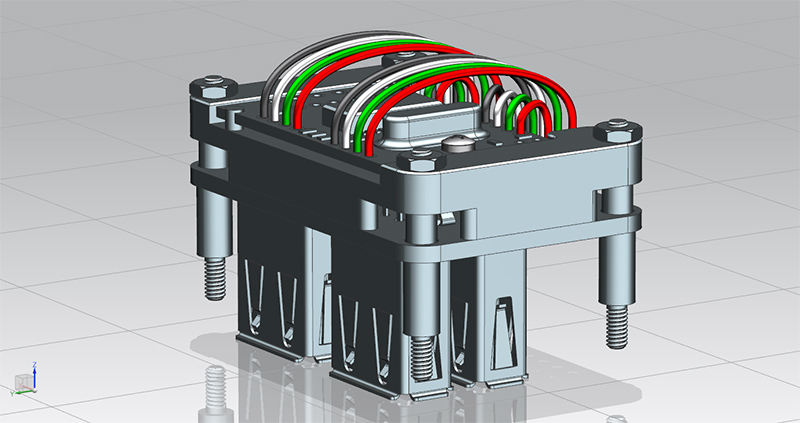

PS: just joking... I actually love this thing. Micro stuff... about the size of your thumb.
__________________
______________________________
'97 Boxster base model 2.5L, Guards Red/Tan leather, with a new but old Alpine am/fm radio.
|

|

|
 08-11-2017, 05:23 AM
|
#151
|
|
I am No. 1348
Join Date: Dec 2016
Location: Tampa/FL
Posts: 340
|
Thanks for the explanation Fred. I was asking about the USB 3.0 since you are using a Windows Platform, it would be cool to be able to store or review photos from my Digital SLR when I'm in the field taking photos. I can transfer them to the Head unit and review them and USB 3.0 has a much faster transfer speed. Not important or essential, like everything else it's nice to have.
__________________
Current: 2004 Boxster S 550 Spyder Anniversary Edition (BSSE)
|

|

|
 08-11-2017, 08:42 AM
|
#152
|
|
Registered User
Join Date: Sep 2013
Location: Montreal, QC. (currently expat to Shanghai)
Posts: 3,249
|
Quote:
Originally Posted by algiorda

Thanks for the explanation Fred.
|
My pleasure  And how come my GH4 is full WIFI and a full frame DSLR is not?! You need an upgrade soon my friend 
Any questions or concerns, do ask guys.
Last update of the week: the kit comes with a door! A lid, cover, panel, whatever you call this thing... it comes with one. Modeling that door is a good sign fellas... we are getting near(er) the manufacturing phase. Just need a heatsink(+CFD), and a frame for the IPS display and off it goes in the machines! The easy bits (hrrr finally)
(off to the river with the 2 dogs, wife and friends for the whole weekend guys - 4hrs driving starting 6am in the morning. Lets catch up next week, have a good one fellas!)
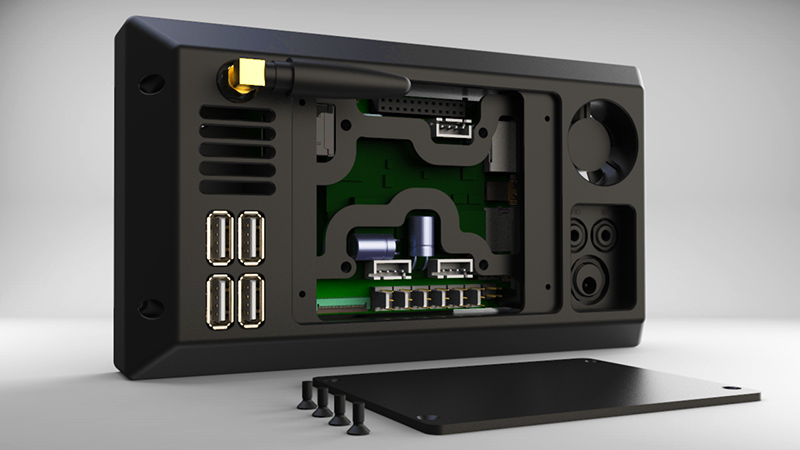
^ poor quality render, apologies. Ran this in less that 10min. Good visual none the less
__________________
______________________________
'97 Boxster base model 2.5L, Guards Red/Tan leather, with a new but old Alpine am/fm radio.
|

|

|
 08-13-2017, 04:27 AM
|
#153
|
|
Registered User
Join Date: Sep 2013
Location: Montreal, QC. (currently expat to Shanghai)
Posts: 3,249
|
Thermal Management
^ All very fancy pics, does it work?!
What a weekend. The dogs kept on barking randomly at some night critters the whole of Saturday night so most of us didn’t get sleep. Well, I did LOL but the others hardly slept (oops!). We stayed in 5* tents, of course (camping!).
Oh well. We came back at lunch time so I am already upstairs in my office carrying on the design validations (CFD) on our assembly while the wife and my puppies are catching up some good sleep. I am only doing flow atm… pointless to include coupled thermal at this stage, all we need to know for now is whether the heatsink I’ve designed a few hour ago is getting an ‘effective’ flow of fresh air.
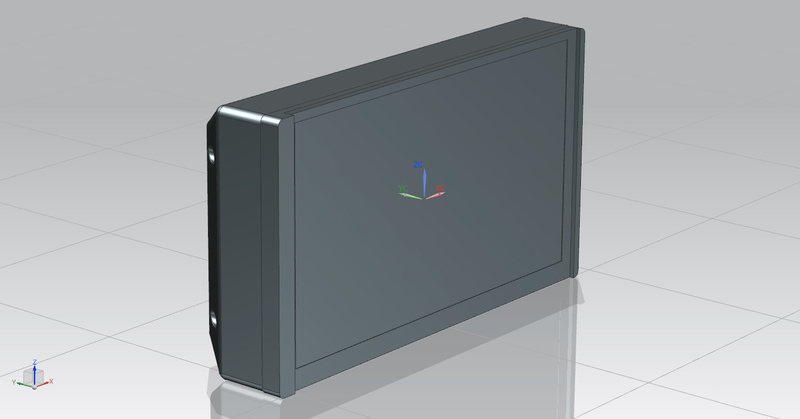
^ Omitted in previous screen grabs is the front of the assembly. Nothing to show really… other than the frame that caps off (seal) the whole enclosure. That frame is modeled to accommodate both the IPS display & capacitive touch screen (sandwiched together).
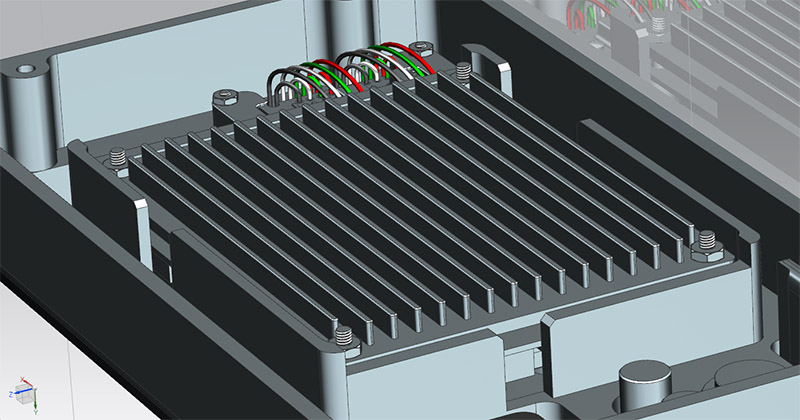
^ Using a straight ‘fin’ system for our heatsink here. The whole idea was to get fresh air flowing between the fins with very little resistance/drag. Pins are also very effective, however in a design like ours, they would simply create excessive turbulence. So for us, fins are the most effective way.
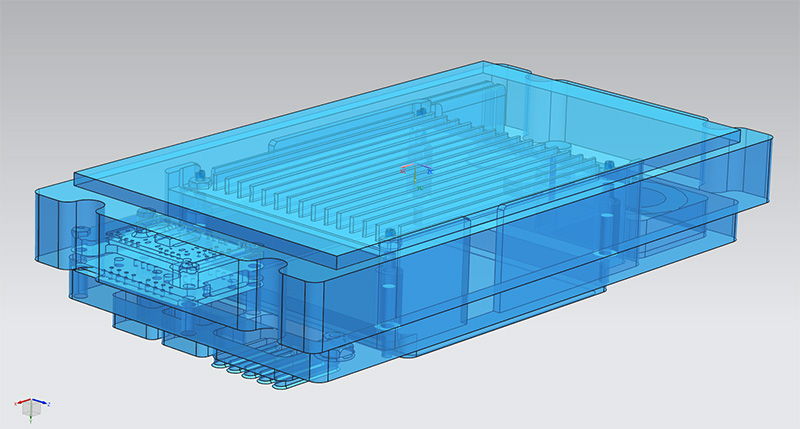
^ Above is our fluid domain. It is the core fluid from our sealed assembly. Essential step to all CFD analisys. Inserting this pic because those fluid domain are quite difficult to extract. This is accurate to 0.2mm.
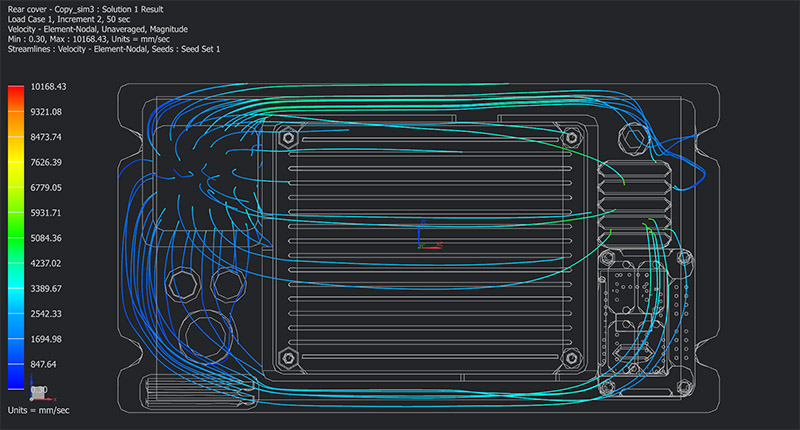
^ The-End-of-the-world here. Preliminary CFD on our design/assembly fails huge. As you can see from the grab above, we are not getting a ‘flow’ on the heatsink. We are surely getting so air (air is air) but not effective at all. My intention of having a inlet and outlet positioned the way they are now was a good one but results are not satisfactory.

^ Oh hang on, we are actually getting 'some' air (air is air!), but nothing like what I was aiming for. That is so NOT going to cool down my CPU and GPU, pretty useless in fact. Don't even bother doing thermal validation with this LOLL
So at that stage, we might as well just buy those $200 Asian (Android?) 2DIN kits. Those aren’t professionally thermally managed and often heat up to 90~100degree Celsius on a good summer day (I’ve heard/read a few weeks ago only).
The other option is to stop crying and fix our design by blocking where the air likes to go and channel ALL of it onto-our-heatsink! Sounds easy but let's see lollll I’ll get this done in a few hours and re-run the validations. This does NOT go into my machines for prod if no proven thermal management comes out before lollll
I'll update later this eve
__________________
______________________________
'97 Boxster base model 2.5L, Guards Red/Tan leather, with a new but old Alpine am/fm radio.
Last edited by Nine8Six; 08-13-2017 at 04:31 AM.
|

|

|
 08-13-2017, 10:33 AM
|
#154
|
|
Registered User
Join Date: Sep 2013
Location: Montreal, QC. (currently expat to Shanghai)
Posts: 3,249
|
Ta Da!
Bingo! We got it. All it needed was closing the top and bottom cabling trays (circled in red below). Thank god I took my time and didn't do the Electrical Routing before CFD, I would have had to run these wires all over again.
So there we have it. Every cubes of air is assigned to cooling the unit, no lost. Now if you ask me, this is the part where I get really exited in manufacturing this assembly. As long as I know this will work out as planed, I'm happy to trow the rest of the energy it needs for project completion. Goes fast from here 
I'll run the thermal analysis this week, although not sure I'll upload as many visuals. Wouldn't want to bore anyone. Besides I am still waiting for a member to say "Hey, this is a CAR forum" lollll Pushing my luck with all this technical stuff 
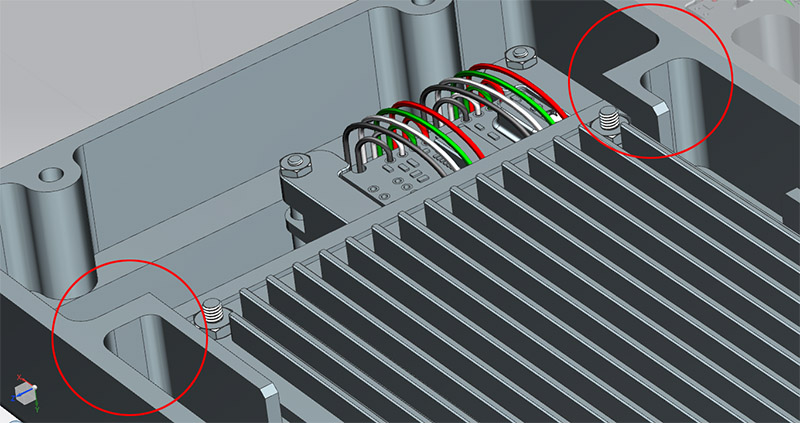
^ In red are are the two areas that needed closing, so to channel ALL of the air between those fins. Bye bye cabling trays however, can;t have it all!
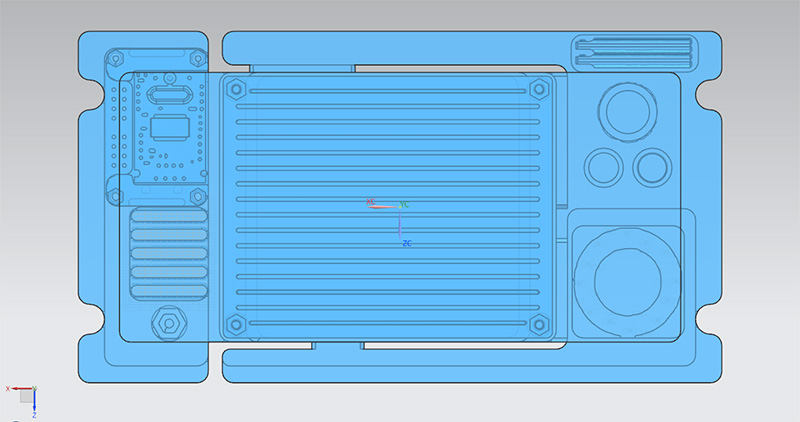
^ Our updated fluid domain. Notice the 3 openings to let the hot air evacuate the central PCB area. This is done with a slight negative pressure
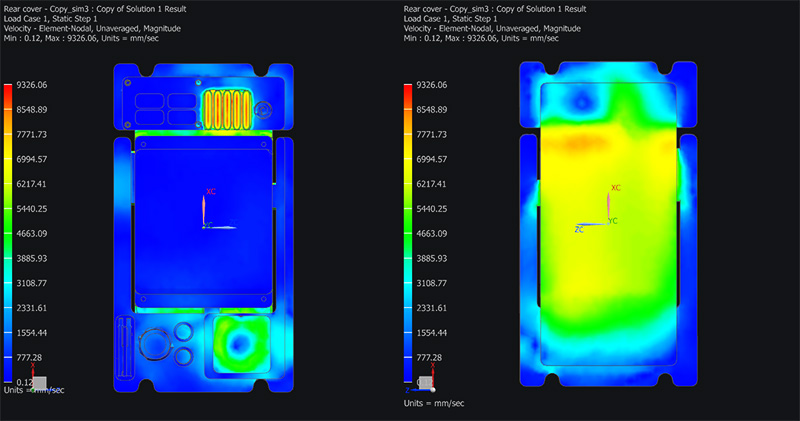
^ More than happy with this consistent flow. In fact, it performs far better than what I was hoping for (see for yourself in below grabs). Super exited about this. Hard work paying off, finally

^ Top view
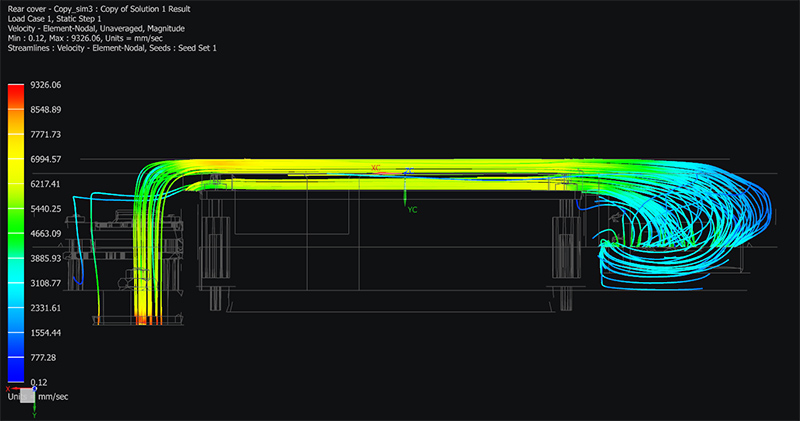
^ View from the side

^ And finally, with some of the layers turned ON... so you guys can visualize what's happening in there 
Enjoy!
__________________
______________________________
'97 Boxster base model 2.5L, Guards Red/Tan leather, with a new but old Alpine am/fm radio.
|

|

|
 08-13-2017, 11:11 AM
|
#155
|
|
Registered User
Join Date: Oct 2012
Location: Wake Forest, NC
Posts: 867
|
Whatever the hell you want, Fred, I'm in. Amazing!!
__________________
2000 Boxster S, 6 speed, Sport Package, Litronics, LED tail lights, LNE IMS-B, OBC, Skybreaker wind deflector, Arctic Silver/Graphite Grey
|

|

|
 08-14-2017, 03:00 PM
|
#156
|
|
Registered User
Join Date: Jun 2013
Location: Central Pennsylvania, USA
Posts: 102
|
This is such a great project and I'm totally in for one (and Skybreaker when you are doing those again)! I love all the details and the updates and can hardly wait for the product.
__________________
2000 Boxster S - B.A.D. short shifter and intake plenum - 996 throttle body - Fred's xenon projector headlights - blue LED instrument cluster - and a few other things
Driving this car makes me wish I lived farther away from work!
|

|

|
 08-15-2017, 01:18 PM
|
#157
|
|
Registered User
Join Date: Sep 2013
Location: Montreal, QC. (currently expat to Shanghai)
Posts: 3,249
|
Haha Kevin, yea not going to be an expansive unit at all. Aiming for less than 8,999 ( EURO), fingers crossed bud lolll
Troy!! 
Ran a few static thermal sims with the CPU max’ed up to its 5Watts, and getting less than dramatic results. This is with the wind, tornados and typhoons turned ON (i.e. Flow) among other sim elements e.g. environment convection and thermal couplings (aka ‘semi’-basic sim). To maintain/stabilize the air temp below 50dC across the unit (static) we need a minimum volume of 0.0016~0.0018m3/s (or 3.5~4CFM if you prefer). Considering a ‘pocket size’ performance computer, that’s not a lot! There, some advantages to designing overkill heatsinks lollll
I have yet to run the transient sims with the temp data I’ve acquired a few weeks ago but then… at that stage I am not worried anymore. Might play with this later on tough, curiosity win and I have the tools to do it so… why not.
Cooling Fan:
I am using the standard DC Fan #3010 bolt pattern therefore, and shall you need to service the unit in 2~3 years loll (i.e. replace the fan), you can get this same dc fan-size everywhere (radioshack/ebay/keywords: DC Fan 3010).
Interestingly enough, I’ve found this dc fan in the 4.x CFM rating in our 3010 bolt pattern, just what we need. However this little monster spins at 7000RPM. So very likely it will(should?!) be quite noisy :/ Dunno, never seen nor worked with a ‘Magnetic Levitation Fan’ (whatever that does). We’ll see, got two on order to test – I’ll Quick Update on the noise level of the Super DC Fan soon LOL (desperate stuff….)

^ 7k RPM... good god... if this thing pass the one month 24/7 ON test I plan on giving it on arrival, it should live forever imo lolll p/n: SUNON KDE0503PFV2-8.
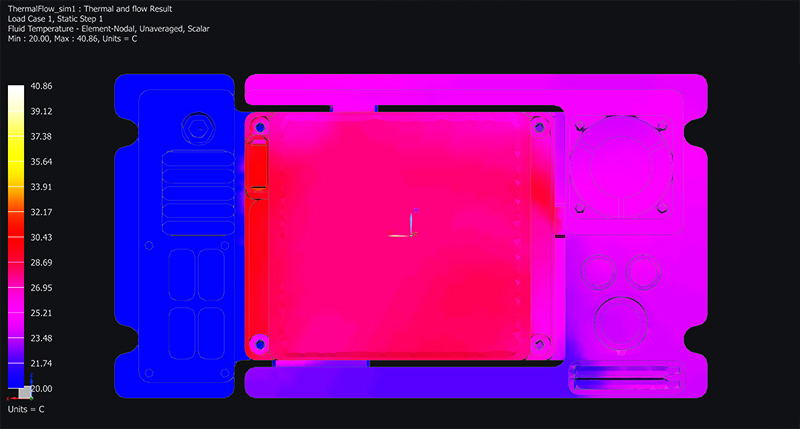
^ Top view of the unit while the CPU is basically at its scorching HOT'est (5watts). A lot, if not all, gets dissipated to the AL heatsink. The central PCB area is warm, but not critical hot at all (30~35.ish dC).

^ Bottom view. That air really does work a lot of heat on its way to the fan. This is actually with a full 0.002 m3/s air flow (4.2CFM).

^ Cut in half, so you can see what's the deal inside of the unit.
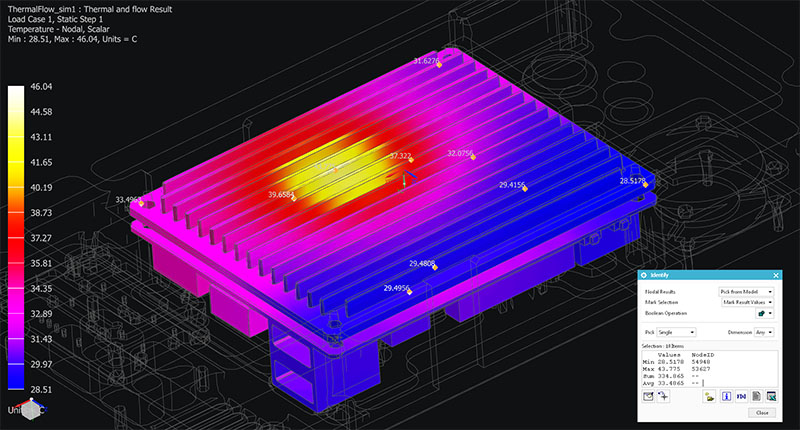
^ Some random pic because, well, pink is nice on Pcar forums!

^ This. Custom made. For us. Undecided whether to use thermal tape or grease between the CPU/GPU and the heasink's pads (OCD? lollll)
__________________
______________________________
'97 Boxster base model 2.5L, Guards Red/Tan leather, with a new but old Alpine am/fm radio.
|

|

|
 08-15-2017, 01:27 PM
|
#158
|
|
Registered User
Join Date: Apr 2014
Location: Seattle
Posts: 362
|
top notch quality as always 
__________________
2000 Boxster S, SPEC stage 1 clutch, Fabspeed sport headers, Fabspeed secondary cat deletes, Billy&Boat muffler, EVOM air intake, Ben006's Custom Short Shifter, Pedro's TechnoBrace, Eibach rear sway bar, De-snorkeled, Fred's custom projector HL
|

|

|
 08-15-2017, 01:41 PM
|
#159
|
|
Motorist & Coffee Drinker
Join Date: Jul 2014
Location: Oklahoma
Posts: 3,952
|
Quote:
Originally Posted by Nine8Six

...
Cooling Fan:
I am using the standard DC Fan #3010 bolt pattern therefore, and shall you need to service the unit in 2~3 years loll (i.e. replace the fan), ...
|
Oh no! Another IMSB.  Is there a way to know the fan bearing is going out before it causes catastrophic shrapnel and ignites the dashboard? I'm thinking you should make it a plain bearing fan with an oil feed from the engine. ..or perhaps tap into the low pressure A/C line and use a micro-evaporator for proper cooling. 
As always Fred, amazing work and sure to be better than anything commercially available. Any reason why I shouldn't get one to replace the PCM unit in my '05 Cayenne?
__________________
I am not an attorney, mechanic, or member of the clergy. Following any advice given in my posts is done at your own peril.
|

|

|
 08-15-2017, 01:53 PM
|
#160
|
|
Registered User
Join Date: Sep 2013
Location: Montreal, QC. (currently expat to Shanghai)
Posts: 3,249
|
Quote:
Originally Posted by Dubaday

top notch quality as always  |
 
Quote:
Originally Posted by 78F350

my '05 Cayenne?
|
lolll Go Go Maglev, the panacea to all B worries
The kit is based off ISO7736 size (180 x 100 mm panel). My guess is... if you know of anyone who does a Cayenne 2DIN mounting kit, then that little carpc clamps right in it 
(I think loll)
__________________
______________________________
'97 Boxster base model 2.5L, Guards Red/Tan leather, with a new but old Alpine am/fm radio.
|

|

|
 Posting Rules
|
You may not post new threads
You may not post replies
You may not post attachments
You may not edit your posts
HTML code is On
|
|
|
All times are GMT -8. The time now is 02:25 AM.
| |