01-14-2015, 01:06 PM
|
#1
|
Registered User
Join Date: Dec 2012
Location: FL
Posts: 4,144
|
Throttle body cleaning on 2000 Boxster S
Anytime I would disconnect the battery or clear the codes for any reason, the idle would get very jumpy, surging between 600-800. Over time it would mostly smooth out, but it would come back at times.
With e-gas, the butterfly valve is always slightly open for idle (there is no dedicated idle valve like with the cable throttle 97-99 boxsters) If it gets gunked up, enough air doesn't get through and so you have a low idle. The ECU opens up the valve a little, idle shoots up. ECU drops it back, and it goes back down but too low. Up and down, up and down. Over time I believe the ECU learns the right fraction to hold it open which minimizes this. I forget which setting on Durametric, but I could see the throttle percentage going up and down and up and down as the ECU tried to smooth out the idle.
Today I was in there and I decided to clean the throttle body. I have a 2000 S and my pictures looked different from Pedros guide and also the 101 Projects guide so here are some new pictures .I have e-gas, but also the AOS tube looked different on mine.
Before you start, some things to keep in mind:
Quote:
Originally Posted by nieuwhzn
Bit of advice. Do this at a pretty high ambient temperature otherwise the hoses are too stiff. Since you are in there consider cleaning the MAF too.
|
Good points there, while you are in there it is a good time to: - Check your air filter
- Clean your MAF
- Check your power steering fluid
My procedure was:
- Put the top in service position and remove the engine cover.
- Disconnect negative end of battery (just for safety)
- Loosen the screw clamp at the MAF end of the intake tube and slip the tube off (I tried to take just the other end off but the tube is too rigid)

- Loosen the screw clamp on the throttle body side of the intake tube and pop that sucker off. It was tough to get off.
- Remove the nut that is holding down the throttle body.

- Remove the AOS tube from the intake just after the throttle body. To do that you squeeze the plastic ring on the serrated parts and slide it off. Even after releasing the clip it still has to slide a decent little amount before it comes off.
- Loosen the screw clamps that are holding the bands that hold the intake splitter. These need to be loose so you can rotate the throttle body up. I did all 4 but I think you could do just the inner ones.

- Rotate the throttle body up, and unclip the e-gas connector. It is a squeeze tab to release but mine was very brittle and half of one tab end broke off, and the whole other tab broke off. I was worried it would not be secure when reinstalling but it was.

- Rotate the throttle body up some more and get ready to clean.
At this point I could have removed the whole throttle body but I decided to just clean in place as I did not have a gasket. If you do remove it, the gasket behind it is part number 99611031802, #9 in this diagram: http://www.********************************************.com/porsche-parts/hardparts.php?dir=986-97-04§ion=107-10
The torque value for the 4 throttle body bolts is 9.7NM (7.0 ft/lbs)
It was gunked up pretty bad (and I lied, I do have a picture of the connector, here it is)
I hit it with some throttle body cleaner and wiped it down pretty good and got it nice and mostly shiny.
DO NOT USE THE STRAW THAT COMES WITH THE THROTTLE BODY CLEANER OR YOU *WILL* BLOW IT DOWN THROUGH AND PAST THE THROTTLE BODY. REPEAT: DO NOT. How do I know? Even after reading this exact guidance in another thread, I figured I would hold the straw with my finger and keep it tight. Guess what? When I had to use that hand to prop open the throttle body I blew the red straw down inside. Very luckily, it stopped just within reach of a long pair of needle nose pliers and I did not have to do more disassembly to get it...
Reinstallation is the reverse of assembly...
- Reattach the e-gas clip to the throttle body.
- Rotate the throttle body down
- I loosely fastened the nut holding down the throttle body to keep it from moving at this point and then attempted to refit the throttle body end of the intake tube... It is very hard to get leverage in there. After many attempts I sprayed the throttle body cleaner on the outside of the throttle body to clean it up and provide some lubrication, and then I was able to pop that tube on, and then tighten the screw clamp.
- Re-tighten the throttle but hold down nut all the way (I just realized I did not do that yet until I was typing these instructions)
- Tighten the screw clamps on the splitter that is downstream of the throttle body. Leaving these loose but with the nut on loosely gives you a little wiggle room on the throttle body as you try to get that tube on. Possibly it could be better to tighten them both up before fitting the tube.
- Re-attach the AOS tube. Make sure it clicks. It slides on a decent bit before it is fully engaged and clicks.
- Slip on the MAF end of the intake tube and tighten it up (way easier than the other end). Before you slip it on, rotate the screw clamp so that you can get to the screw as it may have rotated down.
- I let it sit for a little before tightening it all back to give as much of the throttle body cleaner time to evaporate.
- Reconnect the battery. Turn the key on but let it sit for a minute and do not touch the gas pedal. This is to allow time for the ECU to perform throttle adaptation. I have heard that if you do not do this the idle might be messed up or at the wrong RPM.
- Crank it up. In my case it took about 30 seconds of cranking, a short pause, and then about 10 seconds of cranking before it started up. Probably because of the throttle body cleaner getting down in there.
Idle... rock steady!
Time, 1.5 hours (considering I already had most of the engine compartment open) and I would be able to go a lot faster next time, probably less than an hour.
This was the first time that I unclipped the fasteners at the bottom of the clamshell and moved it up higher out of the way. WAY more room, I will do it this way from now on. Those little clips are a hassle though, I think I have not figure out the right procedure for getting them off.
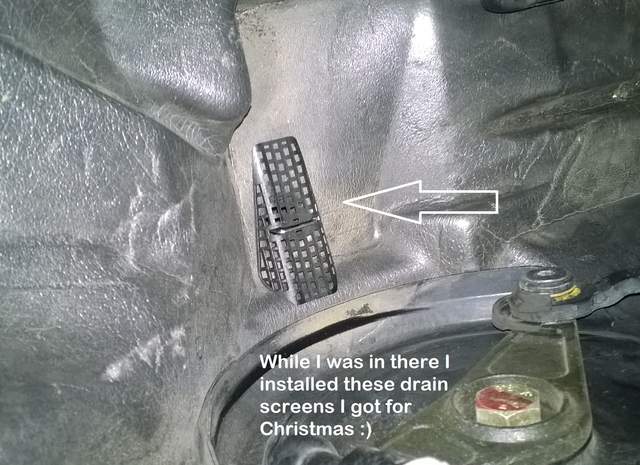
While I was in there I also installed the drain screens I got for Christmas. I keep the car garaged but these were an inexpensive Christmas gift to myself.
Last edited by steved0x; 02-10-2015 at 08:05 AM.
Reason: added pictures
|
|
|
01-14-2015, 02:11 PM
|
#2
|
Custom User Title Here
Join Date: Mar 2012
Location: Ft. Leonard Wood
Posts: 6,164
|
Excellent write up
__________________
https://youtube.com/@UnwindTimeVintageWatchMuseum
|
|
|
01-14-2015, 09:16 PM
|
#3
|
Registered User
Join Date: Nov 2010
Location: Long Island, NY
Posts: 296
|
Bit of advice. Do this at a pretty high ambient temperature otherwise the hoses are too stiff. Since you are in there consider cleaning the MAF too.
|
|
|
01-15-2015, 05:23 AM
|
#4
|
Registered User
Join Date: Dec 2012
Location: FL
Posts: 4,144
|
Quote:
Originally Posted by nieuwhzn
Bit of advice. Do this at a pretty high ambient temperature otherwise the hoses are too stiff. Since you are in there consider cleaning the MAF too.
|
Excellent advice regarding the hoses (and the MAF too) I guess you could go for a drive and then come back, let the car cool for a little, and then do it if it was a cooler day. It has been cold here in FL but the last few days it has been very moderate, and warmish in my garage, maybe 70. Today it is back down in the 40s...
|
|
|
01-15-2015, 05:27 AM
|
#5
|
Registered User
Join Date: Dec 2012
Location: FL
Posts: 4,144
|
Placeholder post in case I need to add more pictures in the future as you are limited to 10 per post.
Last edited by steved0x; 01-15-2015 at 05:49 AM.
|
|
|
01-15-2015, 06:15 AM
|
#6
|
Registered User
Join Date: Dec 2012
Location: FL
Posts: 4,144
|
Quote:
Originally Posted by particlewave
Excellent write up 
|
Thank you, check it out now that I added the pictures
|
|
|
01-15-2015, 08:40 AM
|
#7
|
Registered User
Join Date: Mar 2014
Location: Eastern NC
Posts: 701
|
I pulled those clips on the clamshell using a tool desgned for removing cotter pins. It looks like on icepick with a j hook in the end. Works great - but wear gloves to protect your hands.
|
|
|
01-15-2015, 10:19 AM
|
#8
|
Registered User
Join Date: Dec 2012
Location: FL
Posts: 4,144
|
Quote:
Originally Posted by BFeller
I pulled those clips on the clamshell using a tool desgned for removing cotter pins. It looks like on icepick with a j hook in the end. Works great - but wear gloves to protect your hands.
|
I will check it out, I used a pair of needle nose, one of the clips looks like #$%^ now but at least I got it positively fastened, and I may have jabbed a hole in my foam under there on the side... Anything would be better than that...
|
|
|
01-15-2015, 02:35 PM
|
#9
|
Registered User
Join Date: Sep 2013
Location: Montreal, QC. (currently expat to Shanghai)
Posts: 3,249
|
Now that is some kickarse documented DIY
May I ask how many miles you had on your car for the thing to look that gunky? approaching 60k on mine and I have a feeling it wouldn't hurt cleaning things up. Almost scared to open mine up and finding dead/dried insects or little animals. 17 years LOL
What's the recommended scheduled maintenance on this TB cleaning, every 50k miles, every two years? when the idle starts to screw up I'm guessing... just curious to know if Porsche or other experts are recommending a maintenance schedule for the TB
Sorry for the multiple questions lolll
__________________
______________________________
'97 Boxster base model 2.5L, Guards Red/Tan leather, with a new but old Alpine am/fm radio.
|
|
|
01-15-2015, 06:11 PM
|
#10
|
Registered User
Join Date: Dec 2012
Location: FL
Posts: 4,144
|
I have 115K on mine. I have not seen a recommended interval for this cleaning and the Bentley does not have a procedure. I didn't think to check the service manuals pdfs I got from ebay or to search rematch for tech service bulletins, it may be in there.
Quote:
Originally Posted by Nine8Six
Now that is some kickarse documented DIY 
|
Coming from the master of DIY guides and projects, thank you!
Probably if/when the idle gets jumpy would be the time to do it.
I wonder how it gets gunky? Just air supposedly goes through it in one direction? Does some backflow from the combustion process get on it? Or is it just gunk that flows through. Maybe the same gunk that gets on the maf...
Last edited by steved0x; 01-15-2015 at 06:16 PM.
|
|
|
01-16-2015, 08:02 AM
|
#11
|
Registered User
Join Date: Jan 2007
Location: BC
Posts: 1,346
|
Good writeup. I personally found it easier to take it out of the car for cleaning. May just be a sign of my aging back and how much it hurts when I have to lean into the engine bay for too long!
__________________
2001 Boxster, 5 spd, Seal Grey
|
|
|
02-07-2015, 07:22 AM
|
#12
|
Registered User
Join Date: Dec 2014
Location: Pasadena
Posts: 261
|
TB clean
So, Just asking cause I'm thinking of doing. Most later vehicles with Drive by wire require TB relearn. Does finagling with Butterfly valve have any dire consequences later after cleaning? I have 02 S model. Nice write up too
|
|
|
02-07-2015, 05:37 PM
|
#13
|
Registered User
Join Date: Dec 2012
Location: FL
Posts: 4,144
|
Quote:
Originally Posted by Lapister
. Most later vehicles with Drive by wire require TB relearn. Does finagling with Butterfly valve have any dire consequences later after cleaning?
|
I sure hope not  I was worried about that. I tried to be smooth when I opened the butterfly to clean the edges and behind it. If you took it off you could probably do 99% without having to open the valve and if you had something narrow you could probably slip it through. I think there may be such a tool like a pipe cleaner sort of thing fir throttle bodies.
I didn't take mine off because I didn't have a new gasket and I was afraid I would not be able to reuse the old one. Also tbh I didn't even think to try it. Once you get to the TB like I did it is just 4 bolts and it is off...
Thank you!
Steve
|
|
|
10-14-2015, 01:37 PM
|
#14
|
still plays with cars...
Join Date: May 2011
Location: Baden, ON, Canada
Posts: 1,088
|
Excellent DIY!
I just completed this and a MAF cleaning too.
The only step I deviated was to disconnect the AOS line at the AOS itself instead of at the throttle body.
I still was able to rotate the throttle body up adequately and I found it MUCH easier to disconnect the vent line here.
Oh yeah, and it ran great after I reconnected said vent line.
Thanks again.
__________________
Six speed 2000 Boxster S
Arctic Silver on Metropol Blue | LN Dual Row IMSR | Arctic Silver console, spoiler frame & bumperettes | Crios mod | Technobrace | RoboTop module & modified convertible top relay for one-touch roof operation
Last edited by BoxsterSteve; 10-14-2015 at 02:06 PM.
|
|
|
10-14-2015, 05:41 PM
|
#15
|
Registered User
Join Date: May 2013
Location: Michigan
Posts: 18
|
wow that was really really dirty ......... I let mine go for 10k once. It only looked half that bad.
Great job on the clean up.
|
|
|
10-15-2015, 05:11 AM
|
#16
|
Registered User
Join Date: Dec 2012
Location: FL
Posts: 4,144
|
I think mine had gone a lot longer than 10K... I think I am going to make it an annual thing to clean it. Good tip on the other end of the hose. Getting that hose off was the hardest part, well tied with getting the throttle end of the intake tube on and off which was pretty hard too.
Steve
|
|
|
04-29-2016, 04:58 PM
|
#17
|
Registered User
Join Date: Dec 2015
Location: Denver
Posts: 866
|
I could not get the AOS clip loose, even with pliers; advise?
__________________
5280 Cruising @High Altitude
Seal Gray & K&N Filter
|
|
|
04-30-2016, 06:09 PM
|
#18
|
Registered User
Join Date: Dec 2012
Location: FL
Posts: 4,144
|
Quote:
Originally Posted by Ciao
I could not get the AOS clip loose, even with pliers; advise?
|
I think I remember squeezing it by hand, and then wriggling it side to side gently until it came out. There are two possible ways to squeeze it, and I think I got the correct way from looking at a photo on Pedro's site, but I don't have it handy now. It was very fiddly, I do remember that. My notes have this: "Remove the AOS tube from the intake just after the throttle body. To do that you squeeze the plastic ring on the serrated parts and slide it off. Even after releasing the clip it still has to slide a decent little amount before it comes off. " until I squeezed the serrated part I had no success..
|
|
|
05-05-2016, 02:07 PM
|
#19
|
Registered User
Join Date: Dec 2015
Location: Denver
Posts: 866
|
Quote:
Originally Posted by steved0x
I think I remember squeezing it by hand, and then wriggling it side to side gently until it came out. There are two possible ways to squeeze it, and I think I got the correct way from looking at a photo on Pedro's site, but I don't have it handy now. It was very fiddly, I do remember that. My notes have this: "Remove the AOS tube from the intake just after the throttle body. To do that you squeeze the plastic ring on the serrated parts and slide it off. Even after releasing the clip it still has to slide a decent little amount before it comes off. " until I squeezed the serrated part I had no success..
|
Yes, squeezing at the serrated side is the consensus. I'll try again with pliers, maybe it's just frozen; I was able to replace the airfilter and took K&N and threw it away...too much gunk; used MANN filter; next time I'll also clean the MAF since I know more about it now...all in all I hope to improve HP (slightly) and mileage.
Cheers!
__________________
5280 Cruising @High Altitude
Seal Gray & K&N Filter
|
|
|
04-30-2016, 03:17 PM
|
#20
|
Tyler
Join Date: Sep 2015
Location: North Carolina -> New York -> Georgia
Posts: 52
|
My box had about 64K last fall when I cleaned mine, and I would say my throttle body looked very similar (about the same amount of gunk). I would think that is pretty typical for this mileage. I changed my AOS right after that.
|
|
|
Posting Rules
|
You may not post new threads
You may not post replies
You may not post attachments
You may not edit your posts
HTML code is On
|
|
|
All times are GMT -8. The time now is 09:34 AM.
| |