 01-22-2015, 07:01 PM
|
#1
|
|
Custom User Title Here
Join Date: Mar 2012
Location: Ft. Leonard Wood
Posts: 6,169
|
Dang! Customs has been holding onto mine for going on 3 days 
__________________
https://youtube.com/@UnwindTimeVintageWatchMuseum
|

|

|
|
01-22-2015, 07:18 PM
|
#2
|
|
Registered User
Join Date: Jun 2013
Location: Nanaimo, Vancouver Island, British Columbia, Canada
Posts: 916
|
Ps did you remove your Center console ?
|

|
|
|
01-22-2015, 07:35 PM
|
#3
|
|
Registered User
Join Date: Jun 2013
Location: Nanaimo, Vancouver Island, British Columbia, Canada
Posts: 916
|

Fieldfit, looks good. One word of advice be super careful. It scratches very easily. I handled with microfibre and still managed to scratch it but still looks amazing 
Fred got any pics of the wires going into the console
|
|
|
|
|
01-22-2015, 07:47 PM
|
#4
|
|
Registered User
Join Date: Sep 2013
Location: Montreal, QC. (currently expat to Shanghai)
Posts: 3,249
|
Quote:
Originally Posted by Fintro11

Fieldfit, looks good. One word of advice be super careful. It scratches very easily. I handled with microfibre and still managed to scratch it but still looks amazing
Fred got any pics of the wires going into the console |
Outdoor, dusk time, coastline in the background, Skybreaker lit up.... I'd pay for one of these pic 
You can scratch it as much as you want, any plastic 'polisher' works in all honesty (Novus, PlastX, etc). 2 min buff with a microfiber and it comes back brand new looking Just don't scratch it with a solid stainless steel "wrist watch". Also don't use WINDEX or any strong chemical on that thing - ever - and it should last you a few years.
No connection pics at the moment Martin -stop embarrassing me lolll. Planning on reaching/snaking the 12v lead wire to the clam's brake light and terminate there (that's also on the parking light circuit). When I'll have time I want to do that brake-light dual intensity retrofit thingy.
__________________
______________________________
'97 Boxster base model 2.5L, Guards Red/Tan leather, with a new but old Alpine am/fm radio.
Last edited by Nine8Six; 01-22-2015 at 07:49 PM.
|
|
|
|
|
01-22-2015, 08:04 PM
|
#5
|
|
Registered User
Join Date: Jun 2013
Location: Nanaimo, Vancouver Island, British Columbia, Canada
Posts: 916
|
I used a flat screw driver with some shop towels over the edge and pushed it in between ( lazy ) 

|
|
|
|
|
01-22-2015, 08:06 PM
|
#6
|
|
Registered User
Join Date: Sep 2013
Location: Montreal, QC. (currently expat to Shanghai)
Posts: 3,249
|
Quote:
Originally Posted by Fintro11
|
pffff. you see what I mean by being embarrassed? That looks 100 time better than my set-up
I quit
__________________
______________________________
'97 Boxster base model 2.5L, Guards Red/Tan leather, with a new but old Alpine am/fm radio.
|
|
|
|
|
01-22-2015, 08:29 PM
|
#7
|
|
Registered User
Join Date: Jun 2013
Location: Nanaimo, Vancouver Island, British Columbia, Canada
Posts: 916
|
|
|
|
|
|
01-22-2015, 09:08 PM
|
#8
|
|
Registered User
Join Date: Jun 2013
Location: Nanaimo, Vancouver Island, British Columbia, Canada
Posts: 916
|
Would there be any issues if I hooked it up to the ashtray circuit ?
|
|
|
|
|
01-22-2015, 09:26 PM
|
#9
|
|
Registered User
Join Date: Sep 2013
Location: Montreal, QC. (currently expat to Shanghai)
Posts: 3,249
|
Quote:
Originally Posted by Fintro11
Would there be any issues if I hooked it up to the ashtray circuit ?
|
My Dream: Let the brightness ctrl sit right there in the shelf bag, behind driver's head. I want to reach to the brake circuit as permanent solution (SkyActivMode lol)
Sat morning is breakfast with wife and play time for me until 12noon! There you go. Will report soon. 100% I want to hook it up on my right tail light' loom. We'll see, still thinking (window switch!)
If one day someone makes a dual brake intensity diy!!! I'll subscribe for sure
__________________
______________________________
'97 Boxster base model 2.5L, Guards Red/Tan leather, with a new but old Alpine am/fm radio.
|
|
|
|
|
01-22-2015, 10:07 PM
|
#10
|
|
Registered User
Join Date: Nov 2009
Location: San Jose , CA
Posts: 579
|
Let's see them turned on!
__________________
Lapis Blue 03 Boxster S
Seal Grey 04 Boxster S (RIP 9-21-14)
|
|
|
|
|
01-22-2015, 10:18 PM
|
#11
|
|
Registered User
Join Date: Jun 2013
Location: Nanaimo, Vancouver Island, British Columbia, Canada
Posts: 916
|
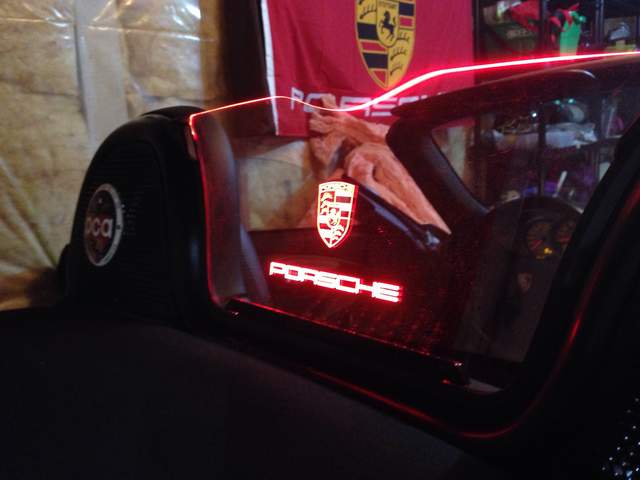
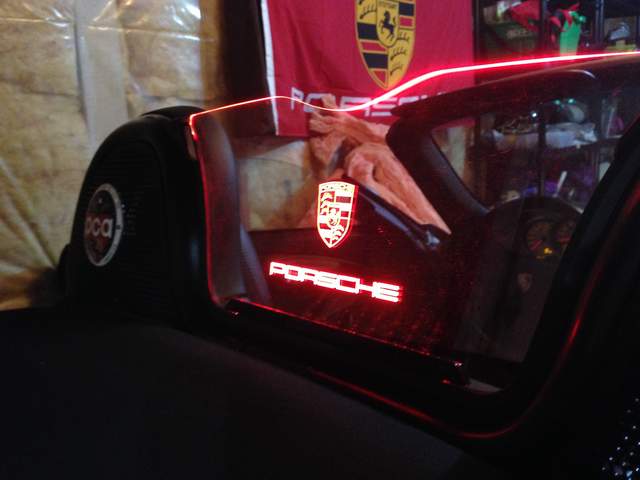
How I installed My Windstop
Step One -
Carefully push the windstop clip and pull the windstop towards the back of the car. The wind stop should pop out easily and without much force. ( Take care not to break the clips )
Step Two -
Once you have your windstop out pull the bracket away from the screen. The bracket should come away relatively easily.

Step Three -
Line up your illuminated windstop to the bracket. You will have to drill a small hole for the cable to run though. I used a small drill bit and drilled from the top down, then from the bottom up applying pressure along a horizontal path ( so the connector can slide past ) 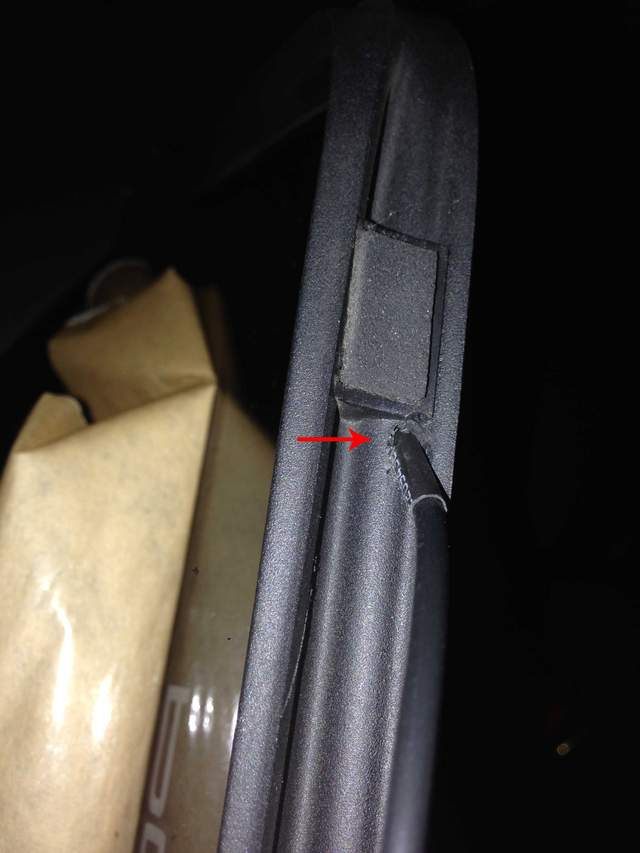
Step Four -
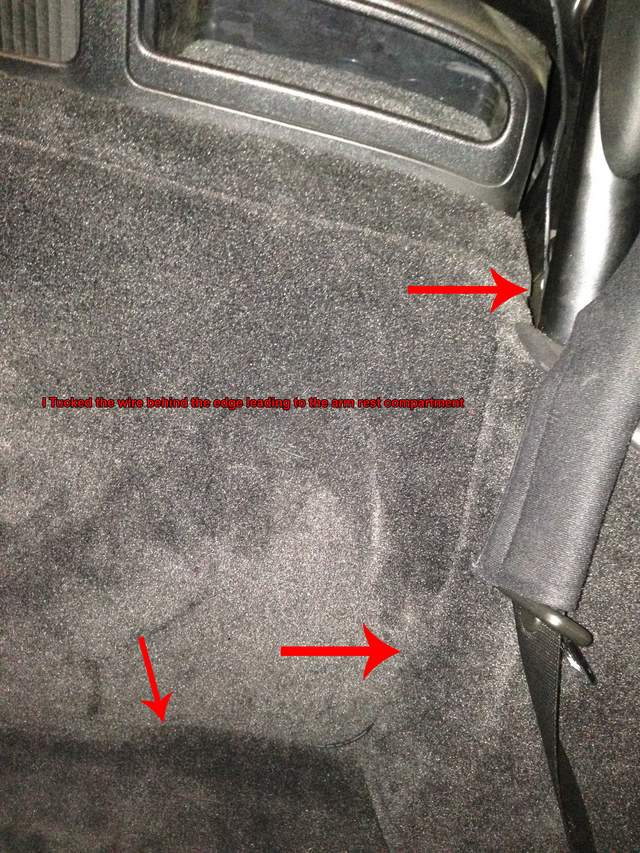
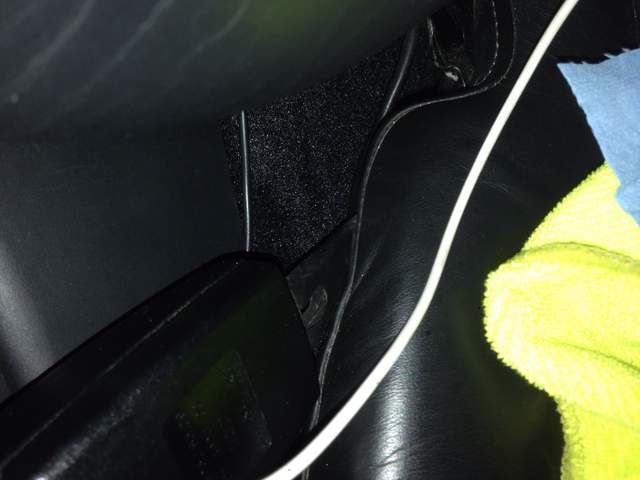
Install your illuminated windstop into the bracket and install it onto your car. You will want to keep the protective sheet on the windstop for now. Make sure the wire runs towards the driver side. I used a large flat screwdriver with paper towel wrapped around the tip and pushed the wire into the gap on the roll bar cover. 
Then keep running it around the back of the seat
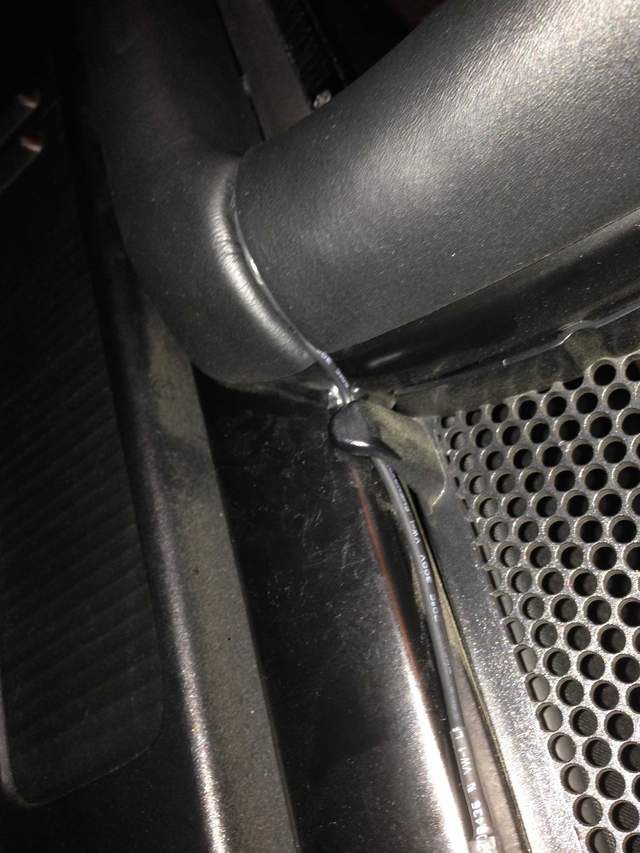
Step Five
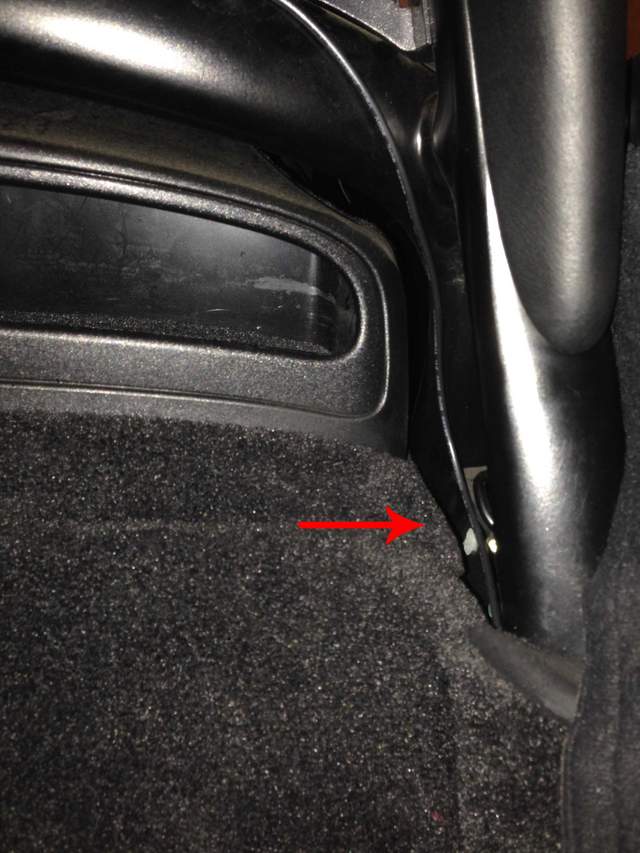
Run the wire into the seam of the access panel down leading to the arm rest cubby
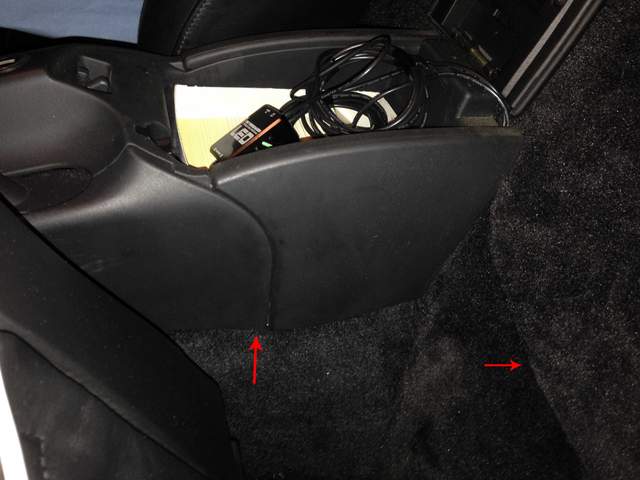
I removed the ash tray, and the ash tray housing to access the ash tray light circuit.
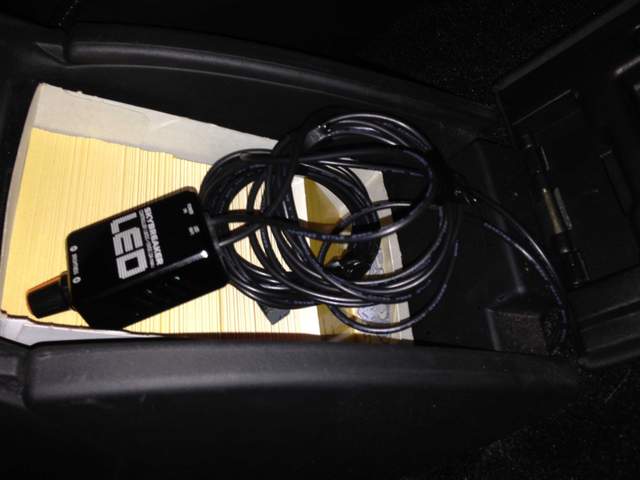
I fed the power cable up underneath the parking brake. Once I had the wire where i wanted it, I tucked the wire up inside the console ( see the above picture )
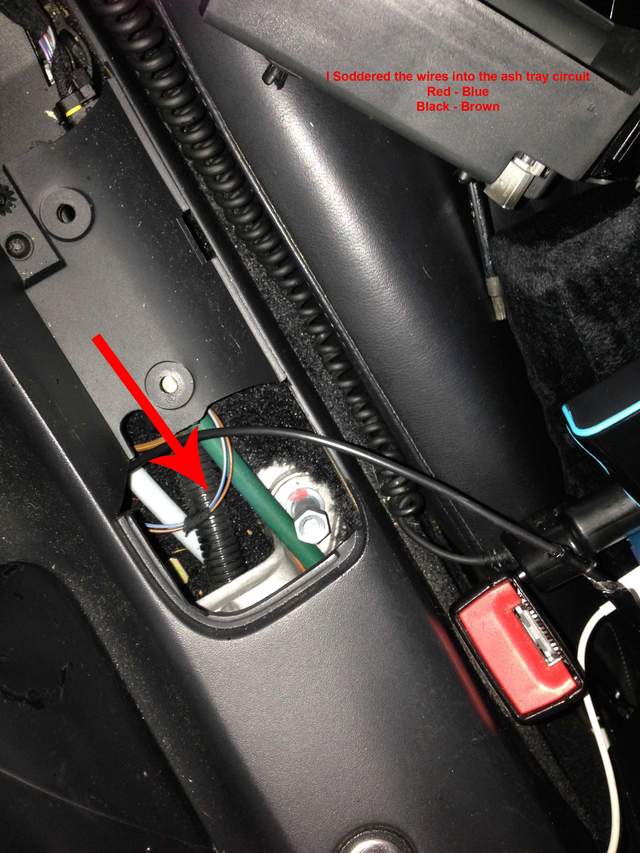
As per the image above I soldered the wires into the ash tray circuit. Once done I wrapped with electrical tape and re installed the ash tray.
Sorry for any mistakes and Fred/ Charles please add in if i did anything wrong!
Hopefully this helps as a reference for you guys.
PS Fred thanks for making such an amazing product!
|
|
|
|
|
01-22-2015, 10:29 PM
|
#12
|
|
Registered User
Join Date: Sep 2013
Location: Montreal, QC. (currently expat to Shanghai)
Posts: 3,249
|
Quote:
Originally Posted by Fintro11
How I installed My Windstop
|
Wow man. You've just made 16 good friends right there.
17 incl me Martin 
ps. Try to hide the excess cabling under the carpet, somewhere, somehow. Mine is in the driver seat rear pouch now loll (prefer your idea tho)
__________________
______________________________
'97 Boxster base model 2.5L, Guards Red/Tan leather, with a new but old Alpine am/fm radio.
Last edited by Nine8Six; 01-22-2015 at 10:33 PM.
|
|
|
|
|
01-22-2015, 10:40 PM
|
#13
|
|
Custom User Title Here
Join Date: Mar 2012
Location: Ft. Leonard Wood
Posts: 6,169
|
Quote:
Originally Posted by Fintro11
How I installed My Windstop
|
Very cool! Thanks for posting 
__________________
https://youtube.com/@UnwindTimeVintageWatchMuseum
|
|
|
|
|
07-02-2015, 09:23 AM
|
#14
|
|
Registered User
Join Date: Jun 2013
Location: Nanaimo, Vancouver Island, British Columbia, Canada
Posts: 916
|
This is how I did mine,
Quote:
Originally Posted by Fintro11
How I installed My Windstop
Step One -
Carefully push the windstop clip and pull the windstop towards the back of the car. The wind stop should pop out easily and without much force. ( Take care not to break the clips )
Step Two -
Once you have your windstop out pull the bracket away from the screen. The bracket should come away relatively easily.
Step Three -
Line up your illuminated windstop to the bracket. You will have to drill a small hole for the cable to run though. I used a small drill bit and drilled from the top down, then from the bottom up applying pressure along a horizontal path ( so the connector can slide past )
Step Four -
Install your illuminated windstop into the bracket and install it onto your car. You will want to keep the protective sheet on the windstop for now. Make sure the wire runs towards the driver side. I used a large flat screwdriver with paper towel wrapped around the tip and pushed the wire into the gap on the roll bar cover.
Then keep running it around the back of the seat
Step Five
Run the wire into the seam of the access panel down leading to the arm rest cubby
I removed the ash tray, and the ash tray housing to access the ash tray light circuit.
I fed the power cable up underneath the parking brake. Once I had the wire where i wanted it, I tucked the wire up inside the console ( see the above picture )
As per the image above I soldered the wires into the ash tray circuit. Once done I wrapped with electrical tape and re installed the ash tray.
Sorry for any mistakes and Fred/ Charles please add in if i did anything wrong!
Hopefully this helps as a reference for you guys.
PS Fred thanks for making such an amazing product! |
|
|
|
|
|
01-22-2015, 10:18 PM
|
#15
|
|
Custom User Title Here
Join Date: Mar 2012
Location: Ft. Leonard Wood
Posts: 6,169
|
Aw, man! My inferior superiority complex hurts, haha!
You are correct, Fred!
Ashtray light circuit
Don't mind me, folks. Nothing to see here. Carry on.
__________________
https://youtube.com/@UnwindTimeVintageWatchMuseum
Last edited by particlewave; 01-22-2015 at 10:34 PM.
|
|
|
|
|
01-22-2015, 10:24 PM
|
#16
|
|
Registered User
Join Date: Sep 2013
Location: Montreal, QC. (currently expat to Shanghai)
Posts: 3,249
|
Quote:
Originally Posted by particlewave
Aw, man! My inferior superiority complex hurts, haha!
Ashtray light circuit
Don't mind me, folks. Nothing to see here. Carry on.
|
You make my superiority one worsty :/
I'll dbl-chk on the 97-99 tomorrow. Martin got the S all new model, these guys have better electronics as it appears
__________________
______________________________
'97 Boxster base model 2.5L, Guards Red/Tan leather, with a new but old Alpine am/fm radio.
|
|
|
|
|
01-23-2015, 09:54 AM
|
#17
|
|
Registered User
Join Date: Jun 2014
Location: New Jersey
Posts: 230
|
Yeah, I'm in the same boat as Charles. Mine have been stuck at Customs for over 4 days now! I am hoping they get unstuck before the weekend at least, so I receive them next week. Keeping my fingers crossed!!
__________________
2001 Seal Gray Boxster (Hair Salon on wheels)
2013 Audi Q5 (Family Mover)
2006 Yamaha R1 (Adrenaline Machine)
|
|
|
|
|
01-23-2015, 11:15 AM
|
#18
|
|
Registered User
Join Date: Jun 2013
Location: Nanaimo, Vancouver Island, British Columbia, Canada
Posts: 916
|
I think it's a security thing going on with the states, some of our work shipments have been sitting at customs for a few days as well
|
|
|
|
|
01-23-2015, 10:21 PM
|
#19
|
|
Registered User
Join Date: Sep 2013
Location: Montreal, QC. (currently expat to Shanghai)
Posts: 3,249
|
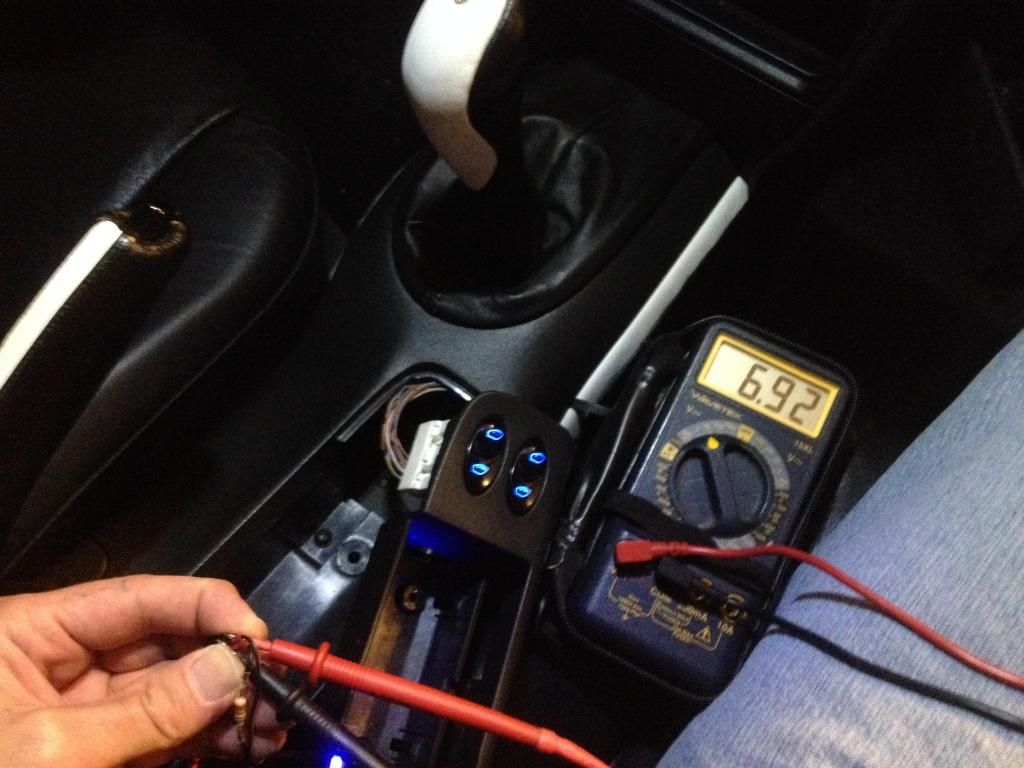
Confirmed working: Ashtray Light connectivity
I can dbl-confirm that Martin's ashtray install methods works just perfectly. The circuit is indeed 6.6volts however it delivers 9V when the SkyBreaker is connected. More than enough current flows to power ON the kit. Looks good!
1) Remove ashtray
2) Unscrew the two torx screws
3) Pull out the assembly and set aside (no need to unplug anything, switches etc)
4) Splice both brown & bleu ashtray light wires and terminate as you wish (soldered mines, covered with 2" of electrical tape. Sufficient)
Brown = ground (goes to SkyBreaker black)
Blue = positive (goes to SkyBreaker red)
No need to remove the console, the cabling is so small it's easy to push under with your fingers. My controller is now residing in the armrest compartment same as Martin's initial idea. I've hidden the 385 kilometers of wires under the carpet/driver's side however
In all, the installation takes aprox 20-30min. From sliding out your OEM windows to closing the lid of the armrest compartment! Way too easy and extremely unchallenging (i.e. boring)
The rest really is to snake the little WD cable around the hoop. Copy what I did (see pics below) or if you are braver than me, pull off the trim and tidy everything inside of it. The reason I chosen this method is because it will be easy to remove for cleaning. I don't want to bother removing the trim each time - I'm suspecting brittle clips under there!


On a side note, I couldn't push back my Boxster inside its storage shed so I had no choice but to start it up. Guess what, went for a 2hrs topless drive (warm and bright sunshine here today). Just came back all fixed lollll haven't driven this car for almost 1.5months. What a blast each time
__________________
______________________________
'97 Boxster base model 2.5L, Guards Red/Tan leather, with a new but old Alpine am/fm radio.
Last edited by Nine8Six; 01-23-2015 at 10:24 PM.
|
|
|
|
|
01-24-2015, 06:29 PM
|
#20
|
|
Registered User
Join Date: Jan 2015
Location: Melbourne, Australia
Posts: 74
|
[QUOTE=Nine8Six;433070]I can dbl-confirm that Martin's ashtray install methods works just perfectly. The circuit is indeed 6.6volts however it delivers 9V when the SkyBreaker is connected. More than enough current flows to power ON the kit. Looks good!
1) Remove ashtray
2) Unscrew the two torx screws
3) Pull out the assembly and set aside (no need to unplug anything, switches etc)
4) Splice both brown & bleu ashtray light wires and terminate as you wish (soldered mines, covered with 2" of electrical tape. Sufficient)
Brown = ground (goes to SkyBreaker black)
Blue = positive (goes to SkyBreaker red)
No need to remove the console, the cabling is so small it's easy to push under with your fingers. My controller is now residing in the armrest compartment same as Martin's initial idea. I've hidden the 385 kilometers of wires under the carpet/driver's side however
/QUOTE]
Fred,
Sorry to be so pedantic (remember I'm a complete novice)
When you do this:
Splice both brown & bleu ashtray light wires and terminate as you wish
Brown = ground (goes to SkyBreaker black)
Blue = positive (goes to SkyBreaker red)
Does the ashtray light still work after you connect the skybreaker wires? Or does it eliminate the light? Not that it really matters if the light in there is lost, but just wondering.
Plus instead of soldering, I have these wire connectors I use so you don't even have to strip the insulation from the wires and no tape needed.
Sorry if this is a stupid question, I just don't want to short circuit anything 
Thank You
__________________
1998 Porsche Boxster
986 Arena Red, Tiptronic Base
|
|
|
|
| Thread Tools |
|
|
| Display Modes |
 Hybrid Mode Hybrid Mode
|
 Posting Rules
|
You may not post new threads
You may not post replies
You may not post attachments
You may not edit your posts
HTML code is On
|
|
|
All times are GMT -8. The time now is 12:10 AM.
| |


![Porsche Wind Deflector with Edge Lighting [from CAD, prototyping to finish]](/forums/iconimages/diy-project-guides/porsche-wind-deflector-edge-lighting-%5B-cad-prototyping-finish%5D_ltr.gif)

 2004 Porsche Boxster
 2003 Porsche Boxster S


