 08-27-2017, 11:55 AM
|
#2
|
|
Registered User
Join Date: Jan 2007
Location: BC
Posts: 1,353
|
Quote:
Originally Posted by particlewave

|
Hey Charles, your pics are no longer available. Can you repost them? Thanks
__________________
2001 Boxster, 5 spd, Seal Grey
|

|

|
|
08-05-2015, 09:26 PM
|
#3
|
|
On the slippery slope
Join Date: Mar 2014
Location: Austin and Palm Springs
Posts: 3,800
|
Long live the spud!
__________________
2004 Boxster S 6 speed - DRL relay hack, Polaris AutoTop DIY
2004 996 Targa Tip
Instructor - San Diego region
2014 Porsche Performance Driving School
2020 BMW X3, 2013 Ram 1500, 2016 Cmax, 2004 F-150 "Big Red"
|

|
|
|
08-17-2015, 07:19 PM
|
#4
|
|
Registered User
Join Date: Nov 2009
Location: San Jose , CA
Posts: 579
|
I just picked up a set off ebay for $400. Except for the totally burned out inner lens, the housings are in great shape. I don't even think I'll have to do too much work on them.
Tony
__________________
Lapis Blue 03 Boxster S
Seal Grey 04 Boxster S (RIP 9-21-14)
|
|
|
|
|
08-17-2015, 07:41 PM
|
#5
|
|
Custom User Title Here
Join Date: Mar 2012
Location: Ft. Leonard Wood
Posts: 6,169
|
Quote:
Originally Posted by amagalla
I just picked up a set off ebay for $400. Except for the totally burned out inner lens, the housings are in great shape. I don't even think I'll have to do too much work on them.
Tony
|
Nice! 
Sent you a PM about the bulbs.
__________________
https://youtube.com/@UnwindTimeVintageWatchMuseum
|
|
|
|
|
08-22-2015, 07:44 PM
|
#6
|
|
Registered User
Join Date: Nov 2009
Location: San Jose , CA
Posts: 579
|
Just pulled the trigger on the Gunmetal Turismos. Can't wait.
__________________
Lapis Blue 03 Boxster S
Seal Grey 04 Boxster S (RIP 9-21-14)
|
|
|
|
|
08-24-2015, 09:36 PM
|
#7
|
|
Registered User
Join Date: Mar 2012
Location: Arizona
Posts: 720
|
I'll share.
Courtesy of particlewave:

__________________
99 Porsche Boxster 986 3.8
85 Toyota Corolla AE86 F20C
12 Honda Accord
16 Mercedes C450 AMG
22 Tesla Model X Plaid
|
|
|
|
|
08-24-2015, 09:37 PM
|
#8
|
|
Registered User
Join Date: Mar 2012
Location: Arizona
Posts: 720
|
__________________
99 Porsche Boxster 986 3.8
85 Toyota Corolla AE86 F20C
12 Honda Accord
16 Mercedes C450 AMG
22 Tesla Model X Plaid
|
|
|
|
|
08-28-2015, 05:05 PM
|
#9
|
|
Custom User Title Here
Join Date: Mar 2012
Location: Ft. Leonard Wood
Posts: 6,169
|
Is it both headlights?
If so, try pulling the headlight switch first and cleaning it out with contact cleaner (spray inside the switch).
__________________
https://youtube.com/@UnwindTimeVintageWatchMuseum
|
|
|
|
|
08-28-2015, 05:07 PM
|
#10
|
|
Registered User
Join Date: Jun 2014
Posts: 13
|
Quote:
Originally Posted by particlewave
Is it both headlights?
If so, try pulling the headlight switch first and cleaning it out with contact cleaner (spray inside the switch).
|
It is both headlights. I just pulled them both and the connections are still good.
The switch in the car that turns the lights on?
How do I pull that (looking it up on google)
|
|
|
|
|
08-28-2015, 05:14 PM
|
#11
|
|
Custom User Title Here
Join Date: Mar 2012
Location: Ft. Leonard Wood
Posts: 6,169
|
Yes, the headlight switch in the car. That's the only area where both headlights get power. I doubt both headlights would go bad at the same time, so the common factor would be the headlight switch.
Pelican has a write up under "headlight switch replacement". 
__________________
https://youtube.com/@UnwindTimeVintageWatchMuseum
|
|
|
|
|
08-28-2015, 05:32 PM
|
#12
|
|
Beginner
Join Date: Mar 2013
Location: Houston
Posts: 1,659
|
I replaced mine as it was getting finicky working sometimes, and sometimes not. Replacing it is very easy.
__________________
2003 S manual
|
|
|
|
|
08-28-2015, 05:37 PM
|
#13
|
|
Registered User
Join Date: Jun 2014
Posts: 13
|
Thanks for the quick responses. Pulled everything apart, put it all together and still doing it. Now one light isn't even sparking (lightning). New switch ordered.
Will post again after new switch is installed.
|
|
|
|
|
08-28-2015, 05:42 PM
|
#14
|
|
Registered User
Join Date: Jun 2014
Posts: 13
|
Quote:
Originally Posted by strachan
Thanks for the quick responses. Pulled everything apart, put it all together and still doing it. Now one light isn't even sparking (lightning). New switch ordered.
Will post again after new switch is installed.
|
The switch going bad...would that also make the stereo get staticky when the switch is in the on position?
|
|
|
|
|
08-28-2015, 05:59 PM
|
#15
|
|
Beginner
Join Date: Mar 2013
Location: Houston
Posts: 1,659
|
Any poor connection arcing could do that.
__________________
2003 S manual
|
|
|
|
|
08-30-2015, 08:29 AM
|
#16
|
|
Registered User
Join Date: Nov 2009
Location: San Jose , CA
Posts: 579
|
OK. I just received my projectors from Pelican, and on initial inspection, It looks like there might be some debris in one of the projectors. Is this normal? Do I have to disassemble them to clean them out? Are there instructions to disassemble them? I would imagine that the heat of the bulb will cause the debris to damage the projector.
Second issue/question. How do you feed the projector solenoid and angle eye wires through the reflector?
Last thing. These came with the kit:
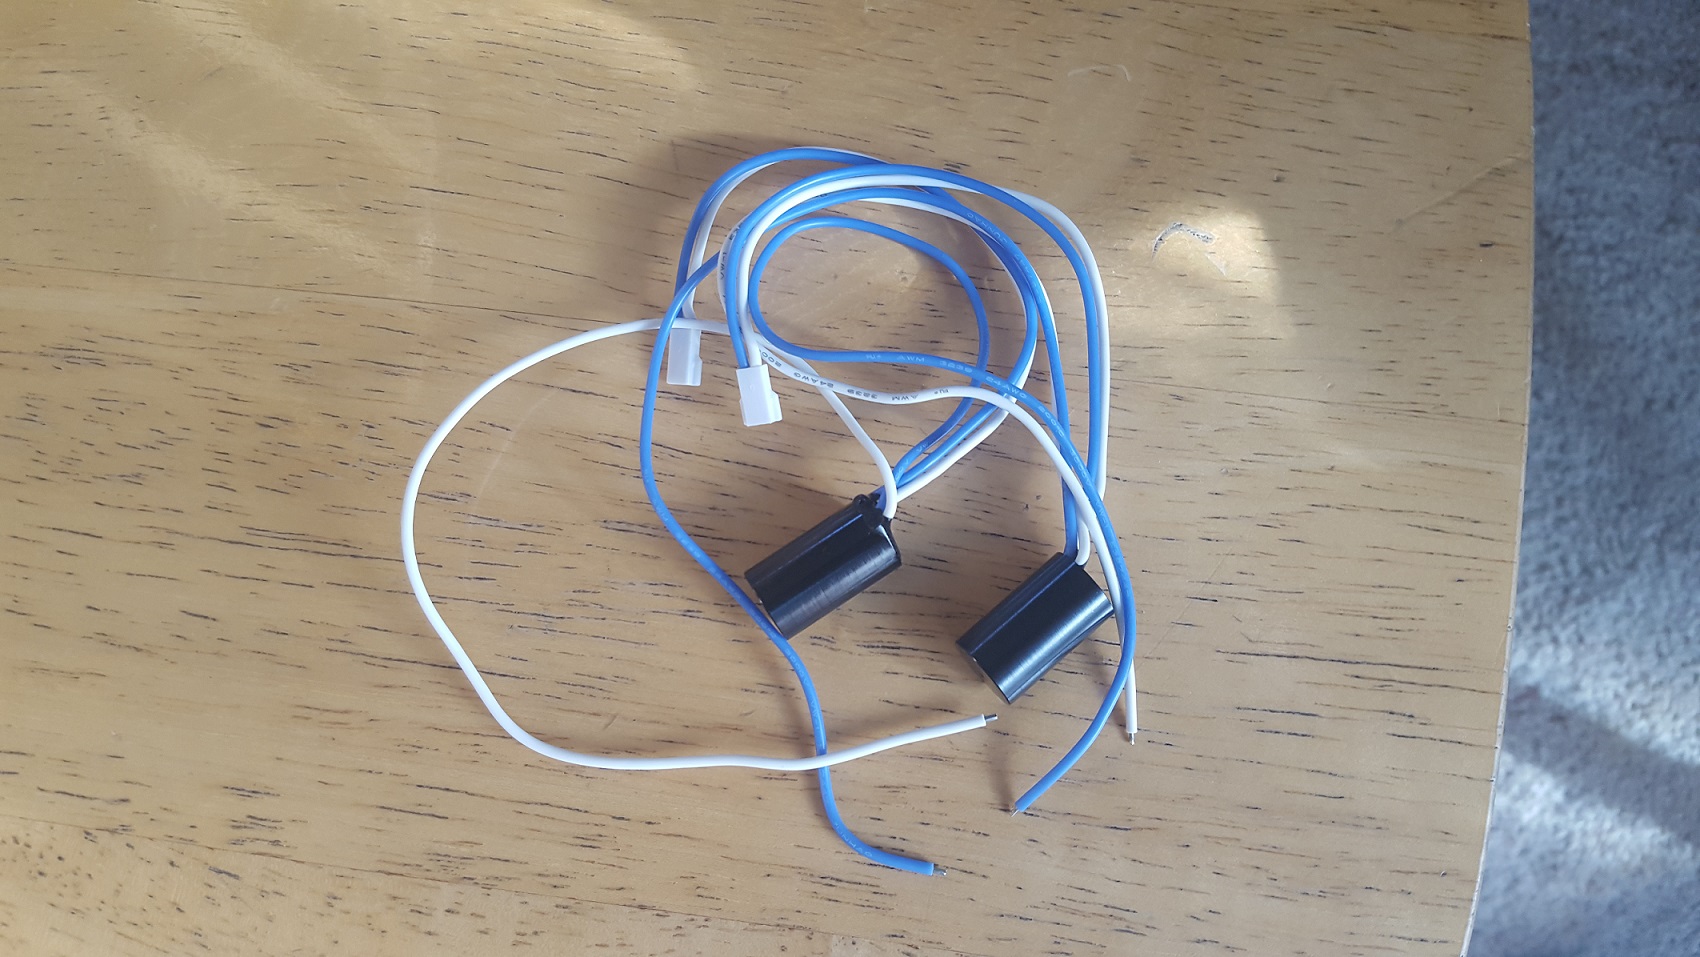
I assume they go to the angel eyes, but what are they?
Thanks
Tony
__________________
Lapis Blue 03 Boxster S
Seal Grey 04 Boxster S (RIP 9-21-14)
Last edited by amagalla; 08-30-2015 at 09:00 AM.
|
|
|
|
|
08-30-2015, 09:11 AM
|
#17
|
|
Registered User
Join Date: Jan 2007
Location: BC
Posts: 1,353
|
There should be no debris in the projectors. I wasn't careful enough during my installation and got dust inside one of them. You can remove the inside screws to get it apart and very carefully clean the inside. Getting the screws back in can apparently be a PITA, although I found it easy.
I did not have the angel eye option. The solenoid wires (and presumably the angel eye wires) go thru the little rectangular opening under the projector, shown on page 17 and 18 of the instructions.
My kit did not have the wires you show.
__________________
2001 Boxster, 5 spd, Seal Grey
|
|
|
|
|
08-30-2015, 12:01 PM
|
#18
|
|
Custom User Title Here
Join Date: Mar 2012
Location: Ft. Leonard Wood
Posts: 6,169
|
Yes, you should clean thoroughly right before install. Debris inside from shipping is normal because they are not sealed units. There are 4 screws that hold the lens portion on the reflector.
The picture you posted shows the angel eye voltage regulators.
__________________
https://youtube.com/@UnwindTimeVintageWatchMuseum
|
|
|
|
|
08-30-2015, 12:04 PM
|
#19
|
|
Custom User Title Here
Join Date: Mar 2012
Location: Ft. Leonard Wood
Posts: 6,169
|
Quote:
Originally Posted by Nine8Six
by Norm (member Clickman) & Charles (member Particlewave)
Excellent News
We now have a complete DIY Installation Manual for those who wish to upgrade their Porsche Boxster (986) or Porsche 911 (996) old halogen headlights with a true bi-xenon & HID lighting system. The manual is completed with 29 pages, 27 HD pics and one video.
Can't thank Norm and Charles enough for helping me out for putting this together. And it's in English! Thank you  Download [3MB]:
http://www.gtprojectors.com/downloads/Porsche_986_996_Headlight_Retrofit_Instructions.pd f
Download [3MB]:
http://www.gtprojectors.com/downloads/Porsche_986_996_Headlight_Retrofit_Instructions.pd f

^ The Ultimate Exterminate the Halogen Manual!
|
..........
__________________
https://youtube.com/@UnwindTimeVintageWatchMuseum
|
|
|
|
|
08-30-2015, 02:56 PM
|
#20
|
|
Registered User
Join Date: Sep 2014
Location: Kuna, Idaho
Posts: 308
|
The do it yourself guide is really only one step long.
1: send to Particlewave.
|
|
|
|
 Posting Rules
|
You may not post new threads
You may not post replies
You may not post attachments
You may not edit your posts
HTML code is On
|
|
|
All times are GMT -8. The time now is 05:31 PM.
| |


 2004 Porsche Boxster S
 2004 Porsche 996 Targa
 2004 Porsche Boxster
 2003 Porsche Boxster S

 Hybrid Mode


