 07-25-2012, 03:54 PM
|
#81
|
|
2001 Arctic Silver 2.7
Join Date: Jun 2012
Location: Huntington Beach,CA
Posts: 310
|
Quote:
Originally Posted by jb92563

Nice work.
I didn't know the plastic surround was all one piece like that.
You could literally mount the stereo in its rack and then slip the entire plastic surround back in it looks like.
Makes getting to screws in the back and sides on the stereo much easier.
Also seems like you have different plugs in your wiring harness.
Perhaps they do use unique wiring harness for different stereo options from the factory.
|
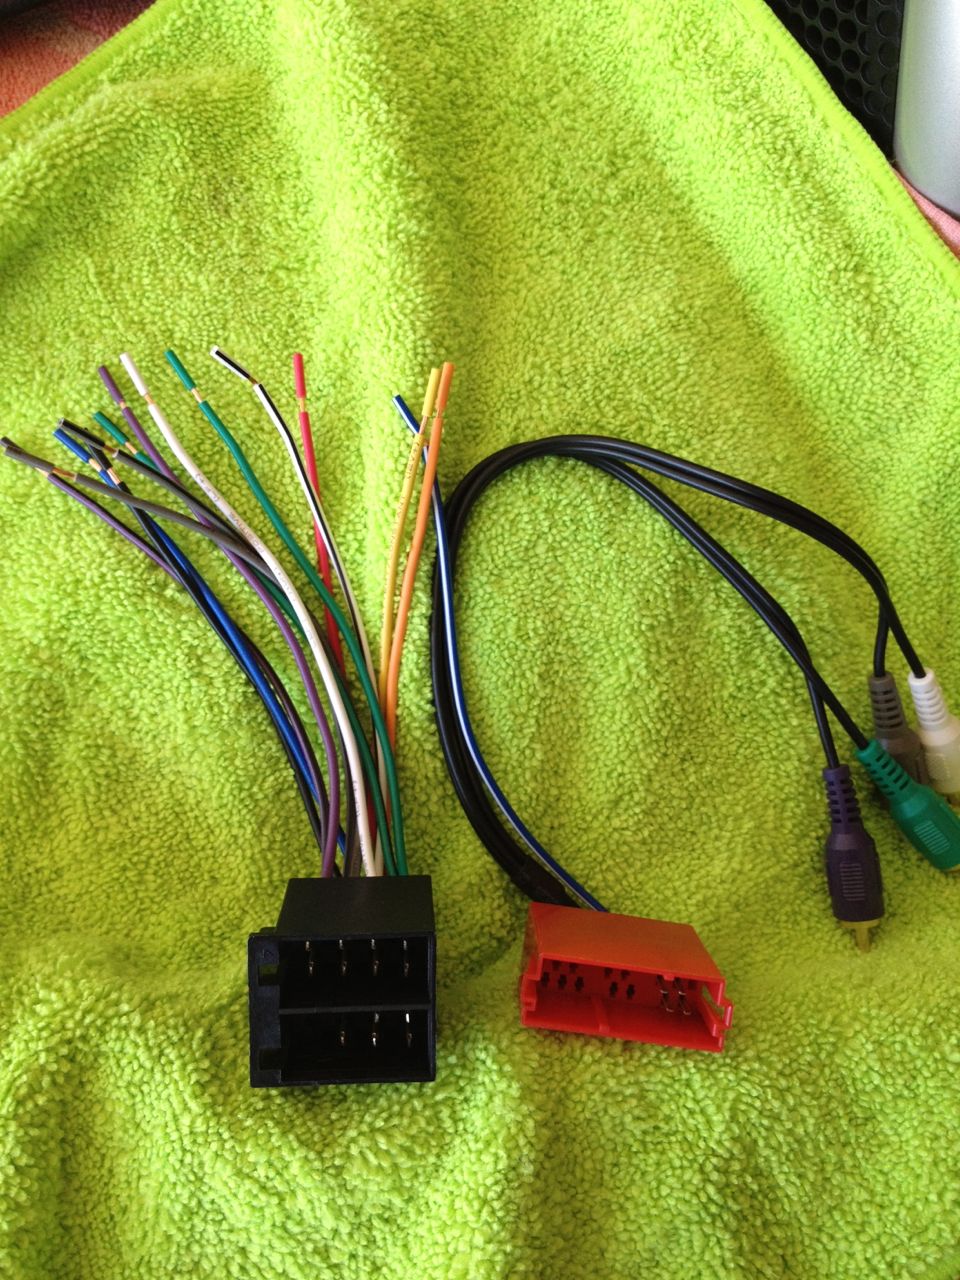
It was a 2 Din kit I purchased on eBay. (pricey but convenient)
 97-02 PORSCHE 986 BOXSTER 2 DIN INSTALLATION KIT | eBay 97-02 PORSCHE 986 BOXSTER 2 DIN INSTALLATION KIT | eBay
There is a sleeve that mounts to the stereo and it slides in.
Just waiting on the stereo to arrive.. wire it to the adapters and slide it in.
The wiring adapter plugs fit into the stock connectors. (See pics)
T


__________________
2001 Boxster - Arctic Silver Metallic
RMS, IMS, 87.5K
|

|

|
|
07-25-2012, 05:01 PM
|
#82
|
|
Registered User
Join Date: Apr 2012
Location: Riverside, CA
Posts: 1,666
|
I also saw that DIN install kit from ebay but the $165 was just too much to swallow when its 75% of the stereo purchase price.
I fabricated my own out of 1/8" aluminum plate (~$10) in 90 minutes, using a metal cutoff wheel in my grinder, a file to finish the sharp corners and some black spray paint so its invisible until I get my plastic in place.
I still need to make a black plastic piece that sits on top of the aluminum to finish it off.
__________________
"It broke because it wants to be Upgraded  "
2012 Porsche Performance Driving School - SanDiego region
2001 Boxster S, Top Speed muffler, (Fred's) Mini Morimotto Projectors, Tarret UDP,
Short Shifter, Touch Screen Dual Din Radio, 03 4 Bow glass Top (DD & Auto-X since May 17,2012)
|
|
|
|
|
07-26-2012, 03:22 AM
|
#83
|
|
Registered User
Join Date: Nov 2011
Location: Sunny Scotland
Posts: 21
|
Quote:
Originally Posted by tony_fury
Nice pic's
I also prepped my dash for a Kenwood I have coming this Friday.
Attachment 16392 |
The Kenwood I fitted plugges straight into the cars ISO connector so no extra splicing was required.
The only extra cable is the amp to phono lead - which I just used the sub amp (front doors) and I used the head units amp for front dash and rear storage box speakers.
Out of interest, I added screws to my kit to fit the cage to the sides of the dash plastic as I had seen some double dins fitted that appeared to sag after a few weeks running around meaning that the head unit was tipping upwards as a result.
David
|
|
|
|
|
07-27-2012, 10:37 AM
|
#84
|
|
Registered User
Join Date: Jun 2012
Location: Atlanta GA
Posts: 8
|
HELP.... Can anyone tell how to get my speacker wire to the front trunk? I have 04 S with BOSE AMP, trying to bypass and connect to the speaker direct. I ran a couple wires from the unit over the top just to test and they work fine. Just cant see a way from the back of the HU to the FTrunk.
|
|
|
|
|
07-27-2012, 04:19 PM
|
#85
|
|
2001 Arctic Silver 2.7
Join Date: Jun 2012
Location: Huntington Beach,CA
Posts: 310
|
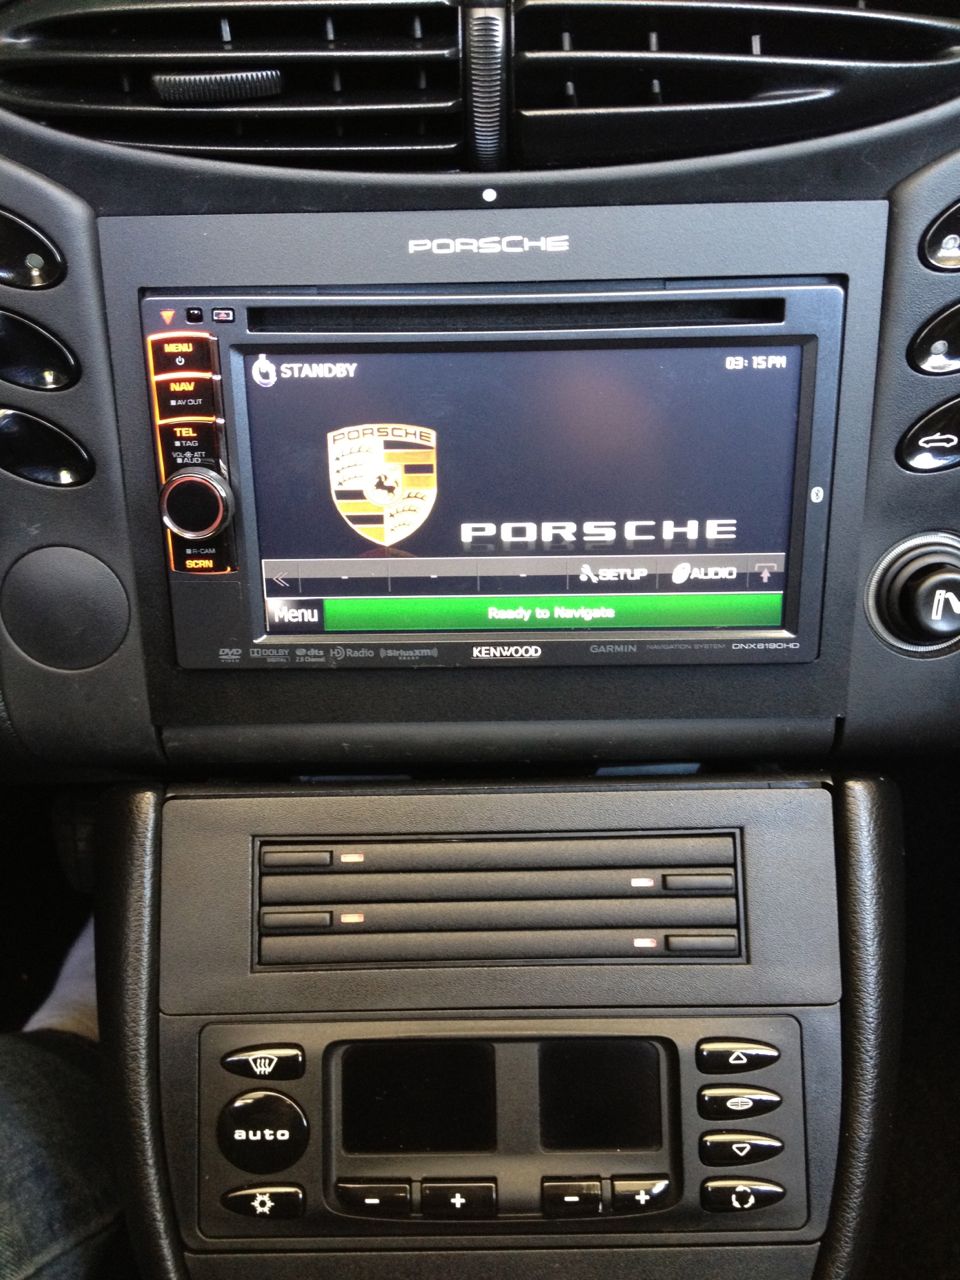
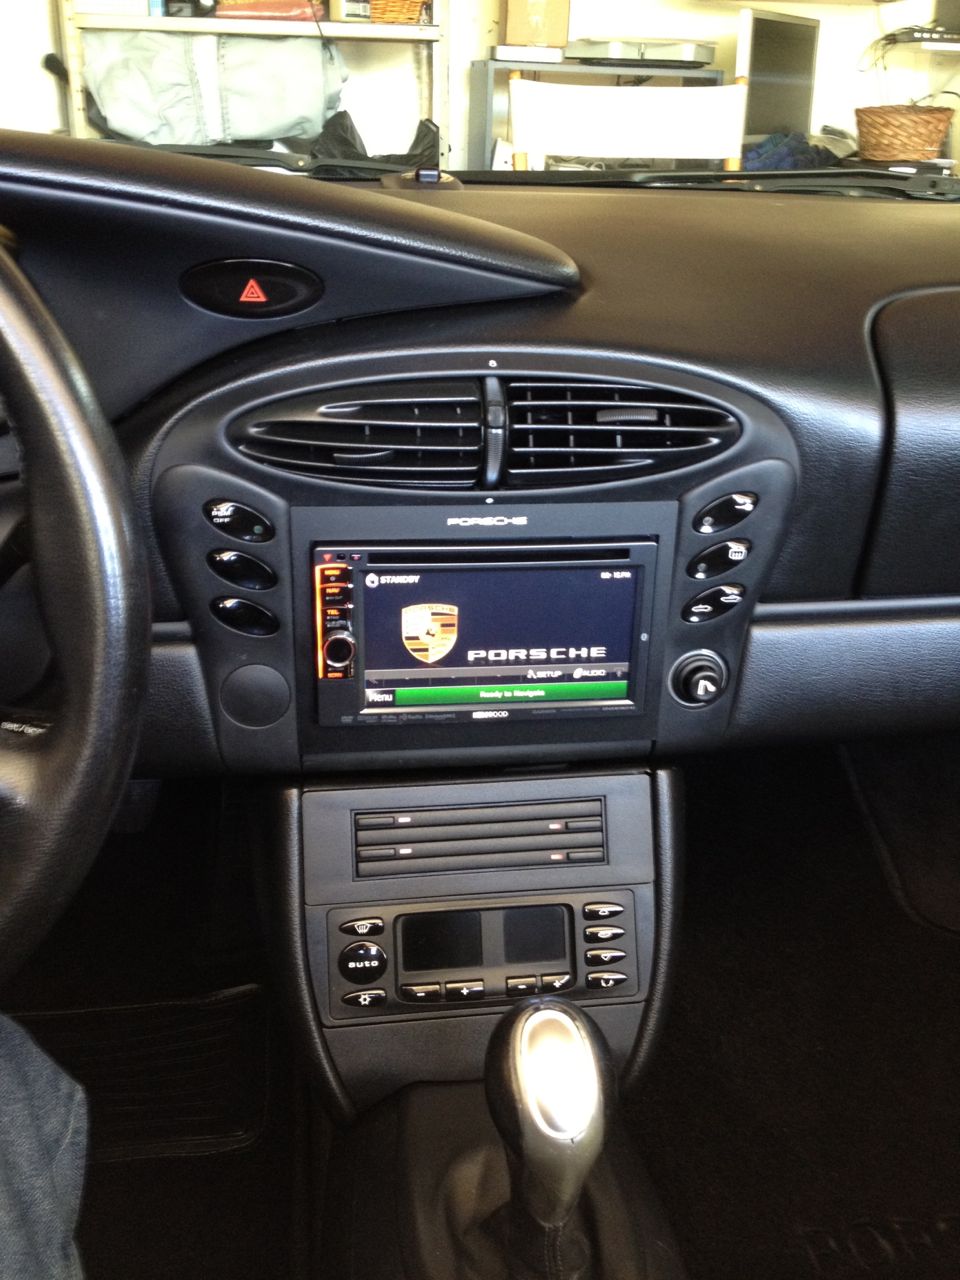
All back together.. had everything ready when the radio showed up.
Installed it on my lunch hour... Sounds excellent..
Kenwood DNX6190HD
__________________
2001 Boxster - Arctic Silver Metallic
RMS, IMS, 87.5K
|
|
|
|
|
07-27-2012, 09:50 PM
|
#86
|
|
Registered User
Join Date: Jul 2010
Location: Pacific Northwest
Posts: 308
|
Don't mean to hijack this thread, but I'm contemplating an install and had some questions. Who better to ask than the members that have already done this?
I'd like to put the climate control in the upper compartment. Any cons to this? And do I need to trim the plastic in the housing as shown in the photo below?
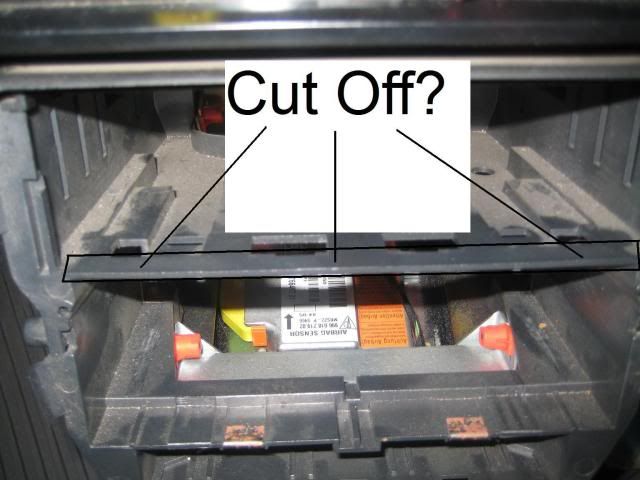
Bottom of climate control gets hung up on this plastic. Looks like about an inch needs to be trimmed off.
And regardless if I put the climate control on the top or bottom, it looks like you have to trim off those two plastic "guides" on the bottom, as shown in the photo.
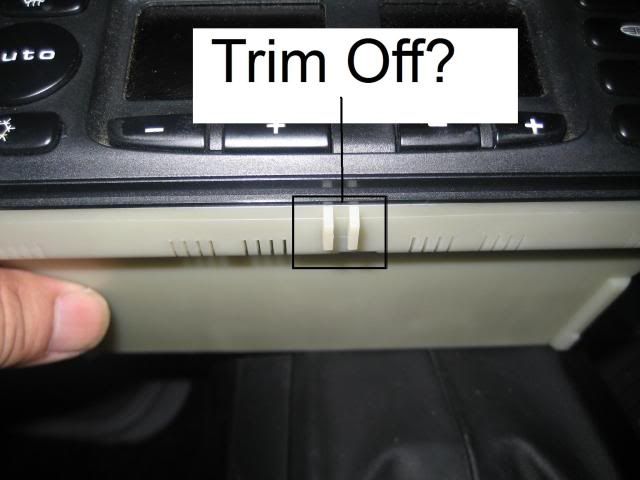
It looks like if you don't trim these two nubs off, the batwing won't fit back on.
These installations look great! I'm inspired.
__________________
Glen
Last edited by Gforrest2; 07-27-2012 at 10:38 PM.
|
|
|
|
|
07-27-2012, 10:25 PM
|
#87
|
|
2001 Arctic Silver 2.7
Join Date: Jun 2012
Location: Huntington Beach,CA
Posts: 310
|
While you could cut and trim that slot, if you look closely, there are no screw holes for securing the climate control in that slot.
That slot was designed for the CD holder or tray.
The climate controls is normally located on the top slot (cup holder) or bottom slot
my 2 cents..
__________________
2001 Boxster - Arctic Silver Metallic
RMS, IMS, 87.5K
|
|
|
|
|
07-28-2012, 01:45 AM
|
#88
|
|
Registered User
Join Date: Nov 2011
Location: Sunny Scotland
Posts: 21
|
Quote:
Originally Posted by SoloBox1
HELP.... Can anyone tell how to get my speacker wire to the front trunk? I have 04 S with BOSE AMP, trying to bypass and connect to the speaker direct. I ran a couple wires from the unit over the top just to test and they work fine. Just cant see a way from the back of the HU to the FTrunk.
|
Why not just run wires from the head unit to the speakers?
Much shorter cable runs and 5 mmins to do the job.
David
|
|
|
|
|
07-29-2012, 08:59 AM
|
#89
|
|
Registered User
Join Date: Jun 2012
Location: Atlanta GA
Posts: 8
|
Thanks, I will do that ....
|
|
|
|
|
07-29-2012, 04:06 PM
|
#90
|
|
Registered User
Join Date: Jul 2010
Location: Pacific Northwest
Posts: 308
|
Quote:
Originally Posted by SoloBox1
HELP.... Can anyone tell how to get my speacker wire to the front trunk? I have 04 S with BOSE AMP, trying to bypass and connect to the speaker direct. I ran a couple wires from the unit over the top just to test and they work fine. Just cant see a way from the back of the HU to the FTrunk.
|
Remove the battery. There is a large rubber plug that leads into the driver's side below the steering wheel. Easy path to the head unit. And to the left of the battery (facing from the front), there is a plug that leads from the battery compartment to the frunk. And there's already a cutout in the carpet for the wires.
I believe this is much easier then running wires directly from the head unit to the speakers. I just did this yesterday. Pulled the harness that attached to the amp. Figured out which pins go to which speakers, and then ran my new speaker wire to these pins (bought male pins, soldered and shrink wrapped, and then inserted these pins into the female plug that used to go to the factory amp).
__________________
Glen
Last edited by Gforrest2; 07-31-2012 at 12:52 PM.
|
|
|
|
|
07-30-2012, 07:25 AM
|
#91
|
|
Registered User
Join Date: Jun 2012
Location: Atlanta GA
Posts: 8
|
Yes I found it, Thanks. and Im now complete. Sounds great even the BOSE SUB sounds great from the HU. Will add new amp later if needed.
Any one know how to get the PORSCHE emblem and TAG on the Display? I check what was on the unit and did not see the one JB and others used.
|
|
|
|
|
07-30-2012, 09:03 AM
|
#92
|
|
Registered User
Join Date: Apr 2012
Location: Riverside, CA
Posts: 1,666
|
Here is how I routed the GPS antenna. No Drilling or mods required and the cable and antenna is virtually 100% invisible to the driver and passenger.
I simply tucked it into the joints with a screw driver about 1/4" and it disappeared completely except for a short section that blends with the existing trim anyway, where it goes from the steering wheel to the left button pads.
You pull the two button strips out, undo the 4 screws holding the plastic vent/trim out a few inches and route the cable into the area behind the stereo unit and make the connection.

Just add some double sided tape to the GPS antenna and stick it to the dash behind the instruments.
GPS Antenna before the cable was tucked into the panel joints.

The Amp/ignition interference that I initially had with the speaker wires, went away once I taped (Black electricians tape) all the bare phono plug ends and other exposed wires.
They must have been touching each other or the chassis and picking up the interference. It sounds crystal clear now. 
Just need to route the backup camera and finish the plastic trim above the radio.
The last thing will be to play with the WIN CE6 OS and see what software, logos etc I can add to enhance its use.
__________________
"It broke because it wants to be Upgraded "
2012 Porsche Performance Driving School - SanDiego region
2001 Boxster S, Top Speed muffler, (Fred's) Mini Morimotto Projectors, Tarret UDP,
Short Shifter, Touch Screen Dual Din Radio, 03 4 Bow glass Top (DD & Auto-X since May 17,2012)
Last edited by jb92563; 07-30-2012 at 09:18 AM.
|
|
|
|
|
07-30-2012, 08:42 PM
|
#93
|
|
2001 Arctic Silver 2.7
Join Date: Jun 2012
Location: Huntington Beach,CA
Posts: 310
|
Quote:
Originally Posted by SoloBox1
Any one know how to get the PORSCHE emblem and TAG on the Display? I check what was on the unit and did not see the one JB and others used.
|
SoloBox1:
If your referring to the Porsche logo on the display, this is just a jpeg file I got off the web.
The Kenwood allows for changing the background image with a jpeg file.
You use the USB port on the radio to connect to a USB memory stick to load the image to assign as the background display.
Hope that helps.
T
__________________
2001 Boxster - Arctic Silver Metallic
RMS, IMS, 87.5K
|
|
|
|
|
08-01-2012, 01:08 PM
|
#94
|
|
Registered User
Join Date: Mar 2012
Location: Arizona
Posts: 720
|
I went ahead and bought this with the installation kit today.
Delivery comes in sometime next week. I'm gonna try to DIY, but something tells me with my mechanical skills that I'll probably get a friend or someone else to do it haha
But I'm very excited.
|
|
|
|
|
08-01-2012, 02:31 PM
|
#95
|
|
Registered User
Join Date: Apr 2012
Location: Riverside, CA
Posts: 1,666
|
Awesome Chronos, I think in retrospect the install was not very difficult at all.
The result is a great touch screen unit that adds some higher technology to a great car. It also gives you some stuff to fiddle with and impress your friends while your waiting for your turn on the AX grid.
Gotta get that lap timer/analyzer going on this unit.
I have been quietly researching the WinCE6 aspect of my unit and have a few things to try so that I can expand its utility with additional software.
I want the Porsche Logo to appear on Startup and in the background too and arrange the buttons around it.
From what I read so far it sounds doable.
I'll post when I make some more progress.
__________________
"It broke because it wants to be Upgraded "
2012 Porsche Performance Driving School - SanDiego region
2001 Boxster S, Top Speed muffler, (Fred's) Mini Morimotto Projectors, Tarret UDP,
Short Shifter, Touch Screen Dual Din Radio, 03 4 Bow glass Top (DD & Auto-X since May 17,2012)
|
|
|
|
|
08-02-2012, 07:56 AM
|
#96
|
|
Registered User
Join Date: Oct 2010
Location: NKY
Posts: 211
|
Quote:
Originally Posted by Crono0001
I went ahead and bought this with the installation kit today.
Delivery comes in sometime next week. I'm gonna try to DIY, but something tells me with my mechanical skills that I'll probably get a friend or someone else to do it haha
But I'm very excited.
|
I think this will be the route I take come winter. Please let me know of any issues you run into when getting it wired and installed!!
__________________
2001 Seal Gray 5-Speed - 2007 Yamaha R6 - 2003 Honda Civic EX - 1999 Nissan Frontier XE - 2003 Coleman Utah
|
|
|
|
|
08-02-2012, 09:59 AM
|
#97
|
|
Registered User
Join Date: Nov 2011
Location: Sunny Scotland
Posts: 21
|
Quote:
Originally Posted by jb92563
Here is how I routed the GPS antenna.
|
I installed mine under the central thingy next to the windscreen... very easy and invisible as it fits under the plastic cover.
You can access that area of the dash when the head unit is out the dash.

|
|
|
|
|
08-02-2012, 10:12 AM
|
#98
|
|
Registered User
Join Date: Jun 2012
Location: St. Louis
Posts: 162
|
Quote:
Originally Posted by Crono0001
I went ahead and bought this with the installation kit today.
Delivery comes in sometime next week. I'm gonna try to DIY, but something tells me with my mechanical skills that I'll probably get a friend or someone else to do it haha
But I'm very excited.
|
So you got the ebay double din and the ebay install kit that is $165?
|
|
|
|
|
08-02-2012, 12:13 PM
|
#99
|
|
Registered User
Join Date: Mar 2012
Location: Arizona
Posts: 720
|
Quote:
Originally Posted by MConte05
So you got the ebay double din and the ebay install kit that is $165?
|
Yup. About $400 total with shipping.
|
|
|
|
|
08-06-2012, 11:21 AM
|
#100
|
|
Registered User
Join Date: Mar 2012
Location: Arizona
Posts: 720
|
The items came in today! I'm so happy. Gonna start the project (and hopefully finish) tonight. I'll let you guys know how it goes.
|
|
|
|
 Posting Rules
|
You may not post new threads
You may not post replies
You may not post attachments
You may not edit your posts
HTML code is On
|
|
|
All times are GMT -8. The time now is 06:33 PM.
| |


 Porsche Boxster Silver
 Linear Mode


