 02-14-2015, 05:04 PM
|
#61
|
|
Need For Speed
Join Date: Feb 2013
Location: Funville
Posts: 2,114
|
Quote:
Originally Posted by Dave S.

|
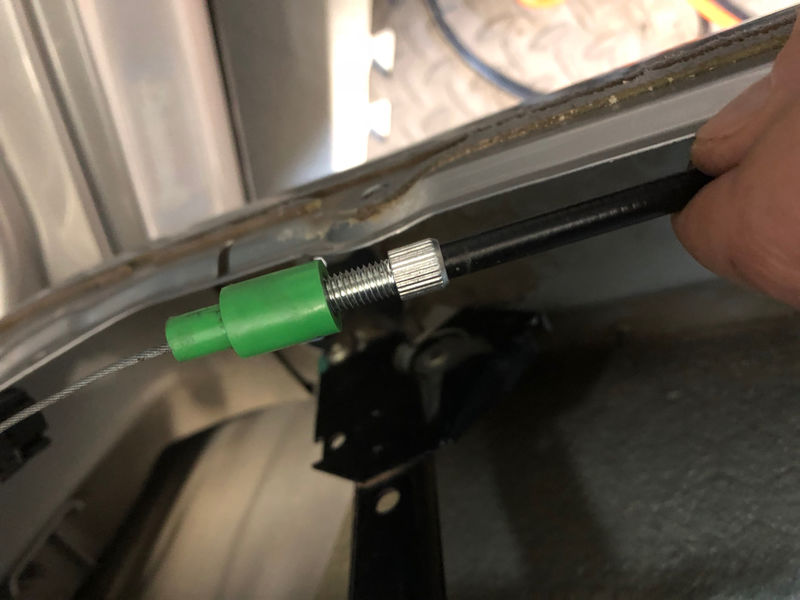
Success using this piece on my 03 Boxster, but I could have used a bit more thread length. This part gave me just enough window movement for the window to clear.
Quote:
Originally Posted by Dave S.
|
Following this guide I did not know what he was talking about when he says removed the C-shaped piece of plastic. This piece is what he is talking about.

__________________
2003 Boxster S
| 987 Air Box | K&N Air Filter | 76mm Intake Pipe| 996 76mm TB | 997 Distribution T | Secondary Cat Delete Pipes | Borla Muffler | NHP 200 Cell Exhaust Headers |
Last edited by KRAM36; 02-17-2015 at 03:59 PM.
|

|

|
|
02-14-2015, 11:14 PM
|
#62
|
|
Multi-Boxer Driver
Join Date: Nov 2010
Location: Orange Park, FL
Posts: 1,434
|
Funny this thread came back up. 
Last week the pass. regulator crunched out, seems my "temporary" (read: lazy) fix came undone and the cable got twisted and came off of the pulleys. Just replaced the regulator with a nice used example I bought from Woody, and all is well again.
__________________
-Chris
2004 Porsche Boxster 2.7 (gone  )
2004 Porsche 911 C4S Cab
1991 Porsche 911 C2 Targa 3.6
2017 Subaru Outback 3.6R
|

|
|
|
09-08-2015, 06:11 AM
|
#63
|
|
Registered User
Join Date: Aug 2015
Location: Florida
Posts: 193
|
I just tried this but I think I ended putting too much pressure on the line. It makes a cracking sound going up. Does anyone have a close up on how the line is suppose to fit back into the roller behind the speaker?
|
|
|
|
|
03-10-2016, 03:05 PM
|
#64
|
|
Registered User
Join Date: May 2009
Location: North Texas
Posts: 3
|
Question for Dave and Chuck Re: window regulator fix
Facing the exact same issue. Both failed within one week of each other. Dave, since you had to drill to get the adjuster in place, I assume you had to disconnect the cable and move it out of the way. That would also allow you to remove the tip from the cable housing. Can you share how that is done?
Chuck, since it looks as if you did not have to drill, can you tell me how you got the adjuster in place? Was there enough slack in the cable to get it in place?
Thank for these tips. My mechanic wanted 1,200 to install two new OEM regulators!!!
|
|
|
|
|
03-10-2016, 05:00 PM
|
#66
|
|
Registered User
Join Date: Jul 2013
Location: Bastrop, Tx
Posts: 2,644
|
Cole9900, I sell the window regulator/motor as one for $50. I'll gladly walk you through it if you come here. You wouldn't be the first person I've helped replace their regulator using my tools. It's real easy.
__________________
Woody
|
|
|
|
|
03-10-2016, 06:40 PM
|
#67
|
|
Registered User
Join Date: May 2013
Location: North Alabama
Posts: 2,079
|
Woody
You are a stand up guy 
|
|
|
|
|
03-10-2016, 07:31 PM
|
#68
|
|
Registered User
Join Date: Jul 2013
Location: Bastrop, Tx
Posts: 2,644
|
Quote:
Originally Posted by Pdwight
You are a stand up guy |
Why thanks and you too Helping each other out is what we do here right?
__________________
Woody
|
|
|
|
|
03-20-2018, 12:47 PM
|
#69
|
|
Registered User
Join Date: Mar 2018
Location: CO
Posts: 2
|
Old thread, but just wanted to say thanks...
Just implemented this fix and it completely resolved my 'front of the window isn't dropping quite enough when I pull the handle' problem on my 996 Turbo.

|
|
|
|
|
05-14-2018, 08:08 AM
|
#70
|
|
Registered User
Join Date: Feb 2018
Location: Montana
Posts: 7
|
This is obviously an old thread as previously stated but I wanted to say that the zip-tie fix worked for my passenger side window (2000 S); it would lower as normal but would not "close" when I shut the door.
$3.89 in zip-ties and an afternoon for a newbie (me) made it worth it.
Thank you, Dave S., for the effort and sharing.
|
|
|
|
|
05-14-2018, 09:59 AM
|
#71
|
|
Registered User
Join Date: Jun 2014
Location: Dallas Texas
Posts: 11
|
ims bearing.
Quote:
Originally Posted by ppbon
... stretch.
There's a plastic guide inside the regulator that breaks (with age) and lets the cable have a bit of slack.
That's why people tend to think that the cable has stretched.
I love your inventiveness.
I had done something similar with a ferrule cut to size, but it was not adjustable and it moved a bit.
Thanks for sharing your solution.
Happy Boxstering,
Pedro
|
Hello Pedro - this is out of topic but just have a question and need your input.
I leaving the country for 3 months, I thinking to drain some oil maybe 2 quarts from my boxster so the IMS bearing was not submerged in oil, then When I get it back will add the the oil again. Maybe you have some input. Is it bad for engine to be low on oil when not driving/using it anyway. Just to save the IMS bearing of engine oil/acid that might/will penetrate in there. thank you for your input.
|
|
|
|
|
10-31-2018, 11:23 AM
|
#72
|
|
Registered User
Join Date: Apr 2009
Location: Orlando
Posts: 1,266
|
Regulator fix
Yes, the ties work amazingly. Mine was the one in front of door bottom. Works fine again. I give ⭐️⭐️⭐️⭐️⭐️ For this .05 cent repair.
__________________
http://i768.photobucket.com/albums/x...6/PC120055.jpg
Old Hippie Young Heart
2000 S/3.2 Liter/Tiptronic/Boxster S Sport Package/Cruise Control/Slate Grey Metallic
Red Special Leather Interior/Red Floor Mats/Red Hand Painted Instrument Dials/Roll Bar/Windstop
Small Carbon Package/Leather Wrap Carbon Wheel/Center Console Exterior Color/Alum Carbon Shift Knob
AM/FM Radio w/CD Player & Changer/Digital Sound Package/18" Turbo Wheels/Wheel Caps w/Colored Crest
|
|
|
|
|
11-02-2018, 05:20 PM
|
#73
|
|
Registered User
Join Date: Dec 2015
Location: nw AR
Posts: 29
|
I'm missing something here. 10 How did you determine which green plastic bushing to work on? does it matter? the one in the photo looks just like mine....not broken or damaged but the bottom one is accessible, the top not. 2( how did you get down to the bare wire cable? the cable has a thick plastic and metal housing it slides through. It seems that the cable is wrapped around a pulley that is covered on the outside and I don't see how to get to the bare cable to get the split clamp on it. Will the clamp simply thread itself into the green plastic bushing? What does the plastic tie do? I need some help please
Last edited by rockstar68; 11-02-2018 at 05:31 PM.
Reason: left out words
|
|
|
|
|
12-28-2018, 05:20 AM
|
#74
|
|
Thom
Join Date: Jan 2016
Location: Florida
Posts: 41
|
I hear you
Quote:
Originally Posted by rockstar68
I'm missing something here. 10 How did you determine which green plastic bushing to work on? does it matter? the one in the photo looks just like mine....not broken or damaged but the bottom one is accessible, the top not. 2( how did you get down to the bare wire cable? the cable has a thick plastic and metal housing it slides through. It seems that the cable is wrapped around a pulley that is covered on the outside and I don't see how to get to the bare cable to get the split clamp on it. Will the clamp simply thread itself into the green plastic bushing? What does the plastic tie do? I need some help please
|
I have read the entire thread and I think I follow the instructions, but there seem to be some pictures missing from the 2010 posts. I know it is over 8 years but this thread seems to be worth piles of gold. I've got to dig into my issues which appear to be the same as everyone else's so before I go and buy new switches & regulators for almost $300 I'll be happy to try some zip ties and cable turnbuckles. If anyone can put together a step by step that would be awesome.
cheers.
Thom
|
|
|
|
|
02-07-2019, 03:00 PM
|
#75
|
|
Registered User
Join Date: Feb 2017
Location: North Eastern US
Posts: 646
|
Did the window regulator fix to my drivers side (left) door today. Front cable had a lot of slack. All green inserts ok, all cables are on their pulleys as far as I could tell. I carefully cut the green cable insert/holder off of the slack cable with a dremel. Should have left it on and added the bicycle adjuster behind it. Barely had enough adjustment to take out all the slack and leave enough of the adjuster to fit into the pulley assembly.
Works like a champ! Thanks Dave S!
The original green fitting pulled all the way out of the pulley fitting. Thats a lot of slack.

The green fitting after I Dremeled it off.

Done!

Sent from my iPad using Tapatalk
__________________
Rgds, Fred
#317 550 Spyder Anniversary Edition 2004 Boxster S, 3.8L Flat Six Innovations engine, PSS9s, etc, etc . . .
The contents of my posts are for entertainment only. As confirmed by my many motor sports fails, I am not qualified to give product endorsements or mechanical advice 
Last edited by Oldcarguy; 02-07-2019 at 03:09 PM.
|
|
|
|
 Posting Rules
|
You may not post new threads
You may not post replies
You may not post attachments
You may not edit your posts
HTML code is On
|
|
|
All times are GMT -8. The time now is 07:06 AM.
| |


 My car
 Boxster
 Parts Car, car parts
 Honda Del Sol(s)
 "Hers"
 My Original '99
 The 78 F350
 This
This That
That The S 2.5
 Other
Other
 The Beast
 Linear Mode


