 10-21-2016, 11:02 PM
|
#1361
|
|
Custom User Title Here
Join Date: Mar 2012
Location: Ft. Leonard Wood
Posts: 6,169
|
Quote:
Originally Posted by Van914

Particlewave does a great job. He converted mine and did some repairs.
Great job, communication and well worth the money.
Much easier than DIY
Thanks Charles
Van
|
Quote:
Originally Posted by tommy583
Charles is the man. If he is offering his services to do the retrofits DO NOT hesitate taking him up on the offer. He is the absolute expert on this procedure.
|
Thanks guys! 
I'm taking a little break right now, but you never know... 
__________________
https://youtube.com/@UnwindTimeVintageWatchMuseum
|

|

|
|
10-30-2016, 04:01 PM
|
#1362
|
|
Registered User
Join Date: Jan 2014
Location: New Jersey
Posts: 1,631
|
A few additional notes to the instructions
If you're doing the headlight conversion for the first time, here are a few things I learned yesterday that I'd like to pass along. Please correct me if I've got any of this wrong.
The 3 white retainers on the side that help hold the weatherstripping in place do not come off. They just raise a small amount and then you remove the weatherstripping by gently stretching it around the round, white head, sort of like unbuttoning a shirt. When you read the instructions, you see the headlight unit with the weatherstripping off and the 3 white things still on the headlight, but I thought this might be helpful to know.

There seem to be two ways that the clips of the corner pieces are attached to the headlight units and my car had one of each. On one type, the corner piece clip attaches directly to ears on the units, like this:
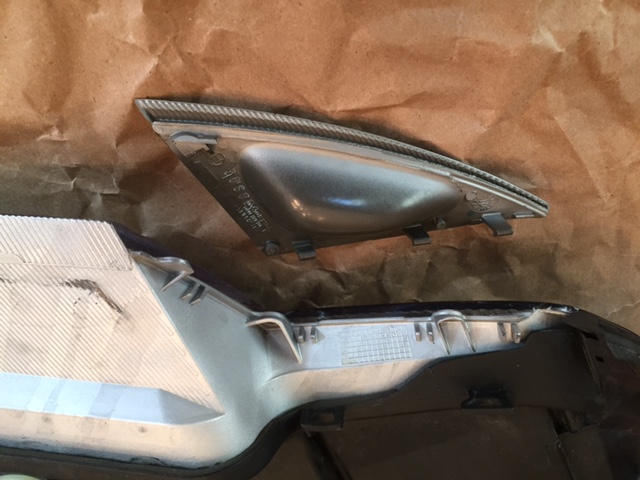
On the other type, the ears on the underside of the headlight unit are ground off, there is a special separate black bracket that goes in their place:
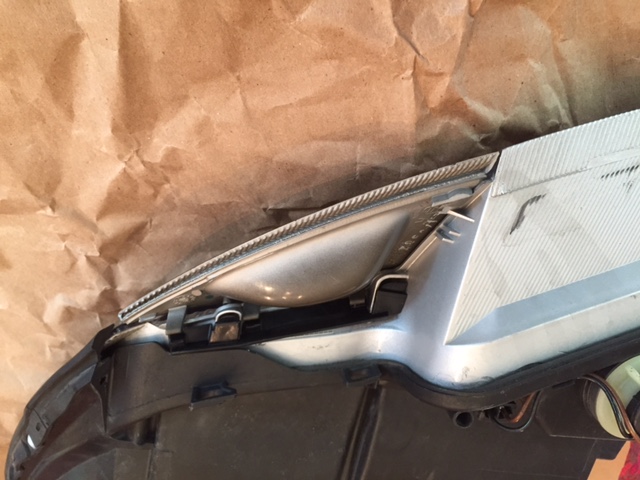

If you have the type with the extra black piece, they are much easier to remove without breaking a clip. I got that side off without a problem, and 2 clips broke on the other side.
I hope everyone is getting their kits, and that these notes are helpful!
|
|
|
|
|
10-30-2016, 06:57 PM
|
#1363
|
|
Registered User
Join Date: May 2015
Location: Sydney, Australia
Posts: 335
|
@PaulE : The white 'buttons' on the side do come out (maybe don't 'need' to but I did), get something under them pry and they should pop out easily, just have little 3 little leg pins holding them in there.
Not seen the corners with the extra retainer, that seems like a much better idea! If you have the old type, heating the legs up with a heat gun or hairdryer for a few seconds first will help them flex a bit and make them less likely to snap off... wish I thought of that that the first time I tried!
|
|
|
|
|
10-30-2016, 08:29 PM
|
#1364
|
|
Registered User
Join Date: May 2015
Location: Sydney, Australia
Posts: 335
|
Anyone heard anything from Nine8Six or GTCollection in a while? I purchased a set 3 weeks ago and the payment was processed by Paypal but I've had no follow up about shipping or anything since, and no response to emails sent to the GTCollection customer service address either. Also Fred's not posted in here for almost 2 months, little worried he's gone missing again...
|
|
|
|
|
10-31-2016, 11:08 AM
|
#1365
|
|
Registered User
Join Date: Jan 2014
Location: New Jersey
Posts: 1,631
|
Thanks oldskool73. I didn't know how hard to pry under those white things. After breaking 2 of 3 clips on one corner, and seeing I could get the weatherstrip off with them just slightly raised, I chose that route!
Quote:
Originally Posted by oldskool73
@PaulE : The white 'buttons' on the side do come out (maybe don't 'need' to but I did), get something under them pry and they should pop out easily, just have little 3 little leg pins holding them in there.
Not seen the corners with the extra retainer, that seems like a much better idea! If you have the old type, heating the legs up with a heat gun or hairdryer for a few seconds first will help them flex a bit and make them less likely to snap off... wish I thought of that that the first time I tried!
|
|
|
|
|
|
11-10-2016, 08:43 AM
|
#1366
|
|
Registered User
Join Date: Apr 2016
Location: Norway
Posts: 29
|
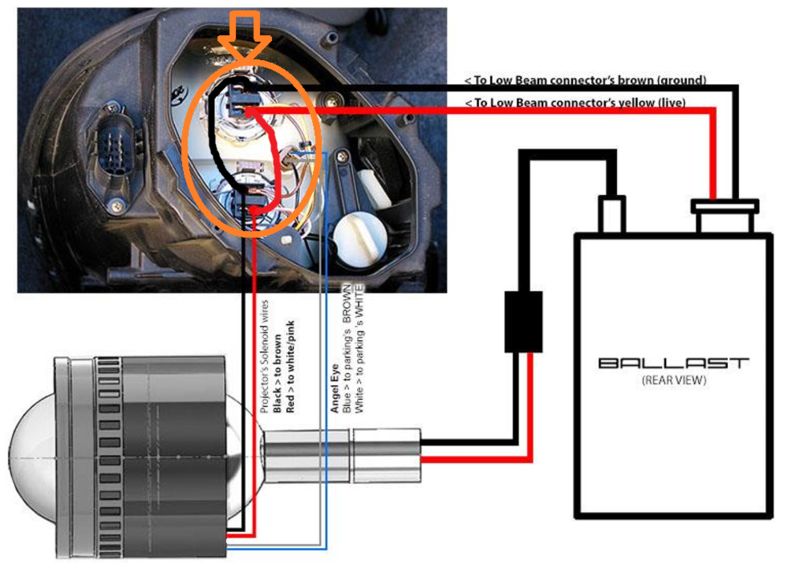
Hello! i have recived and installed the projectors. looks great!
Now i just have to do the final adjustments with leveling. I have allready used them alitlebit, and run it with fog + angeleyes at daytime.
my question: is it possible to Connect hi beam to lo beam? so that when i run park lights (angel eyes) and flash hi beam the lights (ballast) become activated? have painted what i'm thinking in, inside the Orange circle.
__________________
Porsche Boxster 2.5L 1999
|
|
|
|
|
11-10-2016, 11:44 AM
|
#1367
|
|
Custom User Title Here
Join Date: Mar 2012
Location: Ft. Leonard Wood
Posts: 6,169
|
|
|
|
|
|
11-13-2016, 04:14 PM
|
#1368
|
|
Registered User
Join Date: Nov 2015
Location: South Wales, UK
Posts: 852
|
That wouldn't work as it would also activate the full beam solenoid in the bi-xenon lens whenever you wanted dipped beams particlewave's post on my thread is how you do it!
__________________
Porsche Boxster S Type 986
Bi-xenon Headlight Upgrade | 987 S 18" Anthracite Alloys | Android Head Unit | 5000k 55w HID's | 5000k Cree DRL's | 5000k Cree number plate lights | Cree LED Indicators | One-touch roof operation | Bypass exhaust pipes | Parking sensors | Ambient footwell lighting
|
|
|
|
|
11-17-2016, 07:49 AM
|
#1369
|
|
Registered User
Join Date: May 2015
Location: Sydney, Australia
Posts: 335
|
Just a PSA for anyone thinking of buying these.
At the moment Nine8Six (aka Fred, the board member who sells them) seems to be missing. I paid for a set 6 weeks ago now via the GTCollection website and have heard nothing since, had no replies to my support emails, and most importantly... got no lights.
At the moment I'd have to suggest you hold off purchasing anything from the GTCollection site as it doesn't seem like it's manned at all (although it will still charge you at checkout) and orders are not being fulfilled.
|
|
|
|
|
11-17-2016, 11:39 AM
|
#1370
|
|
Registered User
Join Date: Jan 2014
Location: New Jersey
Posts: 1,631
|
oldskool73 a couple pages back in this thread a little over a month ago Nine8Six talked about his internet issues in China. I'm guessing that even though he said they got a SAT phone they still have issues, because he hasn't posted anything on this forum since then. I hope Nine8Six is ok and that everyone gets their lights. Having gotten mine, I can say they were worth the wait! (although I barely got to use them before the electrical switch portion of my ignition lock crapped out and I need to fix that so I can fully enjoy them!
|
|
|
|
|
11-17-2016, 11:44 PM
|
#1371
|
|
Registered User
Join Date: Sep 2013
Location: Montreal, QC. (currently expat to Shanghai)
Posts: 3,249
|
Wrong timimng :/
Helen and I have been back from Singapore since a week now... where I was initially hospitalized for nearly 3 weeks and stranded for 2 more for doctor/hospital visits.
For those of you guys who aren't aware, I had a pretty nasty high-side at about 120kph. A high-side is when the non-rear-happy race bike spit you up 2 meter above your confortable seat. I only remember flying like a kite and have no recollection of touching down... which is a good thing... a few doctors commented.
For all we know, I woke up 3 days post accident in the Shanghai Huashan hospital ICU to be air transferred to SG General on the fourth day as per med insurance request. Very pleasant, and so is the feeling of 6 broken bones scattered in my upper left arm, back ribs and shoulder.
I still have a persistent headache and neck pain but this seems to be improving every week.
Good news is I am recovering quite fast and well, no permanent damage caused(they say loll) and should be fit for office work in mid December. The bad news; my superbike MOTOGP 'wannabe' carreer is over. Little over 20+years of SBK racing TERMINATED.
Special thanks to the BUPA (medical insurance company) for caring for me in a very important way. Those of you into extreame/dangerous sports, those are the guys to go with. I am not sure how much in total but someone told me around US$60k for the package (incl a minor surgery in the shoulder).
I'll be back full throttle in a month, less the racing bit :/
Lots of catch-up to do. Missed you all
__________________
______________________________
'97 Boxster base model 2.5L, Guards Red/Tan leather, with a new but old Alpine am/fm radio.
|
|
|
|
|
11-18-2016, 04:43 AM
|
#1372
|
|
Registered User
Join Date: Jun 2014
Location: LB, Germany
Posts: 1,526
|
Get well soon!
Regards, Markus
|
|
|
|
|
11-18-2016, 06:28 AM
|
#1373
|
|
Registered User
Join Date: Mar 2014
Location: Eastern NC
Posts: 701
|
I wish you well and hope the recovery continues smoothly.
__________________
"YouTube Certified in Various Specialties"
|
|
|
|
|
11-18-2016, 06:30 AM
|
#1374
|
|
Registered User
Join Date: Jan 2014
Location: New Jersey
Posts: 1,631
|
Wow, glad you are going to be OK! I have been to the hospital twice from road bicycle crashes, I can't imagine a motorcycle crash. PS, my headlights are done and they are amazing. Thanks Fred!

|
|
|
|
|
11-18-2016, 08:07 AM
|
#1375
|
|
Registered User
Join Date: Jun 2012
Location: Bedford, TX
Posts: 2,755
|
Get well soon Fred! Sorry to hear but glad you are on the road to recovery 
__________________
______________________________________________
2001 Boxster S Lapis Blue
TS Cat Bypass Pipes and exhaust
iPad Mini Dash Install
DEPO Tail Lights
|
|
|
|
|
11-18-2016, 08:46 AM
|
#1376
|
|
Registered User
Join Date: Apr 2014
Location: Seattle
Posts: 362
|
Get well soon Fred!
__________________
2000 Boxster S, SPEC stage 1 clutch, Fabspeed sport headers, Fabspeed secondary cat deletes, Billy&Boat muffler, EVOM air intake, Ben006's Custom Short Shifter, Pedro's TechnoBrace, Eibach rear sway bar, De-snorkeled, Fred's custom projector HL
|
|
|
|
|
11-19-2016, 05:40 AM
|
#1377
|
|
Registered User
Join Date: Oct 2012
Location: Cincinnati, Ohio
Posts: 373
|
Fred,
Get well soon!
|
|
|
|
|
11-22-2016, 10:55 PM
|
#1378
|
|
Registered User
Join Date: Jun 2013
Location: Central Pennsylvania, USA
Posts: 102
|
Wow, glad you are on the mend! Healing wishes sent your way.
-Troy
__________________
2000 Boxster S - B.A.D. short shifter and intake plenum - 996 throttle body - Fred's xenon projector headlights - blue LED instrument cluster - and a few other things
Driving this car makes me wish I lived farther away from work!
|
|
|
|
|
11-23-2016, 04:59 AM
|
#1379
|
|
Project Addicted
Join Date: Aug 2015
Location: Eastern Shore, MD
Posts: 623
|
Fred, The highside really does suck! I have been there too without the serious injury to my old body. Get well soonest!
Arte you still accepting order for this kit??
__________________
______
Jon
1966 912, 1976 911
1986 944, 2000 Boxster
|
|
|
|
|
11-23-2016, 07:57 AM
|
#1380
|
|
Registered User
Join Date: Apr 2012
Location: Riverside, CA
Posts: 1,666
|
We were hoping that you didn't visit Thailand again on your vacation due to last times unfortunate incident but hearing that you took up flying with your motorcycle is a nightmare.
Hope you heal up quick and well from your accident.
However, I see racing the Boxster in your future now 
Surely it wont be long until you've figured out what else you can race.
If racing is in your blood it will be impossible to not find that alternative adrenaline rush.
__________________
"It broke because it wants to be Upgraded "
2012 Porsche Performance Driving School - SanDiego region
2001 Boxster S, Top Speed muffler, (Fred's) Mini Morimotto Projectors, Tarret UDP,
Short Shifter, Touch Screen Dual Din Radio, 03 4 Bow glass Top (DD & Auto-X since May 17,2012)
|
|
|
|
 Posting Rules
|
You may not post new threads
You may not post replies
You may not post attachments
You may not edit your posts
HTML code is On
|
|
|
All times are GMT -8. The time now is 06:02 PM.
| |


 2001 Boxster S
 Ocean blue
 Linear Mode


