 06-11-2011, 08:37 PM
|
#21
|
|
Registered User
Join Date: Mar 2007
Location: Ohio
Posts: 2,031
|
BTW, JFP, I have to tell you: While I was cranking on the thing, working up a sweat, my son shows up in his Celica, wanting to appropriate some garage space next to the Boxster so he can adjust his end links or some such thing. (Were constantly stealing tools away from each other.) Anyway, he sees what Im doing, working my a$$ off, and comments You really need to put the impact wrench on that, Dad. I told him I was NOT going to do that, that the instructions with the SIR state categorically that Positively DO NOT USE POWER OR IMPACT TOOLS, that it will invalidate the warranty, etc, etc. (He doesnt read instructions, wouldnt follow them if he did.)
This continues for awhile, his impact wrench comments directed at me as Im drippin sweat everywhere as I crank. You know, stuff like, Dad, a real man would put down that breaker bar and go for the impact wrench. On and on, me stickin to my guns, him raggin on me about my pig-headedness.
Anyway, so awhile later I was re-reading your post about my set up. I had previously seen the Looks right part, but had missed the second part (below your photo) in which you had to go valid his argument with your Normally, I would use an impact wrench to get it moving. I was the good loser, however, and did show him your recommendation
I take it youve never broken a SIR tool this way??
|

|

|
|
06-12-2011, 09:42 AM
|
#22
|
|
Registered User
Join Date: Feb 2005
Location: It's a kind of magic.....
Posts: 6,657
|
No, I have never had a failure with one of these tools. On new ones, some of the bits do fit tightly, but loosen up with use and wear. And, while SIR does say not to use an impact tool, it really does speed up the process of breaking the bearing loose as they do take a "set" to the car. Once the bearing starts to move, it usually comes out with a hand ratchet.
What you might want to do with yours now is to take it to someone with a hydraulic press and have them pop the center shaft out, then de-burr the problem area so the disc moves freely and this does not happen again. Im sure the tool is fine, these things can really take a beating and still work, which is why they are worth owning, along with the fact that SIR makes adaptor pieces that can make the basic tool fit just about any make of car.
__________________
Anything really new is invented only in ones youth. Later, one becomes more experienced, more famous and more stupid. - Albert Einstein
Last edited by JFP in PA; 06-12-2011 at 09:46 AM.
|

|
|
|
06-12-2011, 04:58 PM
|
#23
|
|
Autobahn Glanz
Join Date: Dec 2010
Location: Charlotte, NC
Posts: 1,282
|
Frodo -
I assume you are way past this, but I found this link I had bookmarked. The method used would require an alignment/adjustment of the rear camber though.
http://boxcar-racing.com/forum/index.php?PHPSESSID=a5b41085554217d7e6f13d6aa03569 1f&topic=562.0
Removing that eccentric bolt (if even eccentric in the front, think camber is determined by three bolts at top of strut housing) in the front though is a pain in the a-s if I remember.
Anyway just thought I would pass this on, cheers.
|
|
|
|
|
06-13-2011, 06:11 AM
|
#24
|
|
Registered User
Join Date: Mar 2007
Location: Ohio
Posts: 2,031
|
Okay, time to swivel the socket wrenches from CCW over to CW and start puttin' things back together. Thanks to everyone for input, BTW. 
General question: As has become apparent by my pics, and despite the benefits of having the SIR, I've got pretty much everything torn apart here. (My kid got involved, one thing led to another..you know the routine.) In 101 Projects for your Boxster, Wayne makes the broad statement,
It's important to note that you should always use brand new factory hardware when replacing your suspension components. Most of the nuts and bolts used in the front suspension have self-locking compounds impregnated into their threads..." Now that was in the chapter on "Suspension Overhaul" and included dis-assembly of some items I have not taken apart, but I've taken apart a lot...
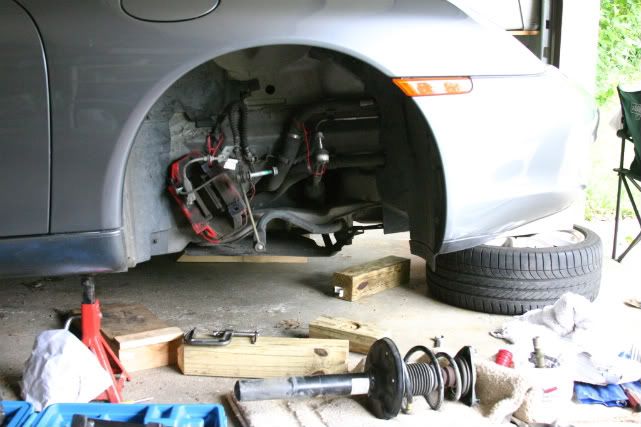
On the bolt holding the main part of the control arm (the wishbone, as 101 Projects calls it), for example---should that be replaced? How about the two long bolts that hold the brake caliper in place? What about Loctite? Would that serve the same purpose as the "self-locking compounds"?
Then there's the Red vs Blue Loctite issue. A number of sources here have recommended using the Red on the axle nut, but neither the Bentley manual nor 101 Projects even mentions using any at all: just crank it up to the recommended torque. Is using Blue as a compromise the cowardly way out? My kid counsels against the Red, makes it sound like I'll be essentially welding the piece on. (I'm exaggerating---he doesn't quite go that far. But you get the idea.) Just how tough is it to get off a nut that's been put on with Red?
|
|
|
|
|
06-13-2011, 07:32 AM
|
#25
|
|
Registered User
Join Date: Sep 2004
Location: Atlanta
Posts: 1,820
|
the only bolts you should consider replacing are for the brake calipers. the ends of the top caliper bolts are actually open to a pocket in the wheel carrier. water pools in the pocket and corrodes the bolt. when you unscrew it later, it will pull the corrosion through the aluminum & gall it. eventually, it will seize in the hole.
as for loctite? don't use it anywhere except the axle nut. i personally use red here, but if you hit the correct torque spec, it's technically unnecessary. i use loctite red on any rotating parts where the rotation moment can cause the fastener to back off. this would be the right side axle nuts & right side CV bolts.
|
|
|
|
|
06-13-2011, 10:55 AM
|
#26
|
|
Registered User
Join Date: Mar 2007
Location: Ohio
Posts: 2,031
|
Quote:
the only bolts you should consider replacing are for the brake calipers. the ends of the top caliper bolts are actually open to a pocket in the wheel carrier. water pools in the pocket and corrodes the bolt. when you unscrew it later, it will pull the corrosion through the aluminum & gall it. eventually, it will seize in the hole. So, not sure what that means...that the bolt will "seize" and be hard/impossible to remove?
as for loctite? don't use it anywhere except the axle nut. i personally use red here, but if you hit the correct torque spec, it's technically unnecessary. i use loctite red on any rotating parts where the rotation moment can cause the fastener to back off. this would be the right side axle nuts & right side CV bolts. With your experience, I assume you've had to remove an axle nut that you had previously pasted with red loctite. Break out the heat gun/propane torch? Is it tricky to get the right amount of heat and not too much? (Sorry...I just don't know these things ") ) )
Originally posted by insite
|
|
|
|
|
06-15-2011, 06:21 PM
|
#27
|
|
Registered User
Join Date: Mar 2007
Location: Ohio
Posts: 2,031
|
YAY! DONE! And it only took me a week and a half. In my defense, I was only finding time to work in short bursts here and there, which got pretty frustrating. But all seems well. That irritating noise experienced at slow speeds, especially when turning...it's gone!
I think that's what made me the most nervous, the diagnosis. That I'd get everything back together just to discover something else was the culprit. Thanks for the help here. 
Think I'll go for another drive...
|
|
|
|
|
06-16-2011, 04:17 AM
|
#28
|
|
Registered User
Join Date: Sep 2004
Location: Atlanta
Posts: 1,820
|
frodo - congrats on finishing up.
to answer your earlier question on red loctite: the stuff is strong, but it's not glue. the fasteners will come off no prob w/ a wrench. i've never had one stick to the point where i had to apply heat. i do, however, avoid using it on aluminum. i only use it where the fastener and the nut/machined part are both steel.
|
|
|
|
|
06-18-2011, 05:23 PM
|
#29
|
|
Registered User
Join Date: Mar 2007
Location: Ohio
Posts: 2,031
|
Last question (pretty sure): You've seen what I did, disconnected nearly everything, had the wheel carrier off the car, etc, etc. Now, I marked the positions of the 3 strut mount nuts at the top of the strut (inside the frunk), and, on the tie rods, all I did was disconnected them from the wheel carrier. The strut mount nuts are now reattached and at exactly the same place they were in before. And the tie rod end is re-attached to the wheel carrier as before.
My question: Is there any need for me to get an alignment (or to even have the alignment checked)?
|
|
|
|
|
06-18-2011, 07:32 PM
|
#30
|
|
Registered User
Join Date: Sep 2004
Location: Atlanta
Posts: 1,820
|
You're fine without an alignment
|
|
|
|
|
06-18-2011, 07:39 PM
|
#31
|
|
Registered User
Join Date: Mar 2007
Location: Ohio
Posts: 2,031
|
Quote:
|
Originally Posted by insite
You're fine without an alignment
|
Music to my ears, young fella, music to my ears. Thanks for the assistance
|
|
|
|
 Posting Rules
|
You may not post new threads
You may not post replies
You may not post attachments
You may not edit your posts
HTML code is On
|
|
|
All times are GMT -8. The time now is 09:23 AM.
| |


 Whip986S - SOLD but will live the good life!
 Peter Jr - SOLD but not forgotten!
 The Silver Surfer (SOLD)
 The Black Widow
 Nite
Nite Linear Mode


