 02-17-2018, 01:07 PM
|
#1
|
|
Registered User
Join Date: Feb 2017
Location: North Eastern US
Posts: 646
|
Serious Plastic Welding - It worked for me
While working on my 14 year old 986 across the last year I've occasionally come across cracked or broken plastic body parts. Rather than to continue to order and wait to receive a new part via UPS (my nearest Porsche dealer is a ~4 hr round trip), I decided to check out plastic welders to try and make repairs. This saves project time waiting for parts and sometimes $$$. Also, I'm waiting on my wheels and Brombacher to be delivered so I have some downtime.
As always, a lot of junk out there. Turns out there are two types of serious plastic welders - ceramic core/metal tip and nitrogen forced air tip. I decided that the nitrogen forced air was too much for my needs (although generally considered superior), so I went for a Polyvance 5700HT Mini Weld Model 7 Airless Plastic Welder. It's basically a 200 watt instrument similar to a soldering iron on steroids with an adjustable temp control, two special tips (a feeder tip and a finishing tip), a bunch of different welding rods, reinforcing screen, an instructional DVD and an invaluable book on plastic types and plastic repair methods. Here's a pic:
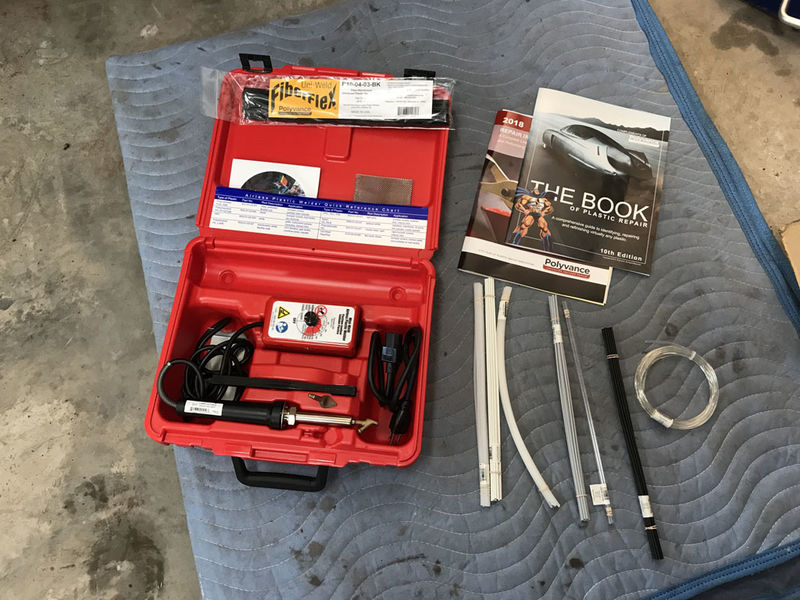
There are two principal types of plastic welding - fusion repair and adhesive bonding repair. You generally use fusion repair when you know specifically the material you are repairing (so you can use a compatible welding rod and correct welding temperature) and you use adhesive bonding repair when you are unsure of the material or under other certain special circumstances. I did a fusion repair.
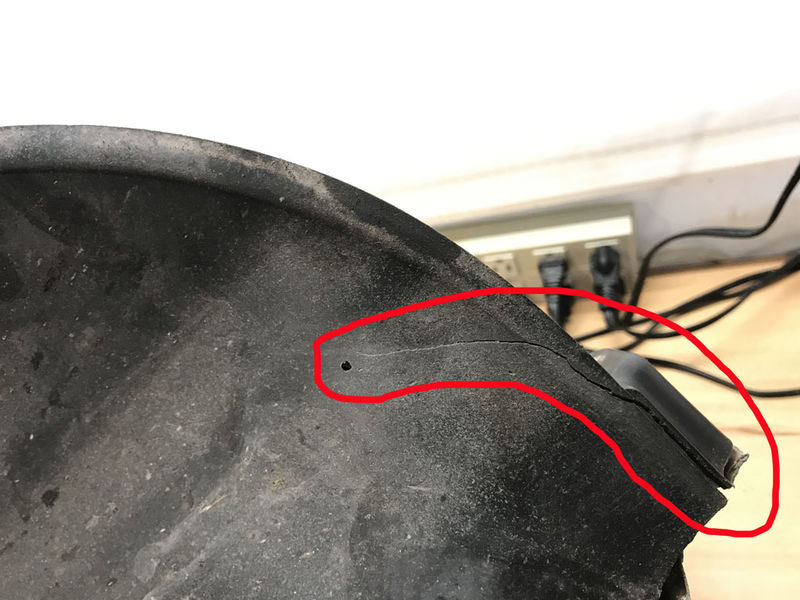
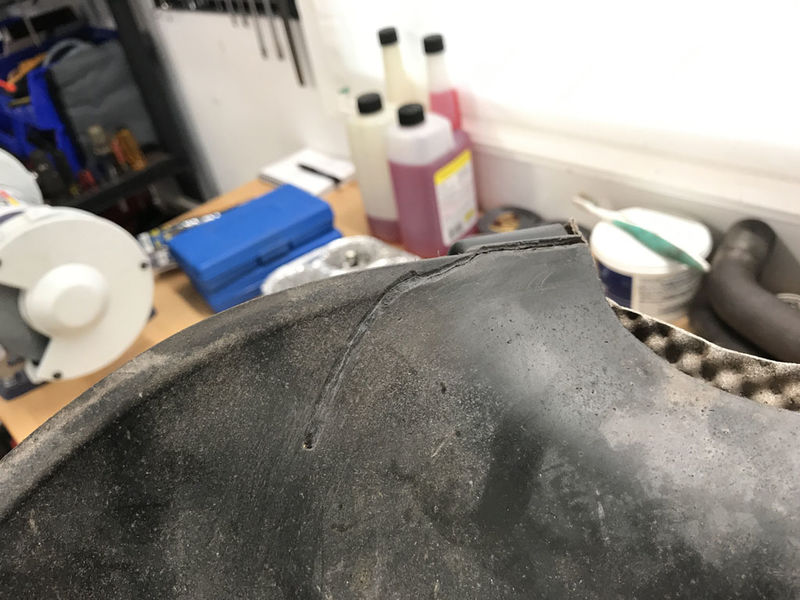
The Problem - a crack on the rear left side inner fender liner that started on the corner seam and that was making its way up the liner. I drilled the hole seen in the left side of my red outline to stop the crack (it had turned, you could see the crack end better from the side not shown):
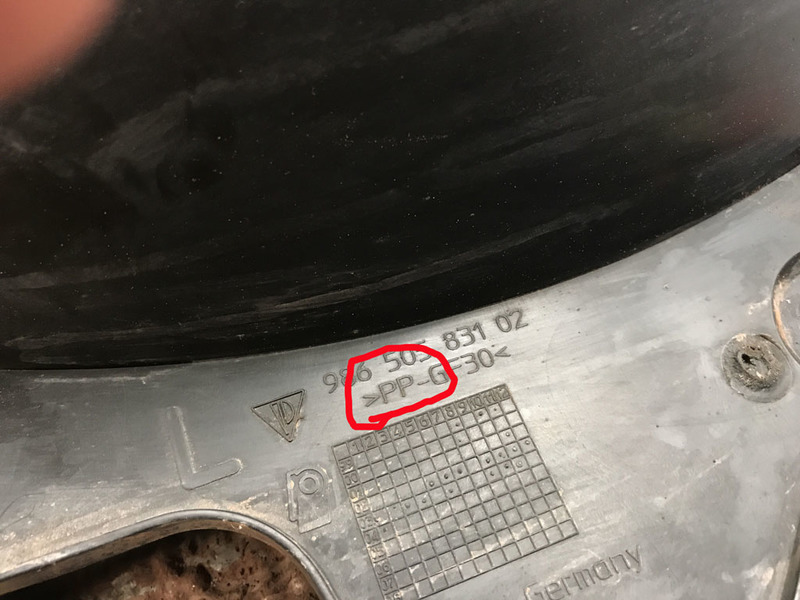
First step was to determine what type of material I was repairing. It's the first two letters of the circled marking (PP - polypropylene) :
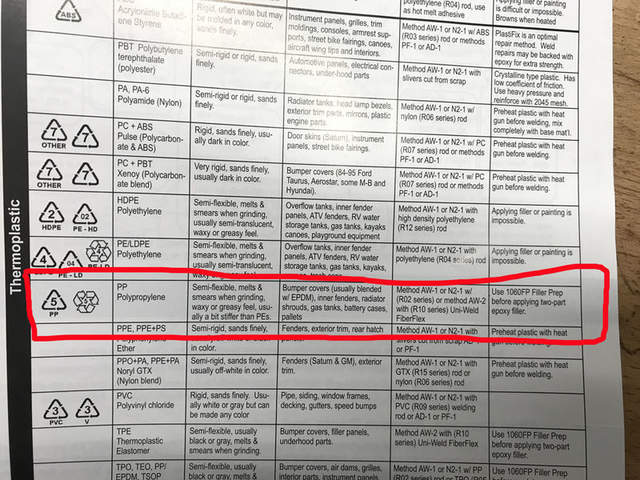
Check the handy included booklet to determine material type, repair processes and welding rod type :
Select the correct rod and set the control unit to "PP":
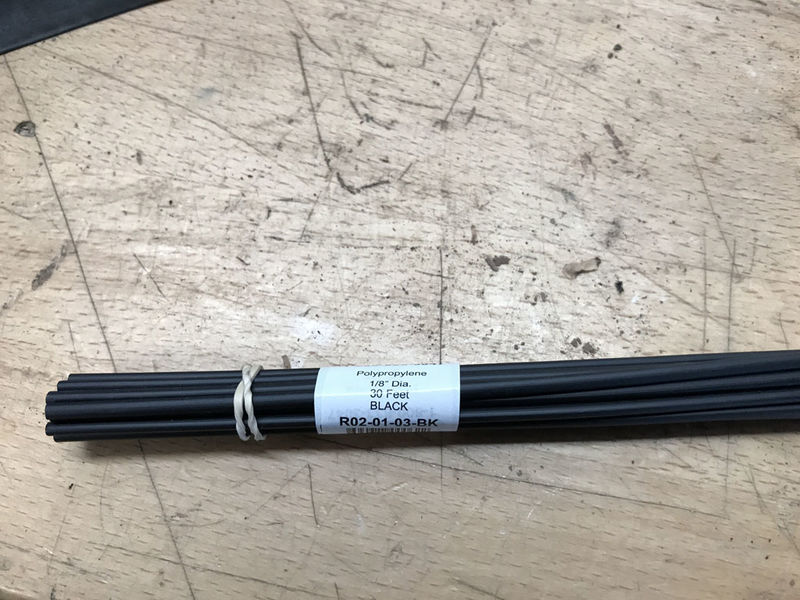
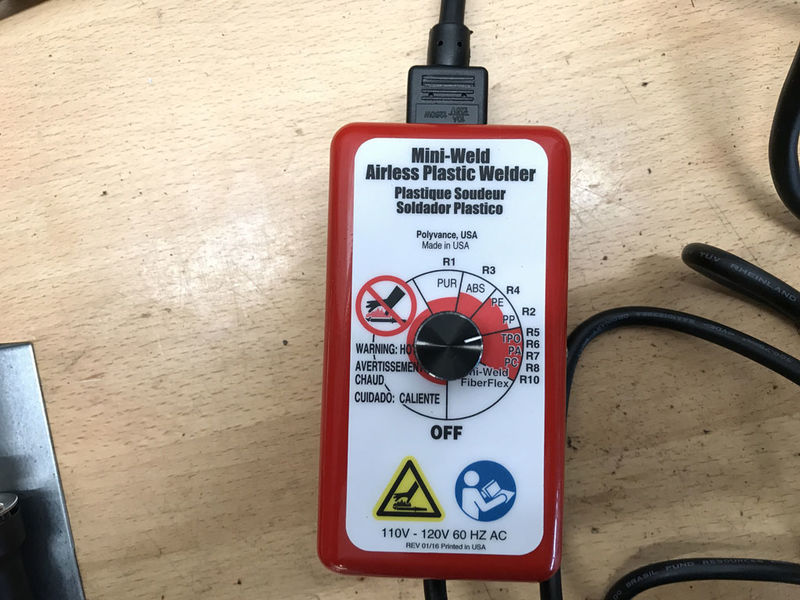
While the iron is heating up, make a valley cut in crack that is 1/2 the thickness of the material. A dremel on low speed worked the me. Be careful, too fast and you'll melt the plastic:
Apply rod material in the valley and fuse/blend the rod material with the feeder tip and smooth with the feeder tip or finishing tip. I used aluminum tape to hold the piece together while welding:
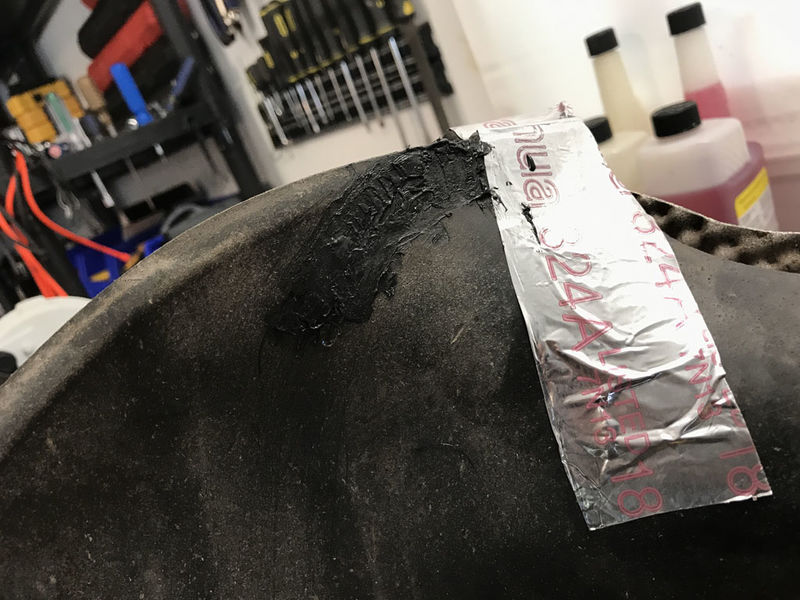
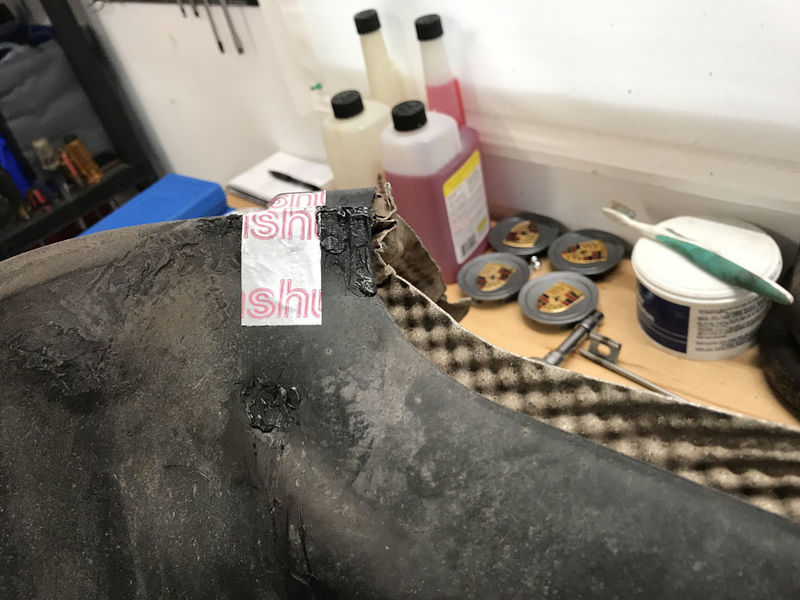
Let the repair cool, test it for integrity, sand it and you're gold!
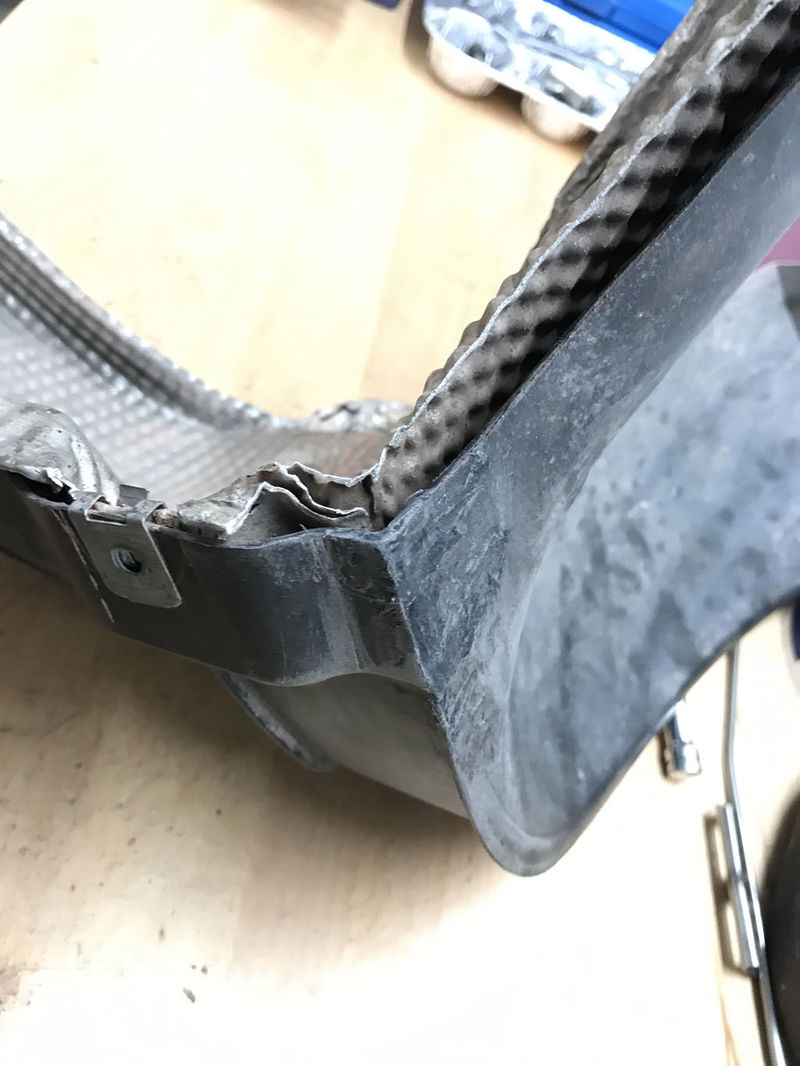
Because the repair is at the back bottom of the inner fender I did not spend any time with finish sanding. Just knocked off the rough edges. If needed, you can sand to body work prep readiness. No amount of reasonable tugging or pulling could separate the repaired crack and everything flexed just as it should.
Now I'm ready for the next crack, broken tab or cracked bolt hole I come across without waiting for parts, and I have another new tool - bonus!
__________________
Rgds, Fred
#317 550 Spyder Anniversary Edition 2004 Boxster S, 3.8L Flat Six Innovations engine, PSS9s, etc, etc . . .
The contents of my posts are for entertainment only. As confirmed by my many motor sports fails, I am not qualified to give product endorsements or mechanical advice 
Last edited by Oldcarguy; 02-18-2018 at 08:02 AM.
|

|

|
 02-18-2018, 01:14 AM
|
#2
|
|
Registered User
Join Date: Feb 2017
Location: CO
Posts: 989
|
Oh... where did you pick up that handy-dandy device? My Jeep has all sorts of plastic on it!
|

|

|
 02-18-2018, 06:17 AM
|
#3
|
|
Artist, 986S tinkerer
Join Date: Aug 2013
Location: Montreal, Canada
Posts: 1,821
|
Thanks for posting this Fred! Great explanation and pictures! 
__________________
James now has: 2008 987S 6 speed
Crashed: 2010 987.2 pdk in speed yellow! 
Sold to a cool racer chick: 2004 986 S
YouTube channel: the PORSCHE as seen by NewArt
www.youtube.com/channel/UCohdrH2xHTklM1thxk0KKOQ?
|

|

|
 02-18-2018, 06:55 AM
|
#4
|
|
There Is No Substitute.
Join Date: May 2007
Location: West Coast
Posts: 3,253
|
Great work, I have only every seen this done by crosshatching with a soldiering iron, much cleaner and stronger to add some additional plastic. 
__________________
1999 Ocean Blue Metallic Boxster - blueboxster.com
|

|

|
 02-18-2018, 07:55 AM
|
#5
|
|
Registered User
Join Date: Feb 2017
Location: North Eastern US
Posts: 646
|
Quote:
Originally Posted by Geof3

Oh... where did you pick up that handy-dandy device? My Jeep has all sorts of plastic on it!
|
Hi Geof, I got mine on Amazon:
https://www.amazon.com/gp/product/B00IEX6NME/ref=oh_aui_detailpage_o00_s00?ie=UTF8&psc=1
Donít buy it directly at the Polyvance site, itís way more expensive for the same kit!
Regarding your Jeep, same for me. Iíll get a lot of use out of it for our atvs, off-road buggy and racing kart also.
__________________
Rgds, Fred
#317 550 Spyder Anniversary Edition 2004 Boxster S, 3.8L Flat Six Innovations engine, PSS9s, etc, etc . . .
The contents of my posts are for entertainment only. As confirmed by my many motor sports fails, I am not qualified to give product endorsements or mechanical advice 
|

|

|
 02-18-2018, 08:09 AM
|
#6
|
|
Registered User
Join Date: Feb 2017
Location: North Eastern US
Posts: 646
|
Quote:
Originally Posted by NewArt

Thanks for posting this Fred! Great explanation and pictures!  |
Hi NewArt, youíre welcome! BTW I really like your YouTube channel.
__________________
Rgds, Fred
#317 550 Spyder Anniversary Edition 2004 Boxster S, 3.8L Flat Six Innovations engine, PSS9s, etc, etc . . .
The contents of my posts are for entertainment only. As confirmed by my many motor sports fails, I am not qualified to give product endorsements or mechanical advice 
|

|

|
 02-18-2018, 08:22 AM
|
#7
|
|
Registered User
Join Date: Feb 2017
Location: North Eastern US
Posts: 646
|
Quote:
Originally Posted by rick3000

Great work, I have only every seen this done by crosshatching with a soldiering iron, much cleaner and stronger to add some additional plastic.  |
Hi Rick, thanks! I’m really happy with the result. Matching the temperature and rod to the material to be repaired seems to be the key. As the name implies, using the fusion technique actually integrates the rod material into the original material. Here’s the Polyvance video on the 5700 unit. It’s worth a watch if you’re interested in plastic repair.
https://m.youtube.com/watch?v=xYLF9DJM-YU
__________________
Rgds, Fred
#317 550 Spyder Anniversary Edition 2004 Boxster S, 3.8L Flat Six Innovations engine, PSS9s, etc, etc . . .
The contents of my posts are for entertainment only. As confirmed by my many motor sports fails, I am not qualified to give product endorsements or mechanical advice 
Last edited by Oldcarguy; 02-18-2018 at 08:26 AM.
|

|

|
 02-19-2018, 07:05 PM
|
#8
|
|
Registered User
Join Date: Sep 2017
Location: California
Posts: 64
|
Some of the mounting holes at the bottom of my front bumper have torn out during years of use. Not sure what the bumper cover material is but do you think your welder might be a solution? Iím on an eternal search to eliminate rattles
|

|

|
 02-19-2018, 07:40 PM
|
#9
|
|
Motorist & Coffee Drinker
Join Date: Jul 2014
Location: Oklahoma
Posts: 3,955
|
Quote:
Originally Posted by Oldcarguy

|
Fred, I've been resisting getting one of these for years. I've had mixed results with a heat gun, soldering iron, and epoxy. You finally convinced me. Thanks for posting this.
Now I think I can do a good job repairing the damaged belly panels on my 550 SE rather than buying new.

__________________
I am not an attorney, mechanic, or member of the clergy. Following any advice given in my posts is done at your own peril.
|

|

|
 02-19-2018, 08:57 PM
|
#10
|
|
Registered User
Join Date: Feb 2017
Location: North Eastern US
Posts: 646
|
Quote:
Originally Posted by Zibodo

Some of the mounting holes at the bottom of my front bumper have torn out during years of use. Not sure what the bumper cover material is but do you think your welder might be a solution? Iím on an eternal search to eliminate rattles
|
Hi Zibodo. The dvd that came with my kit shows how to repair torn out mounting holes as well as create entirely new tabs to replace broken/missing tabs. The key is to match the rod to the material being repaired, use the correct level of heat and follow the recommended repair technique.
There are rods included for the common bumper materials so I think the kit might address your needs. Check out the Polyvance videos on YouTube or their website for more info.
__________________
Rgds, Fred
#317 550 Spyder Anniversary Edition 2004 Boxster S, 3.8L Flat Six Innovations engine, PSS9s, etc, etc . . .
The contents of my posts are for entertainment only. As confirmed by my many motor sports fails, I am not qualified to give product endorsements or mechanical advice 
|

|

|
 02-19-2018, 09:08 PM
|
#11
|
|
Registered User
Join Date: Feb 2017
Location: North Eastern US
Posts: 646
|
Quote:
Originally Posted by 78F350

Fred, I've been resisting getting one of these for years. I've had mixed results with a heat gun, soldering iron, and epoxy. You finally convinced me. Thanks for posting this.
Now I think I can do a good job repairing the damaged belly panels on my 550 SE rather than buying new.
 |
Youíre welcome! I hope it does help with your 550SE resurrection project 
__________________
Rgds, Fred
#317 550 Spyder Anniversary Edition 2004 Boxster S, 3.8L Flat Six Innovations engine, PSS9s, etc, etc . . .
The contents of my posts are for entertainment only. As confirmed by my many motor sports fails, I am not qualified to give product endorsements or mechanical advice 
|

|

|
 02-19-2018, 09:14 PM
|
#12
|
|
Custom User Title Here
Join Date: Mar 2012
Location: Ft. Leonard Wood
Posts: 6,169
|
I've been doing this with a soldering iron for decades. Filler rods seem unnecessary...unless you're building new material or missing a section. I've never needed them. 
.
Last edited by particlewave; 02-19-2018 at 09:17 PM.
|

|

|
 02-20-2018, 05:16 AM
|
#13
|
|
Registered User
Join Date: Feb 2017
Location: North Eastern US
Posts: 646
|
Quote:
Originally Posted by particlewave

I've been doing this with a soldering iron for decades. Filler rods seem unnecessary...unless you're building new material or missing a section. I've never needed them.  |
in my younger days when I was doing a lot of car models, I used to mod and rebond with only an old knife heated on the stove. Occasionally across the years Iíve successfully called this skill into action on my cars and motorcyles also 
__________________
Rgds, Fred
#317 550 Spyder Anniversary Edition 2004 Boxster S, 3.8L Flat Six Innovations engine, PSS9s, etc, etc . . .
The contents of my posts are for entertainment only. As confirmed by my many motor sports fails, I am not qualified to give product endorsements or mechanical advice 
|

|

|
 02-20-2018, 09:06 AM
|
#14
|
|
Custom User Title Here
Join Date: Mar 2012
Location: Ft. Leonard Wood
Posts: 6,169
|
Welding plastic is definitely a fine art. 
|

|

|
 Posting Rules
|
You may not post new threads
You may not post replies
You may not post attachments
You may not edit your posts
HTML code is On
|
|
|
All times are GMT -8. The time now is 02:49 PM.
| |