 08-20-2007, 04:12 PM
|
#1
|
|
Registered User
Join Date: Dec 2006
Location: shoreham, ny
Posts: 1,619
|
Supercharger Install Imagine Auto
11am-6pm
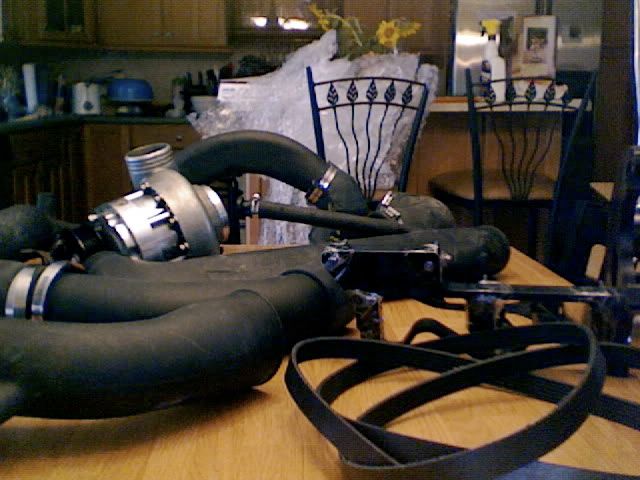
Got the Charger in place
New Headers on
Belt is on
Let me begin with. I think the imagine auto guys smoke some really good *&^%.
The brackets fit like crap, the fittings are straight from home depot, and there piping is the only nice thing. The bracket that holds the charger on needs to be shaved down alittle or the valve cover does, in my case one of the parts on the bracket were shaved down and then I shaved down a part of the valve cover. I will post up some photos tomorrow. I need to get the camera back from my brother.
__________________
996 3.4 engine with 2.7 986 5speed transmission
Ebay Headers, Fabspeed high flow cats, JIC Cross, IPD Plenum, H&R Coilovers, B&M Short Shifter, AEM Uego Gauge Type Analog, Apexi S-AFC Select, 987 air box, Litronics, 2000 Tails and side markers, painted center console, 18" 987 S-Wheels, GT3 Front bumper with splitter.
|

|

|
 08-20-2007, 04:24 PM
|
#2
|
|
Guest
|
cant wait to see the end result good luck

|
|
|

|
 08-21-2007, 11:00 AM
|
#3
|
|
Registered User
Join Date: Dec 2006
Location: shoreham, ny
Posts: 1,619
|
Done. I think I might have to see a therapist three times a week now. I will post up photos/video, and all that good stuff once I get my sanity back. I have not driven the car yet. I still have to go buy a piece of vacuum hose and put some odds and ends on. The car starts and runs and has a slite whine 
__________________
996 3.4 engine with 2.7 986 5speed transmission
Ebay Headers, Fabspeed high flow cats, JIC Cross, IPD Plenum, H&R Coilovers, B&M Short Shifter, AEM Uego Gauge Type Analog, Apexi S-AFC Select, 987 air box, Litronics, 2000 Tails and side markers, painted center console, 18" 987 S-Wheels, GT3 Front bumper with splitter.
|

|

|
 08-21-2007, 12:31 PM
|
#4
|
|
Registered User
Join Date: Sep 2006
Location: California
Posts: 713
|
thats awesome man! wow, I can't wait to see your videos and updates on how well it runs!
__________________
http://farm4.static.flickr.com/3420/...90927559_o.jpg
Some stuff for sale: M030 S 24mm front sway bar, M030 base 19.6mm rear sway bar, 996 GT3 OEM Porsche Motorsport front strut mounts monoball "camber plates"
WTB: looking for some 5-7mm spacers with extended bolts
|

|

|
 08-21-2007, 07:37 PM
|
#5
|
|
Registered User
Join Date: Dec 2006
Location: shoreham, ny
Posts: 1,619
|
OK.. here it goes.

I started the project at 11am monday morning. When I first got the kit It looked simple to do.
My first step was to jack up the passanger side rear and put it up on jack stands. Remove the rear wheel and then move to the inside cabin to get to the belt.
I did not remove the seats for the install I just pulled them all the way foward and leaned them foward. I then took off the 3 clips/nuts 10mm that hold the carpet on the back wall in its spot. Once that was removed I removed the tin cover that seperates us from the belts. That too was held on by a few 10mm nuts. I did at that time take a breaker bar and the correct socket, I don't remember which one and pulled the tensioner clockwise to free the belt. Once that was removed it was time to go under ther car.
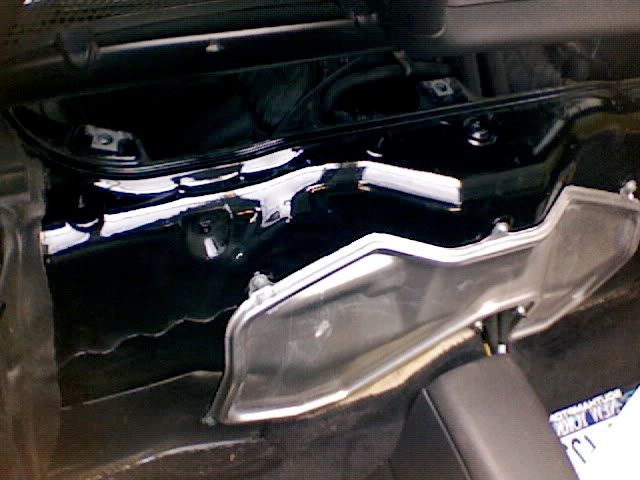
Under the car
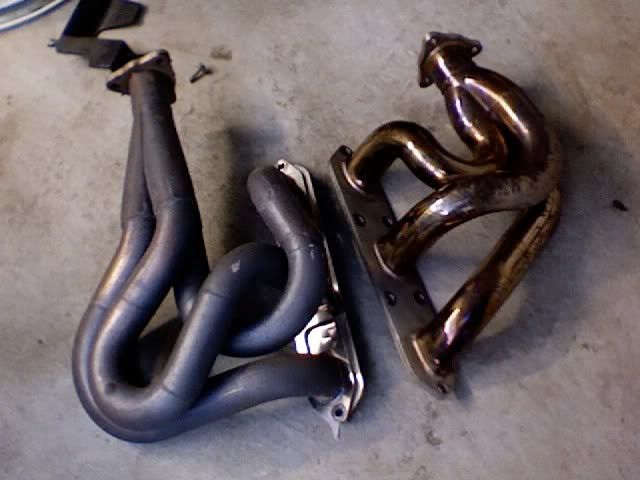
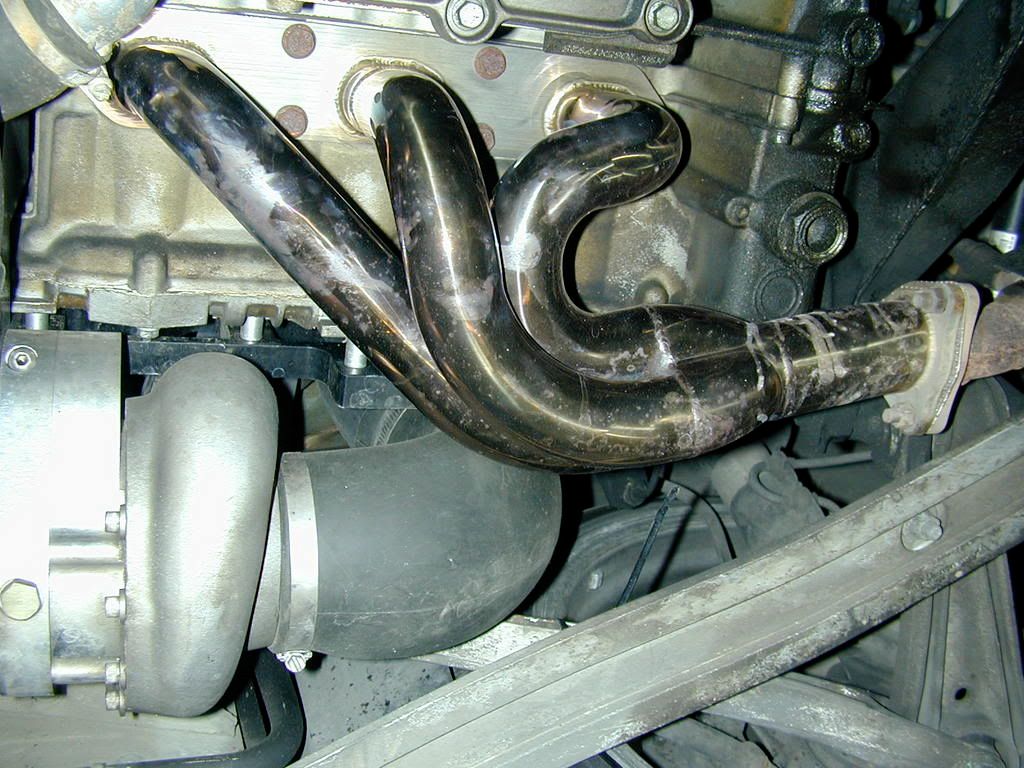
I had S-Car-Go headers on the car. They had to be removed because of the placement of the supercharger. I did not put my new headers on till the end of the install.
Now that the headers were gone I had plenty of room to go to work
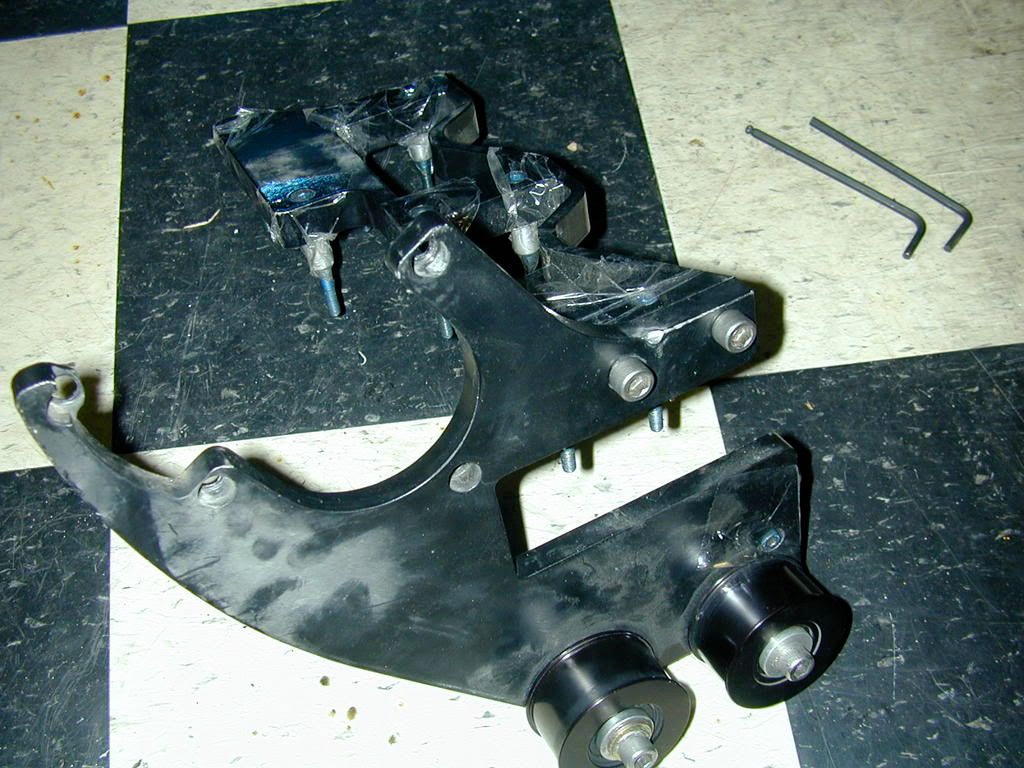
I first tried to mount the the main bracket that mounts to the valve cover not the header bolts like the tpc kit. I layed it out and figured out which 10mm bolts had to be remove. There were 8 of them. The bracket that bolts to the valve cover comes with nice aluminum spacers and extended bolts to fit back in. I lined it up and went to bolt it back on and found out that it fits like crap. To fit the first bracket you have to wizwheel off 2 nubs of aluminum off the valve cover and then grind them down with an air grinder. Along with grinding them down I also had to grind a little bit of the supercharger bracket, not taking any strength from it. That got bolted up and then I relized I need the bracket on it also for the supercharger before I got it up there. I uninstalled that and put the other piece of the bracket that holds the supercharger in place together. I used lock tight on the allens that hold those 2 peices together. When putting that back onto the valve cover it took some brain power and patients to get it up there. Not too bad.
S-Car-Go headers on the left, Turbo Werx Headers on the Right
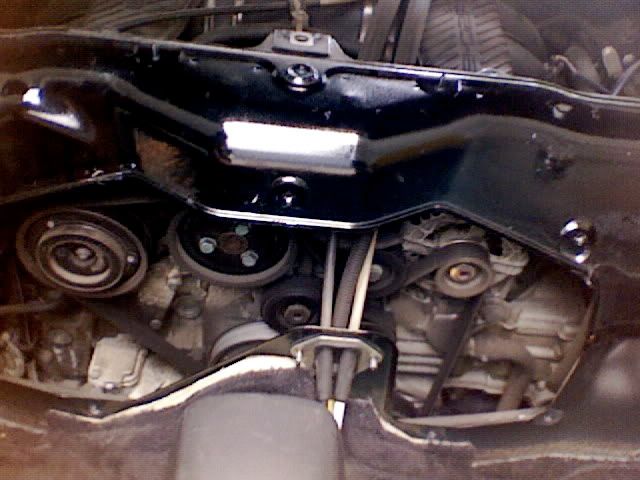
Also photos of the main bracket off and on the car.
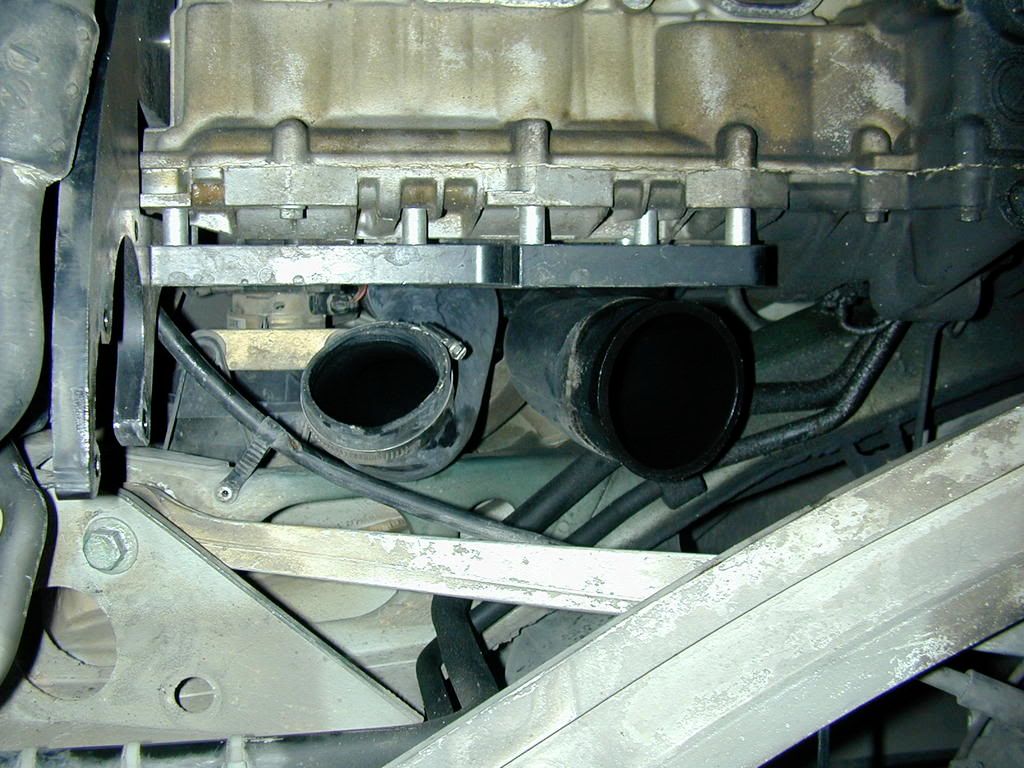

Fitting the Supercharger
Now came time to mount the supercharger in place. My advice on this one is, call a shrink and make an appointment. There is little to no room to make this go in it's spot. To get this in I had to zip tie off some A/C cables off to the side and then jack the rear suspension up, that made some clearance from one of the control arms. With all this room now it was possible to get the charger near its new home. Getting the charger in still took about 30 mins of twisting and pushing until it finally slipped right in to the bracket. Now you have to shrink your arm and hand and bolt it to the bracket with 3 allen bolts. I used a allen wrench and a allen socket. It was not that bad to get them in there.
Photo of the chager in place.. Photo from previouse install on the car this kit came from.
Belt Installation
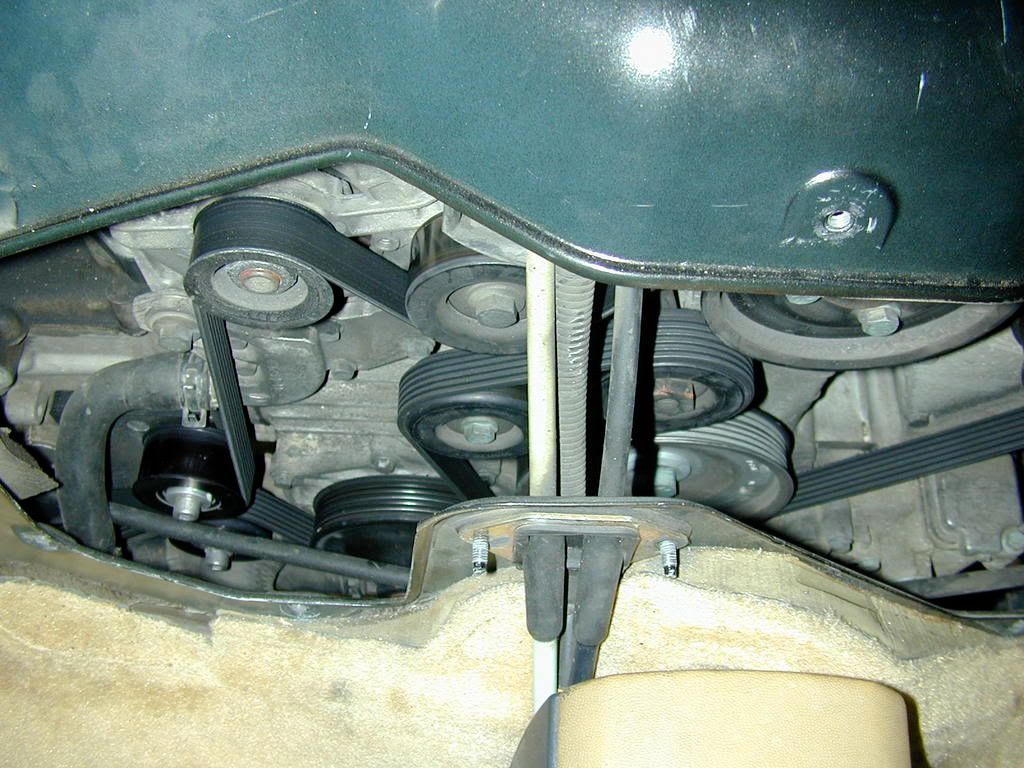
I used a photo that was sent to me of the belt on the car with the charger and just followed that. Took only a couple minutes. I did have to pull to the side a waterline and E-brake line towards the front of the car. These were located from in the engine compartment in the cockpit of the car. Very easy to do just some zip ties again. The reason they had to be moved was the new location of the belt just barely grazed these lines. There was plenty of play to give them alittle pull. While in this position there is also a small bolt to tighten in to the engine that is part of the charger bracket.
Photo of the bracket and and new pulleys on the bracket with the belt installed.
This photo was taken during the uninstall of this by marc over at turbo werx. There are a few photos that I did not take because I was in the heat of the moment and just did not care to go get cleaned up to shoot photos.. Sorry
__________________
996 3.4 engine with 2.7 986 5speed transmission
Ebay Headers, Fabspeed high flow cats, JIC Cross, IPD Plenum, H&R Coilovers, B&M Short Shifter, AEM Uego Gauge Type Analog, Apexi S-AFC Select, 987 air box, Litronics, 2000 Tails and side markers, painted center console, 18" 987 S-Wheels, GT3 Front bumper with splitter.
Last edited by JAAY; 08-22-2007 at 12:56 PM.
|

|

|
 08-21-2007, 07:38 PM
|
#6
|
|
Registered User
Join Date: Dec 2006
Location: shoreham, ny
Posts: 1,619
|
Oh yea. I did it in 2 days. 6 hours a day.
J
__________________
996 3.4 engine with 2.7 986 5speed transmission
Ebay Headers, Fabspeed high flow cats, JIC Cross, IPD Plenum, H&R Coilovers, B&M Short Shifter, AEM Uego Gauge Type Analog, Apexi S-AFC Select, 987 air box, Litronics, 2000 Tails and side markers, painted center console, 18" 987 S-Wheels, GT3 Front bumper with splitter.
|

|

|
 08-21-2007, 07:55 PM
|
#7
|
|
Registered User
Join Date: Aug 2005
Location: VA
Posts: 60
|
Wow, nice write up.. thanks and I look forward to the visuals.
|

|

|
 08-21-2007, 10:08 PM
|
#8
|
|
Registered User
Join Date: Jun 2007
Location: Bowmanville, Ont
Posts: 295
|
Good read
Thanks for taking the time to type that up. I enjoyed reading it and i'm looking forward to the pics/vid.
|

|

|
 08-22-2007, 12:58 PM
|
#9
|
|
Registered User
Join Date: Dec 2006
Location: shoreham, ny
Posts: 1,619
|
Page 2 there were too many photos for 1 post..
Piping..
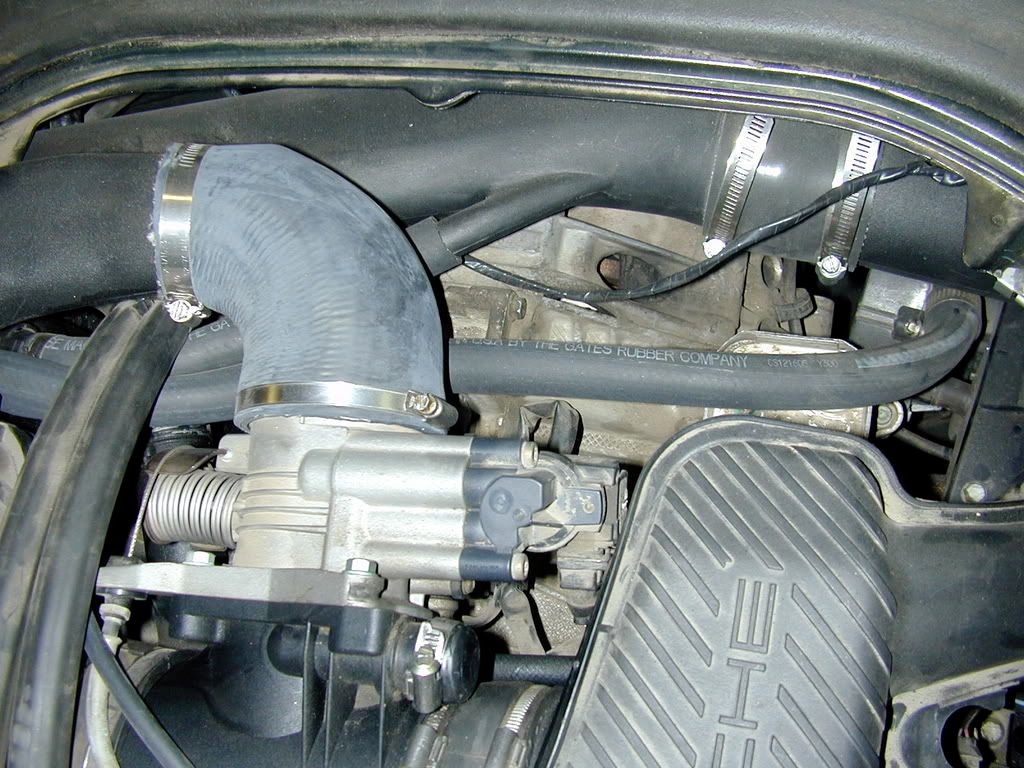
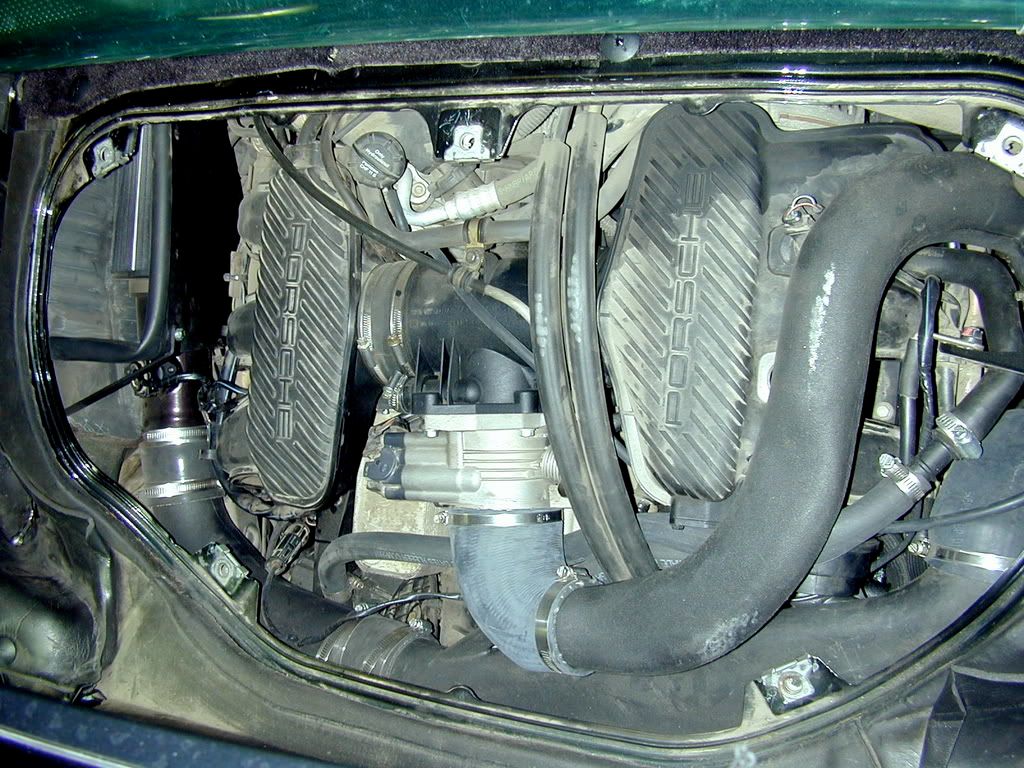
First pipe to do, which I figured out the real hard way is the boost tube coming from the outlet of the charger. This fitting that was supplied to me just would not work out. I cut the fitting they gave me in about 1/2 and then mounted that to the charger with one of many hose clamps for the day. It mounts facing straight up. Now it needed something in it to extend to the next piece of piping. I had some old intercooler piping laying around from a previouse project that was the correct diameter to fit inside the supplied fitting. I cut that down to about 6inches and fit it inside the first fitting and clamped that on. Then with another piece of older soft intercooler piping I cut that to around 6 inches and fastened that to the pipe that I just installed. At this point you now have to start the intake part of the install. I started from the charger inlet with what looks to be a 4inch elbow that faces up also. It is easier to stuff a boxster into a 911. This took a long super flat, flathead screw driver to finally get it on. That just gets secured with a hose clamp. Next you drop down the next intake pipe. There was no fitment problems here. Just drop it down from the top of the engine bay and line it up and hose clamp it. The next intake pipe needs some persuasion, I think I spelt that wrong, anyway, it goes right under one of the wholes for the engine cover clips. It will fit no problem you just have to not be afraid of pushing it in there. That also gets attached with a rubber elbo and some hose clamps. I now went back to the boost tubes. There is only one flattend looking tube that fits in this spot from the top of the outlet tube to the the throttle body. If you did not do it already you have to remove the black tube that goes from some R2D2 looking thing to the throttlebody. The throttlebody end gets capped off with a supplied cap and a hose clamp and the other end, R2D2 :P, gets a rubber hose that is suppled and that goes to a port on the intake pipe. It is very easy to see. Back to the boost tube. The rubber elbow that goes to the throttle body is a pain in the ace to get on there. It is just the wrong size. You have to somewhat shoehorn it on there with brute force and a flathead screwdriver. Once you have that on tight you can go ahead and finish the last boost tube off. The intake pipe is the last big pipe. It is part of the Evo intake kit I think. I used my stock intake because I just sold my Evo intake setup. I just had to cut about 4inches off the evo looking pipe and joined that with my stock airbox with a rubber coupling I had laying around from turbonetics. You need a good selection of car crap/leftovers laying around to get this done. One more thing to install.
Some shots of the piping installed and you can see the air pump relocation hose and the relocation itself. These shots were also from the previouse install. Mine looks the same.
Diverter Valve.
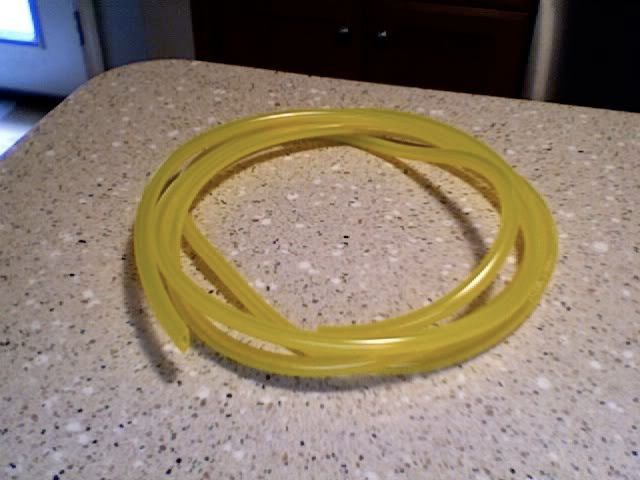
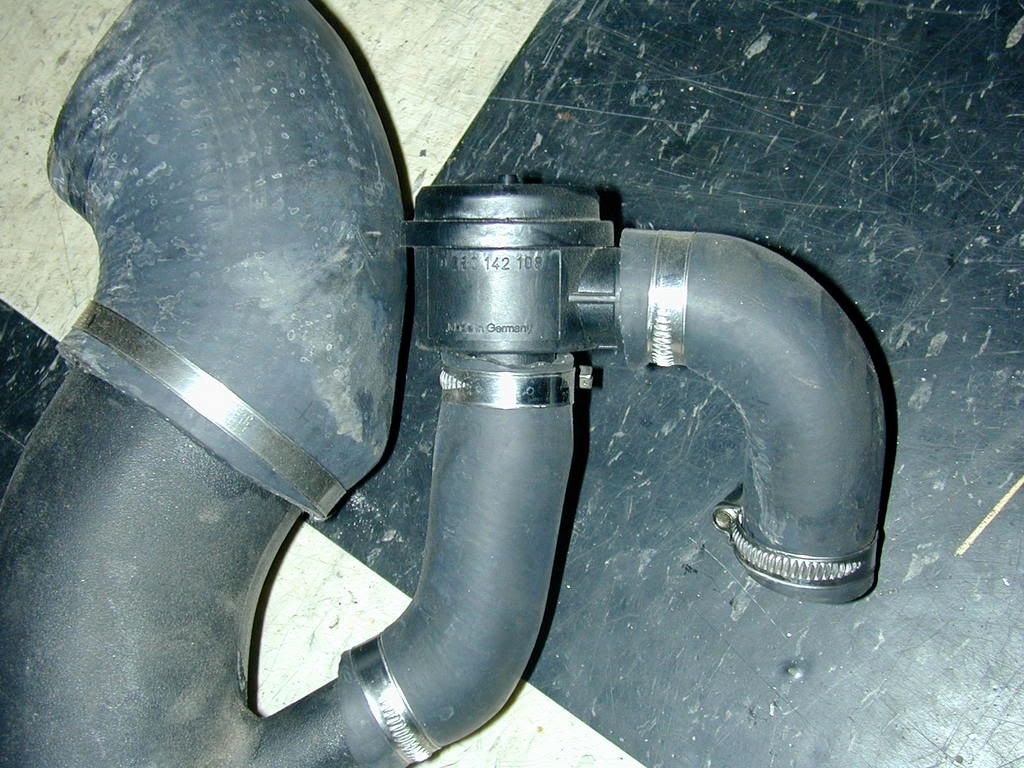
It fits betweent the boost tube and the intake pipe right above the charger. Just 2 rubber hoses and 2 clamps and it is on. No biggie. You have to run a vacuum line for the diverter valve. I got my source from the fpr Fuel Pressure Regulator. I used a vacuum T and some vacuum tubing, about 4.5feet. I just ran it across the motor and tied it to the throttle cable and attached it to the diverter valve.
This is just a photo of the cool new vaccumm line i used from the hardware store. It is silicone. Also a photo of the diverter valve on the intake pipe that goes into the charger.
Re-install the new headers with new gaskets
Things to mention
The charger was filled with oil already
I bought the kit used from one of our members. He has been a huge help and so has his mechanic.
I did this with only photos to go by
I left out alot of the trouble shooting of order to do all this in
12 hours total time.
I still have to send the computer out to get reflashed. I did start the car and it runs fine. I did not drive it... yet.... I will take it down the block tomorrow for a test. I was assured that I was able to drive it if I don't beat it or break 5k rpm.
Sorry for the long post, bad spelling, poor structure and whatever else is on your mind. 
Photos and Video soon
J
__________________
996 3.4 engine with 2.7 986 5speed transmission
Ebay Headers, Fabspeed high flow cats, JIC Cross, IPD Plenum, H&R Coilovers, B&M Short Shifter, AEM Uego Gauge Type Analog, Apexi S-AFC Select, 987 air box, Litronics, 2000 Tails and side markers, painted center console, 18" 987 S-Wheels, GT3 Front bumper with splitter.
|

|

|
 08-22-2007, 01:40 PM
|
#10
|
|
Registered User
Join Date: Jul 2004
Location: Houston, Texas
Posts: 7,243
|
Thanks for all this work! I'm more anxious than ever to have a SC or Turbo on my 2.5 now.
So let me get this straight... the kit was not complete, right? Was this a missing piece from the previous owner, or was it a missing piece from the manufacturer (IA)?
|

|

|
 08-22-2007, 02:08 PM
|
#11
|
|
Registered User
Join Date: Dec 2006
Location: shoreham, ny
Posts: 1,619
|
The kit was a complete, I just had my own take on how things should fit. SO I had to take things into my own hands.
__________________
996 3.4 engine with 2.7 986 5speed transmission
Ebay Headers, Fabspeed high flow cats, JIC Cross, IPD Plenum, H&R Coilovers, B&M Short Shifter, AEM Uego Gauge Type Analog, Apexi S-AFC Select, 987 air box, Litronics, 2000 Tails and side markers, painted center console, 18" 987 S-Wheels, GT3 Front bumper with splitter.
|

|

|
 08-23-2007, 09:42 AM
|
#12
|
|
Registered User
Join Date: Sep 2006
Location: chicago
Posts: 3,510
|
how much does it cost to get the computer re flashed?
__________________
http://i34.tinypic.com/157yslk.jpg
"I couldn't find the sports car of my dreams, so I built it myself." ~F. Porsche
Gemballa springs::litronics::Eurotech 18s(275/225)::B&M::MOMO wheel::
exhaust cutouts::EVOcoldair intake::OEM smoked tails & sidemarkers::
colormatched bumperettes::Top Speed Pro-1 exhaust::
my cardomain/pictures page
|

|

|
 08-23-2007, 01:19 PM
|
#13
|
|
Registered User
Join Date: Dec 2006
Location: shoreham, ny
Posts: 1,619
|
I don't know the real price. I am having someone do it that I just cant mention. He is hooking me up pretty nicely.
__________________
996 3.4 engine with 2.7 986 5speed transmission
Ebay Headers, Fabspeed high flow cats, JIC Cross, IPD Plenum, H&R Coilovers, B&M Short Shifter, AEM Uego Gauge Type Analog, Apexi S-AFC Select, 987 air box, Litronics, 2000 Tails and side markers, painted center console, 18" 987 S-Wheels, GT3 Front bumper with splitter.
|

|

|
 08-24-2007, 01:44 AM
|
#14
|
|
Registered User
Join Date: Feb 2007
Location: Australia
Posts: 220
|
Awesome
Fantastic write up thanks. Looking forward to hearing how it goes. Do you have any more pics or vid yet?
|

|

|
 08-24-2007, 06:43 AM
|
#15
|
|
Registered User
Join Date: Sep 2005
Location: Sacramento
Posts: 3,417
|
How was the build quality of the Turbowerx headers compared to the S-Car-Go headers?
__________________
-99' Zenith Blue 5-spd...didn't agree with a center divider on the freeway
-01' S Orient Red Metallic 6-spd...money pit...sold to buy a house 
|

|

|
 08-24-2007, 07:30 AM
|
#16
|
|
Registered User
Join Date: Dec 2006
Location: shoreham, ny
Posts: 1,619
|
I would say it is the same if not better. They are really a nice piece. I am going to be selling my s-car-go headers. I am accepting offers on them. 
__________________
996 3.4 engine with 2.7 986 5speed transmission
Ebay Headers, Fabspeed high flow cats, JIC Cross, IPD Plenum, H&R Coilovers, B&M Short Shifter, AEM Uego Gauge Type Analog, Apexi S-AFC Select, 987 air box, Litronics, 2000 Tails and side markers, painted center console, 18" 987 S-Wheels, GT3 Front bumper with splitter.
|

|

|
 08-24-2007, 07:43 AM
|
#17
|
|
Registered User
Join Date: Sep 2005
Location: Sacramento
Posts: 3,417
|
Do you happen to have side-by-side pics of the who headers?
__________________
-99' Zenith Blue 5-spd...didn't agree with a center divider on the freeway
-01' S Orient Red Metallic 6-spd...money pit...sold to buy a house 
|

|

|
 08-24-2007, 12:31 PM
|
#18
|
|
Registered User
Join Date: Dec 2006
Location: shoreham, ny
Posts: 1,619
|

They are both the same length the photo just gives that illusion. s-car-go on the left.
__________________
996 3.4 engine with 2.7 986 5speed transmission
Ebay Headers, Fabspeed high flow cats, JIC Cross, IPD Plenum, H&R Coilovers, B&M Short Shifter, AEM Uego Gauge Type Analog, Apexi S-AFC Select, 987 air box, Litronics, 2000 Tails and side markers, painted center console, 18" 987 S-Wheels, GT3 Front bumper with splitter.
|

|

|
 08-25-2007, 02:07 PM
|
#19
|
|
Registered User
Join Date: Sep 2006
Location: new jersey
Posts: 404
|
how much would the install be you think for the supercharger and flashing of the ecu?
|

|

|
 08-25-2007, 03:59 PM
|
#20
|
|
Registered User
Join Date: Jul 2006
Location: Shawnee, KS
Posts: 159
|
Imagine Auto charges 15 hrs. labor at $100 an hr. I think.
|

|

|
 Posting Rules
|
You may not post new threads
You may not post replies
You may not post attachments
You may not edit your posts
HTML code is On
|
|
|
All times are GMT -8. The time now is 05:53 PM.
| |