Go Back   986 Forum - The Community for Porsche Boxster & Cayman Owners > Porsche Boxster & Cayman Forums > DIY Project Guides

Post Reply
 
LinkBack Thread Tools Display Modes
Old 04-15-2014, 10:39 AM   #1
Registered User
 
Benjamin's Avatar
 
Join Date: May 2012
Location: Kalamazoo, MI
Posts: 149
Garage
Direct Oil Feed Installation

Over the course of the last two weekends I installed the Direct Oil Feed system and I thought I would show some pictures about how it's done and a few tips that the instructions didn't cover.

Removing the transaxle, clutch, and flywheel have been documented, so I won't cover that here. I will say that it is well worth the time to remove the rear bumper cover and aluminium bumper bar, as well as the secondary cats. It makes life so much easier when working under the car on jack stands.

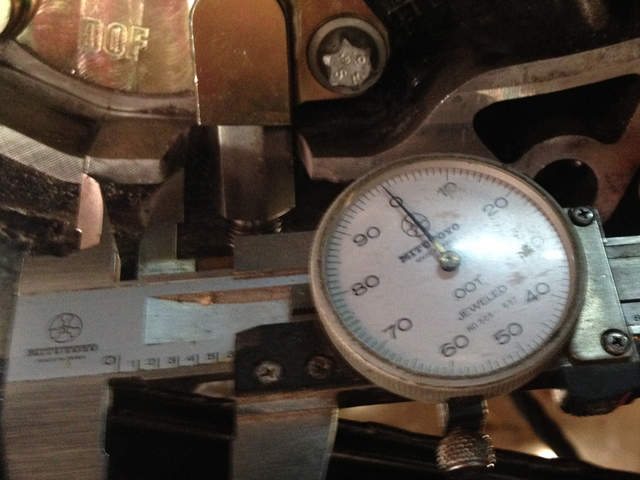
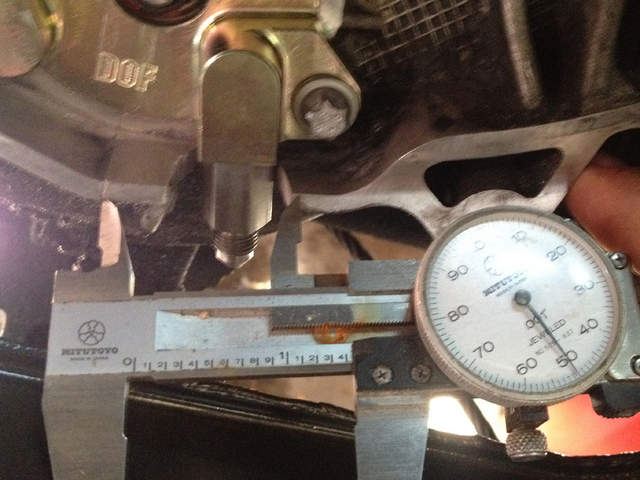
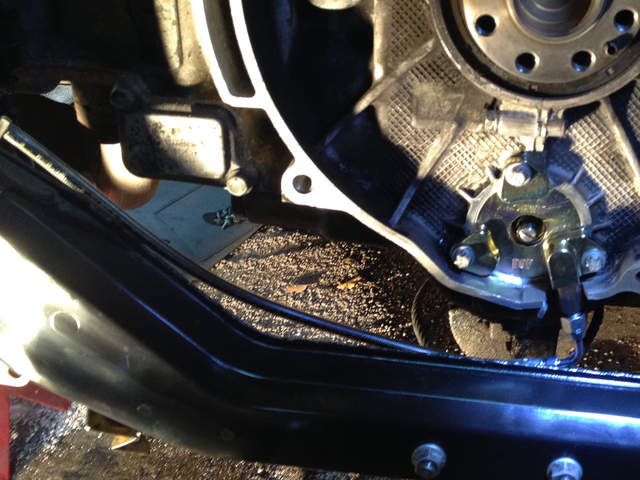
Before removing the IMS bearing flange, you want to mark out and cut the lip of the engine case to accommodate the oil line fitting. The instructions say to to make two lines from the mold mark on the engine case, 13mm and 33mm away. Those distances didn't work for me. More suitable numbers (in my case, anyway) turned out to be .6" and 1.45" (about 15mm and 37mm). The instructions also say "You can cut all the way through the bell housing nerve up to but not into the engine case." I don't know exactly what that means, but you should cut up until you are flush with this surface:


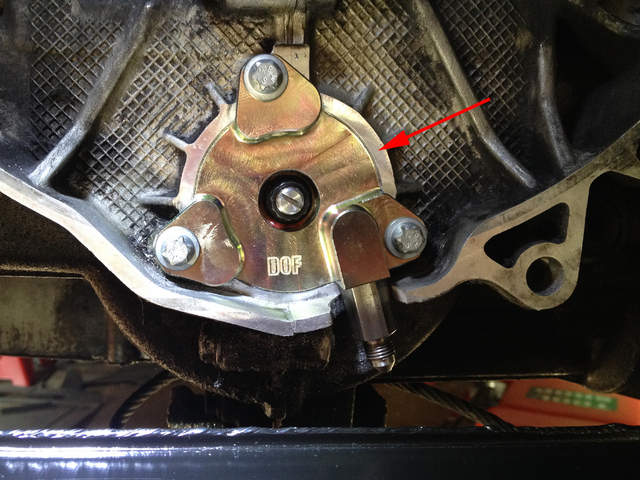
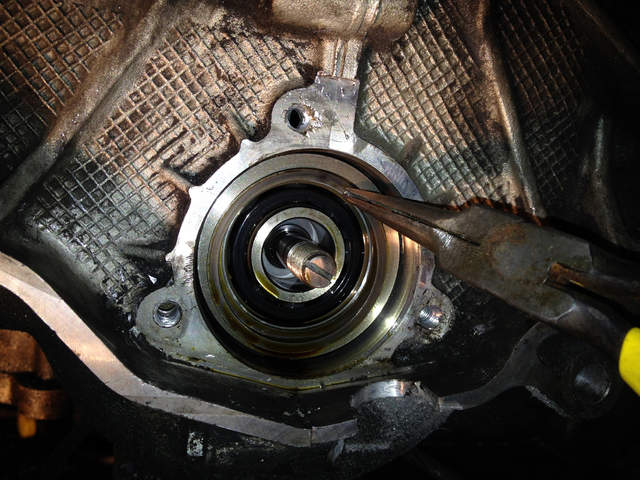
These pictures are after the new flange had been installed:


The instructions tell you to first remove the existing IMS bearing flange and then remove the rear IMS to cam tensioner. I feel that this is wrong and will only lead to a more difficult time removing the flange because of the added side load. I emailed the manufacturer, but never got a response.

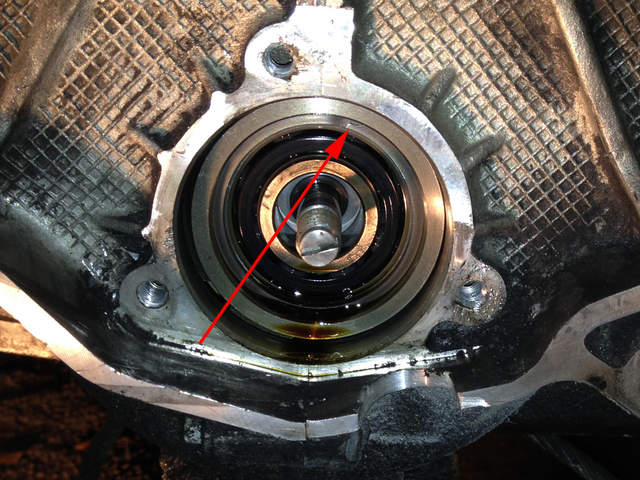
Here the previous IMS flange has been removed. In all of the directions I have read, it states that the spiral clip retainer will collapse inward when you pull on the bearing with the removal tool. I found that I could simply grab the end of the clip with needle nose pliers and "unspiral" it.


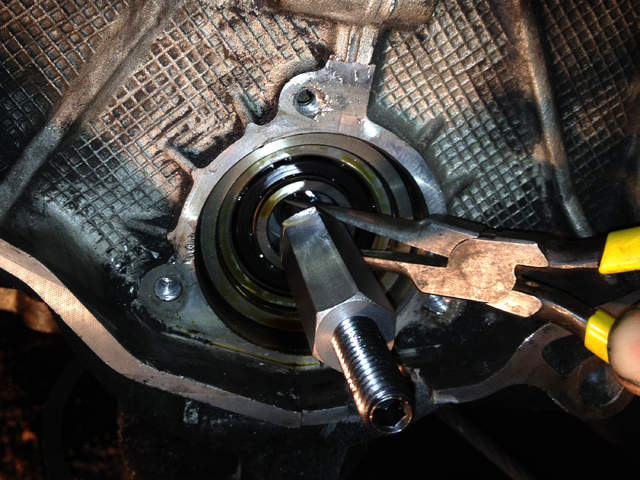
Next you have to thread the hex shaft onto the bearing stud. I found that the needle nose pliers also worked for keeping the stud from rotation while screwing the shaft on.


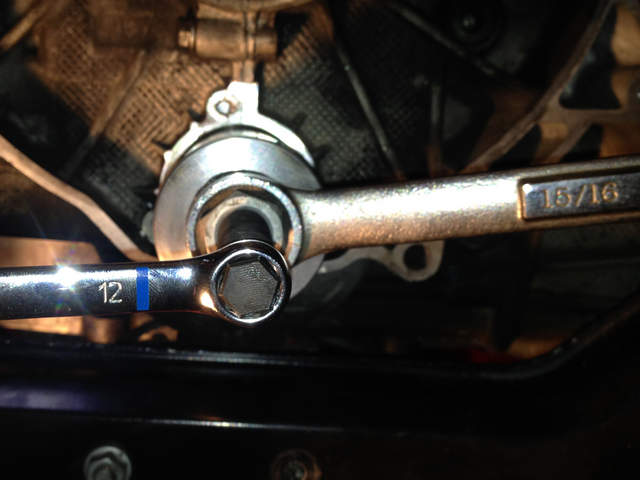
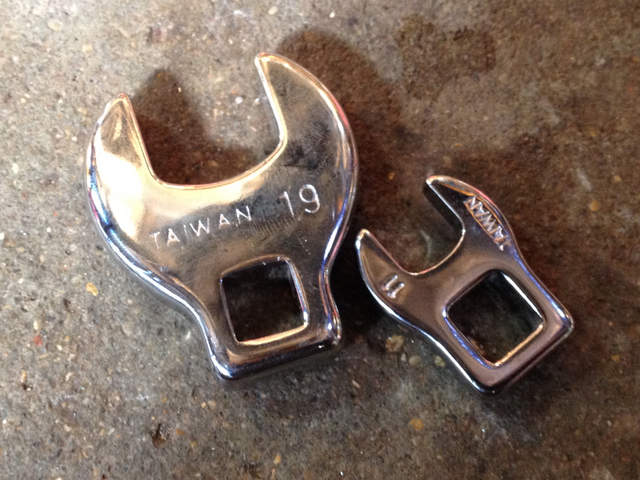
Here are the wrench sizes. The larger diameter is supposed to be 24mm, but I don't have one. A 15/16" 6-point wrench works just fine (and also works for rotating the engine from the pulley side when aligning TDC).


The instructions also make no mention of putting the bearing and install tool in the freezer before installation, but I did. Next install the bearing and flange according to the instructions.

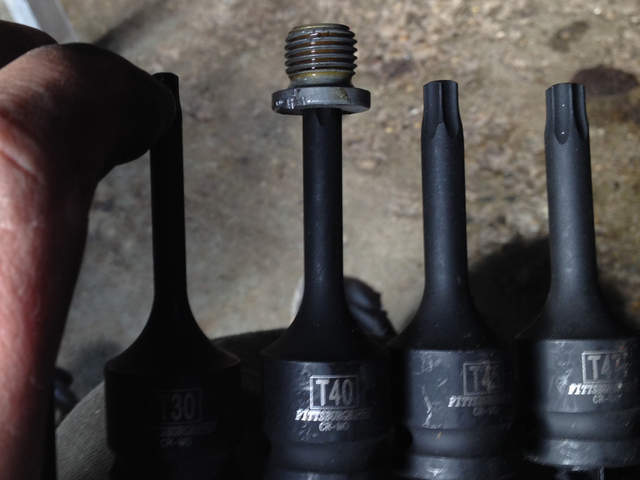
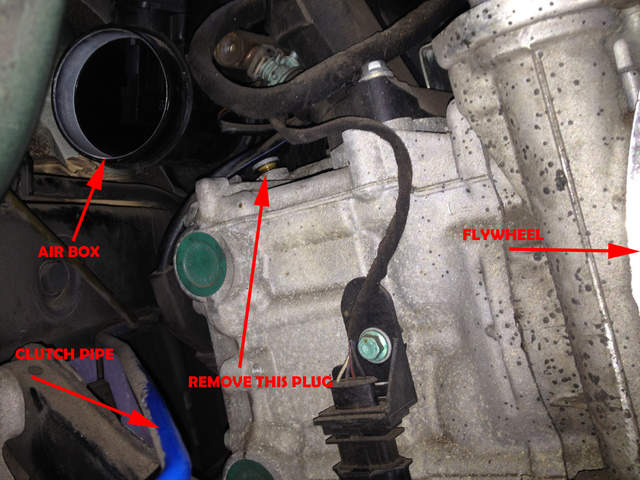
Now you have to open up a plug where the new oil feed will be coming from. It took my probably 5 minutes of searching to find the plug they were referring to, and it's not the easiest to get at because the air box and fuel rail are partly in the way. Not to mention your car is probably up on jack stands, so you need a ladder or something to stand on in order to see and reach the plug. The instructions show an allen wrench going into the plug for removal. This was NOT the case for my engine (2000 3.2). It turns out to be a T40 Torx.


I discovered this once I had already stripped the end of it out with an allen wrench. I ended up removing it with a pair of robo-grips, but pliers or channel locks, or vice grips would have worked as well. They are aluminium and not torqued down very hard, so it didn't take much robo-gripping.


Here is the plug, as seen from underneath the car, facing the flywheel:


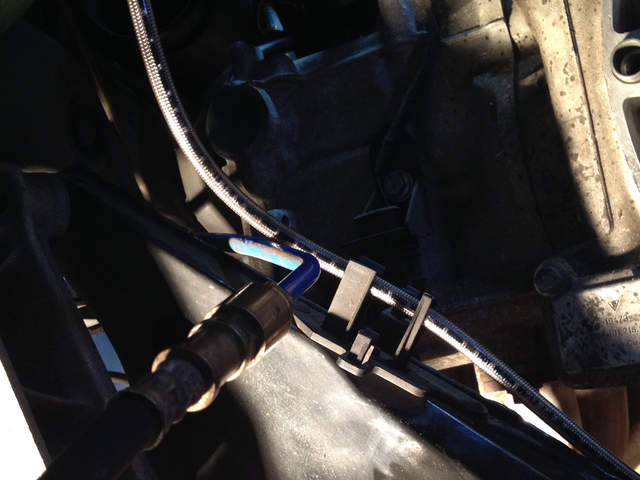
Installation of the new aluminium adapter and oil hose require two crowfoot wrenches, 19mm for the adapter and 11mm for the nut at the end of the hose:


__________________
2000 986 S - "The Black Widow"
Benjamin is offline   Reply With Quote
Old 04-15-2014, 10:43 AM   #2
Registered User
 
Benjamin's Avatar
 
Join Date: May 2012
Location: Kalamazoo, MI
Posts: 149
Garage
It's a good idea to route the hose above both ends of the engine safety strap:


I don't know what these black plastic clips are supposed to be used for, but they ended up working great to hold the hose:


The hose is plenty long enough to clear the air pipe, so re-installing is not a problem.

Then reinstall the flywheel, clutch, transaxle, etc. Hopefully this helps someone that is attempting this project or researching it.

Benjamin
__________________
2000 986 S - "The Black Widow"
Benjamin is offline   Reply With Quote
Old 04-15-2014, 03:15 PM   #3
Registered User
 
BYprodriver's Avatar
 
Join Date: Oct 2008
Location: O.C. CA
Posts: 3,709
Garage
Nice writeup & pic's! FYI the oe cam cover plug is a 5mm allen so yours has been removed before.
__________________
OE engine rebuilt,3.6 litre LN Engineering billet sleeves,triple row IMSB,LN rods. Deep sump oil pan with DT40 oil.
BYprodriver is offline   Reply With Quote
Old 04-15-2014, 03:36 PM   #4
Registered User
 
Benjamin's Avatar
 
Join Date: May 2012
Location: Kalamazoo, MI
Posts: 149
Garage
Quote:
Originally Posted by BYprodriver View Post
Nice writeup & pic's! FYI the oe cam cover plug is a 5mm allen so yours has been removed before.
Thank you! The oil plug was the same way, but it would make sense that it has been replaced before. I can't think of a good reason to change the cam cover plug. It didn't have the appearance of a replaced part as far as dirt and patina, so if it was done it was a long time ago.
__________________
2000 986 S - "The Black Widow"
Benjamin is offline   Reply With Quote
Old 04-16-2014, 08:15 AM   #5
Engine Surgeon
 
Join Date: Aug 2008
Location: Cleveland GA USA
Posts: 2,425
Interesting extraction tool... Looks familiar, like something that was Raby developed.
__________________
Jake Raby/www.flat6innovations.com
IMS Solution/ Faultless Tool Inventor
US Patent 8,992,089 &
US Patent 9,416,697
Developer of The IMS Retrofit Procedure- M96/ M97 Specialist
Jake Raby is offline   Reply With Quote
Old 04-19-2014, 06:40 PM   #6
Registered User
 
Benjamin's Avatar
 
Join Date: May 2012
Location: Kalamazoo, MI
Posts: 149
Garage
It's not much of an update at this point, but a few people asked me to keep this thread updated as to how the DOF is working out. I finally had some time to button everything back up and got it back on 4 wheels last night. I took it out for a 20 mile shake down today and everything is working as expected. I don't notice any difference in how it acts or runs, but I wasn't expecting to. I was only brought to swear words twice during reassembly, once while trying to get the air intake tube reinstalled as there isn't really a good angle for getting at it, and the other time when trying to get the slave cylinder compressed and attempting to get the two holes lined up and the bolt started.

Unrelated to this thread, I also replaced the fuel filter and, if you have done one before, I'm sure you have also said to yourself "how much is IN there??" and "there's MORE??" I'm guessing that not only the filter drains, but the entire fuel rail system also drains. Also, it shifts much better now. I don't know if it is because the slave cylinder bolt was about a half a turn from falling out, because I changed to Swepco 201 instead of the cheapo stuff that the PO had put it, or a combination of the two. At any rate, I'm really happy after day 1 back on the road. I will keep this updated if any new info comes up.

Benjamin
__________________
2000 986 S - "The Black Widow"
Benjamin is offline   Reply With Quote
Old 05-07-2014, 01:02 PM   #7
Registered User
 
Join Date: May 2014
Location: S.California
Posts: 2,027
Hybrid DOF system -easier install

Benjamin,
You helpfully mentioned some difficulty with the oil feed plug location for your DOF project and I have a question/suggestion.
You said:
"It took my probably 5 minutes of searching to find the plug they were referring to, and it's not the easiest to get at because the air box and fuel rail are partly in the way. Not to mention your car is probably up on jack stands, so you need a ladder or something to stand on in order to see and reach the plug. The instructions show an allen wrench going into the plug for removal. This was NOT the case for my engine (2000 3.2). It turns out to be a T40 Torx". /5mm hex?
Suggestion:
Fit a sandwich plate and spin on filter. Take the oil supply from the sandwich plate.This isn't a new idea.It is commonly done for the oil feed to turbo retrofits.You can find a sandwich plate on EBay for less than $20.
Question:
Would this have been easier/better?
Gelbster is offline   Reply With Quote
Old 05-11-2014, 04:35 AM   #8
Registered User
 
Benjamin's Avatar
 
Join Date: May 2012
Location: Kalamazoo, MI
Posts: 149
Garage
It may be easier, but there are a few reasons I would probably choose against it for my situation. 1) there would be the additional cost of filter adapter as well as the oil line. The oil line included with the kit is much longer than you would need to go to the oil filter. Finding the right oil line might be difficult. (I suppose you could loop the oil line and tie it up somewhere.) 2) The oil coming out of an oil filter scavenge plate may or may not be filtered (depending on design) and has not gone through the oil cooler. I can't find where I read it, but I seem to recall that the oil will be around 25 degrees cooler pulling it from the prescribed location vs. from the filter. 3) I already have the LN spin on adapter and for what I paid, I don't want to put it on the shelf.

The IMS Solution does what you suggest and pulls filtered oil from a filter sandwich plate, and they don't seem to figure that cooling is a problem, and Charles is a very good engineer. Their bearing design is different, so oil temperature may be less of a concern for the LN Solution. I don't know for a fact that 25 degrees matters for the DOF kit, but it certainly can't hurt.
__________________
2000 986 S - "The Black Widow"
Benjamin is offline   Reply With Quote
Old 05-11-2014, 07:39 AM   #9
Registered User
 
Join Date: Feb 2005
Location: It's a kind of magic.....
Posts: 6,261
Quote:
Originally Posted by Benjamin View Post
It may be easier, but there are a few reasons I would probably choose against it for my situation. 1) there would be the additional cost of filter adapter as well as the oil line. The oil line included with the kit is much longer than you would need to go to the oil filter. Finding the right oil line might be difficult. (I suppose you could loop the oil line and tie it up somewhere.) 2) The oil coming out of an oil filter scavenge plate may or may not be filtered (depending on design) and has not gone through the oil cooler. I can't find where I read it, but I seem to recall that the oil will be around 25 degrees cooler pulling it from the prescribed location vs. from the filter. 3) I already have the LN spin on adapter and for what I paid, I don't want to put it on the shelf.

The IMS Solution does what you suggest and pulls filtered oil from a filter sandwich plate, and they don't seem to figure that cooling is a problem, and Charles is a very good engineer. Their bearing design is different, so oil temperature may be less of a concern for the LN Solution. I don't know for a fact that 25 degrees matters for the DOF kit, but it certainly can't hurt.
If you get the chance, you should check the actual oil temperature going to the IMS bearing on your setup vs. that of the Solution; you just might be surprised at what you find..................
__________________
Anything really new is invented only in one’s youth. Later, one becomes more experienced, more famous – and more stupid.” - Albert Einstein
JFP in PA is offline   Reply With Quote
Old 05-11-2014, 07:49 AM   #10
Registered User
 
Join Date: May 2014
Location: S.California
Posts: 2,027
The sandwich plate:
If you go on Summit or Jegs ,there is a large selection of sandwich plates for under $20.There is also a large assortment of adapters so you could still use the the LN size filter(actually a Chevrolet Sierra truck interchange size).
Thanks for doing your write up for the Forum.

Gelbster is offline   Reply With Quote
Post Reply


Thread Tools
Display Modes

Posting Rules
You may not post new threads
You may not post replies
You may not post attachments
You may not edit your posts

BB code is On
Smilies are On
[IMG] code is On
HTML code is On
Trackbacks are On
Pingbacks are On
Refbacks are On


All times are GMT -8. The time now is 06:24 AM.


Powered by vBulletin® Version 3.8.7
Copyright ©2000 - 2024, vBulletin Solutions, Inc.
Content Relevant URLs by vBSEO 3.6.0
Copyright 2024 Pelican Parts, LLC - Posts may be archived for display on the Pelican Parts Website -    DMCA Registered Agent Contact Page