 07-24-2016, 03:41 PM
|
#1
|
|
Registered User
Join Date: Oct 2012
Location: Wake Forest, NC
Posts: 867
|
Quote:
Originally Posted by Nine8Six

Have a spare set of headlights here with gunmetal Turismo w/ white angel eyes. That's what going in the car this summer!!! I'll take a few new pics & 4K vids with my new GH4... sure will make you regret your Nikon if not the headlights haha
|
Fred, you're killing me. 
__________________
2000 Boxster S, 6 speed, Sport Package, Litronics, LED tail lights, LNE IMS-B, OBC, Skybreaker wind deflector, Arctic Silver/Graphite Grey
|

|

|
|
08-01-2016, 10:36 AM
|
#2
|
|
Registered User
Join Date: Sep 2013
Location: Montreal, QC. (currently expat to Shanghai)
Posts: 3,249
|
GTCollection.com is ONLINE and finally accepting orders!
https://goo.gl/3m86om
You’ll find an intentionally “stripped” production version of the site for the first month. Reason for this is to tweak SEO (Search Engine Optimization). We will update the site will less relevant content weekly or as it gets indexed and crawled by the webbots eg. homepage fancies, BLOG, etc. To ensure the index sees some regular updated content and peak it up the ranking in <3 months (there, some SEO secret for ya all). The core material & content (the important stuff!) is LIVE however; products, listings, pics, account sign-up, order, mail tracking, etc, we have it all. Finally!
Shop with confidence
Server security: NGINX + HTTP/2 + TLS1.2. Many in the industry will agree that getting a A+ grade at SSL Labs is a great challenge. Ensuring trusted server-vs-client sessions is paramount for me and I’ve proved just that by hitting that ceiling. SSL Labs is the tool of choice to identify whether ecommerce/merchants really deserve hosting personal data. When I shop online, I always run the vendor’s domain at SSL Labs and if the rating ranks below A I simply change shop.
The physical location of the server & database is at Google Cloud (CGE-USA) and its SSD hard drive is encrypted using third party’s. Meaning even if the hard drive falls into the wrong hands, nobody can gain access to the data stored on the server without 2 (two) sets of private keys + a 128bit encryption password. Nothing, absolutely nothing is hosted in China. Public ports include only http(80), htps(443), MTA(25). And that’s it, nothing more than what’s needed.
The server is firewalled (+IDS) and only accessible using Strong VPN/SSH, again, with its own set of keys.
And that’s how it’s done. Enjoy!
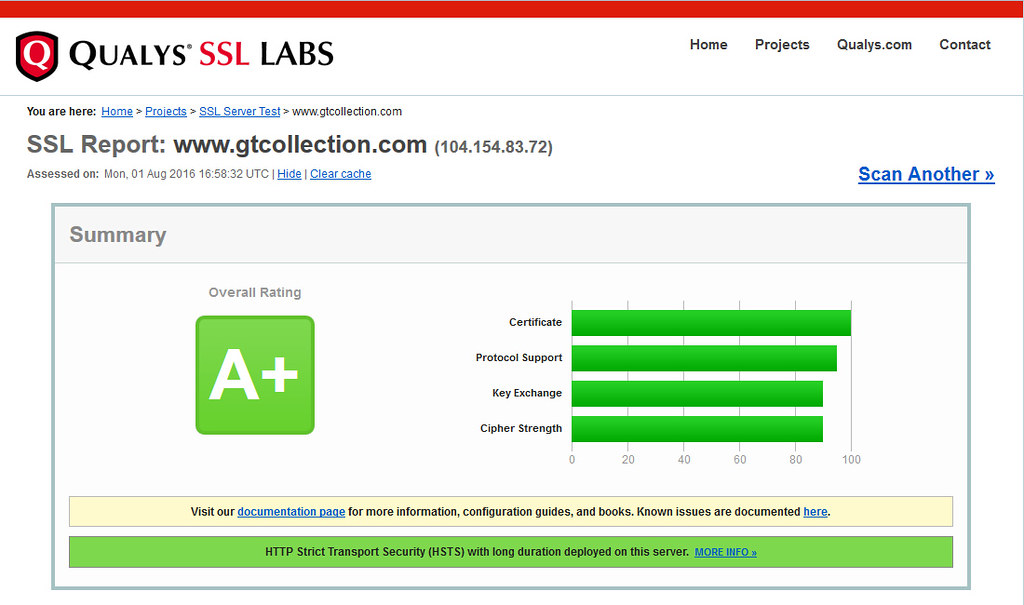
^ Test your sites: https://www.ssllabs.com/ssltest
__________________
______________________________
'97 Boxster base model 2.5L, Guards Red/Tan leather, with a new but old Alpine am/fm radio.
|
|
|
|
|
08-01-2016, 10:42 AM
|
#3
|
|
Registered User
Join Date: Jul 2011
Location: so cali
Posts: 302
|
VERY NICE. Gave me something to shoot for once we launch our website for our company ecommerce site. (not car related) Thanks for sharing, especially the SEO tip.
Quote:
Originally Posted by Nine8Six
https://goo.gl/3m86om
Youll find an intentionally stripped production version of the site for the first month. Reason for this is to tweak SEO (Search Engine Optimization). We will update the site will less relevant content weekly or as it gets indexed and crawled by the webbots eg. homepage fancies, BLOG, etc. To ensure the index sees some regular updated content and peak it up the ranking in <3 months (there, some SEO secret for ya all). The core material & content (the important stuff!) is LIVE however; products, listings, pics, account sign-up, order, mail tracking, etc, we have it all. Finally!
Shop with confidence
Server security: NGINX + HTTP/2 + TLS1.2. Many in the industry will agree that getting a A+ grade at SSL Labs is a great challenge. Ensuring trusted server-vs-client sessions is paramount for me and Ive proved just that by hitting that ceiling. SSL Labs is the tool of choice to identify whether ecommerce/merchants really deserve hosting personal data. When I shop online, I always run the vendors domain at SSL Labs and if the rating ranks below A I simply change shop.
The physical location of the server & database is at Google Cloud (CGE-USA) and its SSD hard drive is encrypted using third partys. Meaning even if the hard drive falls into the wrong hands, nobody can gain access to the data stored on the server without 2 (two) sets of private keys + a 128bit encryption password. Nothing, absolutely nothing is hosted in China. Public ports include only http(80), htps(443), MTA(25). And thats it, nothing more than whats needed.
The server is firewalled (+IDS) and only accessible using Strong VPN/SSH, again, with its own set of keys.
And thats how its done. Enjoy!
^ Test your sites: https://www.ssllabs.com/ssltest
|
__________________
2003 Boxster S
|
|
|
|
|
08-01-2016, 10:49 AM
|
#4
|
|
Registered User
Join Date: Sep 2013
Location: Montreal, QC. (currently expat to Shanghai)
Posts: 3,249
|
Those below are lurking on that same site. My advice, grab them while you can lollll Small qty, rare, never last very long 
Full custom however, club/sport crest, scripts, requests welcome!
 https://goo.gl/3m86om
Quote:
Originally Posted by ohhh my
VERY NICE. Gave me something to shoot for once we launch our website for our company ecommerce site. (not car related) Thanks for sharing, especially the SEO tip. |
Updating your images' ALT tags for a month is often just enough for the bots to pick up regular site updates (another million$ trick they don't tell you!). You want to trigger the engines' rank algorithm as much as you can, key to that is fresh content.
Without updates, the site just sits there really - AVOID during the first 3 months
__________________
______________________________
'97 Boxster base model 2.5L, Guards Red/Tan leather, with a new but old Alpine am/fm radio.
Last edited by Nine8Six; 08-01-2016 at 12:51 PM.
|
|
|
|
|
08-12-2016, 05:19 PM
|
#5
|
|
Registered User
Join Date: Jan 2014
Location: New Jersey
Posts: 1,631
|
I've ordered a kit and am going to take the plunge, but I have a few questions, some of which will be answered when the kit arrives. Looking at some of the pictures of finished conversions, it seems like some have chosen not to paint their reflector bowls or any other interior parts. Is that correct? I think I would prefer not to do any painting, but if everyone else has painted and that's the way it really looks good, I guess I will paint.
Reading the instructions, it looks like the hole for the high beam bulb just stays empty? Do I need to remove the ring that holds the high beam bulb in?
Looking at the instructions and the picture of the kit, there are wires from the projector bulb and angel eyes that go to the connectors for the old bulbs. Do those wires come with the kit, or do I need to buy those separately? If I need to buy wire, what size?
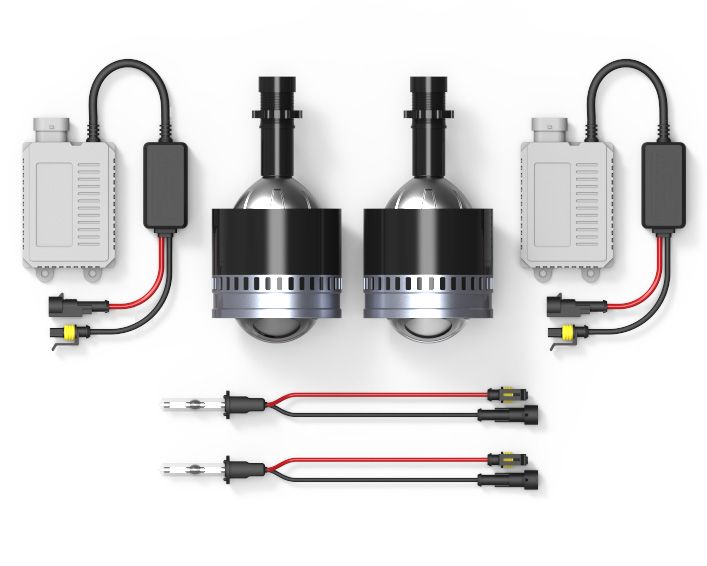
Are the extra wires on the diagram in the kit although they're not shown in the kit picture?
|
|
|
|
|
08-12-2016, 07:19 PM
|
#6
|
|
Registered User
Join Date: Sep 2013
Location: Montreal, QC. (currently expat to Shanghai)
Posts: 3,249
|
Hey Paul
1. You must paint the interior with satin black otherwise the car just won't start. Seriously; its your choice really. All of today's (modern) sport cars have them with black interiors hence the idea of painting them. That's what look best (x1,000) if you ask me, but not mandatory at all.
2. The high beam becomes obsolete with those bi-xenon optics, and so is the socket/hole for the bulb. It is safe to remove the bulb... the back sealed cover is sufficient to prevent dusts to enter the headlight assembly. The high beam connector's 12v is what triggers the bi-xenon solenoid cutoff plate!
3. You do not have to buy additional wires. Those are all included in the kit. They just don't show up on the rendering you've posted above (got lazy doing CAD cabling loll).
Shipping all 26 kits along with a few center caps this coming week!! Crazy I know (twenty-six kits).
Busy this weekend re-machining the small adapters that house the HID bulb in the back of the projector :/ I guess that's what happen when you get new machine-tools and German controllers. Those were initially threaded with a 1.25mm thread while the optic takes a 1mm thread. Crazy mistake... luckily those are quite easy to remake but regardless I have to throw out 180+ parts in the bin.
__________________
______________________________
'97 Boxster base model 2.5L, Guards Red/Tan leather, with a new but old Alpine am/fm radio.
|
|
|
|
|
08-12-2016, 07:52 PM
|
#7
|
|
Registered User
Join Date: Sep 2013
Location: Montreal, QC. (currently expat to Shanghai)
Posts: 3,249
|
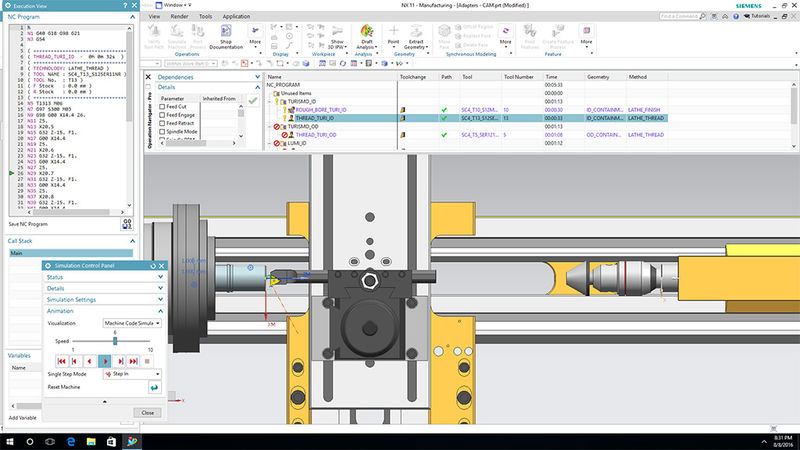
^ Re-doing those little adapters on the benchtop lathe this time. One-by-one, just got 52 to do lolll Not the fastest (time: 2m40s/adapter) but at least I know that this controller will behave and thread those as per postprocessor. I'll sort out the production lathe's controller/threading cycle next week.
Life: How to screw up your Saturday night!
__________________
______________________________
'97 Boxster base model 2.5L, Guards Red/Tan leather, with a new but old Alpine am/fm radio.
|
|
|
|
|
08-13-2016, 03:43 PM
|
#8
|
|
Registered User
Join Date: Jan 2014
Location: New Jersey
Posts: 1,631
|
Thanks!
Quote:
Originally Posted by Nine8Six
Hey Paul
1. You must paint the interior with satin black otherwise the car just won't start. Seriously; its your choice really. All of today's (modern) sport cars have them with black interiors hence the idea of painting them. That's what look best (x1,000) if you ask me, but not mandatory at all.
2. The high beam becomes obsolete with those bi-xenon optics, and so is the socket/hole for the bulb. It is safe to remove the bulb... the back sealed cover is sufficient to prevent dusts to enter the headlight assembly. The high beam connector's 12v is what triggers the bi-xenon solenoid cutoff plate!
3. You do not have to buy additional wires. Those are all included in the kit. They just don't show up on the rendering you've posted above (got lazy doing CAD cabling loll).
Shipping all 26 kits along with a few center caps this coming week!! Crazy I know (twenty-six kits).
Busy this weekend re-machining the small adapters that house the HID bulb in the back of the projector :/ I guess that's what happen when you get new machine-tools and German controllers. Those were initially threaded with a 1.25mm thread while the optic takes a 1mm thread. Crazy mistake... luckily those are quite easy to remake but regardless I have to throw out 180+ parts in the bin.
|
Thanks for the info Fred, this is going to be a winter project for me. It will give me some time to think about the paint!
|
|
|
|
|
08-27-2016, 03:18 PM
|
#9
|
|
Registered User
Join Date: Dec 2013
Location: Dahlonega , Georgia
Posts: 1,364
|
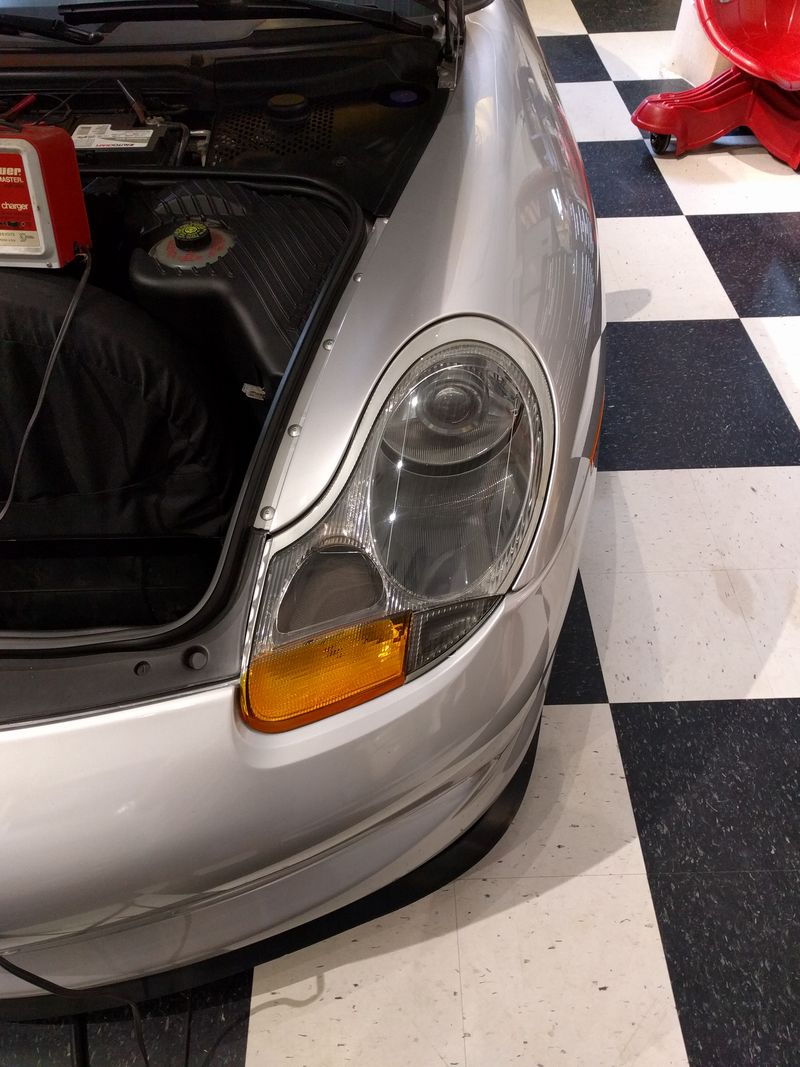
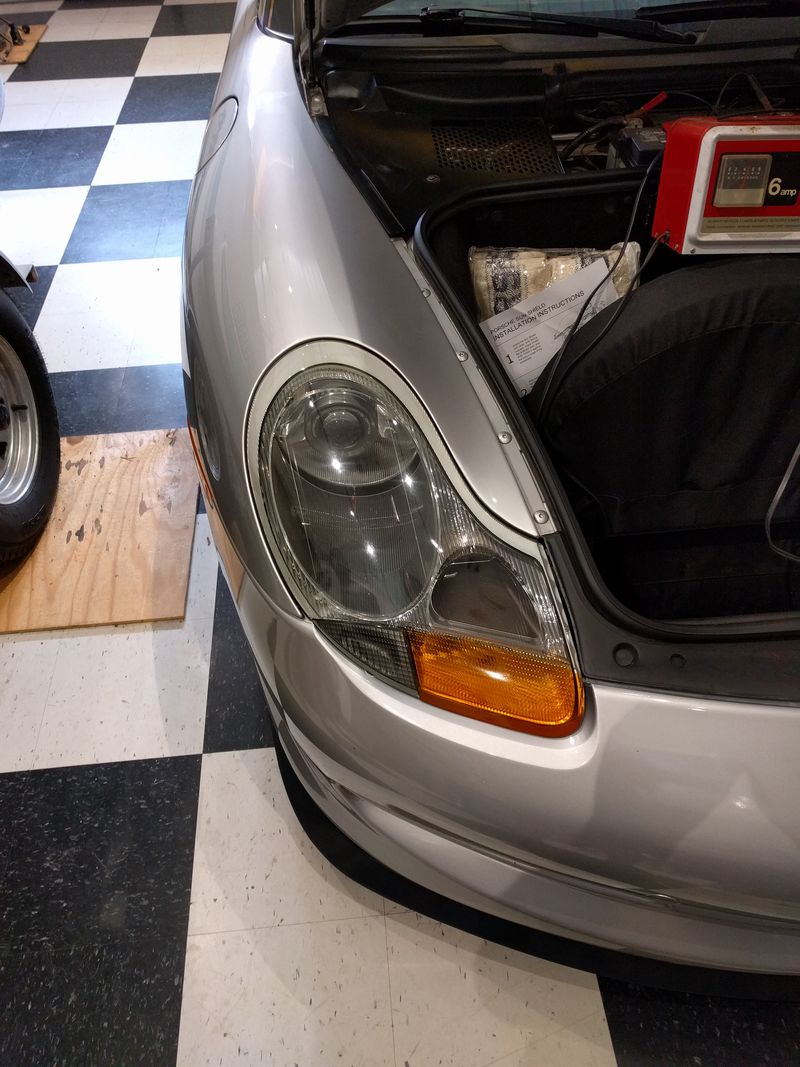
Today I finally installed the headlights I purchased 2 years ago ! How time flies when you are busy . Anyway I picked up some seals locally and treated them with a good coating of Vinylex before installing . Installed the seals and started the remove/replace sequence. It was surprisingly easy and no drama to report . I started the car, started going through the various light checks and the damn things worked  I did have a slight rattle in one light but after looking the light over one of the sockets had come unseated. Gently pulled/prodded until I felt it pop into place. I went with no angel eyes and kept the amber interior lense but went with grey/smoke outer lense. I think it looks great .
If these pics work out they are some crappy pics I took inside the man cave today.
__________________
2002 Boxster S Arctic Silver with black top with glass window and black leather interior. Jake Raby 3.6 SS ( the beast ) with IMS Solution. 996 GT3 front bumper , GT3 rocker covers and GT3TEK rear diffuser and Joe Toth composites rear ducktail spoiler .
|

|
|
|
08-27-2016, 03:20 PM
|
#10
|
|
Registered User
Join Date: Dec 2013
Location: Dahlonega , Georgia
Posts: 1,364
|
__________________
2002 Boxster S Arctic Silver with black top with glass window and black leather interior. Jake Raby 3.6 SS ( the beast ) with IMS Solution. 996 GT3 front bumper , GT3 rocker covers and GT3TEK rear diffuser and Joe Toth composites rear ducktail spoiler .
|
|
|
|
|
08-12-2016, 10:44 PM
|
#11
|
|
Registered User
Join Date: Jun 2012
Location: Bedford, TX
Posts: 2,755
|
Mine are not painted and love the way they turned out. Really a personal preference. Take a look through the thread to see what you like best 
__________________
______________________________________________
2001 Boxster S Lapis Blue
TS Cat Bypass Pipes and exhaust
iPad Mini Dash Install
DEPO Tail Lights
|
|
|
|
|
08-13-2016, 04:36 AM
|
#12
|
|
Registered User
Join Date: Nov 2008
Location: Florida
Posts: 1,111
|
That is a beautiful website, Fred.
|
|
|
|
|
08-25-2016, 10:20 AM
|
#13
|
|
Custom User Title Here
Join Date: Mar 2012
Location: Ft. Leonard Wood
Posts: 6,169
|
...................
|
|
|
|
|
08-27-2016, 06:04 AM
|
#14
|
|
Registered User
Join Date: Apr 2015
Location: Virginia Beach
Posts: 87
|
Blinking angel eye
https://youtu.be/TMVHdNleMHI
I've had the projectors installed for about 8 months now and one of the
Angel eyes is now blinking. I rewired everything on the
Back of the headlight and it is still blinking. Take a look at the video.
Any ideas? I really don't want to crack the lens open again.
__________________
'04 Boxster S - Basalt Black, Fabspeed exhaust and sport headers, UD pulley, Pedro's Bluetooth, 18" Cayman S wheels, Evo cold air intake, IPD plenum, 74mm TB, Ben's SSK with ICT shifter boot, Fabspeed ECU Tune.
|
|
|
|
|
08-27-2016, 09:07 AM
|
#15
|
|
Custom User Title Here
Join Date: Mar 2012
Location: Ft. Leonard Wood
Posts: 6,169
|
Quote:
Originally Posted by F18febe
https://youtu.be/TMVHdNleMHI
I've had the projectors installed for about 8 months now and one of the
Angel eyes is now blinking. I rewired everything on the
Back of the headlight and it is still blinking. Take a look at the video.
Any ideas? I really don't want to crack the lens open again.
|
Looks like it's failing. Unhook it for now (both) and I'll put together some tests for you to find out for sure.
|
|
|
|
|
08-27-2016, 10:58 AM
|
#16
|
|
Registered User
Join Date: Apr 2015
Location: Virginia Beach
Posts: 87
|
Thanks a bunch, PW.
__________________
'04 Boxster S - Basalt Black, Fabspeed exhaust and sport headers, UD pulley, Pedro's Bluetooth, 18" Cayman S wheels, Evo cold air intake, IPD plenum, 74mm TB, Ben's SSK with ICT shifter boot, Fabspeed ECU Tune.
|
|
|
|
|
08-27-2016, 07:30 AM
|
#17
|
|
Registered User
Join Date: Sep 2013
Location: CT
Posts: 19
|
I've been having some problems with these headlights firing up for a few months now. The problem is this, I start the car and then turn on the headlights. Sometimes they fire right up and gradually brighten but sometimes they don't fire up at all. Last night they fired up, warmed up and I started driving. I was on a back road and hit the high beams. The headlights turned off. Turning the headlight switch on and off didn't do anything. Pulling the high beam switch made a momentary flash but didn't turn the headlights on. I pulled to the side of the road and after fiddling with the switches including the high beam, the lights fired up and then worked perfectly for the drive home.
Any thoughts on what to look for?
__________________
2002 Boxster 986
|
|
|
|
|
08-27-2016, 09:03 AM
|
#18
|
|
Custom User Title Here
Join Date: Mar 2012
Location: Ft. Leonard Wood
Posts: 6,169
|
Quote:
Originally Posted by georgewd3
I've been having some problems with these headlights firing up for a few months now. The problem is this, I start the car and then turn on the headlights. Sometimes they fire right up and gradually brighten but sometimes they don't fire up at all. Last night they fired up, warmed up and I started driving. I was on a back road and hit the high beams. The headlights turned off. Turning the headlight switch on and off didn't do anything. Pulling the high beam switch made a momentary flash but didn't turn the headlights on. I pulled to the side of the road and after fiddling with the switches including the high beam, the lights fired up and then worked perfectly for the drive home.
Any thoughts on what to look for?
|
Pull the headlight switch and give it a good cleaning by spraying contact cleaner inside of it while switching it back and forth.
|
|
|
|
|
08-27-2016, 11:29 AM
|
#19
|
|
Custom User Title Here
Join Date: Mar 2012
Location: Ft. Leonard Wood
Posts: 6,169
|
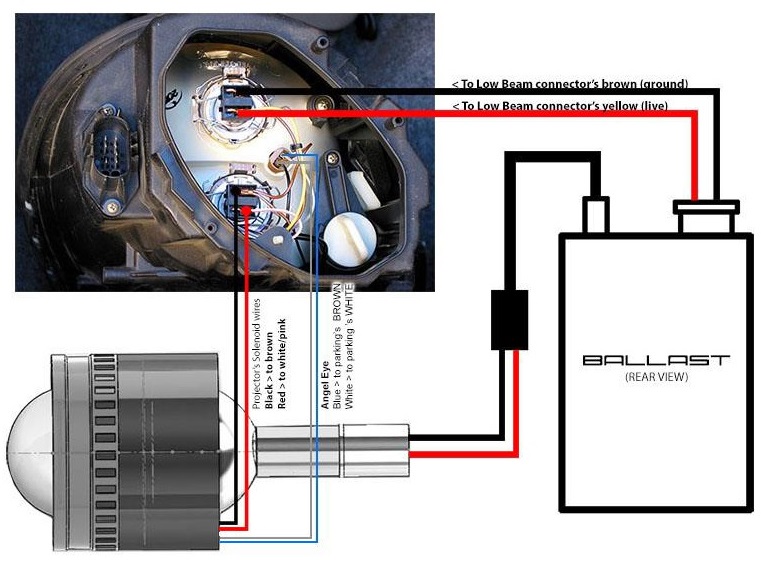
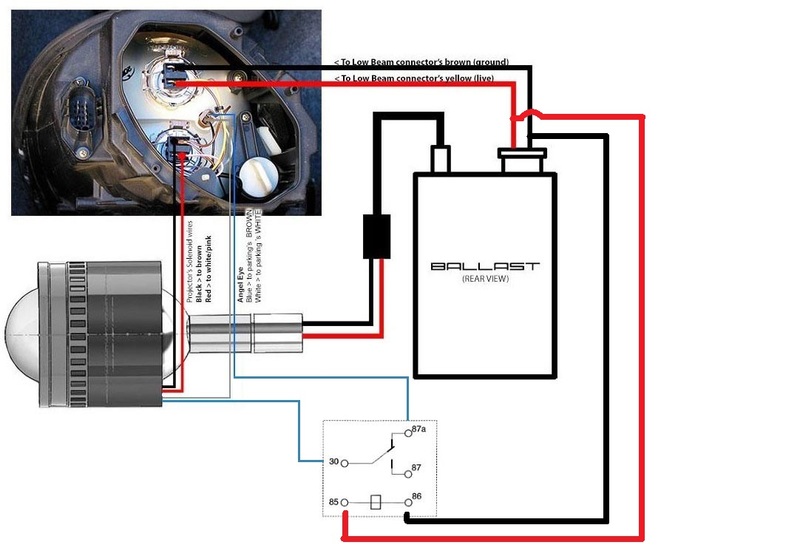
FYI for all that have these installed or plan to install
LEDs don't like heat. The LED angel eye halos are inside of the projector unit with the HID bulb, so you really don't want them powered on while the HIDs are on.
It is wise to put them on a relay so that they are off when the HIDs are on. This will greatly extend their life and prevent premature failure. Wiring shown below...
|
|
|
|
|
08-29-2016, 08:47 AM
|
#20
|
|
Registered User
Join Date: Jan 2014
Location: New Jersey
Posts: 1,631
|
Can you tell us what relay?
I'm waiting for my kit and the relay looks like a good idea. Can you tell us what relay to use? Also, the wiring diagram pictures show the interior/back of the headlight with the stock bulbs in place. Does anyone have any pictures of the wiring with the actual projector lights in place and showing where/how to mount the relay? Thanks!
Quote:
Originally Posted by particlewave
LEDs don't like heat. The LED angel eye halos are inside of the projector unit with the HID bulb, so you really don't want them powered on while the HIDs are on.
It is wise to put them on a relay so that they are off when the HIDs are on. This will greatly extend their life and prevent premature failure. Wiring shown below...
|
|
|
|
|
 Posting Rules
|
You may not post new threads
You may not post replies
You may not post attachments
You may not edit your posts
HTML code is On
|
|
|
All times are GMT -8. The time now is 03:36 PM.
| |


 Boxster S
 Genesis 3.8
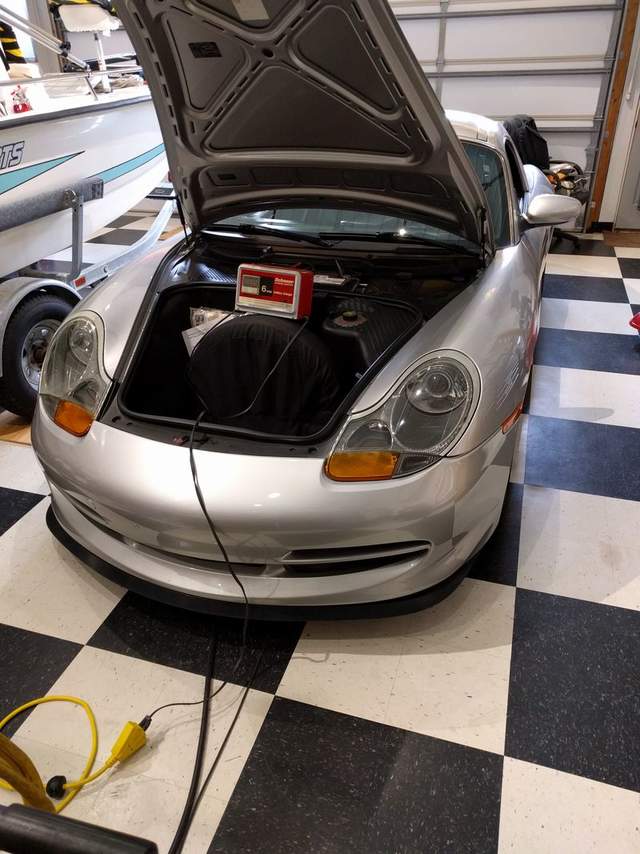
 2001 Boxster S
 Hybrid Mode


