 06-11-2024, 10:24 AM
|
#61
|
|
Registered User
Join Date: Apr 2023
Location: Oregon
Posts: 545
|
Quote:
Originally Posted by KevinH1990

|
Kevin, I just read your thread. My hat's off to you for figuring out the connections. I appreciate the info. It would have been an enormous help if I had decided to retain the power seat. But the manual seat adjustment works fine. Furthermore, time is a constraint. I'm planning to attend a get-together in July and I'd like to drive the 986, which leaves me about a month to finish the interior, and I'm not noted for speed.
__________________
2000 986 base
Arctic Silver/black
2.7 liter
5-speed manual
|

|

|
|
06-11-2024, 11:30 PM
|
#62
|
|
Registered User
Join Date: Apr 2023
Location: Oregon
Posts: 545
|
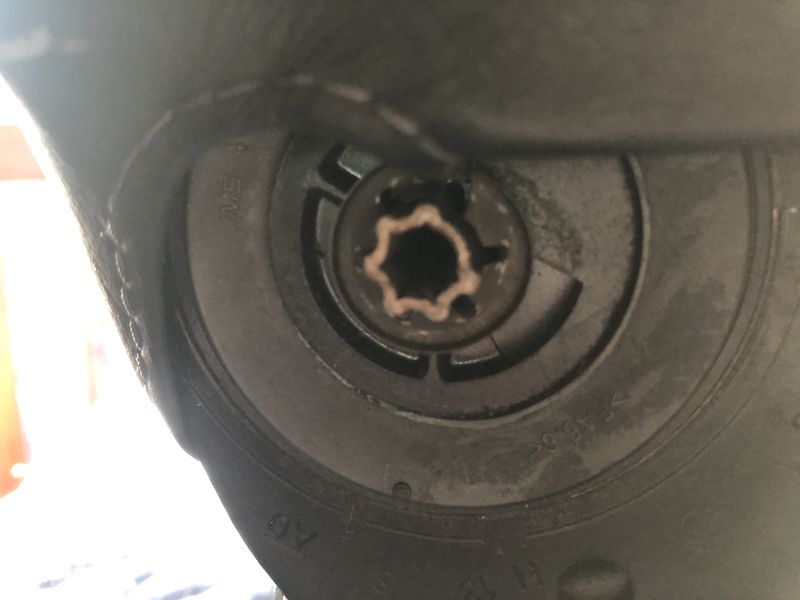
I'm disassembling the seat, switching out the base, from 8-way powered to 2-way/manual, and I'm also preparing to install the heater pads from the original seat. I'd like to separate the back frame from the seat base at the hinge. However, it seems Porsche, in their infinite wisdom, saw fit to use a bolt with a head that's kind of a modified Torx, about an E14, although it foiled the E14 socket in my set, which jumps from E14 to E16, no E15. (Could it be an E15?) At this point it's obvious I need to consult with someone who has successfully separated the seat frame at the hinge.Or maybe it's a bad idea, and the nonstandard bolt's purpose is to discourage home garage mechanics.
__________________
2000 986 base
Arctic Silver/black
2.7 liter
5-speed manual
Last edited by LoneWolfGal; 06-12-2024 at 07:59 PM.
|
|
|
|
|
06-12-2024, 05:58 PM
|
#63
|
|
Registered User
Join Date: Apr 2023
Location: Oregon
Posts: 545
|
Since disassembly at the hinge has turned out to be a thrash, I'll cut the Gordian knot and simply swap the cushions themselves — i.e., install the new cushions, back and bottom, on the original seat's frame as well as the original seat's cushions on the new seat's frame. By the way, I bought a leather cleaner and conditioner kit by Chemical Guys, a brand with high marks, including for its scent. Seems many conditioners have an objectional odor, but Chemical Guys' product smells like leather. I'm going to clean and condition both seats to a fare-thee-well before I install — or rather, wrestle — them back in the car. I found Chemical Guys' how-to video informative:
https://www.chemicalguys.com/blogs/interior-how-tos/how-to-clean-and-protect-leather-car-seats
__________________
2000 986 base
Arctic Silver/black
2.7 liter
5-speed manual
Last edited by LoneWolfGal; 06-12-2024 at 07:51 PM.
|
|
|
|
|
06-14-2024, 12:34 PM
|
#64
|
|
Registered User
Join Date: Apr 2023
Location: Oregon
Posts: 545
|
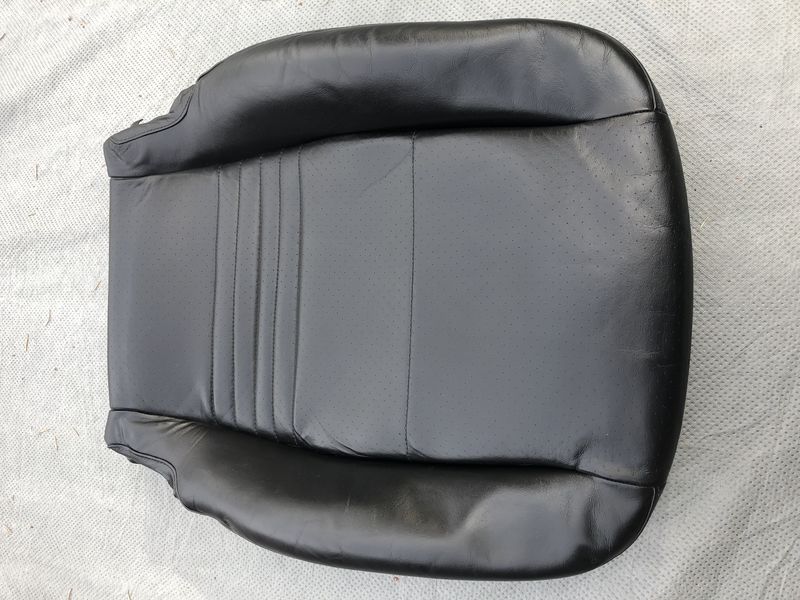
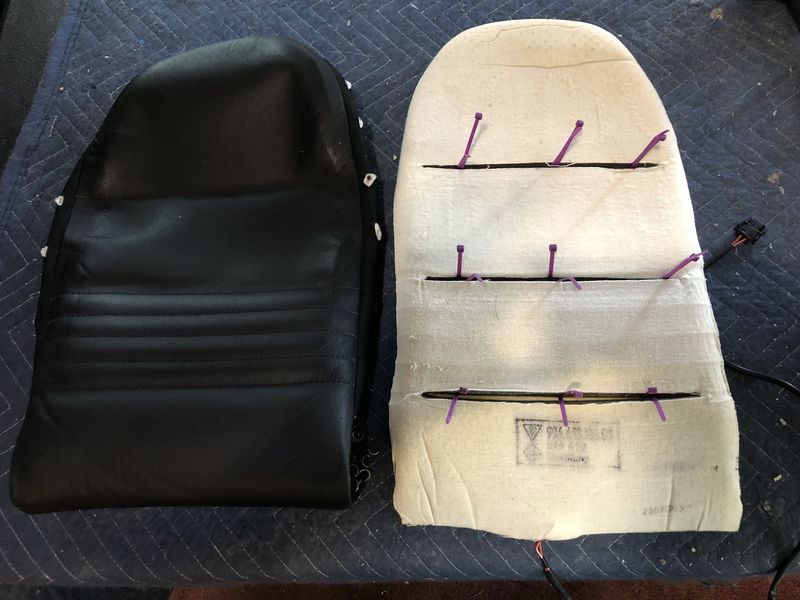
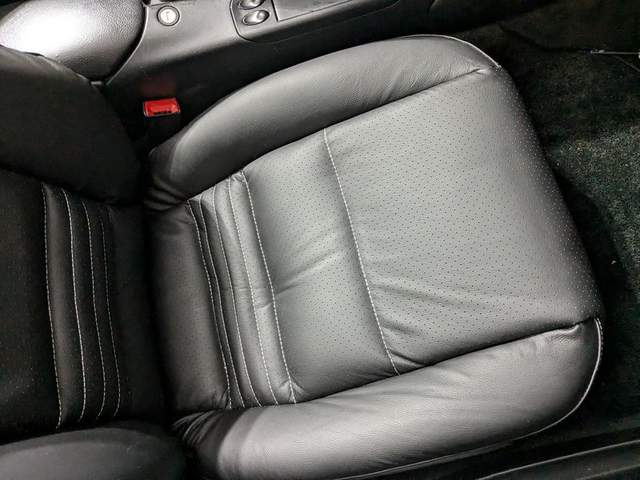
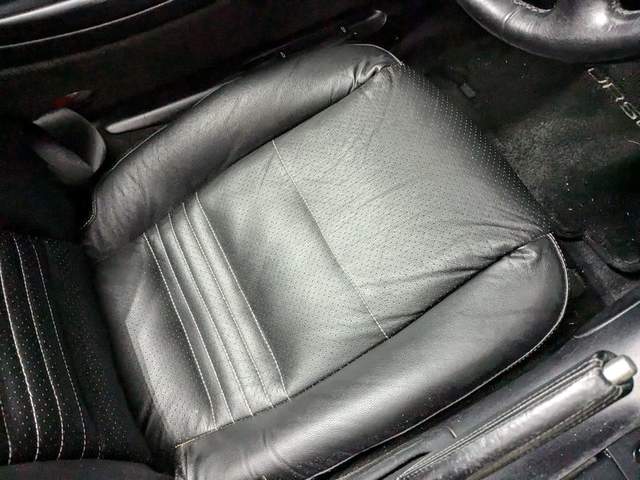
Before removing the leather from the cushions preparatory to installing the heater pads, I wanted to make sure it was soft and supple, so I hit it first with Chemical Guy's leather cleaner, followed by two applications of conditioner. The leather looked pretty good before but the difference is noticeable. Have a look at the bottom cover. (The leather has been detached from the the rigid plastic seat form underneath the foam, which is why it looks somewhat loose.)
__________________
2000 986 base
Arctic Silver/black
2.7 liter
5-speed manual
Last edited by LoneWolfGal; 06-14-2024 at 09:44 PM.
|
|
|
|
|
06-15-2024, 08:02 PM
|
#65
|
|
Registered User
Join Date: Apr 2023
Location: Oregon
Posts: 545
|
I intended to start a new thread documenting the conversion of my new seat from unheated to heated, but I think I'll just continue spewing in this one. There are plenty of videos and how-tos that show how to add a heat pad, although most use after-market products. My heat pad is OEM, out of the original drivers seat. Here's a look at it after I used spray adhesive to glue it in place on the foam seat cushion. Gluing is necessary. You don't want the pad moving around under the leather..
As you can see, I opted to go with nylon pull-ties instead of hog rings, the original method of attaching the leather to the seat cushion. I do have access to hog ring pliers and hog rings and I fully intended to use them. But after messing around with them a while I tossed them aside. My resistance to them might have something to do with what a thrash it was to remove the original hog rings. My wire cutters weren't up to the task, even though they had clipped other hog rings with no problem. Go figure. Maybe Porsche used titanium hog rings on this particular seat. I ended up using a Dremel with a metal-cutting blade instead. Pull-ties are much, much easier to deal with, You simply thread them around a wire rod at the bottom of the slit in the foam. You don't have to wrestle the foam aside and try to get hog ring pliers down there where it's hard to see what you're doing, while the leather itself fights you. You simply pull nylon loops tight. I have every confidence the pull-ties will last well into the next century. In 2124, when my 986's owner needs to replace the leather, it's a matter of merely snipping the nylon ties, no Dremel necessary.
I'm now in the process of finishing installation of the leather cover after securely zip-tying it to the foam cushion, which sits in a sculpted plastic seat base. The leather needs to be stretched around the bottom edge of the base and secured with a flexible plastic channel around the inside edge of the cover. The leather was pretty tight before I removed it. Adding a 3/8" thick heat pad to the cushion will make it even tighter. I'll need to stretch it considerably before I can secure it in place. I'm using clamps around the bottom edge to stretch it. From time to time I stretch it a little more and clamp it again. Tomorrow I'm going to try heat from a hair dryer to stretch it even more. I've also enlisted the help of a couple of manly volunteers who can compress the foam for me to give the leather yet more slack.
And I haven't even gotten to the seat back yet.
__________________
2000 986 base
Arctic Silver/black
2.7 liter
5-speed manual
Last edited by LoneWolfGal; 06-18-2024 at 10:45 PM.
|
|
|
|
|
06-17-2024, 05:32 PM
|
#66
|
|
Registered User
Join Date: Apr 2023
Location: Oregon
Posts: 545
|
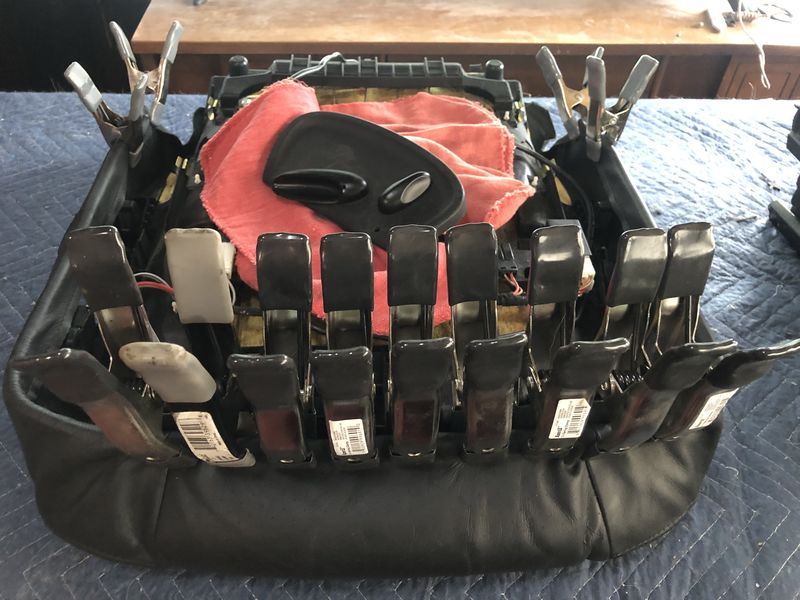
The clamp method, I'm happy to report, is a rousing success. Here's the technique I used. I first seated the leather cover's plastic channel at one spot on the base's edge and secured it with a beefy clamp. Then ten or fifteen minutes later I added another clamp about an inch further down. And then another an inch down from the last one. I proceeded in that manner all the way around the base's edge. A clamp can exert far more continuous force than any human hand. You can let them squeeze all night, which is what I did to make the progress you see here. Only one stipulation: You gotta have a lot of clamps, which might involve a trip to Home Depot or Harbor Freight. You can pick them up for a buck or two apiece. You'll want at least a dozen. I had 13 on hand.
This seat has eclampsia. The front was especially stubborn, so I'm going to let the clamps stabilize it overnight.
__________________
2000 986 base
Arctic Silver/black
2.7 liter
5-speed manual
Last edited by LoneWolfGal; 06-17-2024 at 06:35 PM.
|
|
|
|
|
06-22-2024, 02:57 PM
|
#67
|
|
Registered User
Join Date: Apr 2023
Location: Oregon
Posts: 545
|
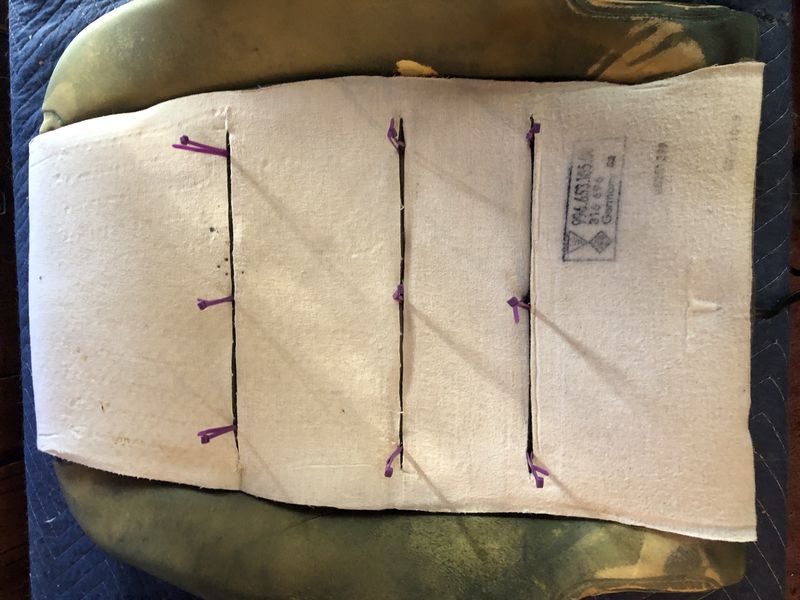
Compared to the seat bottom, adding the heat pad to the back insert was a piece of cake. I found the holes used by the hog rings were too small to fit the pull-ties through, so it was necessary to drill 1/8" holes in the retaining plastic. The easiest — in fact, the only way to accomplish it cleanly — is to do it from the underside (see photo). The plastic isn't attached, so it can be lifted away from the foam to get a clean shot at the target with the drill, three holes per slit, nine in all.

Whoever installed the original hog rings must have been a neophyte. A few rings missed the plastic entirely. The pull-ties attached the leather to the cushion much more securely. In case you haven't noticed, I'm big on pull-ties for this application.
All that remains is to hook the leather at the bottom and the seat insert will be finished. You really have to reef on the leather to hook it together, due to the thickness of the heat pad. I couldn't do it alone, so I enlisted a pair of strong hands to assist.
Next, I'll join the seat back and bottom by bolting their respective frames together. After taking care of a few details, such as pull-tying the wiring in place under the seat, it will be time to wrestle the seats, both heated, back into the car.
__________________
2000 986 base
Arctic Silver/black
2.7 liter
5-speed manual
Last edited by LoneWolfGal; 06-24-2024 at 01:29 PM.
|
|
|
|
|
06-25-2024, 08:06 PM
|
#68
|
|
Registered User
Join Date: Apr 2023
Location: Oregon
Posts: 545
|
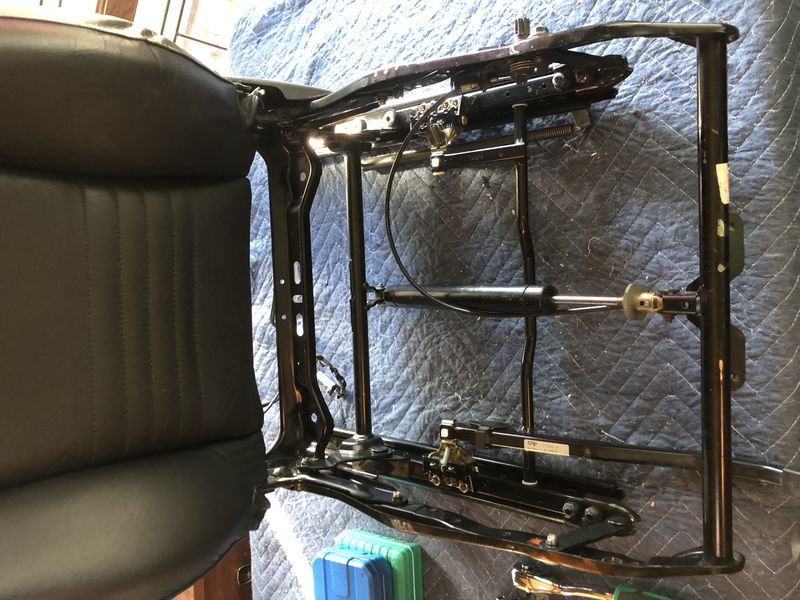
The bottom cushion's ready to clamp onto the frame. And "clamp" is the right word. Two beefy nylon clamps at the front and one lonely Philips screw at the back are all that holds the cushion and its base in place on the frame. I was sorta expecting a more convoluted fastening system from Porsche. Maybe they felt bad about making you disassemble a good part of the underside, including unbolting a couple frame struts, to change the transmission oil, or making you unhook a bunch of hoses underneath (after of course removing the plastic belly pan) to drain the coolant system for flushing. Things like that. So maybe they decided to cut us a break with the seat fastening method. But I digress...
I direct your attention to the bottom frame and its seat adjustment mechanisms, below. Everything was coated with 24 years of grime. I couldn't stand it, I had to clean it up. The grime must've acted as a protective coating, because everything cleaned up beautifully and looked almost new. I'd like to install the bottom cushion tomorrow. And then I'll clean up the underside of the passenger seat. I took a look underneath it and it wasn't as bad as the drivers seat was, so it shouldn't take long.
__________________
2000 986 base
Arctic Silver/black
2.7 liter
5-speed manual
Last edited by LoneWolfGal; 07-08-2024 at 09:45 AM.
|
|
|
|
|
07-06-2024, 07:41 PM
|
#69
|
|
Registered User
Join Date: Apr 2023
Location: Oregon
Posts: 545
|
UPDATE:
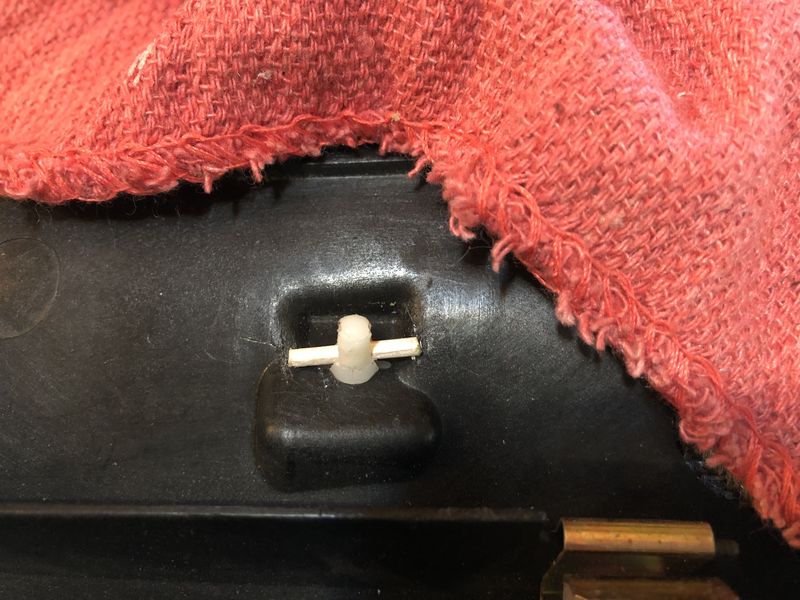
I encountered a setback just as I was about to mate the bottom cushion with the frame. The one-inch-deep crack between the left bolster and the center section had become a shallow crack barely a quarter-inch deep and the bolster's leather looked flaccid. Porsche's method of attaching the leather at the bottom of the crack was suspect. It involved seating a plastic bead the length of the crack into five plastic clips (see photo below) at the bottom. It looked dubious to me when I took it apart because it depended solely on the claw-like clips. But I shrugged and reassembled it the same way. And I assure you, the bead was seated in the clips, thanks to a tool I built out of a quarter-inch dowel with my Dremel. The seat looked perfect... until the seam's attachment point became detached. I sighed with resignation and then I peeled off the leather that covered the left bolster.
Just as I suspected, part of the bead had pulled out of the clips, but there were also a couple plastic clips, still attached to the bead, that had pulled out of the seat base. The clips are mounted on the inside of the contoured seat base into which the cushion fits. They're called "expanding clips." The bottom part of it is pushed through a hole and then it expands, securing the clip. I left them in place on the seat base when I took it apart.
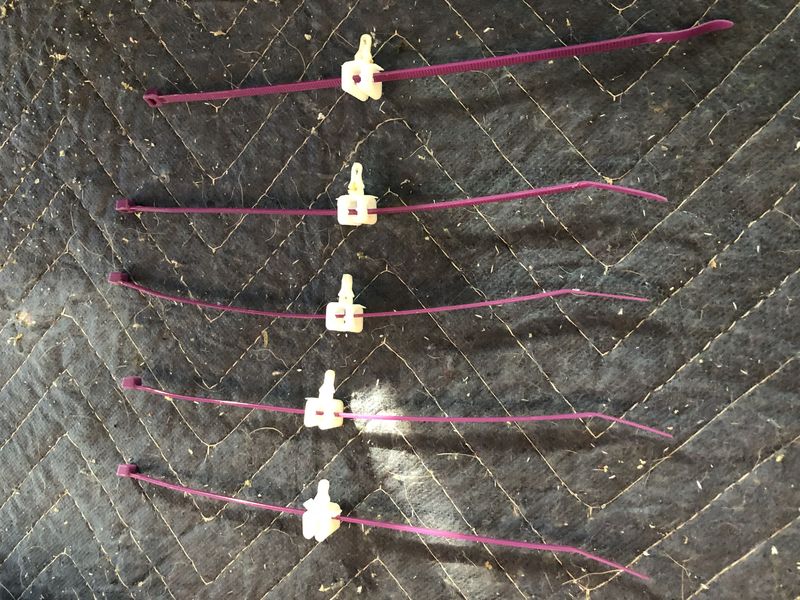
So I had two points of failure, two problems to solve. Keeping the bead locked in the clips was an easy one: pull-ties to the rescue. But first I had to drill a hole through each clip for the pull-tie to go through (see photo above). A bench vice I picked up at Harbor Freight was indispensable for the task. As for the clips pulling out of the holes, I used tiny dowels (a.k.a. wooden toothpicks) to prevent the expanding part from collapsing and slipping back through the hole.
My workarounds solved the problems. I replaced the bolster's leather, now tight once again, and had a Coors to celebrate.
To be continued...
__________________
2000 986 base
Arctic Silver/black
2.7 liter
5-speed manual
Last edited by LoneWolfGal; 07-08-2024 at 07:44 PM.
|
|
|
|
|
07-07-2024, 03:34 AM
|
#70
|
|
Registered User
Join Date: Sep 2018
Location: Laval QC
Posts: 865
|
Good work. Like you I discovered that this job, like many others on an aging car, takes a lot of experience mixed with imagination and lateral thinking.
__________________
Grant
Arctic Silver 2000 Boxster S - bought with a broken engine, back on the road with the engine replaced
Green 2000 Boxster 5-speed and 1978 928 auto
1987 924S 5-speed (Sold) - Blue 2000 Boxster 5 spd (Sold)
|

|
|
|
07-07-2024, 07:17 AM
|
#71
|
|
Registered User
Join Date: Jul 2014
Location: Valparaiso, IN
Posts: 190
|
I'm so impressed with the fine job you did and the clear, concise description of the creative ways you overcame the many challenges you encountered. I hope you enjoy sitting in your newly recovered seat for many, many enjoyable miles in your Boxster!
Lary (The Bald Eagle)
|
|
|
|
|
07-07-2024, 01:10 PM
|
#72
|
|
Registered User
Join Date: Apr 2023
Location: Oregon
Posts: 545
|
Many thanks, Grant and Lary. It's been a long slog chock full of gotchas. But it was worth it, although I never, ever want to do it again.
__________________
2000 986 base
Arctic Silver/black
2.7 liter
5-speed manual
|
|
|
|
|
07-07-2024, 01:17 PM
|
#73
|
|
Registered User
Join Date: Apr 2023
Location: Oregon
Posts: 545
|
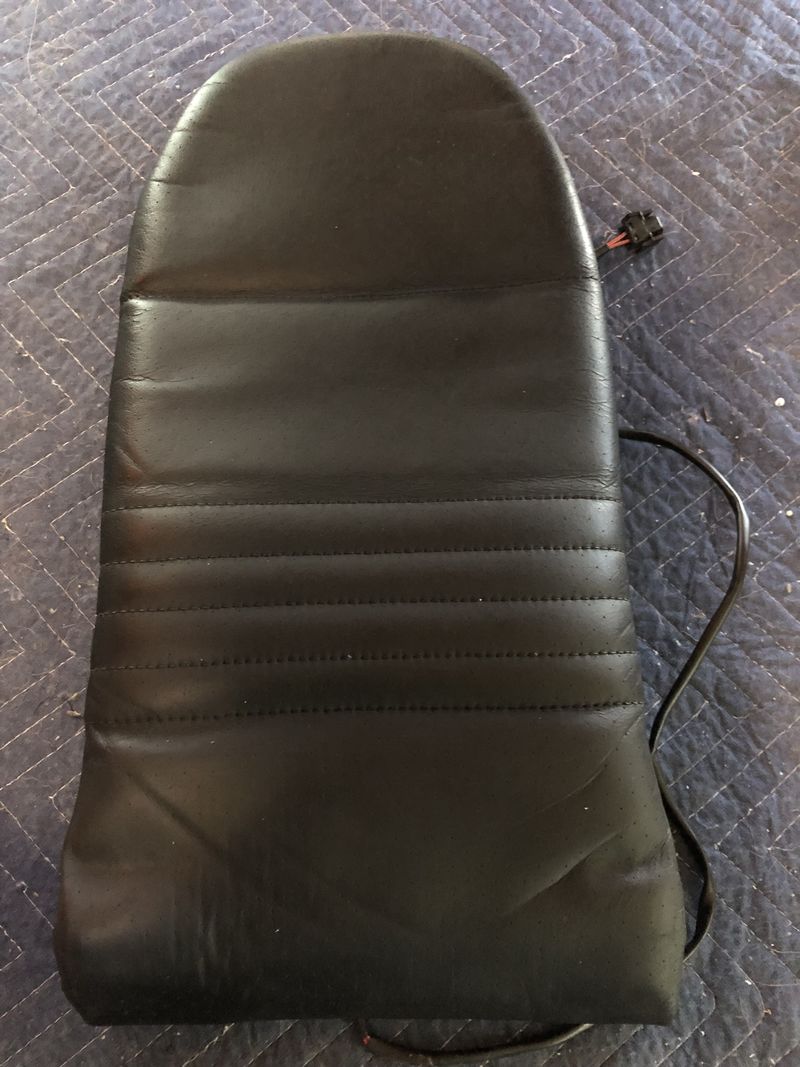
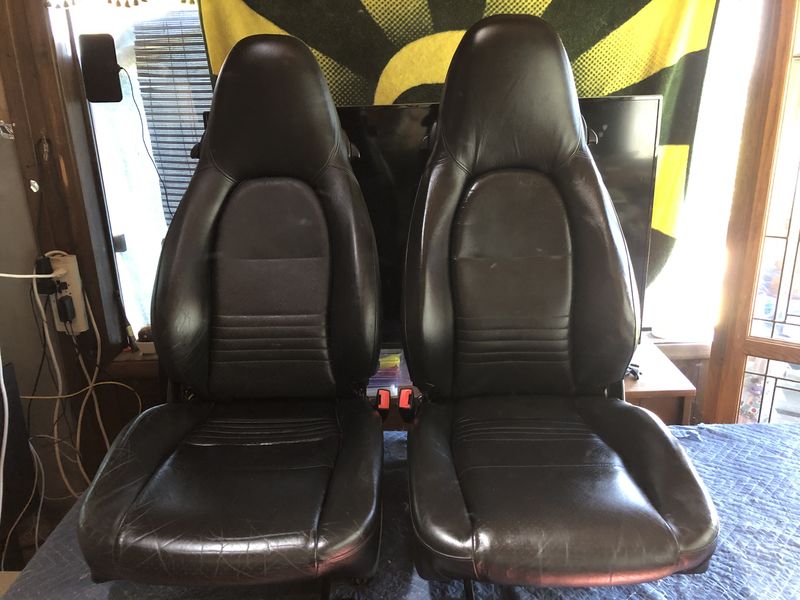
The finished seats, now both heated, ready for mounting in the car — after I psych myself up for the wrestling match. The passenger seat's leather has more "character" than the new one, but its condition is more than acceptable. Please ignore the weird lighting that resulted in strange reflections and shadows on the drivers seat.
__________________
2000 986 base
Arctic Silver/black
2.7 liter
5-speed manual
Last edited by LoneWolfGal; 07-08-2024 at 07:48 PM.
|
|
|
|
|
07-08-2024, 04:29 AM
|
#74
|
|
Registered User
Join Date: Mar 2018
Location: Winter Park, FL
Posts: 68
|
Gave it another shot!!
Went by another upholsterer, and quoted me "at least one day's work" (~$1,000), to "get them looking half way decent'.
So, with long weekend, I gave the passenger side a go.
Decided I was NOT going to do it in my Garage, as it is in mid-90's here in Central FL.
Step by step, just to see how far I could get.
Started by removing the seat bottom, doing that, then centerpiece, then back.
i added some padding to seat bottom as well.
Staple gun is my new friend!!
I'll post pics in natural light, as they don't look very well in flash!
Definitely kept me focused.
now I have to remove the seat bottom of the driver's side and do that again!
Thx for the clamp suggestion! Worked GREAT!!
|
|
|
|
|
07-08-2024, 08:06 AM
|
#75
|
|
Registered User
Join Date: Feb 2006
Location: Virginia
Posts: 1,754
|
Quote:
Originally Posted by LoneWolfGal
The finished seats, now both heated, ready for mounting in the car after I psych myself up for the wrestling match. The passenger seat's leather has more "character" than the new one, but its condition is more than acceptable.
|
Congratulations on seeing this project through to completion. I expect that it is a great feeling to look back and see how you overcame each challenge.
There is a song by the Indigo Girls called "Hammer and Nail." https://www.youtube.com/watch?v=yTI2GGNFR_U
If someone ever questions why you take on a project like this rather than pay someone to do it for you, these lyrics may apply:
I gotta get out of bed and get a hammer and a nail
Learn how to use my hands, not just my head
I think myself into jail
Now I know a refuge never grows
From a chin in a hand in a thoughtful pose
Gotta tend the earth if you want a rose
Good luck with your next project.
__________________
2000 Arctic Silver/Black, Hard Top, On Board Computer
PNP Rear Speakers, HAES 6-Channel Amp, Avic Z140BH,
Painted Bumperettes, 2004 (OEM) Top, Homelink integrated in dash with Targa switch, 997 Shifter, Carrera Gauge Cluster with silver gauge faces, heated 997 adaptive sports seats, Litronics, silver console
|
|
|
|
|
07-08-2024, 10:18 AM
|
#76
|
|
Registered User
Join Date: Apr 2023
Location: Oregon
Posts: 545
|
FUN FACT: The passenger seat's sides and back are, like all stock 986 seats, vinyl. However, the sides and back of the new drivers seat are leather. It's my understanding it came out of a 996, so I guess they went more upscale on the 911 model to justify the elevated price tag.
Today's project: Mount the passenger seat in the car. It's supposed to be 95 degrees today, so I'll break out the box fan and probably another fan as well.
Stiglitz, I'm glad the clamp method worked for you. As tight as the leather was on the bottom cushion after adding the heat pad, it was my salvation. Looking forward to seeing photos of your project.
KevinH, your advice has been indispensable and I thank you for the kind words. I might not have attempted this project without the wise counsel and encouragement from you and several others. And I enjoyed the Indigo Girls' song. The lyrics definitely apply.
__________________
2000 986 base
Arctic Silver/black
2.7 liter
5-speed manual
Last edited by LoneWolfGal; 07-08-2024 at 05:38 PM.
|
|
|
|
|
07-08-2024, 07:38 PM
|
#77
|
|
Registered User
Join Date: Apr 2023
Location: Oregon
Posts: 545
|
I mounted (and balanced) the passenger seat with a minimum of swearing. Installing the drivers seat will have to wait until Wednesday, due to previous commitments. (I hate it when something interferes with working on my 986.) The car must be drivable by the 13th, as I'm taking it out of town for a week. I wish I could have gotten the center console, etc. refinished before I take off. There's enough time for a normal individual, but not for the pickiest, most punctilious person on the planet. I make no apology, I'm sorry. Ta-ta till Wednesday.
__________________
2000 986 base
Arctic Silver/black
2.7 liter
5-speed manual
Last edited by LoneWolfGal; 07-10-2024 at 04:35 PM.
|
|
|
|
|
07-08-2024, 07:50 PM
|
#78
|
|
Registered User
Join Date: Feb 2006
Location: Virginia
Posts: 1,754
|
Quote:
Originally Posted by LoneWolfGal
FUN FACT: The passenger seat's sides and back are, like all stock 986 seats, vinyl. However, the sides and back of the new drivers seat are leather. It's my understanding it came out of a 996, so I guess they went more upscale on the 911 model to justify the elevated price tag.
|
The seats were probably from a car with the full leather interior. I believe that both the 986 and 996 could be ordered with full leather or partial leather interiors. As you point out, the 911 (or Carrera) is the more upscale model and I expect a greater percentage of 996 buyers checked the block for full leather. The full leather adds a dimension to the car that I would like to experience. However, I've heard complaints that the leather on the dash is sensitive to sun exposure and will dry out and shrink. Ironically, the less expensive vinyl is more durable.
My current seats are from a 996 Turbo. I think they are partial leather. Interestingly, the seats don't have map pockets on the back like the original seats in my Boxster.
I'm pleased that you found the Indigo Girls relevant.
__________________
2000 Arctic Silver/Black, Hard Top, On Board Computer
PNP Rear Speakers, HAES 6-Channel Amp, Avic Z140BH,
Painted Bumperettes, 2004 (OEM) Top, Homelink integrated in dash with Targa switch, 997 Shifter, Carrera Gauge Cluster with silver gauge faces, heated 997 adaptive sports seats, Litronics, silver console
|
|
|
|
|
07-12-2024, 04:48 AM
|
#79
|
|
Registered User
Join Date: Mar 2018
Location: Winter Park, FL
Posts: 68
|
Lseat pic
Here's at least pic of bottoms of the seats. The driver's side i have to remove again and tighten it up.
The passenger I added some extra foam on the bottom, so that should flatten out a bit.
BTW, the seat backs trim is definitely easier if the seats have been in sun for a bit (not a problem in Central Fl!!).
I used hands, plastic trim piece removers/plastic spatula to press-bend into place, and left them "tucked in" with the tools holding it in place to stretch/gain memory. Kind of like using the clamps.
I also used my staple gun (with HD staples), CAREFULLY aimed into the edge. Test aim on a piece of wood or something so you can line it up properly. HOLD DOWN the stapler so it does not bounce back, and it will to through the rubber and into the seat. Sometimes they won't go all the way thru, so I "coaxed' it with a flathead and a few taps of a very small/light hammer to 'seat" the staple. Normally, you won't be able to see the staple at all, but if it shows, a black sharpie will cover it up completely (I'll post pics). After that, seat backs will start to tighten up in the sun!
|
|
|
|
|
07-12-2024, 01:54 PM
|
#80
|
|
Registered User
Join Date: Apr 2023
Location: Oregon
Posts: 545
|
The seats are in and the airbag-disable bar under the passenger seat is disabling the passenger airbag — at least, the airbag warning light doesn't light up when it's connected, so I assume it's working. But now I have a new problem: The side panel switch that's supposed to tilt the seat back forward and back tilts it forward but not back. Have you ever had a look at that switch? It's not exactly reassuring. Controlling the back-forward switch contacts is a spring-loaded miniature rocker mechanism that will fly apart it you even look at it wrong. Then you'll be down on your knees looking for miniature springs. Ask me how I know. Apparently, the rocker switch is malfunctioning, so I guess I'll have to remove the control panel again and investigate the problem. However, I have to leave tomorrow for ten days, so I'm reluctant to rock the boat. I'd rather fix it when I get back. An upright seat back doesn't provide a comfortable driving position. Is there a manual release that will enable me to recline the seat back?
__________________
2000 986 base
Arctic Silver/black
2.7 liter
5-speed manual
Last edited by LoneWolfGal; 07-12-2024 at 02:02 PM.
|
|
|
|
 Posting Rules
|
You may not post new threads
You may not post replies
You may not post attachments
You may not edit your posts
HTML code is On
|
|
|
All times are GMT -8. The time now is 05:42 PM.
| |


 Boxster
 Linear Mode


