Go Back   986 Forum - The Community for Porsche Boxster & Cayman Owners > Porsche Boxster & Cayman Forums > Boxster General Discussions

Post Reply
 
LinkBack Thread Tools Display Modes
Old 04-07-2017, 12:24 PM   #1
Registered User
 
Join Date: Sep 2016
Location: NoVa
Posts: 67
Garage
Rear Control Arms - Help

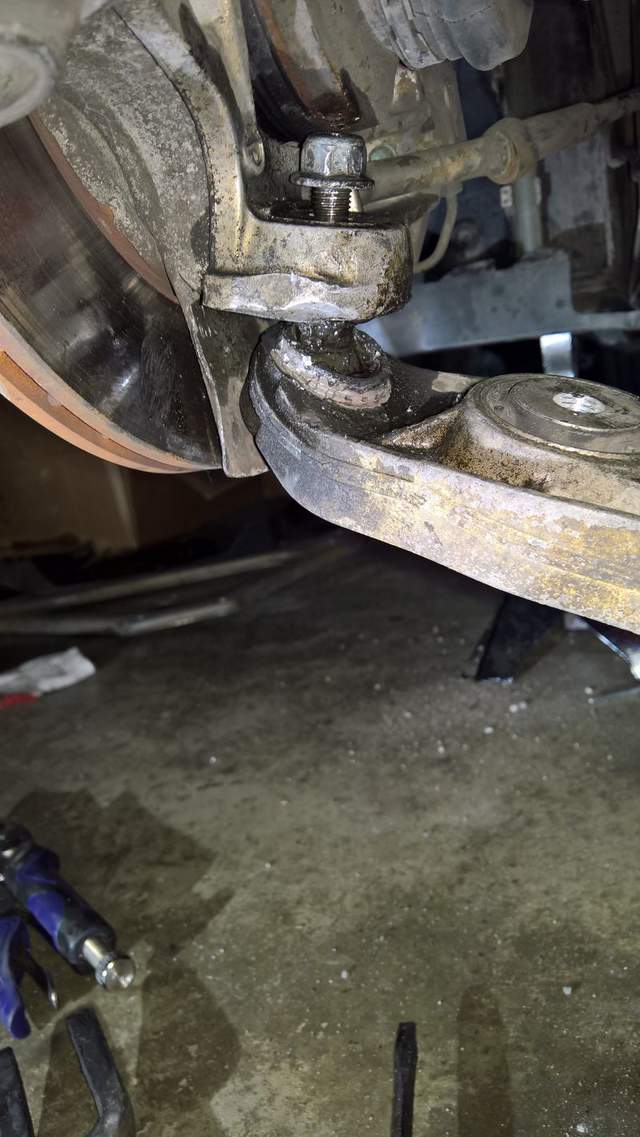
I'm trying to replace the rear control arms. I have been able to loosen all of the required hardware. I noticed the nut holding down the ball joint is unable to be removed from the ball joint while still attached to the wheel bearing carrier. I used a pickle fork to create some space between the carrier and the control arm. At this stage, I am unable to go any further. The ball joint will not slide out of the carrier. What am I missing?


alex.rhodes is offline   Reply With Quote
Old 04-07-2017, 12:29 PM   #2
Registered User
 
steved0x's Avatar
 
Join Date: Dec 2012
Location: FL
Posts: 4,143
I have had this same issue:

Help, I can't get this blasted LCA ball joint loose

The space you have made with the pickle fork I believe is from the destruction of the rubber boot - the ball joint hasn't released or moved.

I solved mine by getting the pickle fork in there, holding the carrier with my other hand, and hitting the pickle fork with a small sledge hammer 3-4 times very hard. I also sprayed some PB Blaster type spray (I think WD40 brand) into the ball joint and let it sit.


I replaced with Meyle LCA that have been working out good for me so far, I have 2 extra ones but it sounds like you have your new LCA arms already?
steved0x is offline   Reply With Quote
Old 04-07-2017, 01:00 PM   #3
Registered User
 
Join Date: May 2014
Location: S.California
Posts: 2,027
The sledge hammer 'technique' requires the finesse that Steve has. Unless you are as deft as him with a BFH ,I suggest frequent applications of PB Blaster or Kroil over several days and much patience and tapping with a smaller BFH. When the corrosion has finally been dissolved ,it will separate without huge impacts.
Once you get a little movement in the joint ,tap it back together again,then apart.Rinse(with PB) and repeat - many times.
Some suggest heating it. That seems to help. I suspect it works because the heat helps 'draw' the penetrant into the corrosion and the expansion may help also. Be careful PB and Kroil burn eventually in a naked flame..
At work they use a "Bolt Buster" device similar to this because of a stubborn car(like yours) being immobile and hogging valuable lift space.
https://www.amazon.com/Bolt-Buster-BB2-ACC-Handheld-Induction/dp/B00ATSL7VE
https://www.youtube.com/watch?v=dAeFvUqTnk0

Last edited by Gelbster; 04-07-2017 at 01:08 PM.
Gelbster is offline   Reply With Quote
Old 04-07-2017, 01:49 PM   #4
Registered User
 
Join Date: Sep 2016
Location: NoVa
Posts: 67
Garage
Soaked with kroil several times already. Guess I'll alternate soaking and hitting all weekend. I just wanted to make sure I was on the right path.
alex.rhodes is offline   Reply With Quote
Old 04-07-2017, 02:02 PM   #5
Registered User
 
911monty's Avatar
 
Join Date: Oct 2014
Location: California Central Coast
Posts: 1,476
Garage
The key to making a pickle fork and BFH work is the ability to impart a SOLID impact to what you are abusing. Unfortunately as you know trying to get a solid impact when the car is on jack stands and the carrier hanging is everything moves when you hit the pickle fork. This absorbs most of the impact. Do you have ramps or some blocks? Try putting the wheel back on and set the car weight back on it. This will make a solid base so the parts will not move and the impact will have a lot more IMPACT.
911monty is offline   Reply With Quote
Old 04-07-2017, 02:28 PM   #6
Registered User
 
Join Date: Sep 2016
Location: NoVa
Posts: 67
Garage
No ramps, but I do have three kids who like to help. Maybe I could use the jack to slightly compress the carrier. That should stabilize it.
alex.rhodes is offline   Reply With Quote
Old 04-07-2017, 02:31 PM   #7
Registered User
 
911monty's Avatar
 
Join Date: Oct 2014
Location: California Central Coast
Posts: 1,476
Garage
Quote:
Originally Posted by alex.rhodes View Post
No ramps, but I do have three kids who like to help. Maybe I could use the jack to slightly compress the carrier. That should stabilize it.
If you do that, loosely reassemble the upper control arm. That will help to hold everything in position. Then take a couple test taps and HIT it! This is no place to use a purse LOL...
911monty is offline   Reply With Quote
Old 04-07-2017, 02:40 PM   #8
Registered User
 
Join Date: May 2016
Location: Northville, MI
Posts: 249
Don't hit the arm or the ball joint, hit the knuckle with a big hammer and it will just pop out of there, it's a taper fit. It's the standard way of removing tie rods or ball joints on most cars. Pickle forks are rarely necessary and I don't recall using mine for the purpose of removing a tie rod or ball joint for over 20 years.
bwdz is offline   Reply With Quote
Old 04-07-2017, 02:54 PM   #9
Registered User
 
911monty's Avatar
 
Join Date: Oct 2014
Location: California Central Coast
Posts: 1,476
Garage
Quote:
Originally Posted by bwdz View Post
Don't hit the arm or the ball joint, hit the knuckle with a big hammer and it will just pop out of there, it's a taper fit. It's the standard way of removing tie rods or ball joints on most cars. Pickle forks are rarely necessary and I don't recall using mine for the purpose of removing a tie rod or ball joint for over 20 years.
This works on cars where the coil spring pushes against the a arm such as in american vehicles. This works by using the opposing forces of vehicle weight pushing up against the spindle and the coil spring pushing down against the a arm against each other. The vibration then separates the taper ball joint that joins the two. Just be sure you only loosen the ball joint nut a few threads. I have done this many times in my lifetime. However this will not work on a McPherson strut suspension since there is no force on the lower control arm and hammering on the aluminum machined carrier is not advisable and can fracture and/or damage the machined taper.

Last edited by 911monty; 04-07-2017 at 03:34 PM.
911monty is offline   Reply With Quote
Old 04-07-2017, 05:03 PM   #10
Registered User
 
Join Date: May 2016
Location: Northville, MI
Posts: 249
Quote:
Originally Posted by 911monty View Post
This works on cars where the coil spring pushes against the a arm such as in american vehicles. This works by using the opposing forces of vehicle weight pushing up against the spindle and the coil spring pushing down against the a arm against each other. The vibration then separates the taper ball joint that joins the two. Just be sure you only loosen the ball joint nut a few threads. I have done this many times in my lifetime. However this will not work on a McPherson strut suspension since there , no force on the lower control arm and hammering on the aluminum machined carrier is not advisable and can fracture and/or damage the machined taper.
You don't need spring force, it works on any taper. You hit the knuckle and it will pop right out, but suit yourself, that's just how I have done it 100s of times. If you ask me you have more chance doing damage with one of those forks. A good smack in the right spot will cause the taper to push right out, it works on any suspension and I never have tension on it, it also works on tie rods. You usually don't even need to smack it very hard. Of course some caution needs to be taken, hit it on it's flattest part and only use the force necessary, meaning that I hit and if that doesn't loosen it with one or 2 smacks I increase the force slightly and if I ever got to a point that I think I could damage something I would use a little heat.
bwdz is offline   Reply With Quote
Old 04-07-2017, 05:53 PM   #11
Registered User
 
steved0x's Avatar
 
Join Date: Dec 2012
Location: FL
Posts: 4,143
I saw a video of someone loading up the joint with tension from a ball joint separator tool and then tapping with a hammer and it came right out. Might be another thing to try.

Maybe a piece of dry ice on the stud connected to the ball joint might contract it and allow it to come out? I was going to try that next if the pickle fork didn't work on mine.
steved0x is offline   Reply With Quote
Old 04-07-2017, 06:37 PM   #12
Registered User
 
Join Date: Nov 2009
Location: Winnipeg MB
Posts: 2,486
Did you try a pickle fork attachment in an air chisel?
__________________
'99 black 986
Mark_T is offline   Reply With Quote
Old 04-07-2017, 07:11 PM   #13
Registered User
 
Join Date: May 2014
Location: S.California
Posts: 2,027
If you must use a BFH, at least do it properley and use 2 hammers!
https://www.youtube.com/watch?v=tX7GVWcB-bg

Last edited by Gelbster; 04-07-2017 at 07:15 PM.
Gelbster is offline   Reply With Quote
Old 04-07-2017, 07:22 PM   #14
Registered User
 
911monty's Avatar
 
Join Date: Oct 2014
Location: California Central Coast
Posts: 1,476
Garage
Quote:
Originally Posted by Gelbster View Post
If you must use a BFH, at least do it properley and use 2 hammers!
https://www.youtube.com/watch?v=tX7GVWcB-bg
This really does work. You don't need to hit with both hammers simultaneously though, just hold the large hammer against the opposite side of the piece you're going to hit. When you hit with the small hammer, the mass of the large hammer transfers the blow into the part. It will then bounce and impart a second hit. Works very well to remove large well caps that have rusted for years. And to be honest IMO a BFH weighs 16 lbs. :P Oh and wail away on American Iron, if it breaks it wasn't tough enough...... Not so much on aluminum though.

Last edited by 911monty; 04-07-2017 at 07:31 PM.
911monty is offline   Reply With Quote
Old 04-07-2017, 07:40 PM   #15
Registered User
 
Join Date: May 2015
Location: Greater Seattle, WA
Posts: 534
Wow guys... just... put the pickle forks (...and for that matter, big f*** hammers...) down!

Get a balljoint separator tool! They're not expensive, and you'll have a chance of suspension disassembly and component re-use that way (if it matters...)

Harbor freight sells an inexpensive one that works great for 986 balljoints, if you add some clearance to the inside diameter (grinding required.) Perfect fit without modification on 986 tie rod ends.
http://t.harborfreight.com/3-4-quarter-inch-forged-ball-joint-separator-99849.html?utm_referrer=https%3A%2F%2Fwww.google.c om%2F
Lubricate all the metal-on-metal contact points with an extreme-pressure grease (my preference is cv joint grease), and make sure to get it fully seated close, so the tool has good leverage before you put the screws to it. You'll be shocked how easy it is to use. And, you won't be damaging precious, fragile, and expensive aluminum 986 suspension components in the process!
__________________
2001 Boxster

Last edited by jakeru; 04-07-2017 at 07:49 PM.
jakeru is offline   Reply With Quote
Old 04-07-2017, 08:38 PM   #16
Registered User
 
BirdDog's Avatar
 
Join Date: Oct 2013
Location: Atlanta, GA
Posts: 419
I'm with Jakeru on this one.

Pickle forks will more often than not destroy the ball joint boots. Not a problem now because you are replacing the LCA (which will come with a new ball joint), but what if you were pulling the spindle to change a wheel bearing? You don't want to have to replace the LCA (they are expensive!) because you destroyed the boot or messed up the ball with your pickle fork.

Instead, get a ball joint separator tool like the one Jakaru suggested.

I use a Kent Moore (aka OTC) tool like this one:


I've had mine for years. If you buy a quality tool it will last you for the rest of your life.

It also works great on tie rod ends.

The forked side slides in where you put your pickle fork (between the knuckle and ball joint). The single side goes over the top and sits on top of the bolt. (so in the picture, the tool would be installed upside down with the tools bolt pointing down). Put a nice long 1/2" drive ratchet (or breaker bar) on it and slowly tighten until it POPS! Be sure your head is clear of the wheel well because when it pops you will jump (I promise!) LOL I've used my Kent-Moore tool to replace 2 of my Boxsters LCAs.

bwdz's method also works if you are good with a BFH. But when I've seen it done (by pros at alignment shops), they usually press a large steel block on the other side of the knuckle. One good shot to the side of the knuckle and the ball joint will pop out due to the taper on the ball joint bolt. Me, I'm not that brave when it comes to hitting my car with a BFH, so I use my Kent-Moore tool.
__________________
2001 Boxster S - Speed Yellow, Black Leather, Tiptronic, Jake Raby rebuilt 3.2 with IMS Solution

Last edited by BirdDog; 04-07-2017 at 08:41 PM.
BirdDog is offline   Reply With Quote
Old 04-07-2017, 09:08 PM   #17
Registered User
 
Join Date: May 2015
Location: Greater Seattle, WA
Posts: 534
That tool looks very beefy, bird dog!

Here's my harbor freight balljoint tool, with inside u-shaped edge ground out to fit around the 986 balljoint's 26mm diameter. (Still works on 986 tie rod ends, too!) I have very little doubt that this tool will also last my lifetime.


If you only back off the nut a little bit, the joints will pop loose with yawn-worthy drama.
__________________
2001 Boxster
jakeru is offline   Reply With Quote
Old 04-08-2017, 06:56 AM   #18
Registered User
 
steved0x's Avatar
 
Join Date: Dec 2012
Location: FL
Posts: 4,143
I've got the HF tool as well which worked on the other side of the car, but not on the side I had trouble with. I didn't grind it though, I think that would have made a difference. That HF is a nice tool, better (and wider jaws) than the loaner version I tried from the auto parts store.

OP: When you do get it, put a little anti-seize on before you put the new one back in to make it easier for next time .
steved0x is offline   Reply With Quote
Old 04-08-2017, 07:03 AM   #19
On the slippery slope
 
JayG's Avatar
 
Join Date: Mar 2014
Location: Austin and Palm Springs
Posts: 3,793
Garage
You can also find them on ebay for under $10
That's where I got mine and works perfectly
__________________
2004 Boxster S 6 speed - DRL relay hack, Polaris AutoTop DIY
2004 996 Targa Tip
Instructor - San Diego region
2014 Porsche Performance Driving School
2020 BMW X3, 2013 Ram 1500, 2016 Cmax, 2004 F-150 "Big Red"
JayG is offline   Reply With Quote
Old 04-08-2017, 07:31 AM   #20
Registered User
 
Join Date: Sep 2016
Location: NoVa
Posts: 67
Garage
Looks like a trip to harbor freight it is. I can do the bfh route, but my back will appreciate the correct took route. I'll have to see if the local store has it in stock, thanks. The ball joints are thoroughly doused in kroil at this point, should make for easy work.

alex.rhodes is offline   Reply With Quote
Post Reply


Thread Tools
Display Modes

Posting Rules
You may not post new threads
You may not post replies
You may not post attachments
You may not edit your posts

BB code is On
Smilies are On
[IMG] code is On
HTML code is On
Trackbacks are On
Pingbacks are On
Refbacks are On


All times are GMT -8. The time now is 12:08 AM.


Powered by vBulletin® Version 3.8.7
Copyright ©2000 - 2024, vBulletin Solutions, Inc.
Content Relevant URLs by vBSEO 3.6.0
Copyright 2024 Pelican Parts, LLC - Posts may be archived for display on the Pelican Parts Website -    DMCA Registered Agent Contact Page