 08-23-2014, 05:23 PM
|
#1
|
|
Registered User
Join Date: Jan 2009
Location: kansas
Posts: 447
|
Can not get transmission cover back on!
Did a transmission oil change today. '00 S 6spd. I loosened the cross braces and took the triangle shaped aluminum cover pan off. Now I can't get the bolts to line up! It's maddening! I've been going back and forth for hours. I'm almost ready to drill the holes out to get it to go back on. Am I missing something?? Could something have moved to make it not line up??? I don't think so, but it was hard to pry off when I took it off.
Anyone else have this problem?
thanks
sean
|

|

|
|
08-23-2014, 05:25 PM
|
#2
|
|
Registered User
Join Date: May 2011
Location: Essex, CT United States
Posts: 301
|
I had the same issue - took some good whacks to get it over the studs.
Drilled a 1.5" hole under the drain plug so i won't go through it again.
__________________
2002 Boxster S, Arctic Silver, 18" Turbo Wheels, 6-speed
|
|
|
|
|
08-23-2014, 05:30 PM
|
#3
|
|
Registered User
Join Date: Jan 2009
Location: kansas
Posts: 447
|
I've tried banging on it with a dead-blow hammer. No luck. The aluminum braces will go on fine but the triangle shaped cover is not even close. Almost half a bolt diameter off. I've already thought about drilling the big hole idea. Good idea. I don't think the rear suspension mounting point where the studs are sticking out could've moved?? Was there a certain order you put the pan back on in?
|
|
|
|
|
08-23-2014, 05:35 PM
|
#4
|
|
Registered User
Join Date: Nov 2013
Location: Seattle
Posts: 274
|
I memory serves me correctly.....(I did the tranny fluid thing last summer)....I put the triangle thing on first and then the two braces.
Also....don't tighten anything up until you have all the bolts threaded. I remember that helping a lot.
__________________
Current: 981 Cayman
Former: '02 BS and '08 C
|
|
|
|
|
08-23-2014, 05:47 PM
|
#5
|
|
Registered User
Join Date: Dec 2008
Location: Queensland, Australia
Posts: 1,522
|
As per Tucker says - before trying to fit up the triangulated alloy cover, loosen off the cross bracing tensioning nuts and then fit the alloy cover. Just make sure the cover is put on squarely before tapping into place.
Drilling out the holes is not a good idea - the whole reason the cover is a tight fit is because its an integral support brace for the rear suspension....
__________________
2001 Boxster S (triple black). Sleeping easier with LN Engineering/Flat 6 IMS upgrade, low temp thermostat & underspeed pulley.
2001 MV Agusta F4.
|
|
|
|
|
08-23-2014, 05:48 PM
|
#6
|
|
still plays with cars...
Join Date: May 2011
Location: Baden, ON, Canada
Posts: 1,088
|
Quote:
Originally Posted by Tucker2

I memory serves me correctly.....(I did the tranny fluid thing last summer)....I put the triangle thing on first and then the two braces.
Also....don't tighten anything up until you have all the bolts threaded. I remember that helping a lot.
|
Solid advice... This technique worked for me as well.
__________________
Six speed 2000 Boxster S
Arctic Silver on Metropol Blue | LN Dual Row IMSR | Arctic Silver console, spoiler frame & bumperettes | Crios mod | Technobrace | RoboTop module & modified convertible top relay for one-touch roof operation
|
|
|
|
|
08-23-2014, 05:57 PM
|
#7
|
|
Registered User
Join Date: Jan 2009
Location: kansas
Posts: 447
|
Yeah, I know the plate goes on first. I meant did you do one side or another in any order? I have the braces all loose. I can get one side or another and the back brace, but I can't get the left and right side to go on at the same time. I agree with you on the drilling the holes out not being a good idea. Ugggh. I'll try again in the a.m. with a fresh attitude!
|
|
|
|
|
08-23-2014, 07:30 PM
|
#8
|
|
Registered User
Join Date: Sep 2008
Location: Florida
Posts: 2,497
|
It funny (not really) but when I had the cover off on my 2000S I had no issue putting back on. On one of two 98 Boxster's I've changed gear oil in, one was easy and one was a PIA to get back on. Just kept at and it eventually got lined up right.
Just hold your mouth right and it'll go on!
|
|
|
|
|
08-24-2014, 09:36 AM
|
#9
|
|
Registered User
Join Date: Feb 2005
Location: It's a kind of magic.....
Posts: 6,660
|
The easy way to get everything to line back up is to use a $10 ratcheting tie down from Harbor Freight. Just attach it to the lower suspension arms on each side and draw them together slightly, and all the bolt holes will line back up.
Never enlarge the bolt holes.
__________________
Anything really new is invented only in ones youth. Later, one becomes more experienced, more famous and more stupid. - Albert Einstein
|

|
|
|
08-24-2014, 03:23 PM
|
#10
|
|
Registered User
Join Date: Jan 2009
Location: kansas
Posts: 447
|
Good advice Jeff. I also read on an old pelican thread to move the tires that are suspended right now and it may line back up. It's over 100 deg. today with high humidity, so I may go out this evening when it's cooler. I have a couple of those ratchet tie downs.
thanks
sean
|
|
|
|
|
08-25-2014, 06:05 PM
|
#11
|
|
Registered User
Join Date: Jan 2009
Location: kansas
Posts: 447
|
follow up:
Success!!
I put a cheap yellow ratchet tie down between the lower control arm mounts and pulled it fairly tight. Everything came back into alignment. I tapped it all back into place with a rubber hammer and had it back together in 10 minutes. Thanks everyone and especially you Mr. JFP in PA for your ratchet suggestion.
Now onto the fuel filter...new adventure.
sean
|
|
|
|
|
08-25-2014, 06:07 PM
|
#12
|
|
Registered User
Join Date: Feb 2005
Location: It's a kind of magic.....
Posts: 6,660
|
Quote:
Originally Posted by SeanZ4
Success!!
I put a cheap yellow ratchet tie down between the lower control arm mounts and pulled it fairly tight. Everything came back into alignment. I tapped it all back into place with a rubber hammer and had it back together in 10 minutes. Thanks everyone and especially you Mr. JFP in PA for your ratchet suggestion.
Now onto the fuel filter...new adventure.
sean
|
Glad to be of assistance..............
__________________
Anything really new is invented only in ones youth. Later, one becomes more experienced, more famous and more stupid. - Albert Einstein
|
|
|
|
|
08-25-2014, 07:43 PM
|
#13
|
|
Registered User
Join Date: Nov 2013
Location: Seattle
Posts: 274
|
Congrats!!!
__________________
Current: 981 Cayman
Former: '02 BS and '08 C
|
|
|
|
|
11-07-2023, 07:27 AM
|
#14
|
|
Registered User
Join Date: Nov 2023
Posts: 3
|
Needing help on Rear Pan install
Looking for help on installing my rear pan. On the ratcheting strap technique. Are you using one strap or two? Where are you latching them on? Pic?
Thanks,
Erik
|
|
|
|
|
11-07-2023, 10:57 AM
|
#15
|
|
Registered User
Join Date: Jul 2008
Location: austin
Posts: 825
|
Quote:
Originally Posted by eriklhayes
Looking for help on installing my rear pan. On the ratcheting strap technique. Are you using one strap or two? Where are you latching them on? Pic?
Thanks,
Erik
|
you are basically pulling the uprights closer together -- one strap is usually sufficient.
Don't pull in the spindles -- you are literally squeezing the frame together, just a little bit.
__________________
Drivers: '15 Panamera Hybrid (wife's), ' 01 996 GT2, 00 Boxster S, '96 993 Çab/Tip (wife's)
Race Cars: '75 911 RSR Replica & '99 Spec Boxster
mike@lonestarrpm.com
|
|
|
|
|
11-07-2023, 08:55 PM
|
#16
|
|
Registered User
Join Date: Sep 2018
Location: Laval QC
Posts: 865
|
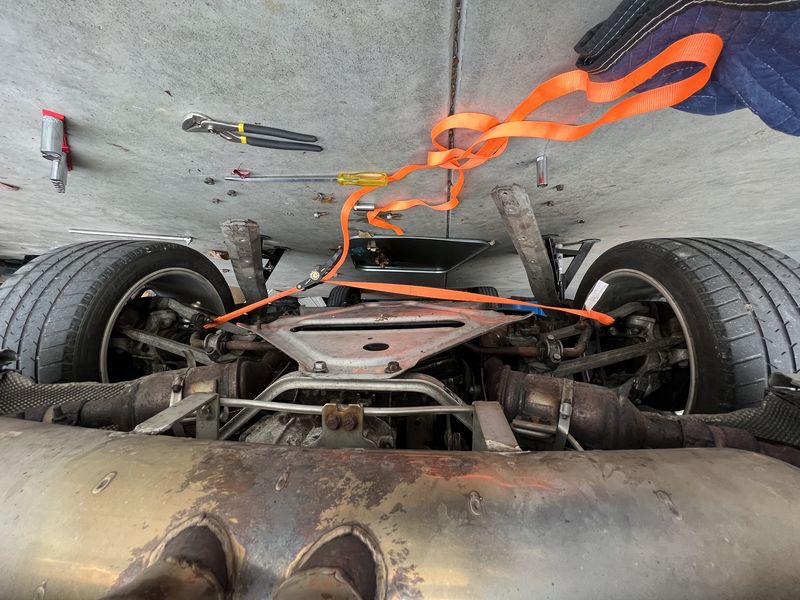
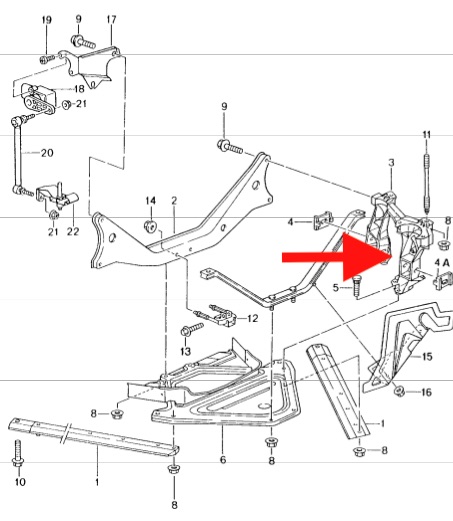
You want to place the strap above the triangle, looped around the uprights indicated by the arrow on both sides.
__________________
Grant
Arctic Silver 2000 Boxster S - bought with a broken engine, back on the road with the engine replaced
Green 2000 Boxster 5-speed and 1978 928 auto
1987 924S 5-speed (Sold) - Blue 2000 Boxster 5 spd (Sold)
|
|
|
|
|
11-10-2023, 08:32 AM
|
#17
|
|
Registered User
Join Date: Nov 2023
Posts: 3
|
Needing help on Rear Pan install
I am not getting them to budge. Should I loosen the bolts that are attaching the brackets?
Thanks,
Erik
|
|
|
|
|
11-10-2023, 10:20 AM
|
#18
|
|
Registered User
Join Date: Nov 2023
Posts: 3
|
It took a Pipe Bar Clamp!!
I had to use a 3/4 inch pipe bar clamp in order to get the mounts close enough to mount the pan!!
Thanks for the support.
Erik
|
|
|
|
 Posting Rules
|
You may not post new threads
You may not post replies
You may not post attachments
You may not edit your posts
HTML code is On
|
|
|
All times are GMT -8. The time now is 02:10 PM.
| |


 The Car with No Name
 Black Croc
 Udo
Udo Boxster
 Linear Mode


