 05-30-2014, 08:02 PM
|
#41
|
|
Custom User Title Here
Join Date: Mar 2012
Location: Ft. Leonard Wood
Posts: 6,169
|
Haha! Sorry, been crazy busy lately. I actually have not done anything with this project since I first posted it.
steved0x was kind enough to donate a set of ambers to the cause, so I will go at them soon and post a DIY and show the finished product 
You could do it with sandpaper, but it would take a long time. The Dremel goes pretty darn quick, but could cause some serious damage to the headlight or your person if you're not extremely careful.
__________________
https://youtube.com/@UnwindTimeVintageWatchMuseum
Last edited by particlewave; 05-30-2014 at 08:36 PM.
|

|

|
|
06-25-2014, 06:15 PM
|
#42
|
|
Custom User Title Here
Join Date: Mar 2012
Location: Ft. Leonard Wood
Posts: 6,169
|
I started by setting my depth to slightly more than 1mm (note the standoff/guide ring - this allows me to better follow the curves of the lens since the guide is much closer to the bit than the routers face).
__________________
https://youtube.com/@UnwindTimeVintageWatchMuseum
|
|
|
|
|
06-25-2014, 06:38 PM
|
#43
|
|
Custom User Title Here
Join Date: Mar 2012
Location: Ft. Leonard Wood
Posts: 6,169
|
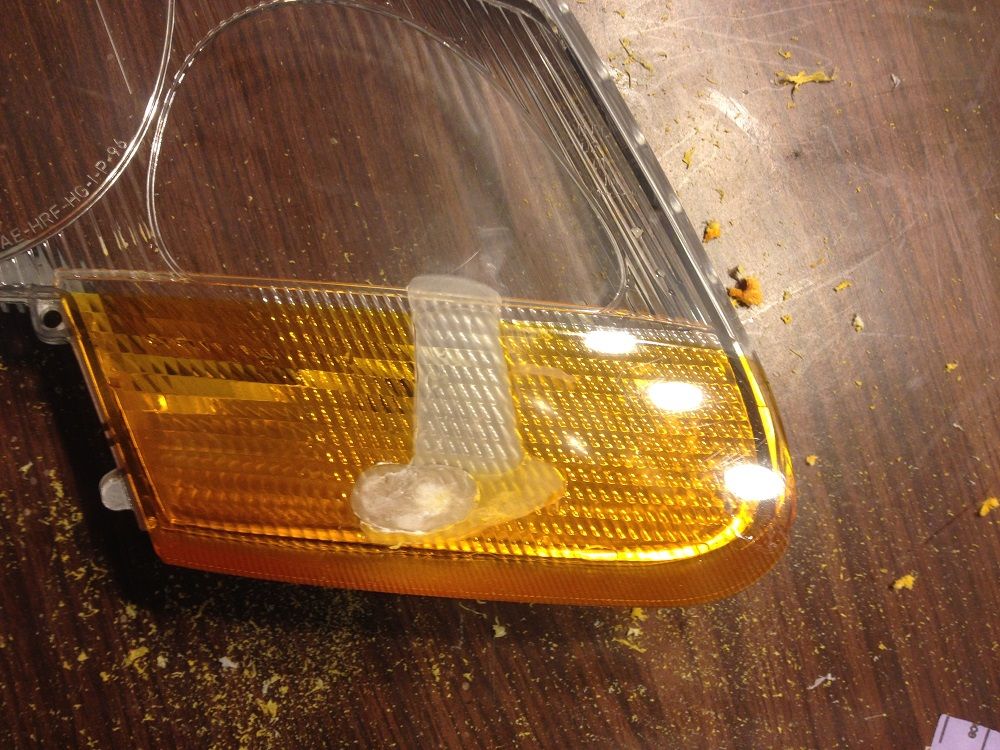
I made horizontal passes, leaving strips of amber in place so that the routers guide had something to ride on.
Slow is the key. I set the Dremel to its slowest speed and made slow passes, advancing 2-3mm and retreating 1-2mm in in a push-pull motion in order to let the debris clear out. Too fast and the polycarbonate will melt instead of shaving away, clogging up your bit. Melting will also cause a divot.
2 tips;
1) use a thin lubricant like WD-40
2) use a sharpie to scribe guide lines (much easier to see)
__________________
https://youtube.com/@UnwindTimeVintageWatchMuseum
|
|
|
|
|
06-25-2014, 06:42 PM
|
#44
|
|
Custom User Title Here
Join Date: Mar 2012
Location: Ft. Leonard Wood
Posts: 6,169
|
Now we are left with horizontal strips. Mark each with a sharpie for better visibility.
Rest the front lip of the smaller router guide on the strip to maintain correct depth and remove remaining strips.
__________________
https://youtube.com/@UnwindTimeVintageWatchMuseum
|
|
|
|
|
06-25-2014, 06:45 PM
|
#45
|
|
Custom User Title Here
Join Date: Mar 2012
Location: Ft. Leonard Wood
Posts: 6,169
|
Amber is 90% gone.
Clean up any remaining amber by removing the Dremel from the router and using it directly on the lens (LIGHTLY).
Here you can see a couple of melt divots from my first pass (was going too fast). Luckily, they were not deep and I was able to blend them in.
__________________
https://youtube.com/@UnwindTimeVintageWatchMuseum
Last edited by particlewave; 06-25-2014 at 06:53 PM.
|
|
|
|
|
06-25-2014, 06:46 PM
|
#46
|
|
Custom User Title Here
Join Date: Mar 2012
Location: Ft. Leonard Wood
Posts: 6,169
|
Sand with a sanding block and 100 grit sandpaper to smooth everything out.
Once smooth, switch to 500 grit, then 1500.
__________________
https://youtube.com/@UnwindTimeVintageWatchMuseum
|
|
|
|
|
06-25-2014, 06:48 PM
|
#47
|
|
Custom User Title Here
Join Date: Mar 2012
Location: Ft. Leonard Wood
Posts: 6,169
|
Go from the 1500 grit straight to new UV coat (no polishing needed).
63 minutes for 1 lens, start to finish (including setup of tools, etc.).
What amber?!
__________________
https://youtube.com/@UnwindTimeVintageWatchMuseum
|
|
|
|
|
06-25-2014, 08:09 PM
|
#48
|
|
Registered User
Join Date: Sep 2013
Location: Montreal, QC. (currently expat to Shanghai)
Posts: 3,249
|
Quote:
Originally Posted by particlewave

Go from the 1500 grit straight to new UV coat (no polishing needed).
63 minutes for 1 lens, start to finish (including setup of tools, etc.).
What amber?!
|
LOLLLLLLLLLLLLLLLLLLLLLLLLLLLLLLLLLLLLLLLLLLLLLLLL LLLLLLLLLLLLLLLLL
(this is unbelievable, and a TOP quality diy)
__________________
______________________________
'97 Boxster base model 2.5L, Guards Red/Tan leather, with a new but old Alpine am/fm radio.
|
|
|
|
|
06-25-2014, 08:23 PM
|
#49
|
|
Registered User
Join Date: Jun 2012
Location: Bedford, TX
Posts: 2,755
|
Wow, truly impressive Charles! Nice work 
__________________
______________________________________________
2001 Boxster S Lapis Blue
TS Cat Bypass Pipes and exhaust
iPad Mini Dash Install
DEPO Tail Lights
|
|
|
|
|
06-25-2014, 08:37 PM
|
#50
|
|
Registered User
Join Date: Sep 2013
Location: Montreal, QC. (currently expat to Shanghai)
Posts: 3,249
|
Quote:
Originally Posted by Nine8Six
You guys are very ambitious
|
^ I can hear you giggling at me from here Charles lol
__________________
______________________________
'97 Boxster base model 2.5L, Guards Red/Tan leather, with a new but old Alpine am/fm radio.
|
|
|
|
|
06-25-2014, 08:43 PM
|
#51
|
|
Custom User Title Here
Join Date: Mar 2012
Location: Ft. Leonard Wood
Posts: 6,169
|
Haha Fred!
I think I may be slightly this side of crazy, lol 
This is not for the faint of heart, but for those on a budget, bored or just looking for something to do with that spare set of ambers, it is very feasible and not at all difficult. It is a little time consuming, but easily done on a day off.
The key phrase to remember is " Dont Rush!"
It can be done carefully in 2-3 hours (both headlights).
Thanks for the support, Fred and Bruce!
__________________
https://youtube.com/@UnwindTimeVintageWatchMuseum
|
|
|
|
|
06-25-2014, 08:57 PM
|
#52
|
|
Registered User
Join Date: Apr 2014
Location: Chicago
Posts: 329
|
I'm so glad this was bumped back up. I tried this with 3 hours of tedious 60 grit sandpaper work  and I'm still on the orange lens. I'll probably roll my sleeves up this weekend and give it a try with a dremel. Great step by step Particlewave!
__________________
'99 Porsche Boxster 986 - weekend car
'04 BMW 645ci e63 - daily driver
'98 BMW 528i e39 - dog carrier
|
|
|
|
|
06-25-2014, 10:15 PM
|
#53
|
|
Registered User
Join Date: Nov 2010
Location: Long Island, NY
Posts: 296
|
Hi Charles.
That looks pretty good. How much did you have to take off?
I really don't like to take a Dremel tool to my headlight covers. I've worked quite a bit on Lucite etc. and the margin for error with anything that takes big chunks off at a relatively high speed is really small. It's easy to take a too big chunk out or to melt what you are working on. The trick is always to go slow and make sure your tool doesn't fill up with debris. I would strongly advice anyone who want to try this on their headlight covers to just go at it manually with a lot of #80 sandpaper and a lot of water first. Even using a belt sander can be pretty disastrous because of the heat buildup.
Still, it's good to know that the orange layer is on the top and can be taken off. Btw. can the corner pieces be done in the same way/
|
|
|
|
|
06-25-2014, 10:34 PM
|
#54
|
|
Custom User Title Here
Join Date: Mar 2012
Location: Ft. Leonard Wood
Posts: 6,169
|
As with anything DIY, proceed at your own risk. This is a proof of concept post.
Just take your time and wear the proper safety gear.
First of all, this does not take big chunks out but shaves off very fine shavings.
Secondly, advising someone not to DIY something seems a little odd to me. Would you also advise against someone working on their own car? Or maybe using any power tools at all? It's very easy and quite frankly, if someone is going to take an eye out or lose a body part doing something like this, they're going to at some point in their life, anyway
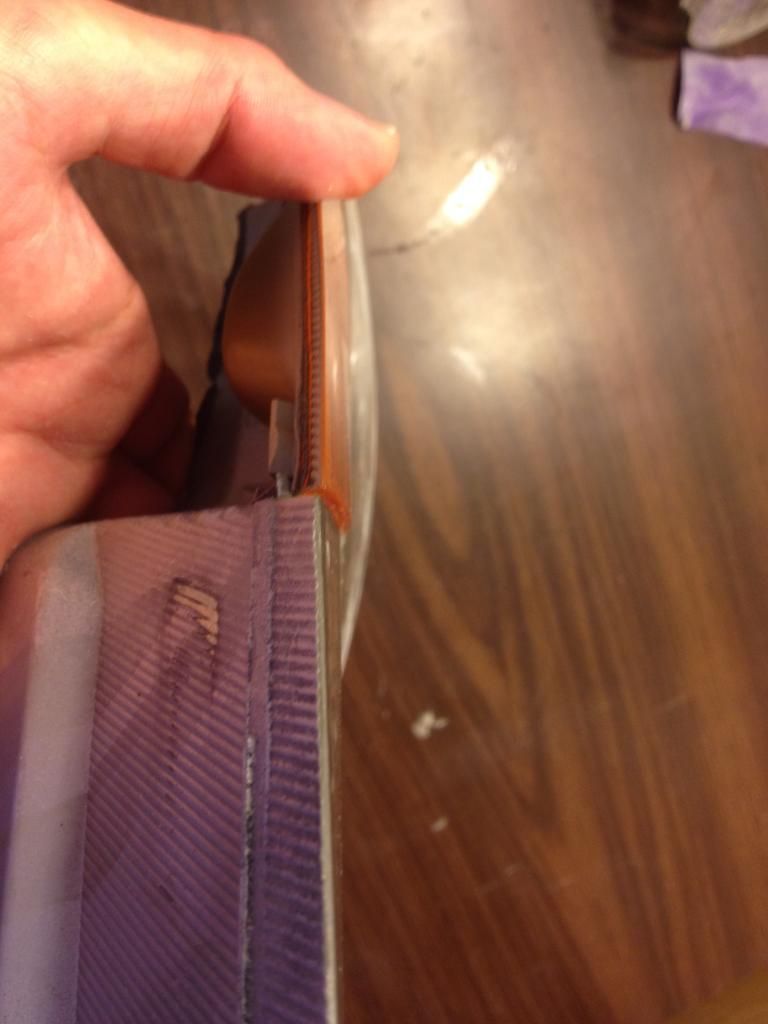
The amber corner trims are solid amber, so this will not work on them.
Here is a picture showing the difference in height between the corner trim and the new turn signal. This is barely noticeable in person and if you didn't know what I had done, you would never know the difference.
Of course you could always taper the edge of your new clear corner trims so that there is a smooth transition between the two
__________________
https://youtube.com/@UnwindTimeVintageWatchMuseum
Last edited by particlewave; 06-26-2014 at 01:44 PM.
|
|
|
|
|
06-26-2014, 06:12 AM
|
#55
|
|
Registered User
Join Date: Dec 2012
Location: FL
Posts: 4,145
|
Looking good!
|
|
|
|
|
06-26-2014, 09:06 AM
|
#56
|
|
Custom User Title Here
Join Date: Mar 2012
Location: Ft. Leonard Wood
Posts: 6,169
|
Thank you for donating these ambers for the cause, steved0x!!!
__________________
https://youtube.com/@UnwindTimeVintageWatchMuseum
|
|
|
|
|
07-06-2014, 06:17 AM
|
#57
|
|
Registered User
Join Date: Jun 2013
Location: Central Pennsylvania, USA
Posts: 102
|
Charles, you truly inspire me! Great work on these... and all your DIY projects. When I first got my Boxster (left to me by my dad), I thought that I was going to have to pay a premium for all service to the car. This forum and people like you have opened a new world to me wrt this car. I have usually done my own work on cars, but just didn't think it would be very feasible with a Porsche. Ha! I love how much information and experience is out there for us to fix, mod, update, etc. and how active the community is. Rock on!
__________________
2000 Boxster S - B.A.D. short shifter and intake plenum - 996 throttle body - Fred's xenon projector headlights - blue LED instrument cluster - and a few other things
Driving this car makes me wish I lived farther away from work!
|
|
|
|
|
07-06-2014, 07:51 AM
|
#58
|
|
Registered User
Join Date: Dec 2012
Location: FL
Posts: 4,145
|
Quote:
Originally Posted by particlewave
Thank you for donating these ambers for the cause, steved0x!!!
|
My pleasure
|
|
|
|
|
09-04-2014, 12:40 PM
|
#59
|
|
North East UK
Join Date: Aug 2013
Location: Sunderland
Posts: 45
|
Hi guys. Due to the great step by step by particleweave I thought I'd give it a go. I looked all over the internet for pictures till I found this forum, hopefully my images also help people decide to give it a go or not.
|
|
|
|
|
09-04-2014, 12:46 PM
|
#60
|
|
North East UK
Join Date: Aug 2013
Location: Sunderland
Posts: 45
|
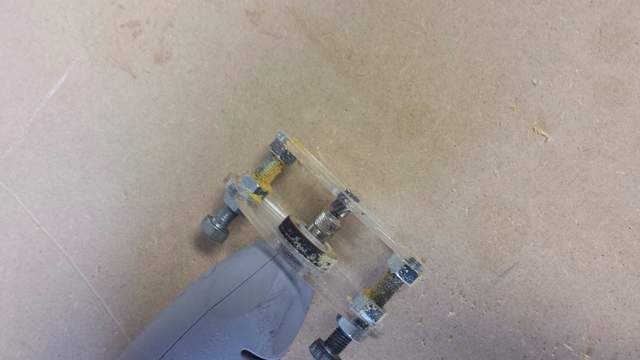
This is the router tool I made for the dremel.
Last edited by BoxPaulie; 09-04-2014 at 12:53 PM.
|
|
|
|
 Posting Rules
|
You may not post new threads
You may not post replies
You may not post attachments
You may not edit your posts
HTML code is On
|
|
|
All times are GMT -8. The time now is 01:34 AM.
| |


 2001 Boxster S
 2000 Acura Integra Type R
 1999 Porsche Boxster
 2004 BMW 645ci
 2005 kawasaki Ninja Zx-10R
 2003 Yamaha Yzf-R6
 "all_mota" budget build
 1994 Pontiac Firebird Formula
 Linear Mode


