 09-04-2014, 12:50 PM
|
#61
|
|
North East UK
Join Date: Aug 2013
Location: Sunderland
Posts: 45
|
It's tricky for sure, took me around 2 hours per lamp I would say.
|

|

|
|
09-04-2014, 12:55 PM
|
#62
|
|
North East UK
Join Date: Aug 2013
Location: Sunderland
Posts: 45
|
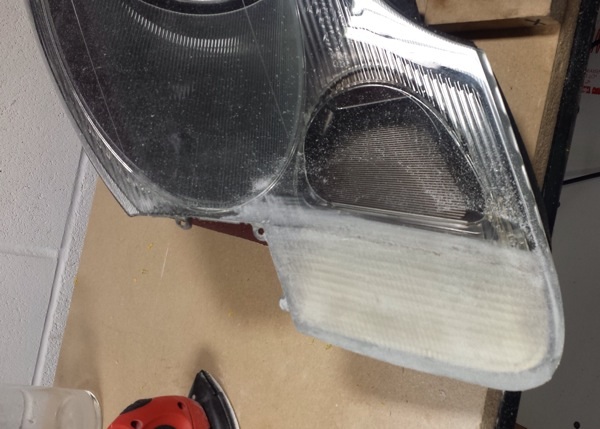
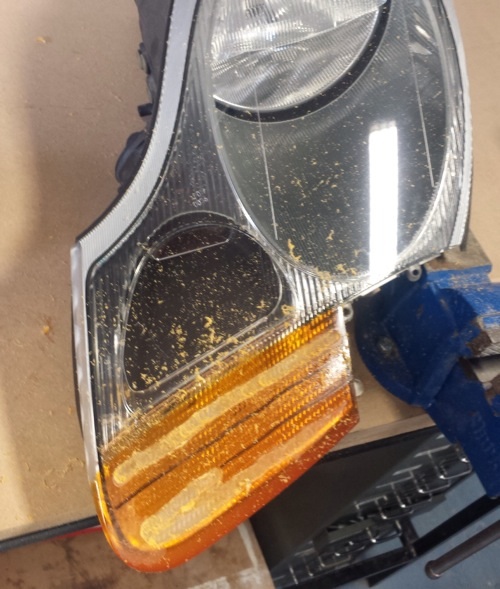
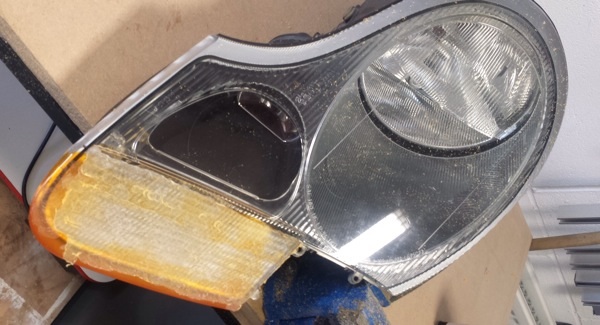
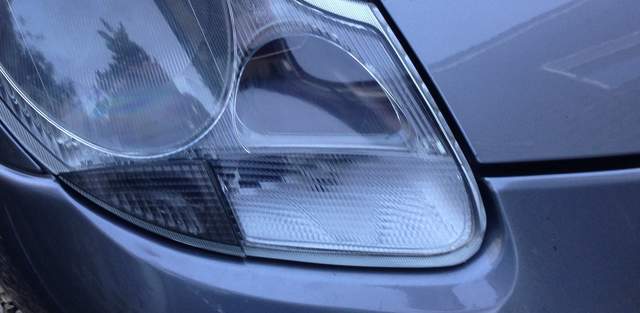
Here is the difference between the two. After routing, sanding with a handheld mouse sander, going through the grit grades and finally cutting compound and then polish.
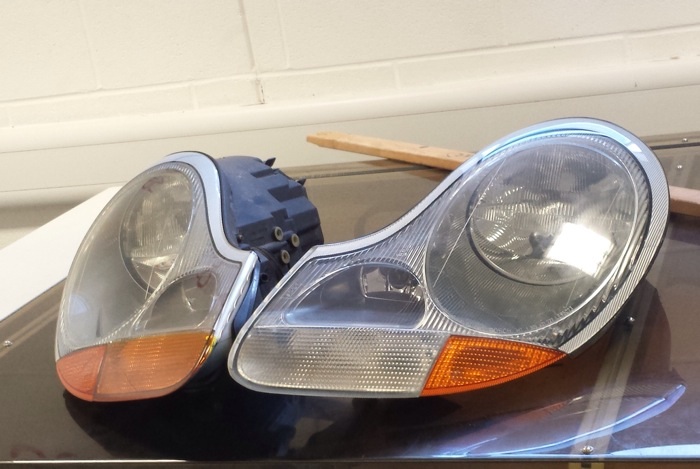
I hope this inspires a few people. Now on to eBay to get the clear corner pieces!
Last edited by BoxPaulie; 09-04-2014 at 01:01 PM.
|
|
|
|
|
09-04-2014, 01:13 PM
|
#63
|
|
Registered User
Join Date: Nov 2009
Location: Winnipeg MB
Posts: 2,485
|
Wow. That has to be one of the most impressive DIY's I've seen yet. Well done, great work! You are a brave man to tackle it.
I bet there's is going to be a bunch of people wanting you to sell them one of those dremel attachments you made.
__________________
'99 black 986
Last edited by Mark_T; 09-04-2014 at 01:18 PM.
|
|
|
|
|
09-04-2014, 01:16 PM
|
#64
|
|
Registered User
Join Date: Jul 2014
Location: Listowel, Ontario, Canada
Posts: 1,120
|
The lights do look so much better de-ambered. My skill level isn't there yet - maybe some day I'll give this one a go. Or just keep watching ebay.
__________________
2011 Boxster 987.2 Arctic silver / Black leather, PDK with Sports Chrono Package Plus
|
|
|
|
|
09-04-2014, 01:21 PM
|
#65
|
|
Registered User
Join Date: Jun 2012
Location: Bedford, TX
Posts: 2,755
|
Very nice work, Particlewave would be impressed 
__________________
______________________________________________
2001 Boxster S Lapis Blue
TS Cat Bypass Pipes and exhaust
iPad Mini Dash Install
DEPO Tail Lights
|
|
|
|
|
09-04-2014, 03:29 PM
|
#66
|
|
Registered User
Join Date: Mar 2012
Location: Arizona
Posts: 720
|
Particlewave always does nice work. That's why he has my headlights.
__________________
99 Porsche Boxster 986 3.8
85 Toyota Corolla AE86 F20C
12 Honda Accord
16 Mercedes C450 AMG
22 Tesla Model X Plaid
|
|
|
|
|
09-05-2014, 04:24 AM
|
#67
|
|
Registered User
Join Date: Apr 2014
Location: Leeds UK
Posts: 105
|
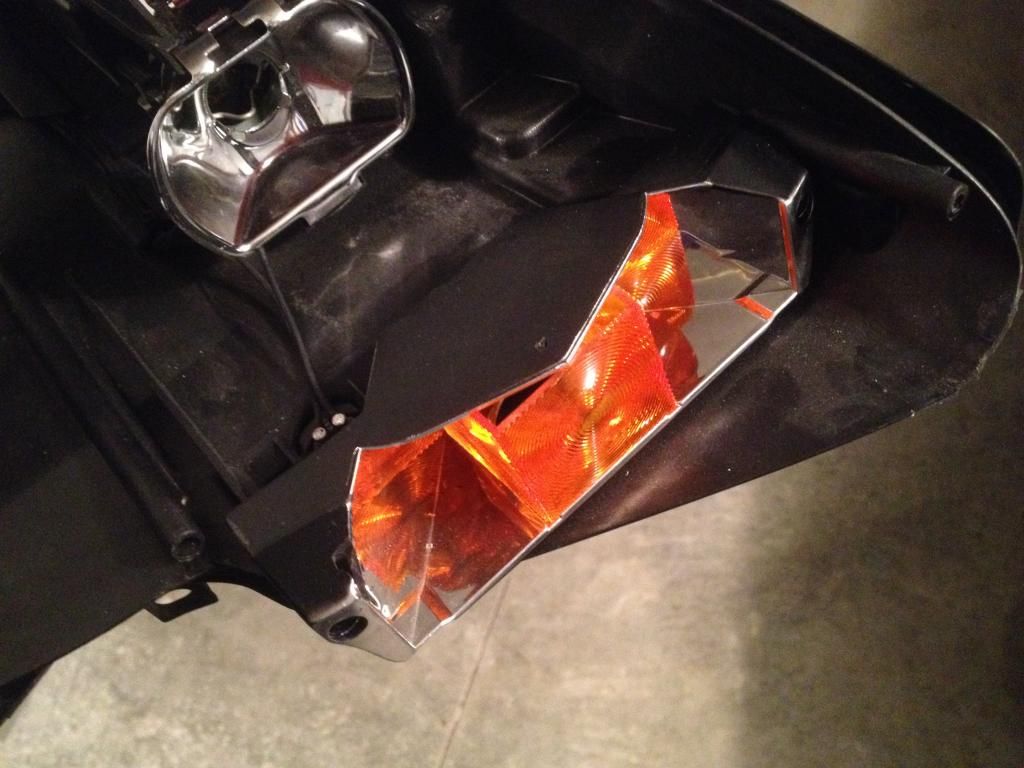
Here's one I did earlier. For those who are not brave enough I am selling them eBay but also I open them up and paint the gold coloured reflector in the indicator. The corner infill is quite dark so I recently baked those as well and opened up to respray silver inside. If you do this be careful as they are very delicate
Last edited by mavis.d; 09-05-2014 at 04:41 AM.
|
|
|
|
|
09-05-2014, 05:02 AM
|
#68
|
|
Registered User
Join Date: Jun 2014
Location: Lancashire, UK
Posts: 33
|
Quote:
Originally Posted by mavis.d

Here's one I did earlier. For those who are not brave enough I am selling them eBay but also I open them up and paint the gold coloured reflector in the indicator. The corner infill is quite dark so I recently baked those as well and opened up to respray silver inside. If you do this be careful as they are very delicate
|
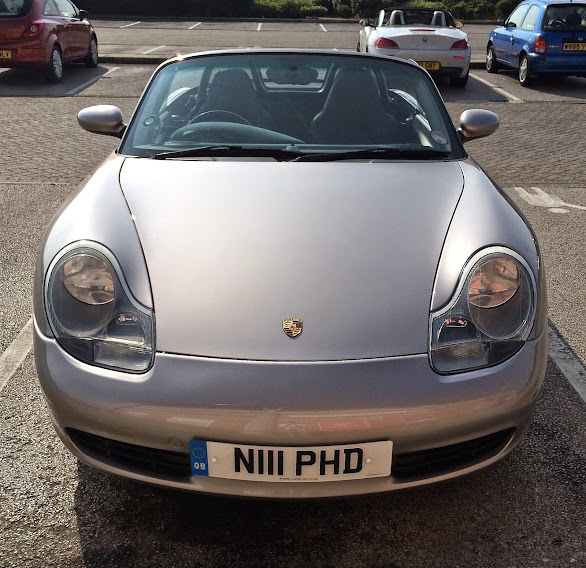
Just thought I'd share some pics of the de-ambered pre-facelifts I bought from mavis.d recently. I'm happy with them 

|
|
|
|
|
09-05-2014, 01:40 PM
|
#69
|
|
Custom User Title Here
Join Date: Mar 2012
Location: Ft. Leonard Wood
Posts: 6,169
|
Excellent work Paulie! Very impressive! 
Mavis - Your post dragged me out of semi-retirement.
1) nice work.
2) the turn signal shroud should be painted black in order to match the rest of the headlight (as is the case in OEM clears).
3) I'm a little surprised to see that you are not only trying to profit off of my DIY, but you also came here to advertise that fact. Seems a little un-cool, but whatever. ")
Later Bros! Love, peace and hair grease! 
__________________
https://youtube.com/@UnwindTimeVintageWatchMuseum
Last edited by particlewave; 09-05-2014 at 02:34 PM.
|
|
|
|
|
09-05-2014, 08:00 PM
|
#70
|
|
Registered User
Join Date: Aug 2007
Location: virginia
Posts: 402
|
I don't get it. Why de-amber ? What is wrong with amber lights ?
|
|
|
|
|
09-05-2014, 10:03 PM
|
#71
|
|
Registered User
Join Date: Nov 2009
Location: Winnipeg MB
Posts: 2,485
|
They are considered fugly by many owners. I swapped out mine for clears and I think it dramatically improves the look of the car. To each his own.
__________________
'99 black 986
|
|
|
|
|
09-06-2014, 07:38 AM
|
#72
|
|
Registered User
Join Date: Apr 2014
Location: Leeds UK
Posts: 105
|
Quote:
Originally Posted by particlewave
Excellent work Paulie! Very impressive!
Mavis - Your post dragged me out of semi-retirement.
1) nice work.
2) the turn signal shroud should be painted black in order to match the rest of the headlight (as is the case in OEM clears).
3) I'm a little surprised to see that you are not only trying to profit off of my DIY, but you also came here to advertise that fact. Seems a little un-cool, but whatever.
Later Bros! Love, peace and hair grease! |
1) Thanks
2) Will try darker paint on the current batch
3) Just spreding Boxster for those who aren't brave enough or skill, tools etc to give it a go
|
|
|
|
|
09-06-2014, 12:19 PM
|
#73
|
|
WALDMEISTER
Join Date: Sep 2013
Location: Germany
Posts: 1,381
|
Now, how cool is that....LOOKS GREAT!!!
Is there maybe an UV coating with a slight color tint in it, e.g. to match the gray corners?
__________________
Original Owner | PORSCHE Boxster 2.7L (MY01) | Seal Gray
|
|
|
|
|
09-11-2014, 05:13 PM
|
#74
|
|
North East UK
Join Date: Aug 2013
Location: Sunderland
Posts: 45
|
Mavis.D do you have any photos and your process for opening up the lamps? I'm reluctant to try it incase I melt mine! Was hoping to open them up and paint the inner reflector. I think that DIY would go perfectly with the guide from particalwave.
|
|
|
|
|
09-12-2014, 04:55 AM
|
#75
|
|
Registered User
Join Date: Apr 2014
Location: Leeds UK
Posts: 105
|
Quote:
Originally Posted by BoxPaulie
Mavis.D do you have any photos and your process for opening up the lamps? I'm reluctant to try it incase I melt mine! Was hoping to open them up and paint the inner reflector. I think that DIY would go perfectly with the guide from particalwave.
|
Hi particalwave has already posted a diy which includes a video how to open up the lights I found that I needs to cook mine for about twenty mins
Good Luck
David
|
|
|
|
|
11-12-2014, 05:09 PM
|
#76
|
|
Registered User
Join Date: Dec 2013
Location: Ranson wv
Posts: 237
|
Some one please do mine.
__________________
02 Boxster
71 VW Karmann Ghia
71 VW Super Beetle
|
|
|
|
|
02-16-2015, 02:41 PM
|
#77
|
|
Side Porsche
Join Date: Jan 2015
Location: Tn
Posts: 157
|
I just came across this. As much as I've read about it, I want to assure myself that this is for the first gen cars? If so I'm starting this today because I'm snowed in for a few days.
|
|
|
|
|
02-16-2015, 03:14 PM
|
#78
|
|
Custom User Title Here
Join Date: Mar 2012
Location: Ft. Leonard Wood
Posts: 6,169
|
Quote:
Originally Posted by mipstien
I just came across this. As much as I've read about it, I want to assure myself that this is for the first gen cars? If so I'm starting this today because I'm snowed in for a few days.
|
Yes, first gen, pre-facelift.
Take your time and it will go easy. Remember, you can always take more off but you can't put it back. 
__________________
https://youtube.com/@UnwindTimeVintageWatchMuseum
|
|
|
|
|
02-16-2015, 03:24 PM
|
#79
|
|
Need For Speed
Join Date: Feb 2013
Location: Funville
Posts: 2,114
|
I want to get rid of the amber in here!

__________________
2003 Boxster S
| 987 Air Box | K&N Air Filter | 76mm Intake Pipe| 996 76mm TB | 997 Distribution T | Secondary Cat Delete Pipes | Borla Muffler | NHP 200 Cell Exhaust Headers |
|
|
|
|
|
02-16-2015, 05:47 PM
|
#80
|
|
Custom User Title Here
Join Date: Mar 2012
Location: Ft. Leonard Wood
Posts: 6,169
|
Quote:
Originally Posted by KRAM36
I want to get rid of the amber in here!
|
The soldering iron method works if you're careful, but it's much easier with the lens off

__________________
https://youtube.com/@UnwindTimeVintageWatchMuseum
|
|
|
|
 Posting Rules
|
You may not post new threads
You may not post replies
You may not post attachments
You may not edit your posts
HTML code is On
|
|
|
All times are GMT -8. The time now is 01:44 AM.
| |


 2001 Boxster S
 "GRAY"
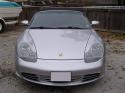 My car
 Linear Mode


