 01-24-2018, 09:11 PM
|
#62
|
|
Motorist & Coffee Drinker
Join Date: Jul 2014
Location: Oklahoma
Posts: 3,955
|
Quote:
Originally Posted by rusty69911

hanging for the updates, love this, hope the water wasnt poo water?? dont lick it to test...
|
I was curious about the flooding and location. When I received the title, I did a little detective work with the previous owner's name (address wasn't listed on the insurance title). The house I identified is in this neighborhood, which was flooded by intentional release of a reservoir:
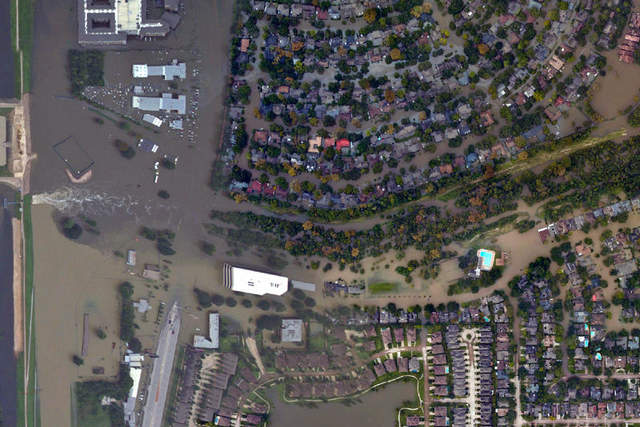
Here's an article: https://www.washingtonpost.com/graphics/2017/national/harvey-flood/?utm_term=.923c11be1dd3
__________________
I am not an attorney, mechanic, or member of the clergy. Following any advice given in my posts is done at your own peril.
|

|

|
|
01-24-2018, 09:19 PM
|
#63
|
|
Motorist & Coffee Drinker
Join Date: Jul 2014
Location: Oklahoma
Posts: 3,955
|
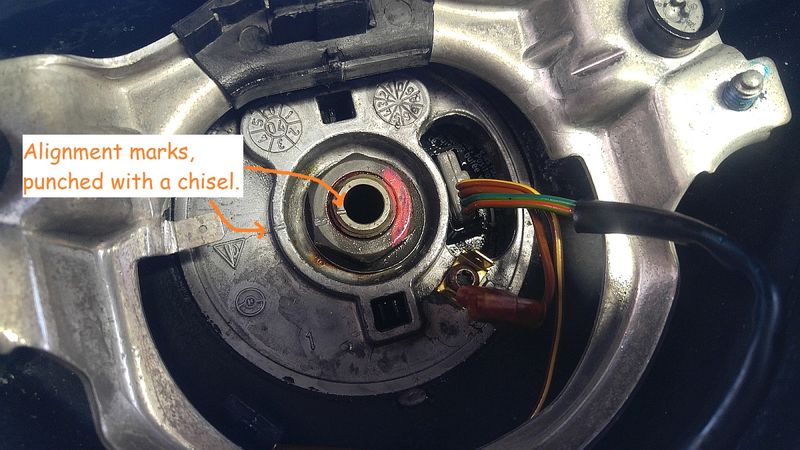
Replacing the Steering Lock and Ignition Tumbler
Buying a car without a key presents a challenge. You can lock it, but you can't unlock it. You can not start it. In this case, the immobilizer/central locking unit module under the driver's seat, was corroded so badly that even if the car had a key, it would not have functioned. I bought a matching set of 3 keys, steering lock, immobilizer box, and DME for about $500. The challenge was, how to get the tumbler and steering lock out.
Edit: First step, remove the instrument cluster (mine was already out). See this article and be very careful with the brittle connectors on the back of the cluster: https://www.pelicanparts.com/techarticles/Boxster_Tech/90-ELEC-996_Cluster/90-ELEC-996_Cluster.htm
Remove the side vent and headlight switch.
Disconnect all the wires from the ignition and steering lock.
Removing the tumbler: Pull out the rubber surrounding the ignition tumbler, then use a chisel to bend and crack the soft cast aluminum that holds the tumbler. Eventually you will be able to pull it out.
Remove the steering wheel: If the steering wheel is locked, you should now be able to push in and turn the ignition with a screwdriver to unlock the steering. Fully loosen the 2 captive screws that hold the airbag and remove it. Disconnect wires. Mark the steering wheel and shaft so that you can reinstall it in the correct position. (24 mm nut and washer.)
Remove the rest of the stuff that's in the way of the steering column. (Small screws and gently prying.)
Remove the bolt that holds the steering lock (10 mm) and the screw for the bracket over the ignition switch.
Push the release button on the steering column where the steering lock connects. It should easily depress if the steering is unlocked. Slide the steering lock out.
Reverse the steps to install the new one.
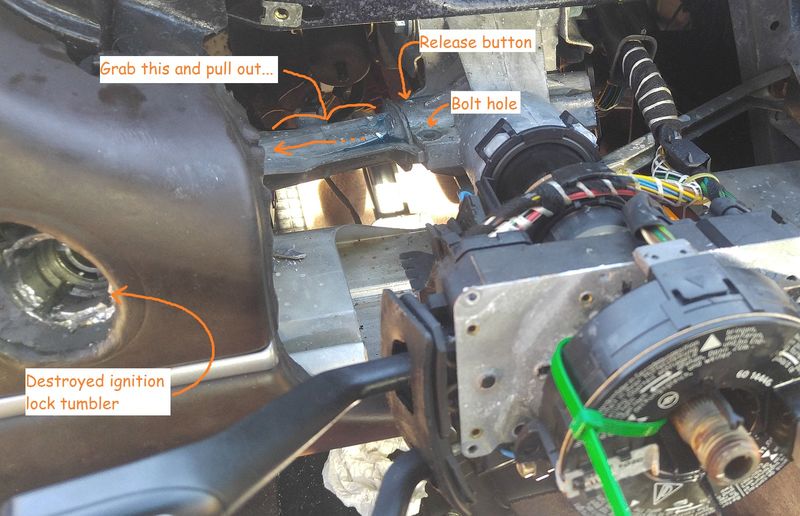
In my car the release button wouldn't move. Something was stuck. I tried various combinations of screwdrivers, rods, and hammers. Nothing worked and at one point I bumped the windshield with the back of the hammer. As a last resort, I used a drill to drill out the button. When I started drilling, the button popped down and the steering lock started to slide out. The drill must have scared it more than the hammer.
Installation was easy.
__________________
I am not an attorney, mechanic, or member of the clergy. Following any advice given in my posts is done at your own peril.
Last edited by 78F350; 01-24-2018 at 09:36 PM.
|
|
|
|
|
01-24-2018, 09:26 PM
|
#64
|
|
Registered User
Join Date: Jan 2008
Location: St Catherines, Ontario
Posts: 439
|
Interesting. Thanks man. Mine was built in April and my commission # is 523103. Hmmm
Enough highjacking and back to the resurrection
|
|
|
|
|
01-25-2018, 02:23 AM
|
#65
|
|
Registered User
Join Date: Jun 2014
Location: LB, Germany
Posts: 1,526
|
Quote:
Originally Posted by 78F350
Fresh, clear water... like Evian. My guess is that the water entered the cylinder by the exhaust valve.
|
Sounds good.
My proposal would be:
Don't turn over engine.
Replace engine oil and oil filter with cheap new ones.
Remove spark plugs and fill cylinders with engine oil / rost inhibitor as good as you can. Let it soak.
Remove air intake at tb. Check air intake filter and clean air intake housing and hose as good as you can without ripping it out of the car. If the air intake filter is intact and no debree passed it, chances are high that the intake system ist free of debree like sand etc. That would be a big plus. For first turn over don't connect intake hose to tb.
Remove headers from engine. Best would be to pull the complete exhaust system and check for water and especially for engine oil. If there is a bigger amount of water / engine oil sludge in the cats this can be problem. For first turn over don't connect headers to engine.
Remove all fuses you don't need and check all electronic parts you need to turn over the engine with the starter.
Check fuel tank for water. If there is water inside, pump all old fuel out and replace it with new fuel. The SE doesn't have an external fuel filter. So if you want to check the filter you have to pull the fuel pump - integral part of the pump.
Check cooling water for debree oil etc. If there is oil in the cooling water check why.
Check belt, tensioner etc.
Remove fuel pump and ignition fuses. Connect starter battery to terminals. Check electronics and fuses once again for shorts and functionality.
Turn over engine with starter motor. This will throw all oil and debree out of the cylinders. This will also make a mess so be prepared.
If you like you can refill the cylinders with oil and do the procedure again until all oil came out of the cylinders.
Install spark plugs and ignition coils / cables etc. install fuses (fuel pump, ignition).
Start engine without headers and tb intake hose. Prepare - this will be loud. Check if all cylinders are present. Check for unusual noises etc. If everything is OK let the engine warm up at idle / lower revs for 10 minutes. That should be enough time to get humidity out.
Than check other components and think about what needs additional cleaning, replacement etc.
Hope that is useful.
Again good look with the SE Houston project
Regards, Markus
|

|
|
|
01-25-2018, 07:10 PM
|
#66
|
|
Motorist & Coffee Drinker
Join Date: Jul 2014
Location: Oklahoma
Posts: 3,955
|
Quote:
Originally Posted by MWS
Pardon if this suggestion is beyond obvious, but if you get to the point when you would like to try to start the car, I would have all the nonessential electronics disconnected and then start adding them back in one at a time (or add "donor" components)....
|
That sounds good. At first, only essentials in the car, then rather than putting the original stuff back in, I'll use my spares (as much as possible). After I know the basic systems and are harness good, I'll switch in the original equipment one by one (the parts that cleaned up and looked good).
So far I have done much of what Markus suggested, except I haven't applied power to the car yet. I put power directly to the starter with the intake and throttle body removed. First with the spark plugs out, then later with the spark plugs in. All of this with the exhaust drained and open and fresh oil with anti rust additive (marine oil).
I pushed other my project car out of the garage today, but still need to clean up and organize my junk before the Houston SE goes in.
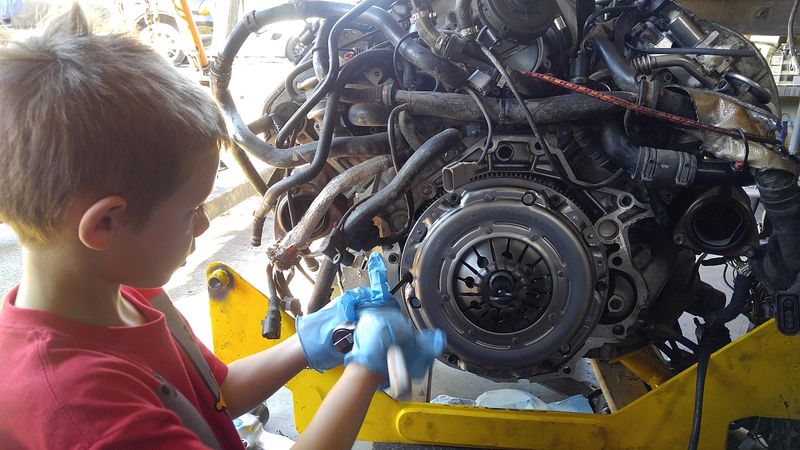
My grandson (6 years old) will be visiting this weekend, so probably not much progress unless he wants to play with cars.
__________________
I am not an attorney, mechanic, or member of the clergy. Following any advice given in my posts is done at your own peril.
Last edited by 78F350; 01-25-2018 at 09:34 PM.
|
|
|
|
|
01-25-2018, 08:52 PM
|
#67
|
|
Registered User
Join Date: Oct 2014
Location: California Central Coast
Posts: 1,476
|
Impressed with the progress you're making AND time for the grandkids! Curious if there was any water in the intake tract downstream of the TB. I would think since TB was closed and tested to 26" manifold vacuum it should have been water tight. The exhaust side of course is open and 2 exhaust valve should be in various states of open but interesting they were same bank. As far as debris the catalyst is a pretty good strainer, so I wouldn't remove the headers unless you really want to. Since exhaust is stainless and water (condensation) is normal, The muffler is all I'd think that needs to be inspected. Carry On!!! 
|
|
|
|
|
01-26-2018, 02:29 PM
|
#68
|
|
Registered User
Join Date: Jun 2014
Location: LB, Germany
Posts: 1,526
|
Quote:
Originally Posted by 911monty
As far as debris the catalyst is a pretty good strainer, so I wouldn't remove the headers unless you really want to.
|
Problem is, that there was too little engine oil in the engine and a lot of water. So it's possible that the engine oil is in the exhaust system and in the cats. In my opionion it's highly recommended to remove the exhaust system at the headers and check if there is engine oil in the exhaust system / cats.
My experience says grandsons always wants to play with cars. But it's questionable if you really have progress with the work you want to do on your cars. 
Have a good time with your grandson and family. Much more important than cars.
Regards, Markus
|
|
|
|
|
01-26-2018, 02:40 PM
|
#69
|
|
Registered User
Join Date: Oct 2014
Location: California Central Coast
Posts: 1,476
|
Quote:
Originally Posted by Smallblock454
Problem is, that there was too little engine oil in the engine and a lot of water. So it's possible that the engine oil is in the exhaust system and in the cats. In my opionion it's highly recommended to remove the exhaust system at the headers and check if there is engine oil in the exhaust system / cats.
Regards, Markus
|
Totally agree. However, while motor oil may kill the cats, the only way to know will be to run them and cook the oil out with exhaust heat. I don't know the condition of the exhaust manifold to head bolts, but at this point I wouldn't risk breaking a few just to see if there is oil in there when we all know the answer to that one (see post 38). If the cats fail deal with it then. They may be fine. Lots of failed AOS that oil soaked cats came back from.
Last edited by 911monty; 01-26-2018 at 02:48 PM.
|
|
|
|
|
01-26-2018, 06:18 PM
|
#70
|
|
Registered User
Join Date: Sep 2016
Location: Central Ohio
Posts: 415
|
Quote:
Originally Posted by Dave80GTSi
|
Glad to see that you made it!
Now, everyone in here needs to chime in over there! - DM
__________________
2000 Ocean Blue Boxster S
1980 Ferrari 308 GTSi
2019 Alfa Romeo Giulia Ti Sport AWD
|
|
|
|
|
01-26-2018, 06:40 PM
|
#71
|
|
Motorist & Coffee Drinker
Join Date: Jul 2014
Location: Oklahoma
Posts: 3,955
|
Quote:
Originally Posted by 911monty
Totally agree. However, while motor oil may kill the cats, the only way to know will be to run them and cook the oil out with exhaust heat. I don't know the condition of the exhaust manifold to head bolts, but at this point I wouldn't risk breaking a few just to see if there is oil in there when we all know the answer to that one (see post 38). If the cats fail deal with it then. They may be fine. Lots of failed AOS that oil soaked cats came back from.
|
Markus, Monty... Yes the cats have oil in them. I am fortunate to have 2 complete Boxster S exhaust systems in my storm cellar full of car parts. I will back-flush the primary cats, with water, then some waste Jet Fuel (like Kerosine), while I have the O2 sensors out. If they fail, I'll replace them later.
Dave, Thanks for introducing me to Grassroots.
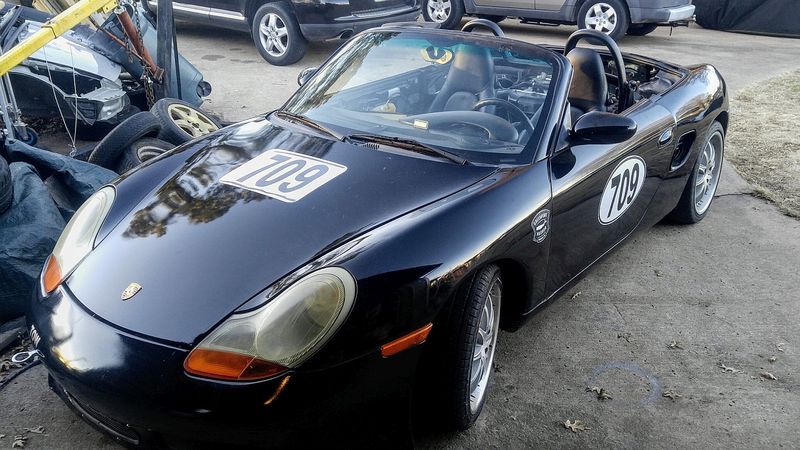
I drove to Missouri and picked up my grandson in a Boxster. "Granny drives an SUV, Grampa drives a sports car..."
(Airbags are disabled in this one.)

__________________
I am not an attorney, mechanic, or member of the clergy. Following any advice given in my posts is done at your own peril.
|
|
|
|
|
01-26-2018, 08:51 PM
|
#72
|
|
Registered User
Join Date: Oct 2014
Location: California Central Coast
Posts: 1,476
|
[QUOTE=78F350;561190]Markus, Monty... Yes the cats have oil in them. I am fortunate to have 2 complete Boxster S exhaust systems in my storm cellar full of car parts. I will back-flush the primary cats, with water, then some waste Jet Fuel (like Kerosine), while I have the O2 sensors out. If they fail, I'll replace them later.
I'm not sure this is a good idea. Just a rich fuel mixture causes the cats to overheat and burn out. Wouldn't want to see the exothermic reaction that would happen with raw fuel in there. I've never actually heard of any cleaners for cats.
PS: Actually I did see a buddies 2006 chevy pickup with a bad supercharger install dumping raw fuel into the cats. They were bright red, almost white, and the undercoating was dripping from the frame rails. Towed his boat to my house to show me.....Amazing it didn't burn down in my driveway.
Last edited by 911monty; 01-26-2018 at 09:00 PM.
|
|
|
|
|
01-26-2018, 09:03 PM
|
#73
|
|
Registered User
Join Date: Jun 2014
Location: LB, Germany
Posts: 1,526
|
Quote:
Originally Posted by 911monty
Totally agree. However, while motor oil may kill the cats, the only way to know will be to run them and cook the oil out with exhaust heat. I don't know the condition of the exhaust manifold to head bolts, but at this point I wouldn't risk breaking a few just to see if there is oil in there when we all know the answer to that one (see post 38). If the cats fail deal with it then. They may be fine. Lots of failed AOS that oil soaked cats came back from.
|
The US SE has 4 cats. 2 in the headers and 2 before the muffler. One problem i see is back pressure. Oil / water mixture in cats can be very tough / doughy (don't know the right english word). If you want to start the car, this can cause more problems than a sheared off head bolt. Also if the oil starts to burn (specially the header cats) by exhaust temperature, the cats will clog / die in a short time.
There are specialized companies that can clean oil contaminated catalytic converters. Oil contamination happens often if turbochargers fail.
And yes, if one or more header bolt shears off this is also a problem. But if you soak them in rust dessolver (min. 2-3 days and don't start the engine in this time) and clean them extensively (best is to soak and clean more than one time) with a steel brush before you try to open them in general they don't shear off. In my opinion these shear off fails are often caused by much too short preparation time.
My approach is always to check for risks and try to go the way with the least risks. Even if it takes more time. And for shure everybody has made it's own experiences and has it's own opinion. In the end everything can go wrong, even if you have tried to take all aspects in consideration.
Just my 2 cents…
Regards, Markus
Last edited by Smallblock454; 01-26-2018 at 09:16 PM.
|
|
|
|
|
01-26-2018, 09:31 PM
|
#74
|
|
Motorist & Coffee Drinker
Join Date: Jul 2014
Location: Oklahoma
Posts: 3,955
|
Quote:
|
I'm not sure this is a good idea. Just a rich fuel mixture causes the cats to overheat and burn out.
|
I was thinking of flushing them out long before actually running the engine. The Jet Fuel would all be evaporated out (and blown through with compressed air when I flushed) Do you think that would still be a problem?
Quote:
|
...And yes, if one or more header bolt shears off this is also a problem. But if you soak them in rust dessolver (min. 2-3 days and don't start the engine in this time) ...
|
On the first day, I sprayed them with penetrating oil, and I have done it again a few times. There is still risk, but I think I can remove them safely if needed.
The rear cats and muffler are already unbolted. I am going to replace them with a good, dry parts before I start. The 'wet' muffler from this car will become my spare.
__________________
I am not an attorney, mechanic, or member of the clergy. Following any advice given in my posts is done at your own peril.
Last edited by 78F350; 01-26-2018 at 09:35 PM.
|
|
|
|
|
01-27-2018, 04:34 AM
|
#75
|
|
Registered User
Join Date: Jul 2013
Location: Bastrop, Tx
Posts: 2,644
|
[QUOTE=911monty;561195]
Quote:
Originally Posted by 78F350
PS: Actually I did see a buddies 2006 chevy pickup with a bad supercharger install dumping raw fuel into the cats. They were bright red, almost white, and the undercoating was dripping from the frame rails. Towed his boat to my house to show me.....Amazing it didn't burn down in my driveway.
|
I've personally seen this happen on a boxster and it's a common cause of fires with them. I'm kind of surprised it's not talked about more on here.
__________________
Woody
|
|
|
|
|
01-27-2018, 09:48 AM
|
#76
|
|
Registered User
Join Date: Oct 2014
Location: California Central Coast
Posts: 1,476
|
[QUOTE=78F350;561197]I was thinking of flushing them out long before actually running the engine. The Jet Fuel would all be evaporated out (and blown through with compressed air when I flushed) Do you think that would still be a problem?
I would not recommend using ANY hydrocarbon in the cats. To the cats the only real difference between gasoline and jet fuel is the length of the molecular chain. JP5, JP8 doesn't matter, they are similar to diesel which does not completely evaporate and will leave residual hydrocarbons in the cats (feels oily) which is mostly paraffin. Simple Green maybe?
Last edited by 911monty; 01-27-2018 at 10:20 AM.
|
|
|
|
|
01-27-2018, 11:17 AM
|
#77
|
|
Motorist & Coffee Drinker
Join Date: Jul 2014
Location: Oklahoma
Posts: 3,955
|
Quote:
Originally Posted by 911monty
I would not recommend using ANY hydrocarbon in the cats. To the cats the only real difference between gasoline and jet fuel is the length of the molecular chain. ...
|
Sometimes I'm slow, but it is finally sinking in. No flammable hydrocarbons. Now tending towards soapy water to get the oily film out of the primary cats, rather than just running the car and burning it out.
I saw some YouTube videos about cleaning old cats. People who were trying to fix failed cats didn't have good results. In this case, I assume they are still good, but coated with oil.
Eric the Car Guy: https://www.youtube.com/watch?v=1uukKrgBXeo
__________________
I am not an attorney, mechanic, or member of the clergy. Following any advice given in my posts is done at your own peril.
|
|
|
|
|
01-27-2018, 01:15 PM
|
#78
|
|
Registered User
Join Date: Oct 2014
Location: California Central Coast
Posts: 1,476
|
I'm just going to throw this out there as something to consider. I can tell by what you've already accomplished that you have no reservations to getting your hands dirty.
I question how "oily" the cats can be. Let's think about the sequence of events and how oil came to be in the cats in the first place.
Flood waters rise and enter the muffler. water fills the entire exhaust system and enters a couple cylinders, (intake valves are at top), then displaces oil to the TOP of the crankcase and back out through the cylinders. Because the exhaust system is entirely full and due to phase separation (oil floating on top of the water) then the only contact of oil to the cats is at the top of the substrate as the oil migrates out the exhaust in a thin stream at the surface of the water. What does this mean? It is likely there was only a minor stream of oil in the exhaust at any given time, far less than the flood that would be seen from a failed AOS that experienced hydrolock. The water/oil did not form an emulsion since it was never sheared. Certainly cleaning is not going to hurt anything but is it necessary?
Regardless I am enjoying this thread. Keep up the good work!
The point of this post is: in my experience with flooded boat engines is that the quicker you could get one running (usually hours) the better. Detailing can happen later.
Last edited by 911monty; 01-27-2018 at 02:11 PM.
|
|
|
|
|
01-27-2018, 05:11 PM
|
#79
|
|
Registered User
Join Date: Sep 2016
Location: Central Ohio
Posts: 415
|
Quote:
Originally Posted by 78F350
Today I pulled out some electronics. The CDR23/amp/CDC4 are beyond repair.
|
Are you certain that the trashed CD player is a CDC-4 and is not a CDC-3?
If it might indeed be a -3, I could use the magazine if you'd be willing to sell it.
Thanks - DM
__________________
2000 Ocean Blue Boxster S
1980 Ferrari 308 GTSi
2019 Alfa Romeo Giulia Ti Sport AWD
|
|
|
|
|
01-27-2018, 07:00 PM
|
#80
|
|
Motorist & Coffee Drinker
Join Date: Jul 2014
Location: Oklahoma
Posts: 3,955
|
Quote:
Originally Posted by Dave80GTSi
Are you certain that the trashed CD player is a CDC-4 and is not a CDC-3?
If it might indeed be a -3, I could use the magazine if you'd be willing to sell it.
Thanks - DM
|
It was a CDC-4 in the car and I think I have a couple -3s in a box. I'll PM or post a pic and price later.
__________________
I am not an attorney, mechanic, or member of the clergy. Following any advice given in my posts is done at your own peril.
|
|
|
|
| Thread Tools |
|
|
| Display Modes |
 Linear Mode Linear Mode
|
 Posting Rules
|
You may not post new threads
You may not post replies
You may not post attachments
You may not edit your posts
HTML code is Off
|
|
|
All times are GMT -8. The time now is 07:11 PM.
| |


 Parts Car, car parts
 Honda Del Sol(s)
 "Hers"
 My Original '99
 The 78 F350
 This
This That
That The S 2.5
 Other
Other 1998 Porsche Boxster


