 03-31-2015, 06:28 PM
|
#1
|
|
Registered User
Join Date: Mar 2014
Location: Nashville, TN
Posts: 210
|
so many little hoses
was cleaning the engine today and noticed a loose hose. it doesn't have vacuum that I can tell. not sure where it is suppose to connect.
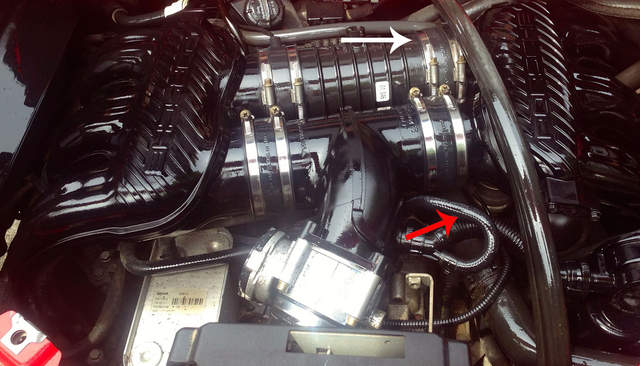
it seems to run from under the resonance tube boot on the right (white arrow) to an area near the AOS (red arrow).

it connects to a Y (blue arrow), which connects to a component mounted to the engine. the other end of the Y (red arrow) has a piece of similar hose that is not connected to anything. I'm guess it should be.
Anyone know where it is suppose to connect?
|

|

|
|
03-31-2015, 07:15 PM
|
#2
|
|
Registered User
Join Date: Jan 2015
Location: Moore, Ok
Posts: 105
|
I have no idea where your ninja hose goes. But I have to say that is beautiful.. so clean, brings a tear to my eye. Bravo
|
|
|
|
|
03-31-2015, 08:02 PM
|
#3
|
|
Motorist & Coffee Drinker
Join Date: Jul 2014
Location: Oklahoma
Posts: 3,960
|
Here's the picture that eventually gets posted in these "Where does this one go?" threads:
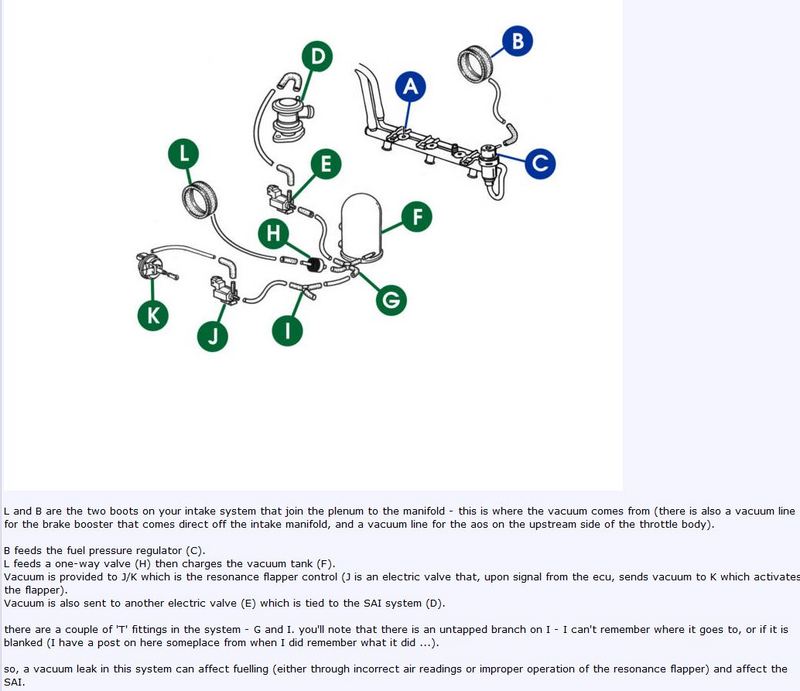
I think the 'Y' that you are looking at is (G) in the diagram - Some have a 3-way split (manual transmission), some 4-way (Tiptronic).
***I'm pretty sure the original source of the image is the PelicanParts tech articles, but not positive.***
..and here's what happens when you put a Boxster in the garage, cover it, and put a box on top:

The bigger the box, the more cats will appear.
I hope one of those pictures helps. :dance:
Last edited by 78F350; 04-01-2015 at 08:02 AM.
|
|
|
|
|
04-01-2015, 01:35 AM
|
#4
|
|
Need For Speed
Join Date: Feb 2013
Location: Funville
Posts: 2,114
|
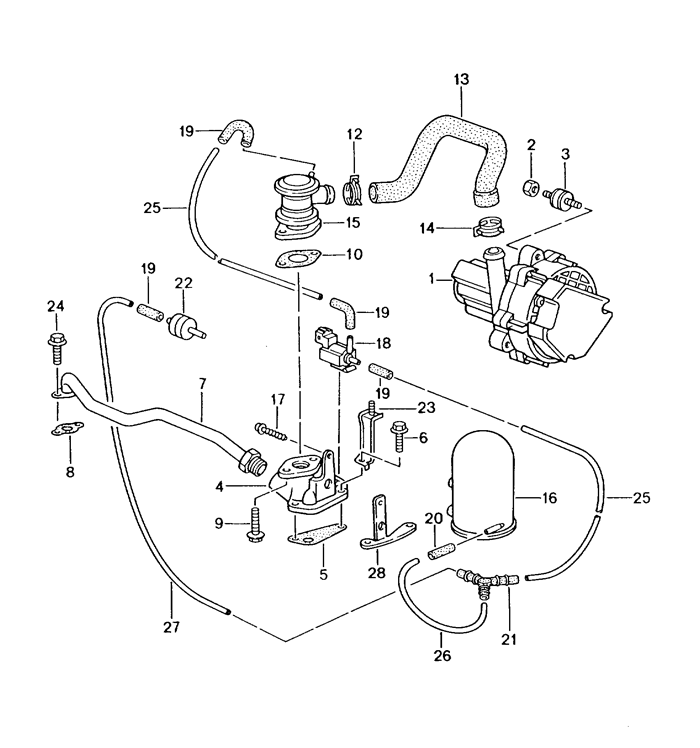
That's the wrong picture for your car, that picture is for Tiptronic transmission cars. I believe it goes to a change-over valve, #18 in this diagram.
See this thread and Jager's explanation of how he fixes it, post #17.
http://986forum.com/forums/performance-technical-chat/56113-why-dont-my-secondary-air-injection-components-look-like.html
__________________
2003 Boxster S
| 987 Air Box | K&N Air Filter | 76mm Intake Pipe| 996 76mm TB | 997 Distribution T | Secondary Cat Delete Pipes | Borla Muffler | NHP 200 Cell Exhaust Headers |
|
|
|
|
|
04-01-2015, 11:44 AM
|
#5
|
|
Registered User
Join Date: May 2014
Location: S.California
Posts: 2,029
|
I am struggling with the same issue.There are several diagrams floating around and some mention of upgrades and changes to 3-way connectors. Few of the diagrams match photos to show exactly where things connect into the flex sleeves on the intake. It is a great opportunity for someone to do the definitive DIY Project Guide!
|
|
|
|
|
04-03-2015, 11:41 AM
|
#6
|
|
Registered User
Join Date: Mar 2014
Location: Nashville, TN
Posts: 210
|
Quote:
Originally Posted by KRAM36

|
that is the diagram I see everywhere, however mine is different.
the first Y connector connect to the vacuum reserve canister, then to a second Y connector. the second one connects to the change over valve (I think) and to the boot on the resonance tube. another line runs from the change over valve to a vacuum solenoid on the resonance tube.
the 3rd connection on the 1st Y is the one that is not connected to anything and I cannot tell where it should go. I have spent hours searching online and looking at the engine trying to see if there is any other connection with a hose.
I would think that this was just a previous owner or mechanics "fix" for a broken line or something. but I have run across one other post where a guy had a similar setup. the post was from 2009 and I tried to reach out to him but I don't think he is still active.
|
|
|
|
|
04-03-2015, 03:33 PM
|
#7
|
|
Need For Speed
Join Date: Feb 2013
Location: Funville
Posts: 2,114
|
The change-over valve, #18 in the diagram is there, you just can't see it. That's where that connection should go to. I agree, the previous owner did a hack job. It's not easy to get to that change-over valve, so he just left it unattached.
__________________
2003 Boxster S
| 987 Air Box | K&N Air Filter | 76mm Intake Pipe| 996 76mm TB | 997 Distribution T | Secondary Cat Delete Pipes | Borla Muffler | NHP 200 Cell Exhaust Headers |
|
|
|
|
|
04-15-2015, 09:56 PM
|
#8
|
|
Registered User
Join Date: Jul 2012
Location: Scottsdale, AZ
Posts: 174
|
Just found that same hose loose today. I remembered reading about it here. Thank God for the forum!!!!
|
|
|
|
|
04-16-2015, 08:22 AM
|
#9
|
|
Registered User
Join Date: Mar 2014
Location: Nashville, TN
Posts: 210
|
Quote:
Originally Posted by madmodz
Just found that same hose loose today. I remembered reading about it here. Thank God for the forum!!!!
|
did you figure out where it goes?
I have to replace the oil filler tube and pipe as soon as my parts come in. I also ordered some of that tubing. Hoping I can see the layout better once I get the intakes off.
|
|
|
|
|
04-17-2015, 01:11 AM
|
#10
|
|
Registered User
Join Date: Jul 2012
Location: Scottsdale, AZ
Posts: 174
|
Not yet, I was going to remove the manifolds to paint them. Found a broken engine mount so another thing to conquer.
|
|
|
|
|
04-17-2015, 11:40 AM
|
#11
|
|
Registered User
Join Date: Nov 2009
Location: Winnipeg MB
Posts: 2,485
|
Quote:
Originally Posted by 78F350
..and here's what happens when you put a Boxster in the garage, cover it, and put a box on top:
The bigger the box, the more cats will appear. |
Not a word, Timco, not a word. Just STFU and walk away.... 
__________________
'99 black 986
|
|
|
|
|
04-19-2015, 06:26 AM
|
#12
|
|
Registered User
Join Date: Mar 2014
Location: Nashville, TN
Posts: 210
|
let the fun begin
received the oil filler tube, oil filler pipe and vacuum hoses for the secondary air system from Pelican today. I also ordered a o-ring for the pipe, but it was delayed. didn't want to wait so I ran down to the Porsche dealer and got one.
Not seeing much on the forum or anywhere else online about replacing the oil filler pipe, so I will try to document as much as I can. I think the main issue is getting to it. everything I have read says you have to take off the intake manifold.
We are expecting rain all next week so I won't be tempted to rush the job to get it back on the road  . Plan to take my time, make sure it is done right as well as fixing the previous owners patchwork on the SAS.
if anyone has done this before and/or removed the intake manifold. be happy for any advice or tips.
|
|
|
|
|
04-20-2015, 07:43 AM
|
#13
|
|
Registered User
Join Date: Mar 2014
Location: Nashville, TN
Posts: 210
|
update
so I was able to get the oil filler tube off without taking off the intake. once you take off the resonance tube you can easily access the one bolt. the second one (under the alternator) is more difficult. I used a flexible extension to get it most of the way up, once it gets to a certain point, the extension won't work because there is no longer enough clearance (the back mount of the alternator blocks it). from that point I used a crowsfoot wrench to slowly work it the rest of the way and a magnetic pick up to grab it.
That being said, not sure getting that bolt back in will be very easy. however, it seems to me that removing the alternator would be a better option than removing the intake.
hopefully when I remove the alternator I will be able to see where the mystery vacuum hose goes.
|
|
|
|
|
04-21-2015, 05:53 PM
|
#14
|
|
Registered User
Join Date: Mar 2014
Location: Nashville, TN
Posts: 210
|
so, I was picking up my wife Mercedes from our Mechanic. which happens to be the same place I bought my boxster and they have done work on it as well. so I took the opportunity to ask the head tech about my secondary air injection system being different than any diagrams I can find. he says, "well the 911 engines have different SAI systems". I'm like, "yeah, so what's that have to do with anything?". he sort of looked puzzled for a second and said, "well, your car has a 911 engine, you didn't know that?"
no, no I did not. "oh, I thought you knew that when you bought it. yeah, the previous owner replaced a blown engine with a 911 with about 10K miles on it."
so now that I have this little piece of info, a lot of things are clear, like, how these F%*%&#* hoses are connected
|
|
|
|
|
04-21-2015, 06:55 PM
|
#15
|
|
Reebuck1
Join Date: May 2013
Location: Georgetown, SC
Posts: 210
|
tub
Interesting!!! Now that you know you have a 996 motor you may want to do a re-flash of your DME with ROW. That would allow you to remove a good portion of those vacuum hoses. If you have a Durametric you will have to get it reworked to be able to get all your readings again. Just a thought....
|
|
|
|
|
04-21-2015, 07:52 PM
|
#16
|
|
98 Arctic silver 986
Join Date: Jul 2011
Location: Upstate, NY
Posts: 1,452
|
Quote:
Originally Posted by kiyakubuke
so, I was picking up my wife Mercedes from our Mechanic. which happens to be the same place I bought my boxster and they have done work on it as well. so I took the opportunity to ask the head tech about my secondary air injection system being different than any diagrams I can find. he says, "well the 911 engines have different SAI systems". I'm like, "yeah, so what's that have to do with anything?". he sort of looked puzzled for a second and said, "well, your car has a 911 engine, you didn't know that?"
no, no I did not. "oh, I thought you knew that when you bought it. yeah, the previous owner replaced a blown engine with a 911 with about 10K miles on it."
so now that I have this little piece of info, a lot of things are clear, like, how these F%*%&#* hoses are connected |
Well now that you said that, I see your oil cooler has a 996 part number on it.
|
|
|
|
|
04-24-2015, 09:34 PM
|
#17
|
|
Registered User
Join Date: Feb 2015
Location: sacramento, ca
Posts: 7
|
Can I ask how you went about cleaning your engine? I can't see sticking my power washer in the back but would like to have my engine look better. Thx
|
|
|
|
|
04-25-2015, 06:04 PM
|
#18
|
|
Registered User
Join Date: Mar 2014
Location: Nashville, TN
Posts: 210
|
Quote:
Originally Posted by bobs_boxster
Can I ask how you went about cleaning your engine? I can't see sticking my power washer in the back but would like to have my engine look better. Thx
|
with the top in service mode, I use plastic and making tape to block off the interior. then sprayed it down with simple green and let it sit for about 15 minutes. then hosed it off. the shine comes from gunk engine bright.
|
|
|
|
|
11-24-2015, 07:11 AM
|
#19
|
|
Registered User
Join Date: Jan 2015
Posts: 18
|
what is #7 in the diagram?
|
|
|
|
|
11-24-2015, 07:45 AM
|
#20
|
|
Registered User
Join Date: Mar 2014
Location: Nashville, TN
Posts: 210
|
|
|
|
|
 Posting Rules
|
You may not post new threads
You may not post replies
You may not post attachments
You may not edit your posts
HTML code is On
|
|
|
All times are GMT -8. The time now is 07:35 AM.
| |


 2001 Porsche Boxster S
 2010 Mercedes C300
 The Hoe
 Avante
 Porsche
 Parts Car, car parts
 Honda Del Sol(s)
 "Hers"
 My Original '99
 The 78 F350
 This
This That
That The S 2.5
 Other
Other My car
 1998 Porsche 986
 Linear Mode


