 11-02-2016, 06:53 AM
|
#41
|
|
2003 Base 5-speed
Join Date: Jul 2015
Location: Stoneham, MA
Posts: 949
|
Clever approach 78F350! Thanks for documenting.
Sent from my iPad using Tapatalk
|

|

|
|
11-02-2016, 02:26 PM
|
#42
|
|
Registered User
Join Date: Oct 2013
Location: Atlanta, GA
Posts: 419
|
Awesome job 78F350 - thanks for the write up!
__________________
2001 Boxster S - Speed Yellow, Black Leather, Tiptronic, Jake Raby rebuilt 3.2 with IMS Solution
|
|
|
|
|
11-17-2016, 08:25 AM
|
#43
|
|
Registered User
Join Date: Mar 2011
Location: Suwanee Ga
Posts: 9
|
Great work 78F350. I have needed to do this job for the past 2 years also and have been studying the excellent write-up that Meir had done. I do not even pretend to a mechanic but I have done simple jobs such as replacing a radiator, brakes, alternator, starter ect.. on my other cars. For some reason I have been scared to get tools anywhere near my 99 Boxster. The only thing I have attempted so far is re-soldering the micro-switch on the top latch and I recently replaced the top assembly so I could have a glass rear window. Both of those went fairly successfully.
I was going to attempt the frunk entry repair method next weekend but I am still very nervous about my ability to pull it off successfully. Now this morning I see you have presented another possible solution.
I am hoping I can have some more details and opinions was to how to tackle this job.
1. How difficult is it to remove the front dash console?
2. What would I have to modify to the console area to gain access to this. (I replaced the radio in the car about 5 years ago but I do not remember what it looked like inside there).
3. What did you use to cut the vent and how likely is it I would damage other parts when I tried to cut into it.
4. Why kind of tape did you use to seal everything back up as I know heat can loosen adhesive over time.
Thanks for any advice that anyone can share.
William
|
|
|
|
|
11-17-2016, 11:04 AM
|
#44
|
|
Motorist & Coffee Drinker
Join Date: Jul 2014
Location: Oklahoma
Posts: 3,958
|
Quote:
Originally Posted by Propes

...
1. How difficult is it to remove the front dash console?
2. What would I have to modify to the console area to gain access to this. (I replaced the radio in the car about 5 years ago but I do not remember what it looked like inside there).
3. What did you use to cut the vent and how likely is it I would damage other parts when I tried to cut into it.
4. Why kind of tape did you use to seal everything back up as I know heat can loosen adhesive over time. ...
|
1. On my car it was very easy to remove and access. The switch panels on the side are removed to access screws that hold it in. The console changed in the later years to one piece and I'm not sure if it's more difficult.
The location of climate control unit, cup holders, and type of stereo may effect the difficulty.

2. I didn't have to make any modifications. I just disconnected and moved things that were in the way. If you replaced the radio before, it's very similar.
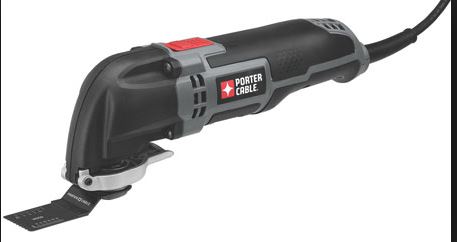
3. I used an oscillating multi-tool with a cutting blade. Surprisingly easy and precise. I almost used a Dremel, but came across this first. Either should work well.
4. My one concern after completing the job is that I'm not sure how well it will hold up to heat long term. You may want to look at 3M Flue Tape which is good to 600 F. The tape I used is thicker than most and has a very strong, finely woven cloth layer. When I tried to find specs online, it looks like it has a recommended operating temp up to 200 F which may be close to the peak temps.
__________________
I am not an attorney, mechanic, or member of the clergy. Following any advice given in my posts is done at your own peril.
Last edited by 78F350; 11-17-2016 at 11:07 AM.
|
|
|
|
|
11-18-2016, 08:22 AM
|
#45
|
|
Registered User
Join Date: Mar 2011
Location: Suwanee Ga
Posts: 9
|
Thank you so much for your quick reply on this. Luckily I have that tool and some flue tape in my garage. Now I just need to find the courage to give this a try.
I may reach out again if I run into any issues.
Hopefully this becomes another alternative fix to a common problem.
|
|
|
|
|
05-29-2017, 08:59 AM
|
#46
|
|
Registered User
Join Date: Mar 2017
Location: Washington D.C.
Posts: 47
|
78F350: Freaking awesome!
I just did this. When I opened up the console and all my foam was gone. I used a standard cutting blade to make the cuts on the vent. I used masking tape to tape up the holes. Took me totally 15 minutes in total. It was very easy to tape the vents with my hands. I did not need to use any tools
Thanks for the innovative process 
|
|
|
|
|
06-10-2017, 09:44 AM
|
#47
|
|
Registered User
Join Date: May 2017
Location: SoCal
Posts: 63
|
Has anyone else followed this method? I need to fix the foam in my vents and this seems like the easiest method.
Quote:
Originally Posted by 78F350
|
|
|
|
|
|
09-13-2017, 08:58 PM
|
#48
|
|
Custom User Title Here
Join Date: Mar 2012
Location: Ft. Leonard Wood
Posts: 6,169
|
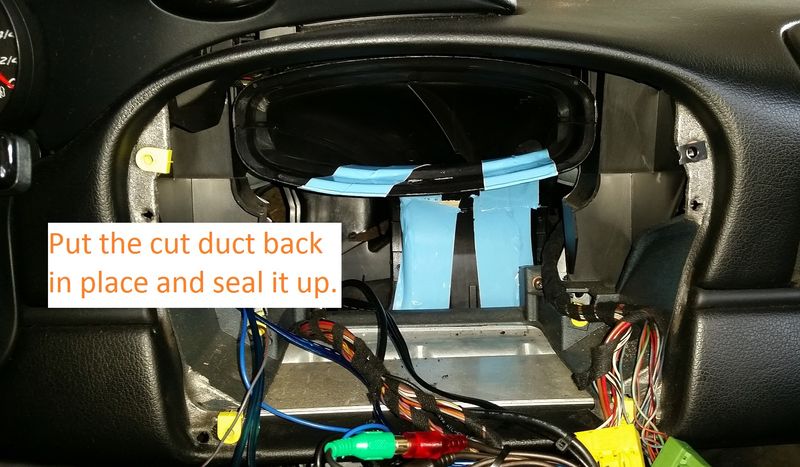
Posting this here for posterity.
Yes. I split the upper duct at the seam, though.
It was a pain getting all of the old foam and its backing material out, and getting the flaps covered, but a lot easier and more thorough than the other method that requires removal of the heater core and does not address the other flap.
Last edited by particlewave; 09-13-2017 at 09:01 PM.
|
|
|
|
|
09-13-2017, 09:02 PM
|
#49
|
|
Custom User Title Here
Join Date: Mar 2012
Location: Ft. Leonard Wood
Posts: 6,169
|
Forum will only let me upload one picture at a time. ")
|
|
|
|
|
09-13-2017, 09:04 PM
|
#50
|
|
Custom User Title Here
Join Date: Mar 2012
Location: Ft. Leonard Wood
Posts: 6,169
|
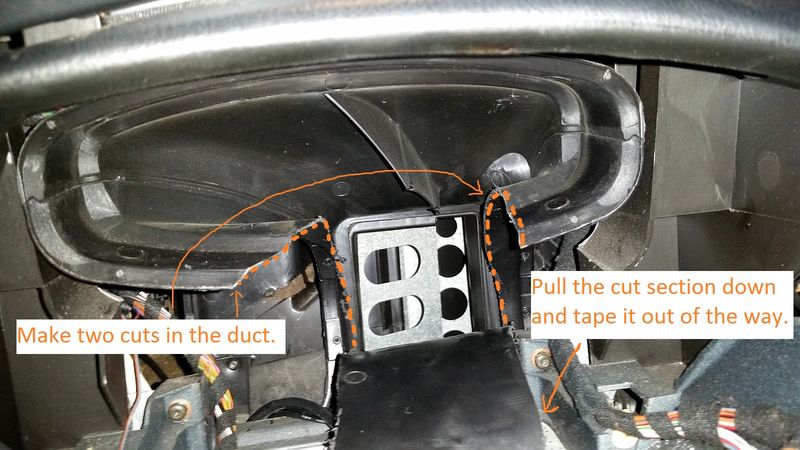
And one more showing the piece of duct remove during the repair.
|
|
|
|
|
11-19-2017, 11:32 AM
|
#51
|
|
Registered User
Join Date: Nov 2017
Location: BEAUMONT,TX
Posts: 1
|
I am not getting cold air. Freon ok. Would this problem cause AC air not to work too?
|
|
|
|
|
11-19-2017, 12:00 PM
|
#52
|
|
Porschephile
Join Date: Jun 2007
Location: Portland, Maine
Posts: 343
|
FYI... i did this fix using this write up last winter. Worked like a charm. Had a great summer with no foam blowing in my face.
Quote:
Originally Posted by grc0456
Clever approach 78F350! Thanks for documenting.
Sent from my iPad using Tapatalk
|
|
|
|
|
|
11-19-2017, 04:32 PM
|
#53
|
|
1999 base
Join Date: Dec 2011
Location: Coral Springs FL
Posts: 1,617
|
Quote:
Originally Posted by Jppcombank
I am not getting cold air. Freon ok. Would this problem cause AC air not to work too?
|
no.
The missing foam just effect the heater efficiency.
If you are not loosing Freon and still have no ac, you have another issue.
Start by testing the compressor.
|
|
|
|
|
11-21-2017, 07:09 PM
|
#54
|
|
Registered User
Join Date: May 2014
Location: S.California
Posts: 2,029
|
Meir makes an important point for some who are reluctant to attempt this repair. Foam loss only reduces cabin-heater performance .It does not seem to affect a/c performance. So in a really mild/warm climate - just ignore the foam debris ?
|
|
|
|
|
11-21-2017, 09:15 PM
|
#55
|
|
Registered User
Join Date: May 2015
Location: Sydney, Australia
Posts: 335
|
That's what I've done, foam stopped coming out after about a year (mostly), and it doesn't seem to have affected the cold (or even the hot too much, but we never see freezing here so...)
Last edited by oldskool73; 11-21-2017 at 09:16 PM.
Reason: affect/effect ... who remembers that stuff?
|
|
|
|
|
11-22-2017, 02:09 AM
|
#56
|
|
Porschephile
Join Date: Jun 2007
Location: Portland, Maine
Posts: 343
|
If you like to keep a clean interior then this is enough motivation to fix this. Turn the car on and get some of this foam in the eye a few times and thats the rest of the motivation anyone will need.
Quote:
Originally Posted by Gelbster
Meir makes an important point for some who are reluctant to attempt this repair. Foam loss only reduces cabin-heater performance .It does not seem to affect a/c performance. So in a really mild/warm climate - just ignore the foam debris ?
|
|
|
|
|
|
11-22-2017, 03:28 AM
|
#57
|
|
Beginner
Join Date: Mar 2013
Location: Houston
Posts: 1,659
|
Quote:
Originally Posted by Gelbster
Meir makes an important point for some who are reluctant to attempt this repair. Foam loss only reduces cabin-heater performance .It does not seem to affect a/c performance. So in a really mild/warm climate - just ignore the foam debris ?
|
Not so much in Texas. Before the foam repair I had to run the a.c. at max recirculation and even then it took fifteen minutes to stop sweating in the car. After the repair the AC rocks. Normal mode is satisfactory for a 100 degree day.
__________________
2003 S manual
|
|
|
|
|
11-22-2017, 08:59 AM
|
#58
|
|
Custom User Title Here
Join Date: Mar 2012
Location: Ft. Leonard Wood
Posts: 6,169
|
There is some misleading info here.
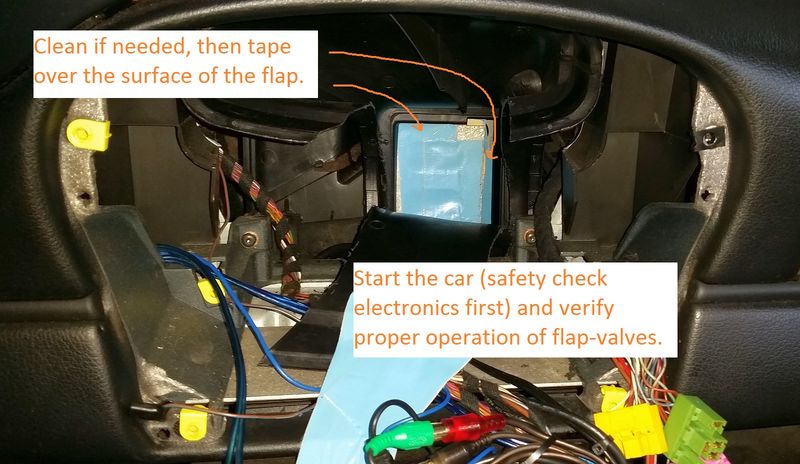
The deteriorated foam absolutely will affect both heat and AC, as James pointed out. The flap in front of the heater core, which is always hot, either makes air blow over the core for heat, or blocks it off. If that flap is full of holes, your AC will partially blow over that hot heater core.
Also, as Tom said, it's nice to keep a clean interior and not be pummeled with foam bits that turn to black tar when you touch them. 
|
|
|
|
|
11-22-2017, 06:00 PM
|
#59
|
|
1999 base
Join Date: Dec 2011
Location: Coral Springs FL
Posts: 1,617
|
Well, I can speak only from my experience.
The Boxster S I had, had a leaking evaporator, so the AC didnt work regardless, and when I fixed it, I obviusely re-foamed the flaps.
On my 99 box and 02 996, there was/is no foam coming out anymore. So the flaps are naked for sure. I do not see any difference with the AC between the 3 cars. They are all blowing cold. The heater is a different story.
With that said, I do not like penguins temperature in my car, although i leave in FL.
Since I have the Boxster S (with the fixed flaps) and the 996 both in my garage, it will be interesting to preform a comparison between the two, using an infra red thermometer directed to the center AC vent (as described in the shop manual).
Maybe Ill do it next week when I get back from my road trip.
|
|
|
|
|
11-23-2017, 03:23 PM
|
#60
|
|
Registered User
Join Date: Apr 2016
Location: SE Michigan
Posts: 496
|
Through two summers of ownership my Boxster spit enough foam to make heater barely working... so finally did this center vent surgery.
With small hand though the cut out, both flaps were fairly accessible to tape up the holes, while positioning and pressing multiple tapes were a bit tedious. I used aluminum waterproof tape that seems solid and sticky enough for the job.
Now heat is back and I also know why AC was often too cold as little heat blends with chilled air. What an ingenious repair method!!!
__________________
1997 Boxster arctic silver/ red, XNE riveted mahogany/ leather steering wheel & 917-style wood shift knob, Bens short shifter, PSE, 996 TB, UDP, stereo/ center console delete, hardtop and speedster humps, daily driver rain or shine or snow!
|
|
|
|
 Posting Rules
|
You may not post new threads
You may not post replies
You may not post attachments
You may not edit your posts
HTML code is On
|
|
|
All times are GMT -8. The time now is 07:41 AM.
| |


 Blue Box
 Parts Car, car parts
 Honda Del Sol(s)
 "Hers"
 My Original '99
 The 78 F350
 This
This That
That The S 2.5
 Other
Other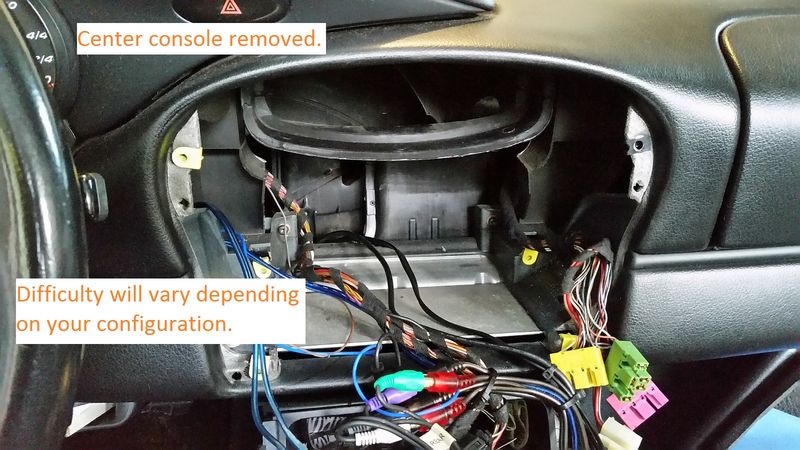
 boxster S
 Linear Mode


