 11-17-2021, 12:24 PM
|
#1
|
|
Registered User
Join Date: May 2021
Location: Stansted
Posts: 67
|
986 3.2 home engine rebuild
I know, this will only be my second post and it will be about a full tear down and rebuild of the engine in my 2001 Boxster S....at home in my garage..in the UK.
Must be a madman 
So, this is not my first full engine rebuild, Ive done many though admittedly only on Mercs, BMWs and Audis, though a few of those were also performance engines. So lets put some context the insanity. I owned a 2000 Boxster S from new and loved it, then marriage came along, as did the sensible cars, then divorce and then thought, wouldn't be great if I could get a S for my sons first car (he s currently 11) and he can work on it with me restoring it, learning and feeling responsible for it
So last Aug, I bought a 2001 S with 70k on the clock, but I could see it needed lots of TLC. Got it home, drove it for a couple of months and then in the garage, gearbox out and IMS fixed with new flywheel, clutch, complete rear suspension, brakes refurb, cats, nuts, bolts, clips, washers, power steering, air con, front rads, air con rads, etc, etc. redone all the soft touch paint, double din stereo, dyed the leather, etc, etc
Basically almost spent the cost of the car in parts for the rear end, but I looking at the learning and memories with my son which are priceless. So between my son and I we took the car from this as am example


to this

The car was so much better and we enjoyed for the summer and even though it sailed though its MOT with low emission values, something wasnt right, there was a slight rubbing sound (I dont know how to describe it ), So I checked the timing and it had a -12 deviation, I adjusted the timing (stupidly with the engine in the car) and got it down to -8.4. It also felt low on power and a few drops on the curve and the fumes smelt wrong.
So loads of research and might be the chain guide, might be valve seals, might be rings, etc
One thing for it, engine out and tear down and what I discovered was wow, not a really bad wow that many have shared but still, wow.
And this brings us to this thread, I would like to share the experience with you all as it may help others, ask for you to look out for me in case you spot something I miss or I am about to balls something up
Thanks in advance and here we go...BTW the engine is already almost torn down so no turning back now 
|

|

|
|
11-17-2021, 12:43 PM
|
#2
|
|
Registered User
Join Date: May 2021
Location: Stansted
Posts: 67
|
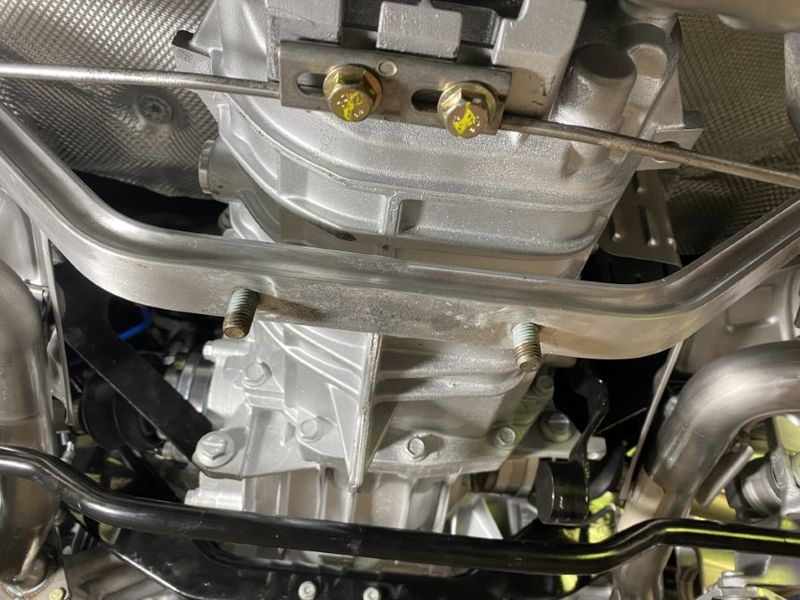
So first thing to do was gearbox, bumper and exhaust out. This only took a couple of hours..what? you say, thats BS.
No its not as I already spent over 3 weeks doing the first time, breaking ever bolt, stud, etc and spending days to do the most simple 30 mins job. I have to say, I have never comes across the level of corrosion in any of the cars I have worked on. Sure one or two bolts or studs shear off, but I am not joking when I say almost all did or the level or corrosion made the threads useless. As an example the rear sub frame and the anti roll bar mounts. All four snapped needed two new sub frames.
Anyway, rambling again, so back on topic. Once gearbox, exhaust was out, it was time to attack the engine. I followed all the great info from Pelican and the great videos in youtube and got the engine onto the hydraulic trolley and lowered in about 2 hours of total time (with lots of breaks, swearing and looking things up in between.
On thing I will say is that I spend hours researching before I start. Easily into the hundreds
so here we go
Engine on trolley
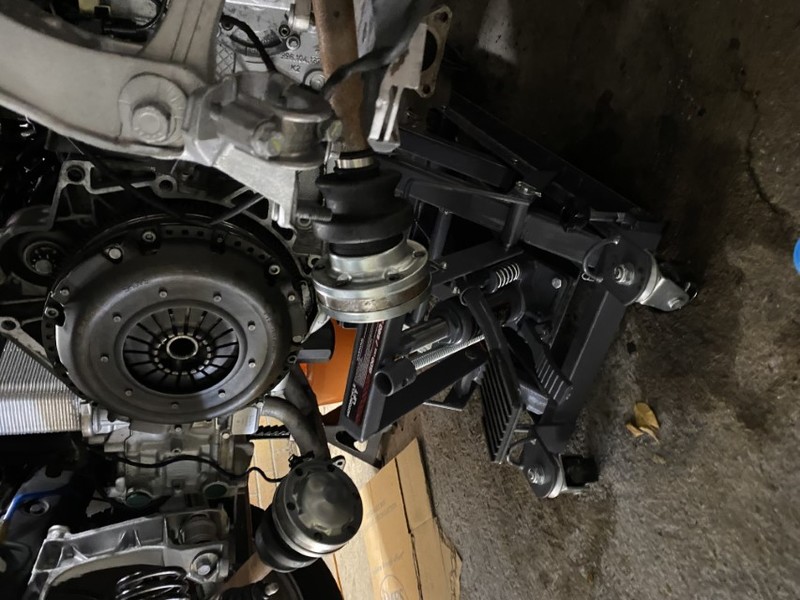
Ok, hit a slight problem, I couldn't get the car high enough as in the UK we have tiny boxes as garages. Dont get me wrong, mine is a double but the height is made for mini me's.
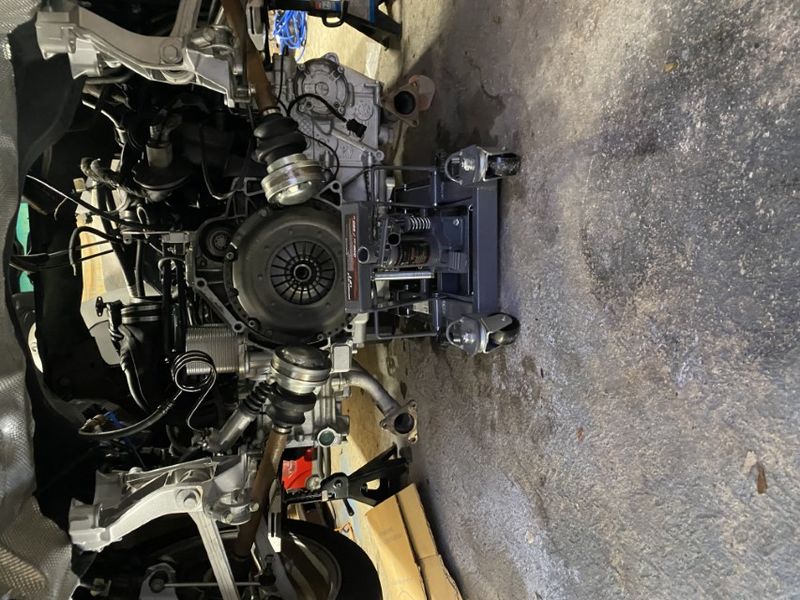
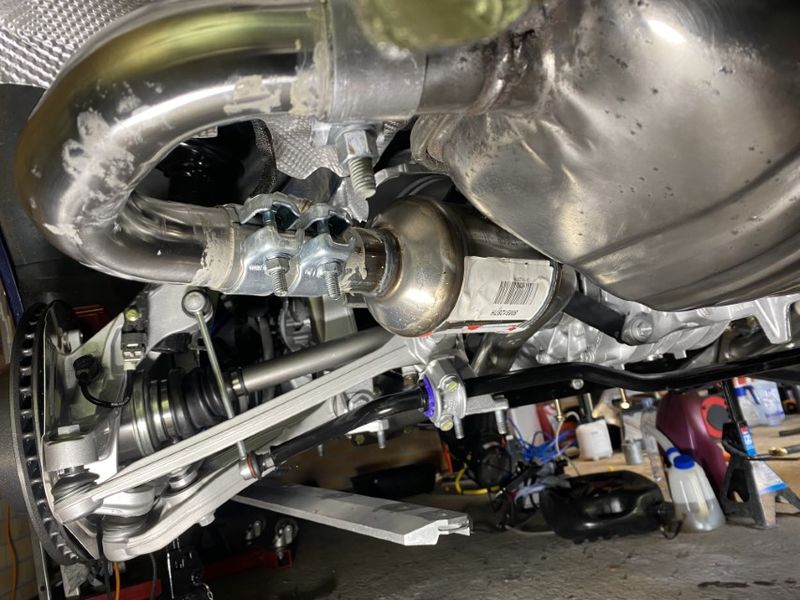
So the engine was stuck in the drive shafts, raised the car to the highest I could and I was still hitting the rear sub frame so it came out. Quick check from the top and yes forgot return fuel line
And finally, engine is out

|
|
|
|
|
11-17-2021, 12:47 PM
|
#3
|
|
Registered User
Join Date: May 2021
Location: Stansted
Posts: 67
|
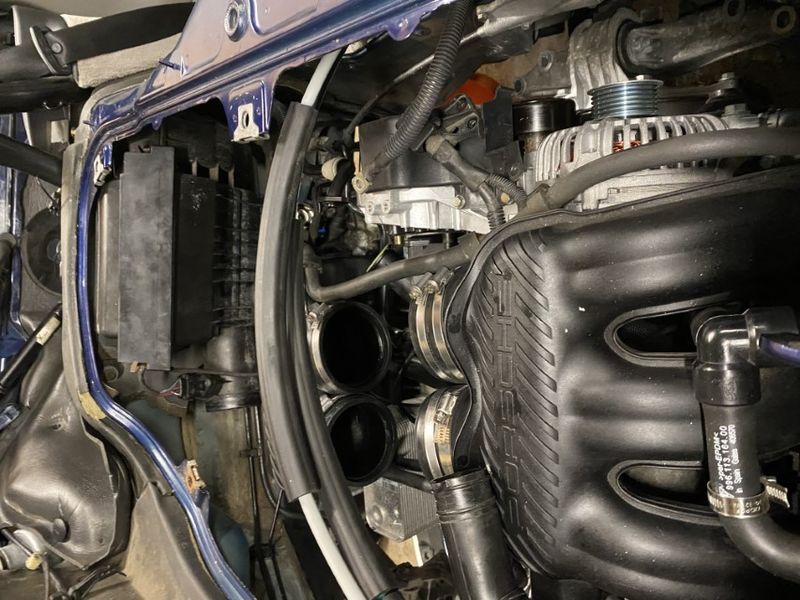
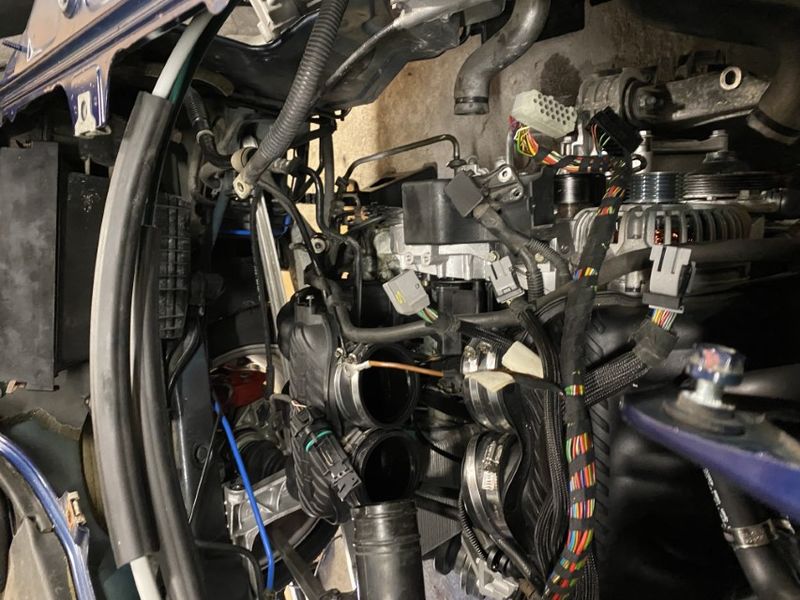
Straight in striping the engine attachments
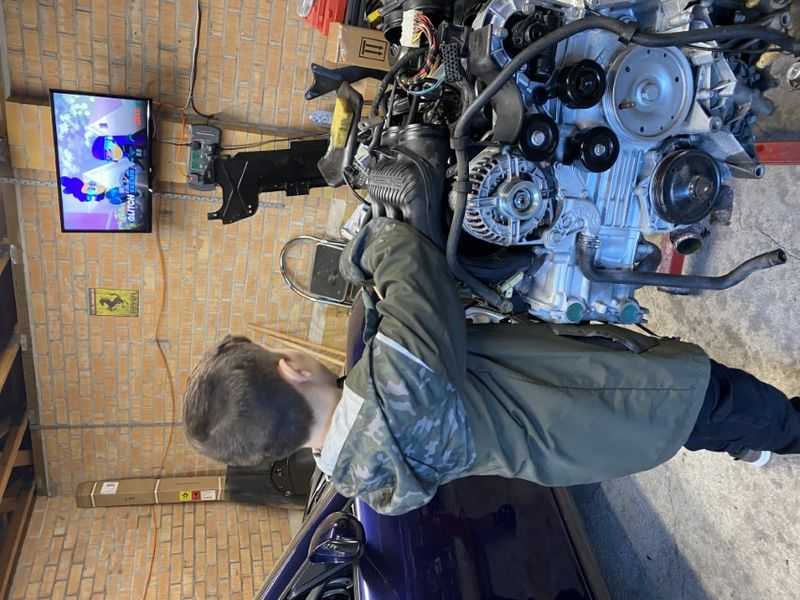
And yes he is watching netflix as he works, we use the TV to looks at videos on YouTube but hey, he is 11
and hour later engine stripped and items labelled bagged, though I will replace all that is not already new with new as much as possible, especially sensors
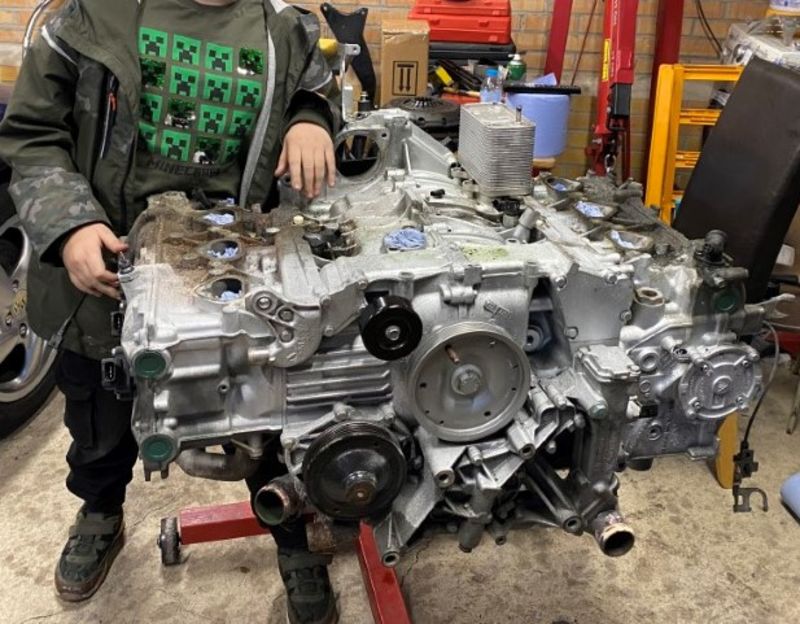
Next time to strip off the covers, cams and heads. This is where the fun begins
|
|
|
|
|
11-17-2021, 02:17 PM
|
#4
|
|
Registered User
Join Date: Feb 2016
Location: SE USA
Posts: 324
|
Thanks for the posts. I love this stuff. It's always nice to see how others do things and by the looks of the way that rear end was rebuilt, you take your time and do it right. Please continue to share your journey.
|
|
|
|
|
11-17-2021, 02:48 PM
|
#5
|
|
Registered User
Join Date: Jan 2014
Location: New Jersey
Posts: 1,631
|
Great posts and even more special as you're doing it with your son! Please keep updating us as you progress, I'll be following.
__________________
Current: 2022 718 Cayman GT4, PDK bone stock (the dark side).
Former: 2003 S, 3.6 LN Nickies, ARP rod bolts, under-drive pulley, Fabspeed sport headers, Softronic tune, 987 airbox 987 motor mount, Function-First Sport motor mount insert, Ben's short shifter, Nine8Six projector headlights & center caps, ROW M030, stainless flexible brake lines, B-K rollbar extension & fire extinguisher mount, hardtop
|
|
|
|
|
11-17-2021, 03:46 PM
|
#6
|
|
Registered User
Join Date: May 2021
Location: Stansted
Posts: 67
|
Thank you to you both.
Lots more to come as i believe it will help many by sharing the hows but also the What the Fanta moments
Have you ever started something you felt would be easy and then wished you never had opened the swimming pool full of worms through no fault whatsoever due to you.
BTW, in case I didnt say, this car is a 2001 S with full Porsche service history with 3 previous owners inc me. The first owner had the car up to 67,000 miles over 16 years
I had budgeted £2k - £4K for the engine rebuild depending on what shape the cylinders and pistons where in.
More to come tomorrow and thanks again for the words of encouragement
|
|
|
|
|
11-17-2021, 09:21 PM
|
#7
|
|
Registered User
Join Date: Jul 2019
Location: Finland
Posts: 354
|
Fantastic journey you have started with your son. We have a same reason I purchaesd the Boxster 2,5 years ago - my son is now 15 yrs and is exited to tinker with boxter and to collect memories together and to learn of the car 
__________________
2001 996 C2 Manual
|

|
|
|
11-18-2021, 01:51 AM
|
#8
|
|
Registered User
Join Date: Aug 2013
Location: Canarias (Small island on African coast)
Posts: 44
|
What a great post, I will definitely enjoy following this!
|
|
|
|
|
11-18-2021, 02:52 AM
|
#9
|
|
Registered User
Join Date: May 2021
Location: Stansted
Posts: 67
|
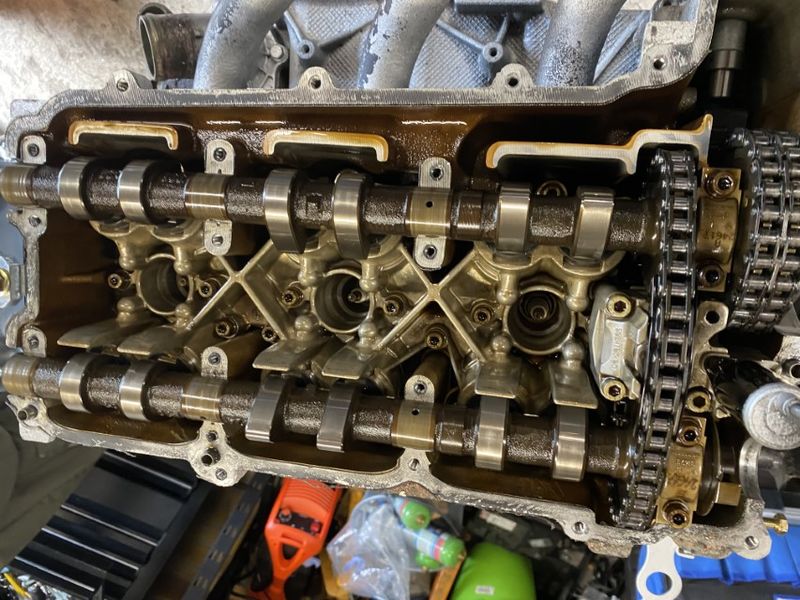
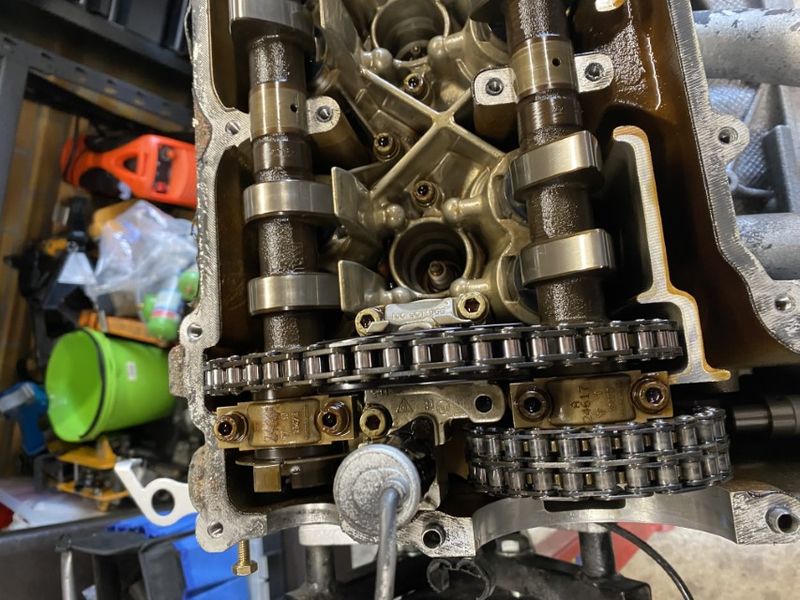
With the engine on a stand, next we locked the cams down and removed the covers.
So far, nothing looks too bad, chains have seen better days but cams and lobes look ok. Of course I need to take measurements but no real scoring
|
|
|
|
|
11-18-2021, 02:55 AM
|
#10
|
|
Registered User
Join Date: May 2021
Location: Stansted
Posts: 67
|
with the cams out, we had a closer look

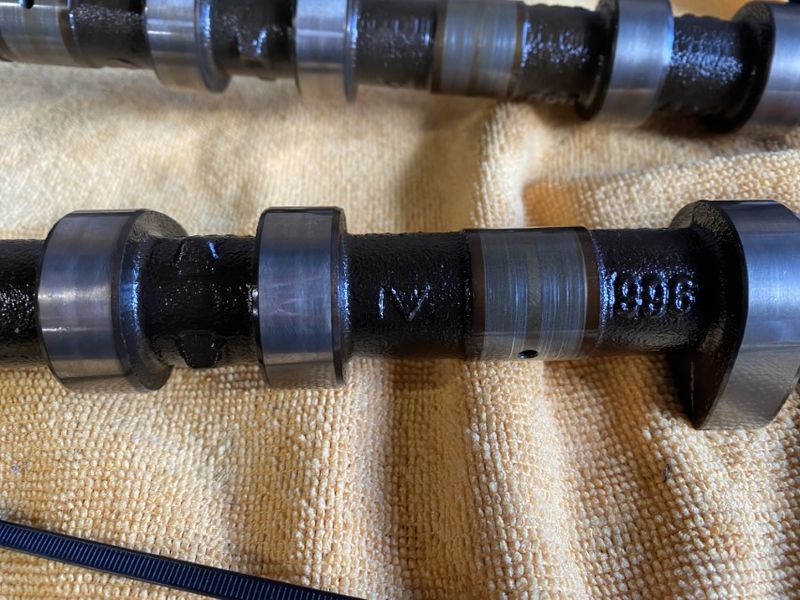

Some scoring on the carrier but not too worrying
|
|
|
|
|
11-18-2021, 02:59 AM
|
#11
|
|
Registered User
Join Date: May 2021
Location: Stansted
Posts: 67
|
So what about the chain guide rails
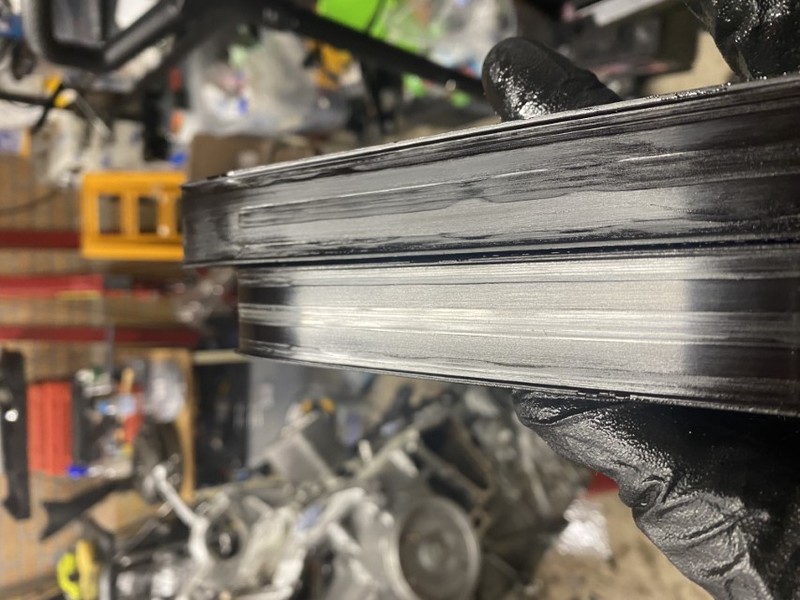
Some grooving but expected worse and then found worse
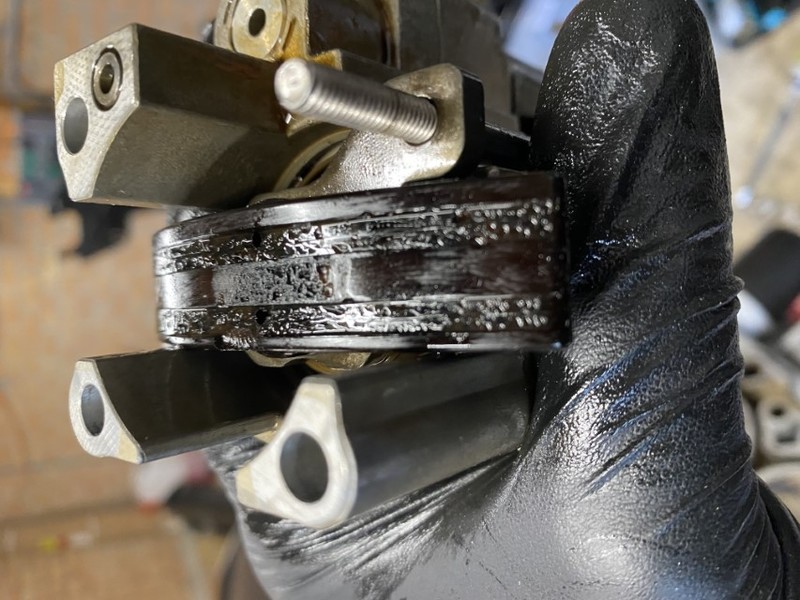
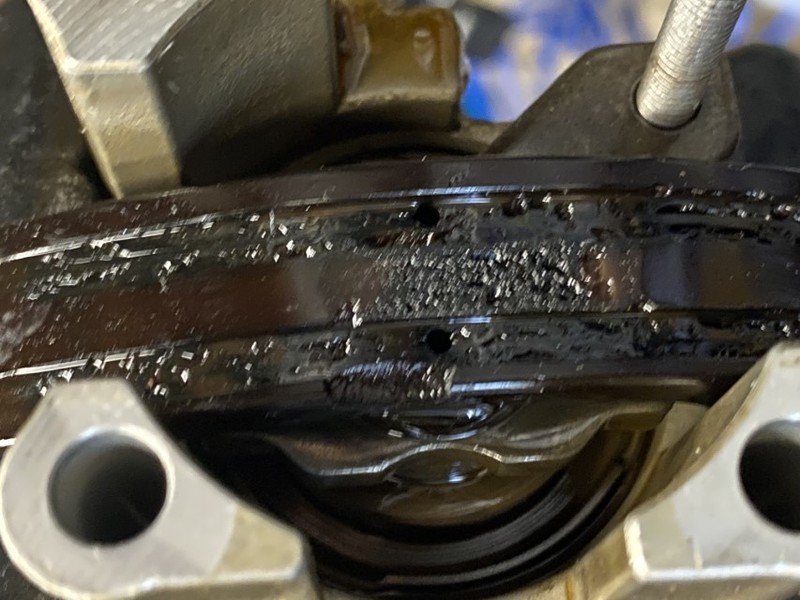
wow, chunks missing. As the car has only 70k on it and full service history, what plastic was used here. looking at this, they should have been changed 10,000s of miles ago
|
|
|
|
|
11-18-2021, 03:04 AM
|
#12
|
|
Registered User
Join Date: May 2021
Location: Stansted
Posts: 67
|
oh, btw this is what I used to compress the tensioner, Much cheaper than the porsche tool and worked perfectly

|
|
|
|
|
11-18-2021, 04:07 AM
|
#13
|
|
Registered User
Join Date: May 2021
Location: Stansted
Posts: 67
|
When stripping down the hydraulic tensioners, one thing I found was the amount of gunk on the pistons. it did not slide easily. Also there was some seriously black oil inside it. I have only done about 800 miles on the car and had done 3 full oil changes, two when I first got it about 300 miles apart, and another when I did the IMS
When I drained the sump the oil was clean but the oil that came out of the tensioner was black so the question is why. I can only think that the it is primed but oil does really flow through it.
In any case after I cleaned the tensioner with paraffin as to not kill the seals in side it now slides smoothly.
Of course I will be changing the guides for new ones and going to test the solenoid on the bench
BTW, important to know which tensioner is which as they have different solenoids. I bag everything in re-sealable sandwich bags that I label and only ever work with one bag at a time as to not mix things up
I'll take some photos to share when I strip and clean the second one
|
|
|
|
|
11-18-2021, 04:22 AM
|
#14
|
|
Registered User
Join Date: May 2021
Location: Stansted
Posts: 67
|
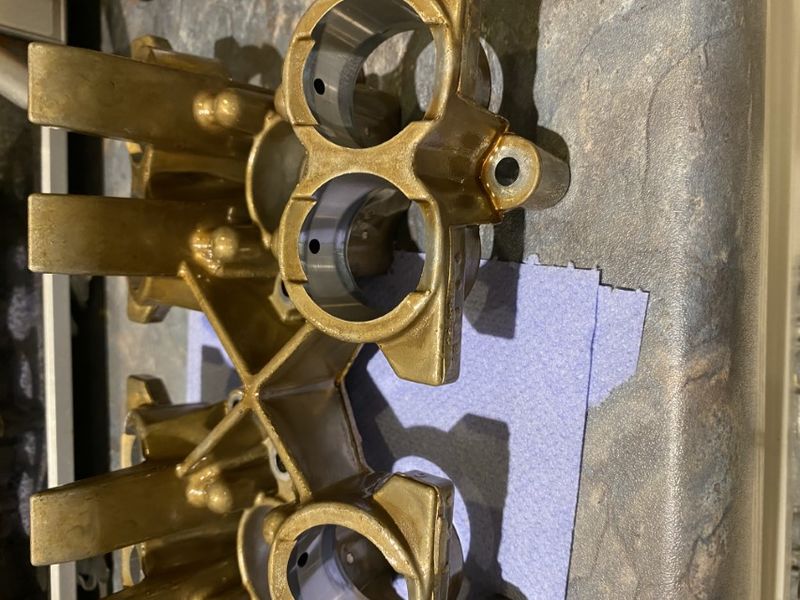
next up the lifters and their guides.
Loads of the lifters gunked up AND were stuck and took some effort to get them to move, once they did the same black but very stinking oil came out. I was able to polish them up and get them moving freely even when primed but I have decided to replace all of them with new

carrier was in good condition though the guides were a little gunked up but they have cleaned up nice and the guides polished out
|
|
|
|
|
11-18-2021, 04:28 AM
|
#15
|
|
Registered User
Join Date: May 2021
Location: Stansted
Posts: 67
|
next we needed to get the manifolds off but I was dreading this as the bolts were rusted to the point the no longer had a hex head. Totally soaked them in Kroil applying it 2-3 times a day over 2 days and used heat, but snap. snap. snap 4-5 bolts each side snapped.
Manged to get a few more out with a stud extractor but will need to drill and tap out the others.

|
|
|
|
|
11-18-2021, 04:42 AM
|
#16
|
|
Registered User
Join Date: May 2021
Location: Stansted
Posts: 67
|
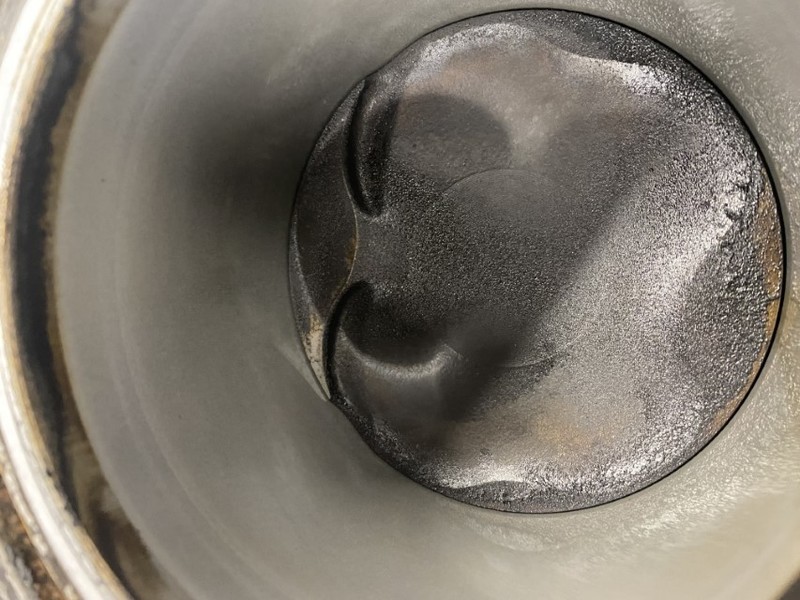
Time for the heads to come off and see what the bores look like (gulp)
Heads, not too bad on bank 1
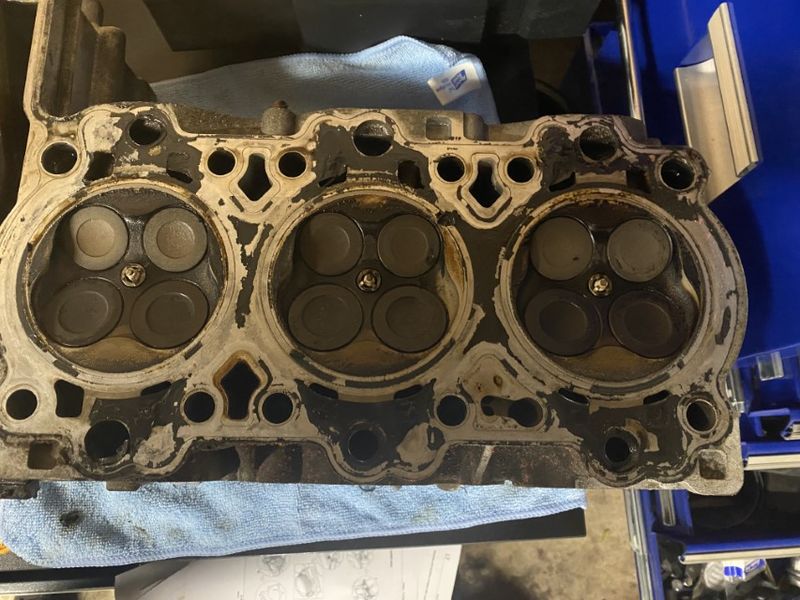
and we can now see the pistons and bores and the pistons were caked in burnt oil, grud and ***te

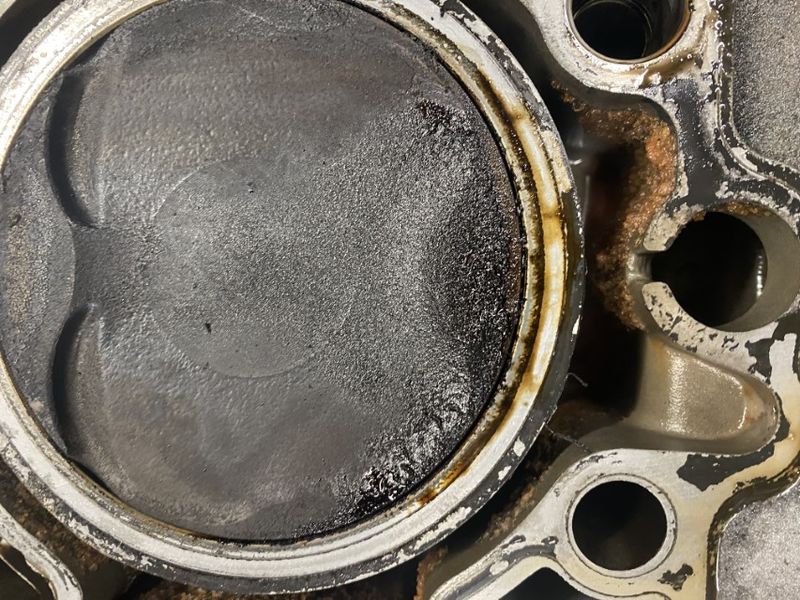

The bores, the ones I could see didnt look to bad at all, no scoring visible and felt smooth to the touch
|
|
|
|
|
11-18-2021, 07:41 AM
|
#17
|
|
Registered User
Join Date: May 2021
Location: Stansted
Posts: 67
|
Quote:
Originally Posted by Jgkram

Thanks for the posts. I love this stuff. It's always nice to see how others do things and by the looks of the way that rear end was rebuilt, you take your time and do it right. Please continue to share your journey.
|
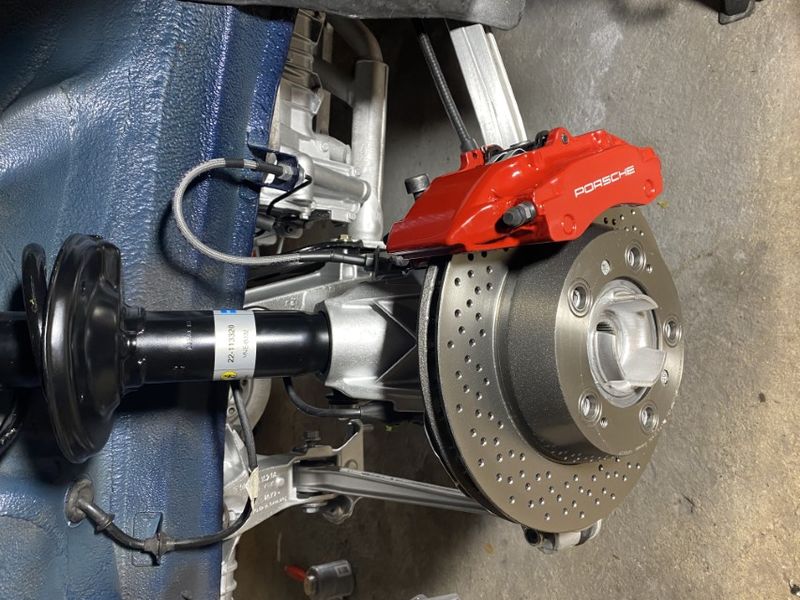
Thanks Jgkram, Im a bit OCD when it comes to restorations, also do pinball machines, arcades and antique fans (dont ask )
Here is an example of the suspension and brakes completely rebuilt with new (apart from callipers which I refurbed)

Last edited by OldManMo; 11-18-2021 at 07:43 AM.
|
|
|
|
|
11-18-2021, 12:37 PM
|
#18
|
|
Registered User
Join Date: Jan 2014
Location: New Jersey
Posts: 1,631
|
I hink you made a wise choice with new lifters. If there were any particles or debris in your engine, you should consider a new oil cooler too. When my engine was rebuilt, they told me those were two areas that couldn't be counted on to get completely clean on the inside. And if you get a new oil cooler, you can potentially get a bigger one from a 3.4, 3.6 or 3.8 engine that will fit your engine and under your intake manifold.
__________________
Current: 2022 718 Cayman GT4, PDK bone stock (the dark side).
Former: 2003 S, 3.6 LN Nickies, ARP rod bolts, under-drive pulley, Fabspeed sport headers, Softronic tune, 987 airbox 987 motor mount, Function-First Sport motor mount insert, Ben's short shifter, Nine8Six projector headlights & center caps, ROW M030, stainless flexible brake lines, B-K rollbar extension & fire extinguisher mount, hardtop
|
|
|
|
|
11-18-2021, 12:58 PM
|
#19
|
|
Registered User
Join Date: May 2021
Location: Stansted
Posts: 67
|
Quote:
Originally Posted by PaulE
I hink you made a wise choice with new lifters. If there were any particles or debris in your engine, you should consider a new oil cooler too. When my engine was rebuilt, they told me those were two areas that couldn't be counted on to get completely clean on the inside. And if you get a new oil cooler, you can potentially get a bigger one from a 3.4, 3.6 or 3.8 engine that will fit your engine and under your intake manifold.
|
Good call. I actually replaced the oil cooler when I did the IMS but the things I found as we stripped the engine makes me want to ensure everything is cleaned out. The next set of posts will explain why
I will be getting all parts ultrasonic cleaned and casings vapour blasted but I definitely will ensure all oilways are flushed and cleaned and if you hadnt mentioned the oil cooler I would have stupidly put it back on as I only replaced it new a few hundred miles ago and no doubt it is contaminated
Thank you PaulE
|
|
|
|
|
11-18-2021, 04:41 PM
|
#20
|
|
Registered User
Join Date: Jan 2014
Location: New Jersey
Posts: 1,631
|
Quote:
Originally Posted by OldManMo
Good call. I actually replaced the oil cooler when I did the IMS but the things I found as we stripped the engine makes me want to ensure everything is cleaned out. The next set of posts will explain why
I will be getting all parts ultrasonic cleaned and casings vapour blasted but I definitely will ensure all oilways are flushed and cleaned and if you hadnt mentioned the oil cooler I would have stupidly put it back on as I only replaced it new a few hundred miles ago and no doubt it is contaminated
Thank you PaulE |
My shop told me there was no way to be sure that the internals of the oil cooler would be completely cleaned of small particles, and a new one was cheap enough, especially compared to the cost of labor and parts for a full rebuild (no way I could do it myself in my lifetime!).
__________________
Current: 2022 718 Cayman GT4, PDK bone stock (the dark side).
Former: 2003 S, 3.6 LN Nickies, ARP rod bolts, under-drive pulley, Fabspeed sport headers, Softronic tune, 987 airbox 987 motor mount, Function-First Sport motor mount insert, Ben's short shifter, Nine8Six projector headlights & center caps, ROW M030, stainless flexible brake lines, B-K rollbar extension & fire extinguisher mount, hardtop
|
|
|
|
 Posting Rules
|
You may not post new threads
You may not post replies
You may not post attachments
You may not edit your posts
HTML code is On
|
|
|
All times are GMT -8. The time now is 08:34 AM.
| |


 Boxster S
 Linear Mode


