 11-28-2021, 08:37 AM
|
#41
|
|
Registered User
Join Date: May 2021
Location: Stansted
Posts: 67
|
I the reassembled the unit taking care in the postion of the pistons, springs solenoid piston (which must go back as it came out, look at the photos), submerged the whole thing in fresh oil for about 10mins, then bagged and tagged it.
I then repeated the same on Bank 2, this is bank 2 unit below:
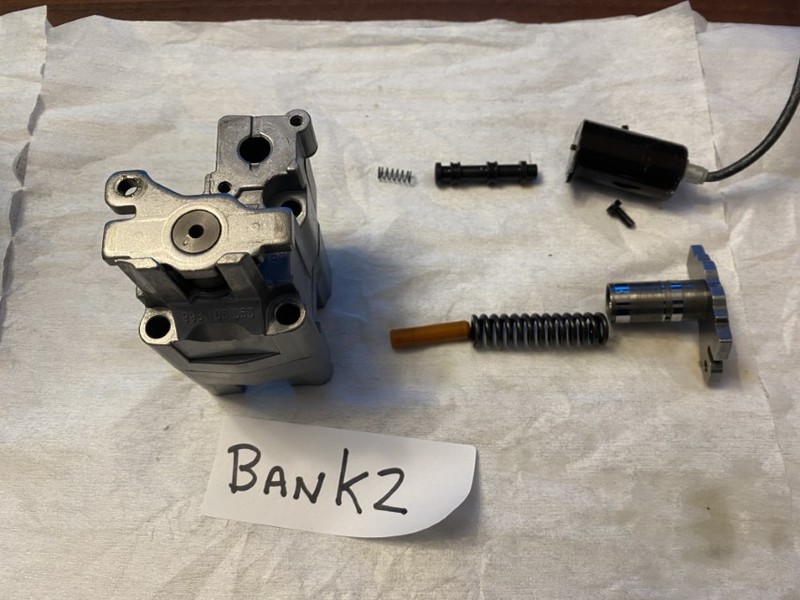
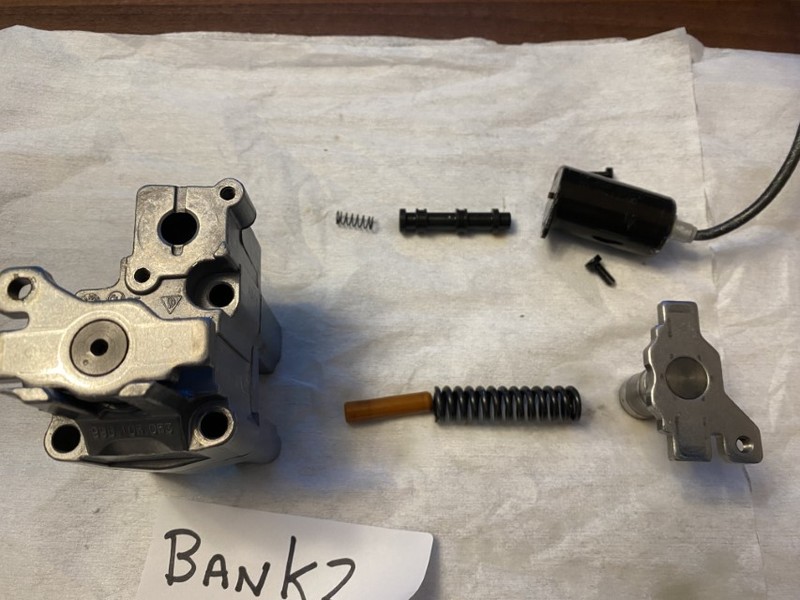
Note that this configuration is not only different to bank 1 but there is an extra oilway at the top
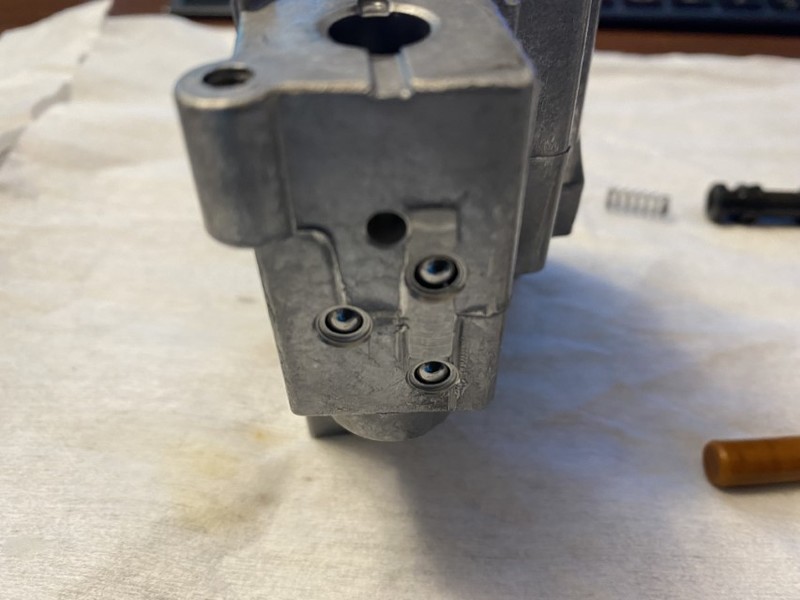
Once the unit was cleaned, it was primed, bagged and tag an back into storage with its sister. I wont know if it has improved things, though there was definitely and issue with contamination or killed the unit until I put the engine all back together, so I will update with observations then but hopefully at least the photos may help others
Now, I have an engineering background and looking at the unit, I feel it should be possible to refurbish it. The only inaccessible part is the central piston, which from what I have seen and feel must have some o-ring internally. There appears to be no way in as the circlip seems to be help in place by the tabs that have been flayed out in the photo below

I can see there are no kits available to refurbish the unit, but I have purchased a second hand one to dismantle with a view of what is needed as there should be no reason why the metal cap in the photo cannot be reproduced. In any case, this is just an experiment and I will share my observations and findings in case it helps others 
|

|

|
 11-28-2021, 11:28 AM
|
#42
|
|
Registered User
Join Date: Jan 2014
Location: New Jersey
Posts: 1,631
|
Cool stuff! You inspired me to purchase a can of carburetor cleaner, my souvenir piston from the rebuild of my 3.2 is soaking in it over the weekend. I'll see if I can get it close to how clean you got yours! But it still has the rings on and the wrist pin in.
__________________
Current: 2022 718 Cayman GT4, PDK bone stock (the dark side).
Former: 2003 S, 3.6 LN Nickies, ARP rod bolts, under-drive pulley, Fabspeed sport headers, Softronic tune, 987 airbox 987 motor mount, Function-First Sport motor mount insert, Ben's short shifter, Nine8Six projector headlights & center caps, ROW M030, stainless flexible brake lines, B-K rollbar extension & fire extinguisher mount, hardtop
|

|

|
 11-28-2021, 12:20 PM
|
#43
|
|
Registered User
Join Date: May 2021
Location: Stansted
Posts: 67
|
Quote:
Originally Posted by PaulE

Cool stuff! You inspired me to purchase a can of carburetor cleaner, my souvenir piston from the rebuild of my 3.2 is soaking in it over the weekend. I'll see if I can get it close to how clean you got yours! But it still has the rings on and the wrist pin in.
|
Awesome  If you are going to have it for show, then some Autosol will bring everything up and stop the rings from rusting
I can honestly say that my ultrasonic bath and small media blaster (using soda or fine glass beads) are outstanding in bringing things back to a near new look. Yes, you need to take care to use the right chems/media and clean thoroughly after using media but there is so much info/videos on the net that it really is not rocket science.
I am considering upgrading my small media blasting cabinet and buying a full on vapour blasting cabinet 
|

|

|
 11-28-2021, 04:46 PM
|
#44
|
|
Registered User
Join Date: Jan 2014
Location: New Jersey
Posts: 1,631
|
Quote:
Originally Posted by OldManMo

Awesome  If you are going to have it for show, then some Autosol will bring everything up and stop the rings from rusting
I can honestly say that my ultrasonic bath and small media blaster (using soda or fine glass beads) are outstanding in bringing things back to a near new look. Yes, you need to take care to use the right chems/media and clean thoroughly after using media but there is so much info/videos on the net that it really is not rocket science.
I am considering upgrading my small media blasting cabinet and buying a full on vapour blasting cabinet  |
I saw a video on Facebook of an auto detailing place, they were using a device that used dry ice in some kind of pressure washer. I think it is called a dry ice blaster. They were treating the undersides and inner fenders of cars with it and the parts were looking like new when they sprayed them. Remember, you can never be too rich, too thin, have too much horsepower or too many tools!
__________________
Current: 2022 718 Cayman GT4, PDK bone stock (the dark side).
Former: 2003 S, 3.6 LN Nickies, ARP rod bolts, under-drive pulley, Fabspeed sport headers, Softronic tune, 987 airbox 987 motor mount, Function-First Sport motor mount insert, Ben's short shifter, Nine8Six projector headlights & center caps, ROW M030, stainless flexible brake lines, B-K rollbar extension & fire extinguisher mount, hardtop
|

|

|
 11-30-2021, 06:07 AM
|
#45
|
|
Registered User
Join Date: Sep 2018
Location: Illinois
Posts: 319
|
There's an article in Pedro's Garage about that.
Freeze your Road Grime!
__________________
A cynic is a man who, when he smells flowers, looks around for a coffin.
-H. L. Mencken
|

|

|
 11-30-2021, 07:46 AM
|
#46
|
|
Registered User
Join Date: May 2021
Location: Stansted
Posts: 67
|
Quote:
Originally Posted by Newsguy

|
Wow, thanks for sharing the link. I want one of those machines.  Not only the car but I will do my neighbours cars, my house, their house, in fact anything else I can find to clean lol
|

|

|
 11-30-2021, 11:13 AM
|
#47
|
|
2003 S, Arctic Silver, M6
Join Date: Oct 2014
Location: Winnipeg, MB, Canada
Posts: 1,346
|
It's called Dry Ice Blasting and has been around a long time in the metal working business. Here is a pretty good run down of what it is, how it works and what it is used for.
https://en.wikipedia.org/wiki/Dry-ice_blasting
The company I retired from is a primary supplier of the dry ice pellets to the industry.
|

|

|
 11-30-2021, 12:47 PM
|
#48
|
|
Registered User
Join Date: May 2021
Location: Stansted
Posts: 67
|
This is one of my favourite parts of any rebuild, no matter what is being rebuilt. When parts start to arrive. For me, it really is like have lots of birthdays 
Recently, we have 24 brand new, shiny lifters/tappets packed in oil
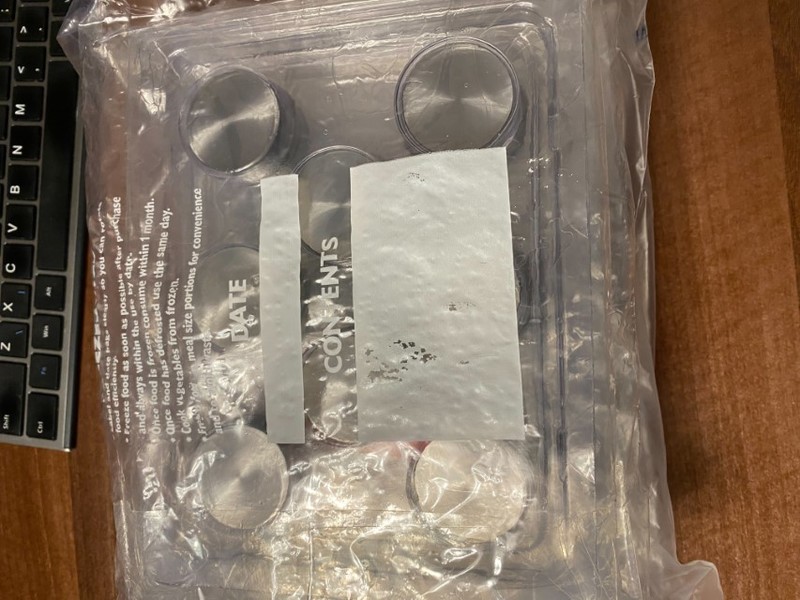
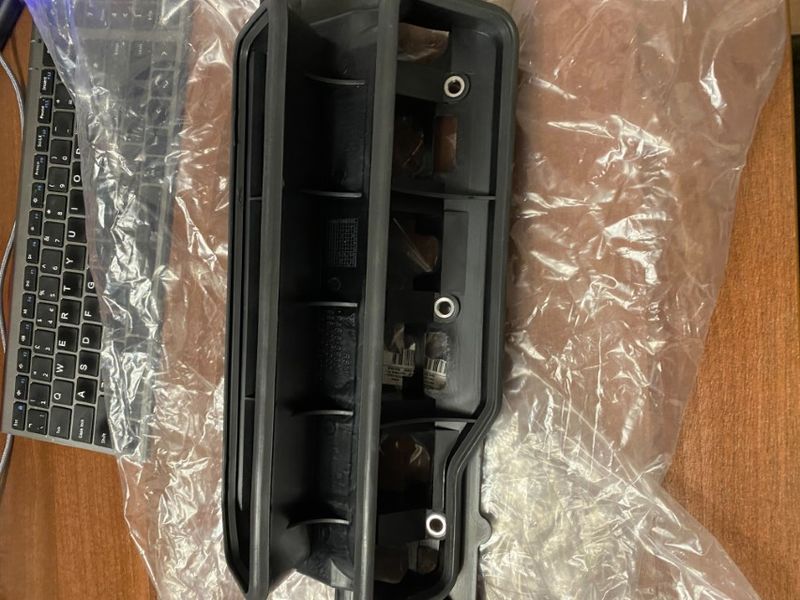
A nice new oil separator with new gaskets
And lots of other parts inc, new injectors, seals, bolts, screws, knock sensors, chains, guides, tensioner, etc. Its only a small portion and loads more on the way, but I like to buy things slowly and especially when I can gab a bargain. As with the injectors and lifters which I paid less than half the normal price for the same part.
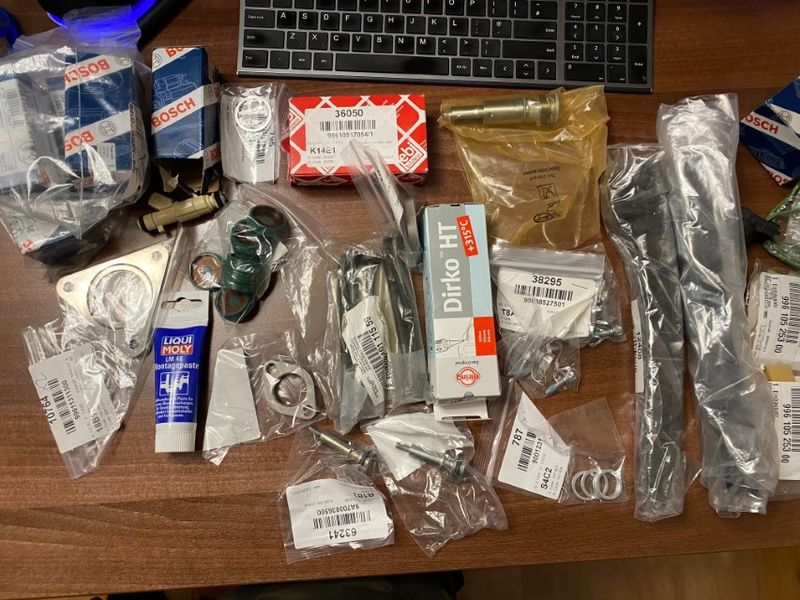
Hopefully the parts I need to start the bearing carrier rebuild will turn up soon
|

|

|
 11-30-2021, 12:58 PM
|
#49
|
|
Registered User
Join Date: Oct 2018
Location: North Cali
Posts: 858
|
Great thread, thanks for sharing! The two variocam units are completely different, they move the chain to the opposite side during the changover. After browsing many threads and taking apart mine for inspection my understanding is that mostly only one of them fails, the one that has the large greenish O-rings that are prone to disintegrate due to aging. I forgot which one it is, I have a thread on this topic somewhere. Theoretically if you remove that steel cover disc you can pull the piston and replace the faulty O-rings. It does not seem to be easy to do though, it requires machining, mill, lathe, etc. If you go down that route let us know how it worked out. When I was rebuilding mine I tested the variocam operation while spinning the engine on my bench and activating the solenoids, and both turned out good. I have a thread on this in show & tell.
Good pictures, keep them coming! 
|

|

|
 11-30-2021, 01:18 PM
|
#50
|
|
Registered User
Join Date: May 2021
Location: Stansted
Posts: 67
|
Quote:
Originally Posted by Homeoboxter

Great thread, thanks for sharing! The two variocam units are completely different, they move the chain to the opposite side during the changover. After browsing many threads and taking apart mine for inspection my understanding is that mostly only one of them fails, the one that has the large greenish O-rings that are prone to disintegrate due to aging. I forgot which one it is, I have a thread on this topic somewhere. Theoretically if you remove that steel cover disc you can pull the piston and replace the faulty O-rings. It does not seem to be easy to do though, it requires machining, mill, lathe, etc. If you go down that route let us know how it worked out. When I was rebuilding mine I tested the variocam operation while spinning the engine on my bench and activating the solenoids, and both turned out good. I have a thread on this in show & tell.
Good pictures, keep them coming!  |
Awsm, thanks for sharing and I will definitely look up your thread.
I struggled to find any real description of the internals and also photos but lots of warnings and statements of “it can’t be done”, “non-serviceable” “cannot be refurbished” etc. I come from an engineering background and hearing that makes me think “really?” And makes me want to run an experiment to see why. Yes, once removed some parts cannot be reused, but with technology as it is today, such 3D-metal printing, CNC machines etc once we have a 3D model of the parts required then why cannot these non reusable parts be replaced? Maybe it’s cost, maybe it’s complexity, that’s the experiment I wish to run and I will share my observations not to encourage everyone not to replace with new Porsche parts but to share and document the observations for other 
I have seen a European company that does produce reconditioned units so it must be possible
|

|

|
 11-30-2021, 01:42 PM
|
#51
|
|
Registered User
Join Date: May 2021
Location: Stansted
Posts: 67
|
Actually, quick question for our community, it feels that the spring in the main piston has a different compression rating between each side. I need to check but from memory bank 2 was far easier to compress than bank 1. The difference being bank 2 could be compressed by hand and bank 1 required far more effort.
Does anyone have any similar experience/knowledge or observations?
Thanks in advance
|

|

|
 11-30-2021, 03:42 PM
|
#52
|
|
Registered User
Join Date: Oct 2018
Location: North Cali
Posts: 858
|
Quote:
Originally Posted by OldManMo

Actually, quick question for our community, it feels that the spring in the main piston has a different compression rating between each side. I need to check but from memory bank 2 was far easier to compress than bank 1. The difference being bank 2 could be compressed by hand and bank 1 required far more effort.
Does anyone have any similar experience/knowledge or observations?
Thanks in advance
|
I didn`t notice that, it`s possible though. Perhaps oil got trapped in one of the units and gave you you the impression it`s harder to compress? Bt, check out this thread, has pics of the internals of both actuators: http://986forum.com/forums/boxster-general-discussions/78048-boxster-986-particles-oil-filter-2.html
|

|

|
 12-01-2021, 02:05 AM
|
#53
|
|
Registered User
Join Date: May 2021
Location: Stansted
Posts: 67
|
Quote:
Originally Posted by Homeoboxter

|
Hi Homeoboxter
Thanks, that is a very good point and I will check the deflection of each spring with a known load as its the only way to tell 
Yes, it was that thread that encouraged me to look deeper into the units. Awesome information
|

|

|
 12-05-2021, 04:09 AM
|
#54
|
|
Registered User
Join Date: May 2021
Location: Stansted
Posts: 67
|
Sweet, all the parts bar one that I need to start the bearing carrier rebuild turned up today (yes on a Sunday  )
Another birthday day lol

|

|

|
 12-05-2021, 02:25 PM
|
#55
|
|
Registered User
Join Date: Jan 2020
Location: Washington State
Posts: 3
|
Great thread! I'm subscribed.
|

|

|
 12-07-2021, 05:24 AM
|
#56
|
|
Registered User
Join Date: Oct 2019
Location: Central Florida
Posts: 253
|
Awesome thread. I'd love to rebuild a 3.4 for my Boxster but don't really have enough room. Maybe when both kids are out of the house.
|

|

|
 12-08-2021, 07:23 AM
|
#57
|
|
Registered User
Join Date: May 2021
Location: Stansted
Posts: 67
|
And my last "part" arrived today so I can start my rebuild 

Have started with the clean up of the bottom end and will start sharing those photos and experiences and lessons learnt
|

|

|
 12-08-2021, 11:20 AM
|
#58
|
|
Registered User
Join Date: May 2021
Location: Stansted
Posts: 67
|
After degreasing the crank and giving it a bath I checked the main journals and all were 60.0mm using a digital calliper. I have a micrometer somewhere and will dig it out to double check , but with all honesty I don’t know if this is good or bad.
Lots if posts from people have measured theirs but there appears to be nothing published as to factory spec by Porsche. Without buying a new crank, is anyone aware of the factory specs for both journals?
|

|

|
 12-08-2021, 12:35 PM
|
#59
|
|
Registered User
Join Date: Feb 2005
Location: It's a kind of magic.....
Posts: 6,657
|
Quote:
Originally Posted by OldManMo

After degreasing the crank and giving it a bath I checked the main journals and all were 60.0mm using a digital calliper. I have a micrometer somewhere and will dig it out to double check , but with all honesty I don’t know if this is good or bad.
Lots if posts from people have measured theirs but there appears to be nothing published as to factory spec by Porsche. Without buying a new crank, is anyone aware of the factory specs for both journals?
|
Porsche never published any internal clearance info on these engines as they didn't want anyone to work on them in the field. They didn't even publish engine internal torque specs. That is why Jake Raby's information is so important.
__________________
“Anything really new is invented only in one’s youth. Later, one becomes more experienced, more famous – and more stupid.” - Albert Einstein
|

|

|
 12-08-2021, 12:53 PM
|
#60
|
|
Registered User
Join Date: May 2021
Location: Stansted
Posts: 67
|
Quote:
Originally Posted by JFP in PA

Porsche never published any internal clearance info on these engines as they didn't want anyone to work on them in the field. They didn't even publish engine internal torque specs. That is why Jake Raby's information is so important.
|
Thanks JFP in PA for confirming and replying, your help is very much welcome and appreciated. Got Jakes torque specs which is a God send as are his DVDs so far.
So the only way anyone can find out what the default factory spec for each journal is to buy a new crank and measure them and then publish them on the net to help others. Don’t really want to spend the money as my crank as far as I can see looks ok though I could be wrong as I don’t know what the original specs are 
Nice (British sarcasm  )
|

|

|
 Posting Rules
|
You may not post new threads
You may not post replies
You may not post attachments
You may not edit your posts
HTML code is On
|
|
|
All times are GMT -8. The time now is 09:20 AM.
| |