 06-25-2015, 11:44 AM
|
#581
|
|
Registered User
Join Date: Nov 2009
Location: San Jose , CA
Posts: 579
|
I started the install process of the wind stop.
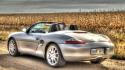
I just need to wire it up now. I can say that the lower Boxster S logo does not get in the way of the rear view at all. Fantastic.
Glad to hear JJ is doing better. Thanks Fred.
Tony
__________________
Lapis Blue 03 Boxster S
Seal Grey 04 Boxster S (RIP 9-21-14)
|

|

|
|
06-30-2015, 05:12 AM
|
#582
|
|
Registered User
Join Date: Jun 2014
Location: New Jersey
Posts: 230
|
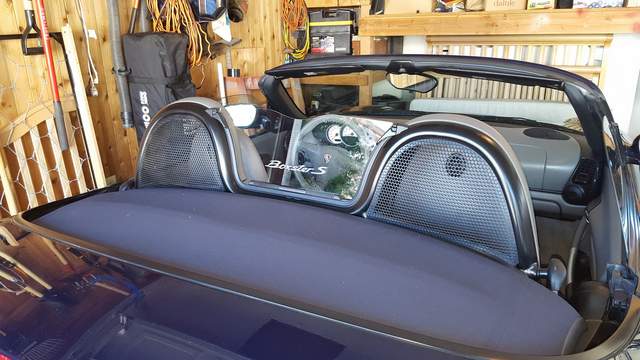
The wife and kid are at the in laws for a couple days so daddy got to play with his toys for a little.  Installed new LED side markers and the wind breaker finally,wired it to the ash tray light:

I should add, the entire install including wiring took no more than 30 mins, probably less actually, I even drilled a channel in the trim to route the wire through. The only thing I had some trouble with was taking the existing piece off without snapping the latches, I was pulling upwards instead of back of course.
Thanks Fred!
__________________
2001 Seal Gray Boxster (Hair Salon on wheels)
2013 Audi Q5 (Family Mover)
2006 Yamaha R1 (Adrenaline Machine)
Last edited by amitmishra4; 06-30-2015 at 05:17 AM.
|
|
|
|
|
06-30-2015, 08:17 AM
|
#583
|
|
Registered User
Join Date: Sep 2013
Location: Montreal, QC. (currently expat to Shanghai)
Posts: 3,249
|
Tony, Amit, looking cool guys and welcome! That cold white looks class
I also got mine installed only this last Sunday afternoon, forever red! Love the new coated panel... I can actually wash it without having to polish it after lollll
Dunno about you guys but I had a massive static issue with mine right after install but that seem to be completely gone now. It discharged itself after a few hours of driving thankfully. So if you experience the same, put it on and drive drive drive, and drive!!!

__________________
______________________________
'97 Boxster base model 2.5L, Guards Red/Tan leather, with a new but old Alpine am/fm radio.
|
|
|
|
|
06-30-2015, 08:03 PM
|
#584
|
|
Toppy
Join Date: Apr 2014
Location: Dorchester, ON, Canada
Posts: 144
|
Looking like mine has just cleared customs, any one who has already installed would you care to share some pictures on the wiring?
__________________
1999 Boxster
Arena Red/Graphite Grey Interior/Black 03 Top/550 All Red Tail Lights
|
|
|
|
|
06-30-2015, 09:53 PM
|
#585
|
|
Registered User
Join Date: Jun 2013
Location: Nanaimo, Vancouver Island, British Columbia, Canada
Posts: 916
|
Look further back I posted pics of wiring install
|
|
|
|
|
07-01-2015, 05:52 AM
|
#586
|
|
Registered User
Join Date: Jun 2012
Location: Bedford, TX
Posts: 2,755
|
Quote:
Originally Posted by Toppy986

Looking like mine has just cleared customs, any one who has already installed would you care to share some pictures on the wiring?
|
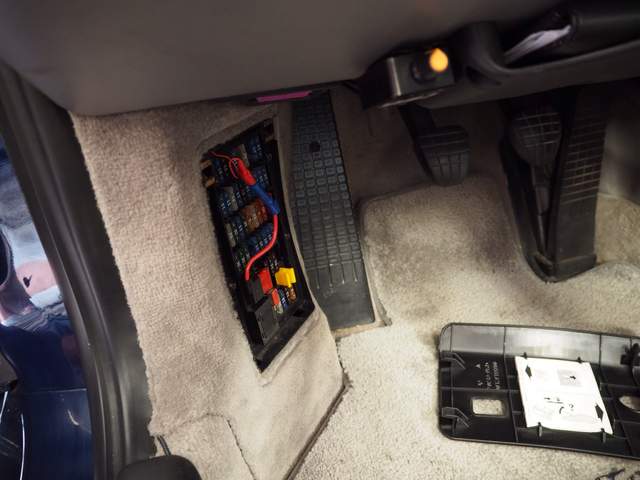
I have some pics somewhere also. I ran my wire along the driver's side door sill to a fuse tap. I mounted the rheostat next to the document holder under the steering wheel.
__________________
______________________________________________
2001 Boxster S Lapis Blue
TS Cat Bypass Pipes and exhaust
iPad Mini Dash Install
DEPO Tail Lights
|
|
|
|
|
07-01-2015, 08:52 AM
|
#587
|
|
Registered User
Join Date: Jun 2012
Location: Bedford, TX
Posts: 2,755
|
__________________
______________________________________________
2001 Boxster S Lapis Blue
TS Cat Bypass Pipes and exhaust
iPad Mini Dash Install
DEPO Tail Lights
|
|
|
|
|
07-01-2015, 12:55 PM
|
#588
|
|
Registered User
Join Date: Oct 2012
Location: Wake Forest, NC
Posts: 867
|
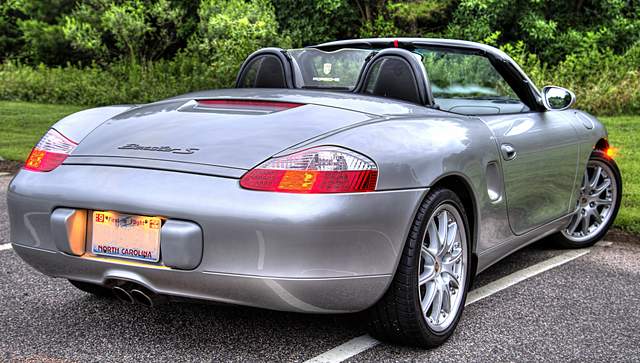
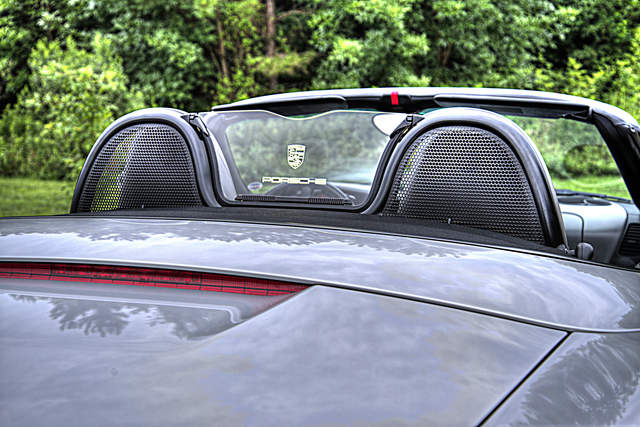
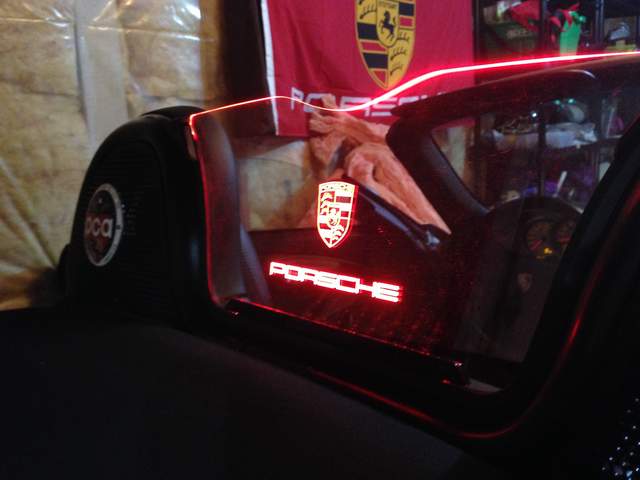
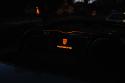
Test Photo
A shot of my Skybreaker taken in my garage. I've thought all along that I'd try to shoot it at dusk (in a less cluttered environment!), but now I think doing it near dawn when the light is diffused might work better. Sorry this has taken so long, Fred, but it's a bit of a bugger to shoot. The Porsche crest needs to have a darker background behind it, of course. Also, I didn't bother cleaning it before taking this image, so need to tend to that when I try shooting it outside. Only other comment - when I "turn up the volume" full blast, there's a lot of visual static in the deflector itself. Not sure that'd be the case with the blue or red ones.

__________________
2000 Boxster S, 6 speed, Sport Package, Litronics, LED tail lights, LNE IMS-B, OBC, Skybreaker wind deflector, Arctic Silver/Graphite Grey
|
|
|
|
|
07-01-2015, 08:08 PM
|
#589
|
|
Registered User
Join Date: Sep 2009
Location: toronto
Posts: 2,668
|
Is there a more convenient source of power where- by you could locate the rheostat at the roll bar firewall area and avoid visible wires?
Defrost hard window or speaker box power?
__________________
986 00S
|
|
|
|
|
07-02-2015, 04:21 AM
|
#590
|
|
Registered User
Join Date: Oct 2012
Location: Wake Forest, NC
Posts: 867
|
Wow. Will keep trying...
Shot at dawn. Ran into issues with depth of field/focus. Aaaaarrggghh!
__________________
2000 Boxster S, 6 speed, Sport Package, Litronics, LED tail lights, LNE IMS-B, OBC, Skybreaker wind deflector, Arctic Silver/Graphite Grey
|
|
|
|
|
07-02-2015, 09:23 AM
|
#591
|
|
Registered User
Join Date: Jun 2013
Location: Nanaimo, Vancouver Island, British Columbia, Canada
Posts: 916
|
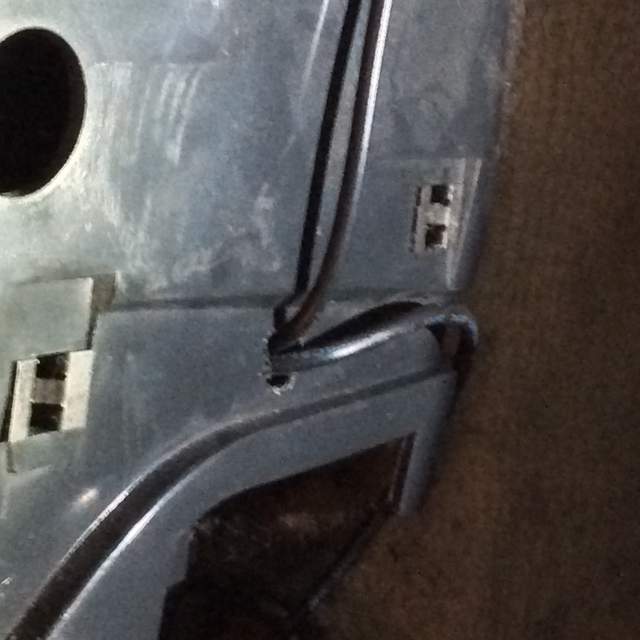
This is how I did mine,
Quote:
Originally Posted by Fintro11
How I installed My Windstop
Step One -
Carefully push the windstop clip and pull the windstop towards the back of the car. The wind stop should pop out easily and without much force. ( Take care not to break the clips )
Step Two -
Once you have your windstop out pull the bracket away from the screen. The bracket should come away relatively easily.

Step Three -
Line up your illuminated windstop to the bracket. You will have to drill a small hole for the cable to run though. I used a small drill bit and drilled from the top down, then from the bottom up applying pressure along a horizontal path ( so the connector can slide past ) 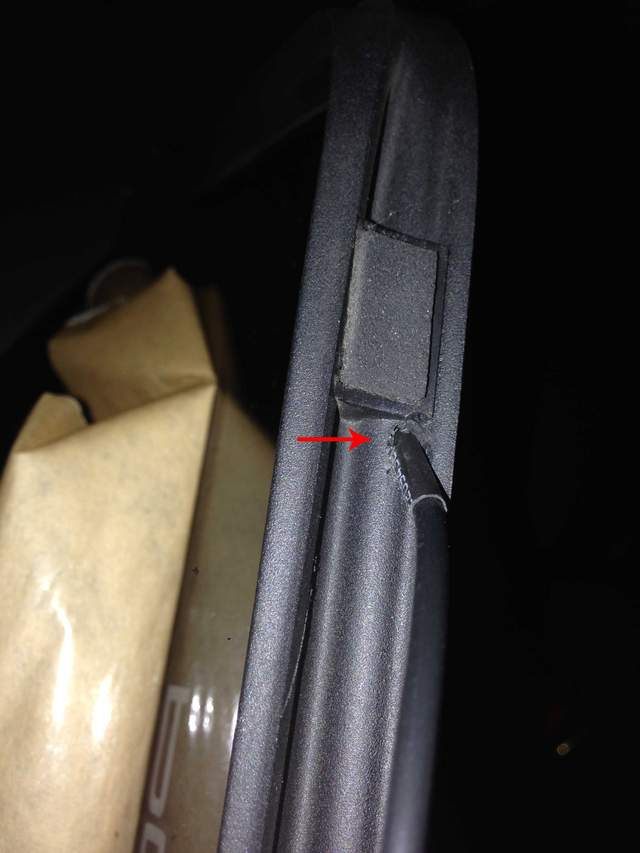
Step Four -
Install your illuminated windstop into the bracket and install it onto your car. You will want to keep the protective sheet on the windstop for now. Make sure the wire runs towards the driver side. I used a large flat screwdriver with paper towel wrapped around the tip and pushed the wire into the gap on the roll bar cover. 
Then keep running it around the back of the seat
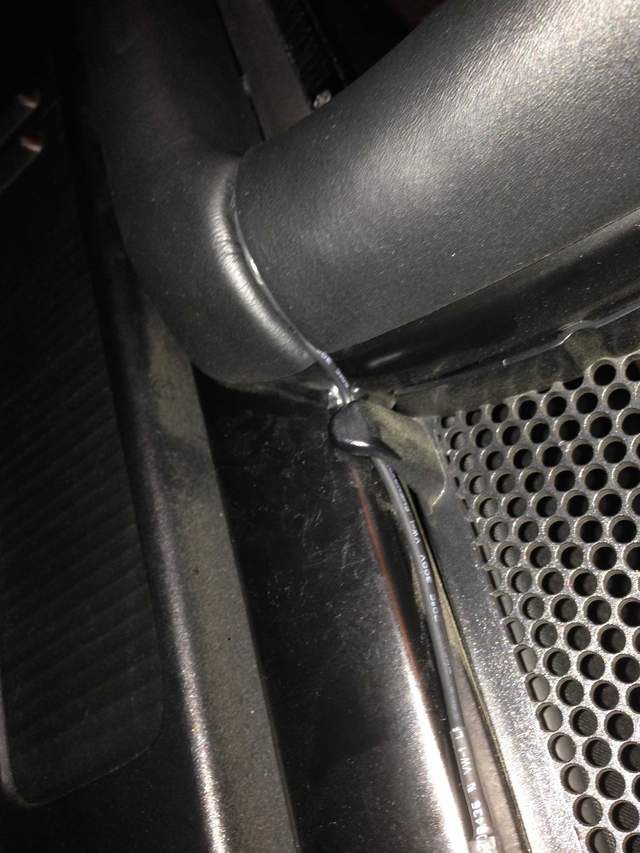
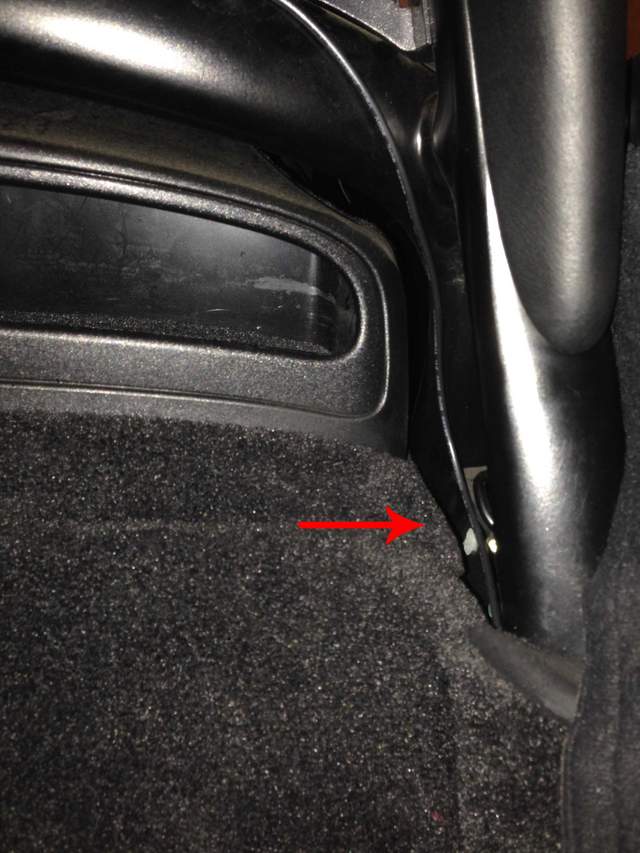
Step Five
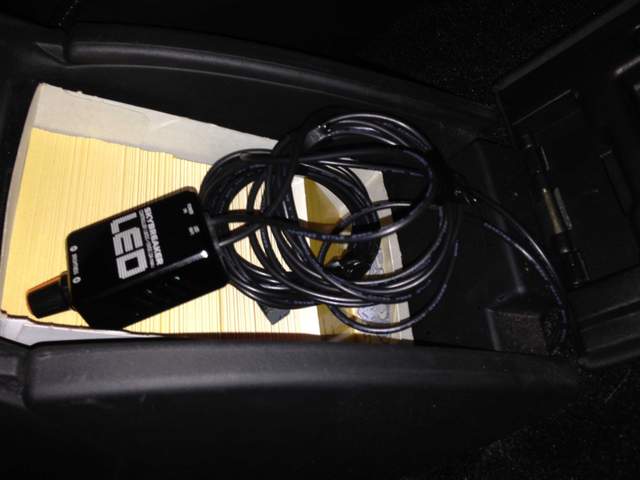
Run the wire into the seam of the access panel down leading to the arm rest cubby
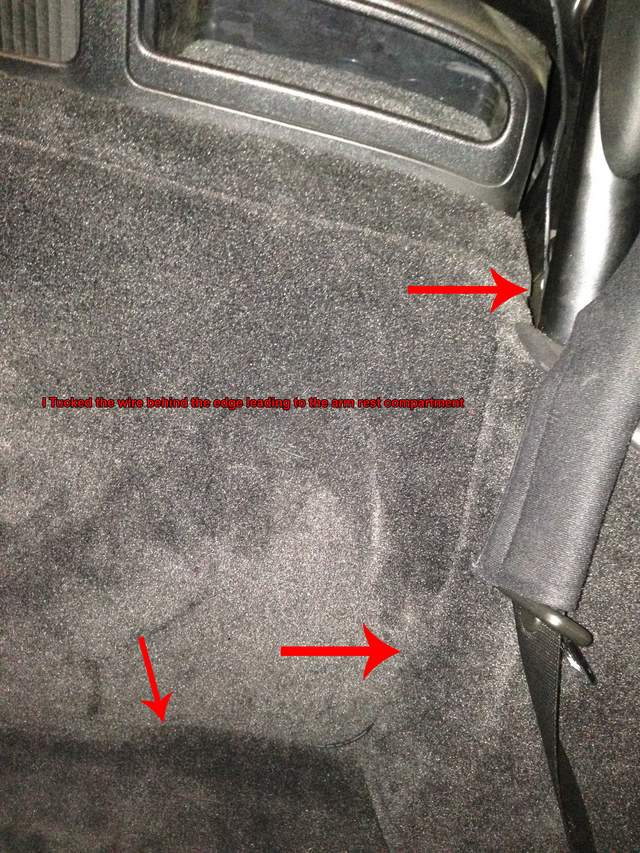
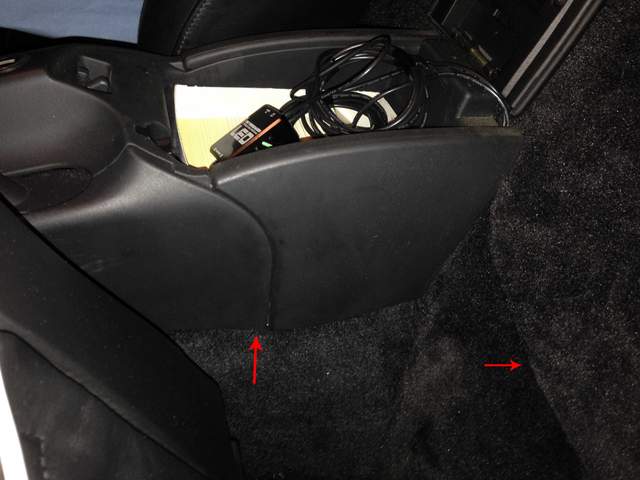
I removed the ash tray, and the ash tray housing to access the ash tray light circuit.
I fed the power cable up underneath the parking brake. Once I had the wire where i wanted it, I tucked the wire up inside the console ( see the above picture )
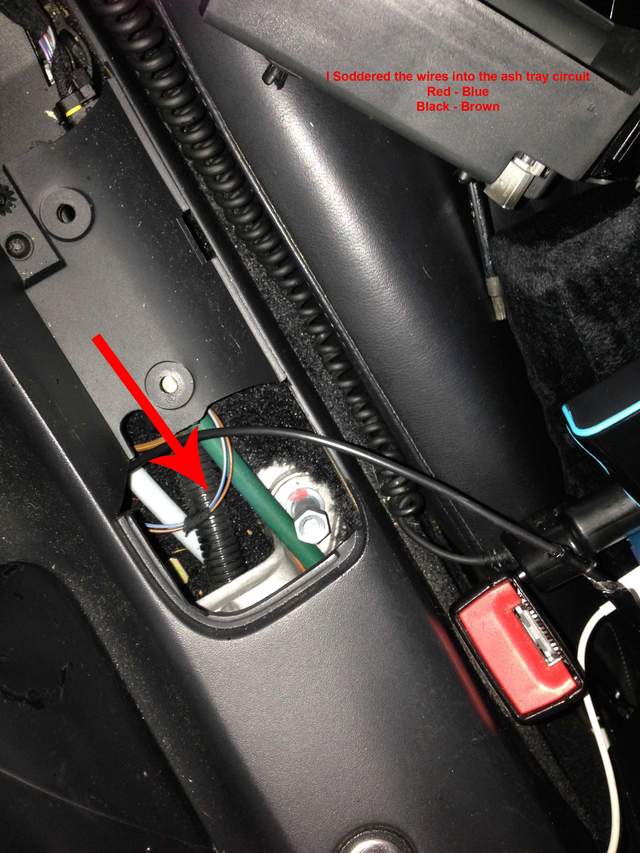
As per the image above I soldered the wires into the ash tray circuit. Once done I wrapped with electrical tape and re installed the ash tray.
Sorry for any mistakes and Fred/ Charles please add in if i did anything wrong!
Hopefully this helps as a reference for you guys.
PS Fred thanks for making such an amazing product! |
|
|
|
|
|
07-03-2015, 06:50 AM
|
#592
|
|
Registered User
Join Date: Jun 2013
Location: Nanaimo, Vancouver Island, British Columbia, Canada
Posts: 916
|

Just installed the new one
|
|
|
|
|
07-03-2015, 06:56 AM
|
#593
|
|
Registered User
Join Date: Jun 2012
Location: Bedford, TX
Posts: 2,755
|
I installed mine the other day too. Version 1.0 rattled quite a bit at speed, Ver 2.0 is significantly better! Thanks again Fred
__________________
______________________________________________
2001 Boxster S Lapis Blue
TS Cat Bypass Pipes and exhaust
iPad Mini Dash Install
DEPO Tail Lights
|
|
|
|
|
07-03-2015, 02:34 PM
|
#594
|
|
Toppy
Join Date: Apr 2014
Location: Dorchester, ON, Canada
Posts: 144
|
Canada Post delivered today, know what I am doing this week-end
__________________
1999 Boxster
Arena Red/Graphite Grey Interior/Black 03 Top/550 All Red Tail Lights
|
|
|
|
|
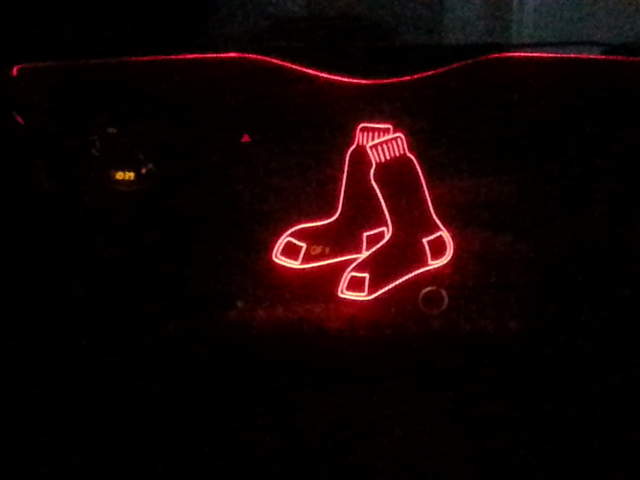
07-03-2015, 08:11 PM
|
#595
|
|
Registered User
Join Date: Apr 2015
Location: Massachusetts
Posts: 160
|
|
|
|
|
|
07-04-2015, 06:44 AM
|
#596
|
|
Registered User
Join Date: Oct 2012
Location: Wake Forest, NC
Posts: 867
|
__________________
2000 Boxster S, 6 speed, Sport Package, Litronics, LED tail lights, LNE IMS-B, OBC, Skybreaker wind deflector, Arctic Silver/Graphite Grey
|
|
|
|
|
07-04-2015, 11:41 AM
|
#597
|
|
Toppy
Join Date: Apr 2014
Location: Dorchester, ON, Canada
Posts: 144
|
Quote:
Originally Posted by Toppy986
Canada Post delivered today, know what I am doing this week-end
|
Installed this morning, wired to ash tray light, thanks Fred for your excellent work, I love it 

__________________
1999 Boxster
Arena Red/Graphite Grey Interior/Black 03 Top/550 All Red Tail Lights
|
|
|
|
|
07-04-2015, 01:50 PM
|
#598
|
|
Rookie
Join Date: May 2014
Location: Portland Oregon
Posts: 215
|
Ordered the crest with Porsche in amber with the cool white option, cant wait! Very very cool, you the man Fred.
__________________
02 Seal Grey 5 Speed
|
|
|
|
|
07-06-2015, 05:07 AM
|
#599
|
|
Registered User
Join Date: Apr 2015
Location: Massachusetts
Posts: 160
|
Quote:
Originally Posted by Toppy986
Installed this morning, wired to ash tray light, thanks Fred for your excellent work, I love it
|
Looks good... How did you get the adjustment know inside the cubby like that? I also wired mine to the ashtray light and fed the wire for that up under the trim but I have the adjustment knob just hanging over the side of the cubby which I do not like...
|
|
|
|
|
07-06-2015, 12:45 PM
|
#600
|
|
Toppy
Join Date: Apr 2014
Location: Dorchester, ON, Canada
Posts: 144
|
Quote:
Originally Posted by soxfan1966
Looks good... How did you get the adjustment know inside the cubby like that? I also wired mine to the ashtray light and fed the wire for that up under the trim but I have the adjustment knob just hanging over the side of the cubby which I do not like...
|
I pulled off the side panel on the console, drilled a small hole into the cubby, guessing at bottom height. Fed both wires through the hole. Fed the feed wire behind park brake trim into the ashtray area. Cut feed wire at length for ashtray light, and after the white end was connected, coiled up extra wire and stuffed it behind the seat belt post carpet. 
__________________
1999 Boxster
Arena Red/Graphite Grey Interior/Black 03 Top/550 All Red Tail Lights
|
|
|
|
 Posting Rules
|
You may not post new threads
You may not post replies
You may not post attachments
You may not edit your posts
HTML code is On
|
|
|
All times are GMT -8. The time now is 07:10 PM.
| |


![Porsche Wind Deflector with Edge Lighting [from CAD, prototyping to finish]](/forums/iconimages/diy-project-guides/porsche-wind-deflector-edge-lighting-%5B-cad-prototyping-finish%5D_ltr.gif)
 2004 Porsche Boxster
 2003 Porsche Boxster S
 2001 Boxster S


 Boxster S
 Genesis 3.8
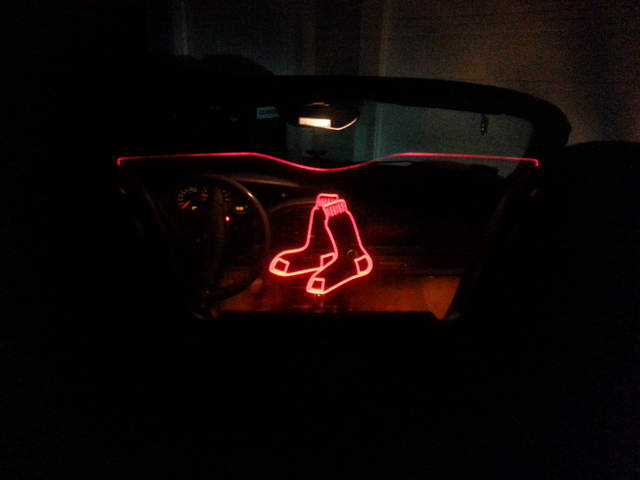


 No name
 Linear Mode


