Go Back   986 Forum - The Community for Porsche Boxster & Cayman Owners > Porsche Boxster & Cayman Forums > DIY Project Guides

Post Reply
 
LinkBack Thread Tools Display Modes
Old 01-11-2014, 07:20 PM   #1
Registered User
 
Join Date: Sep 2008
Location: Florida
Posts: 2,492
Boxster Seat Disassembly Procedure Part 1 of 2

986 Boxster Seat Disassembly Procedure
Seats are expensive to ship so I thought I'd pass along how to disassemble a seat to ship cushions without the seat rail to save a few bucks. Hope this helps somebody.

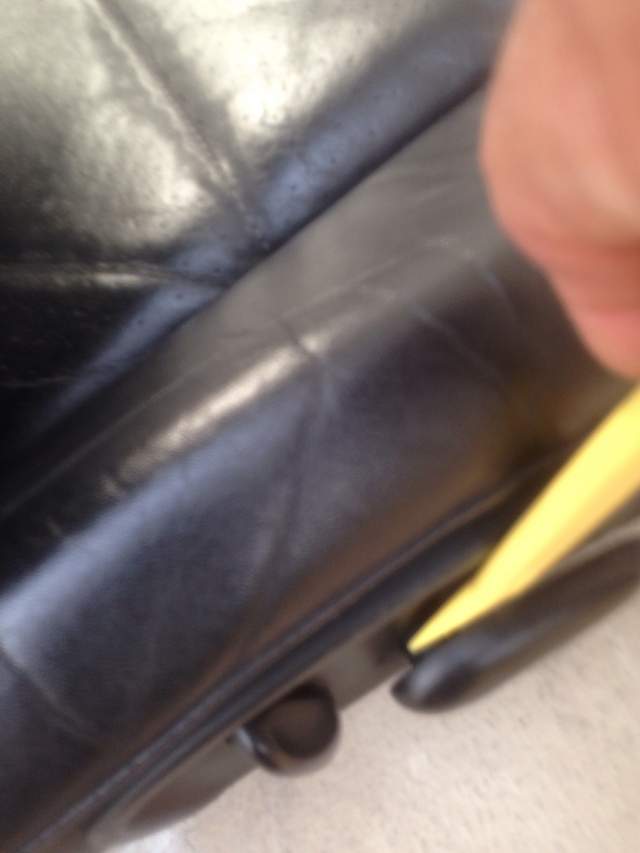
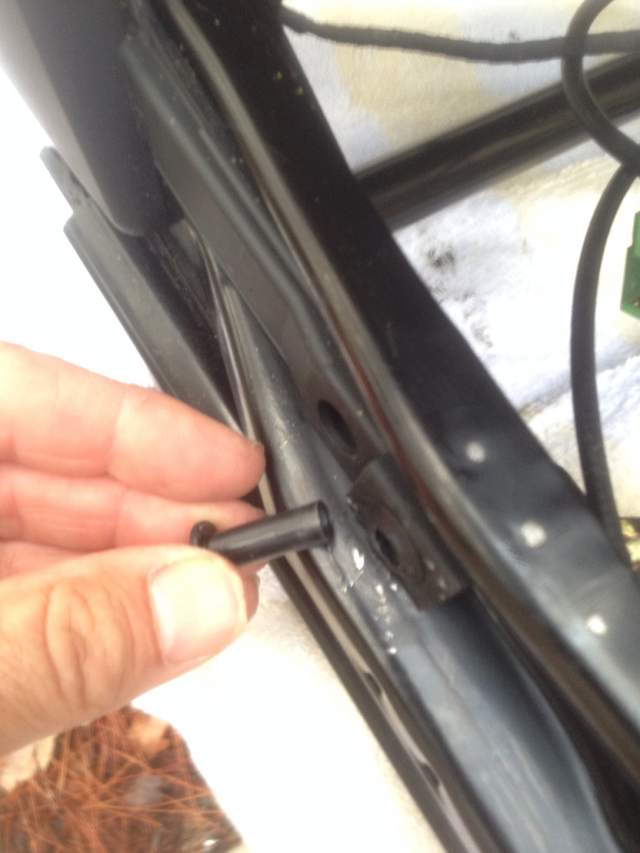
1. Gently pry the seat height adjustment lever located on the outboard side of the seat cushion, Pry on the rearward part of the lever. Do not have remove the lever that adjusts seat back position.


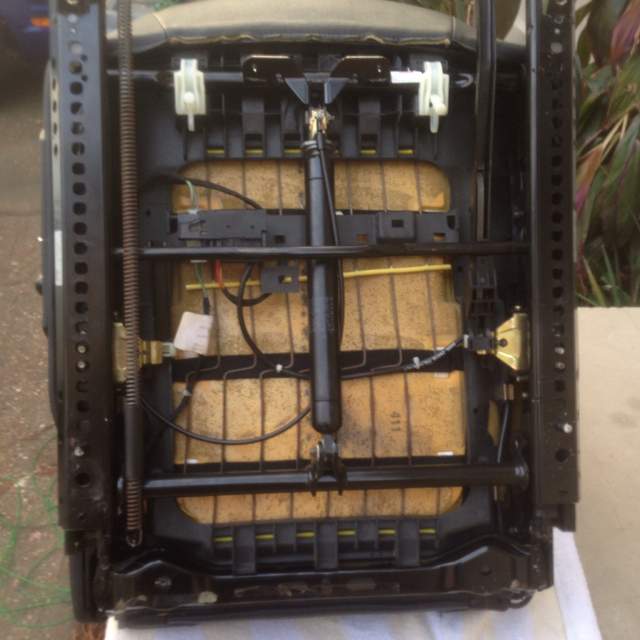
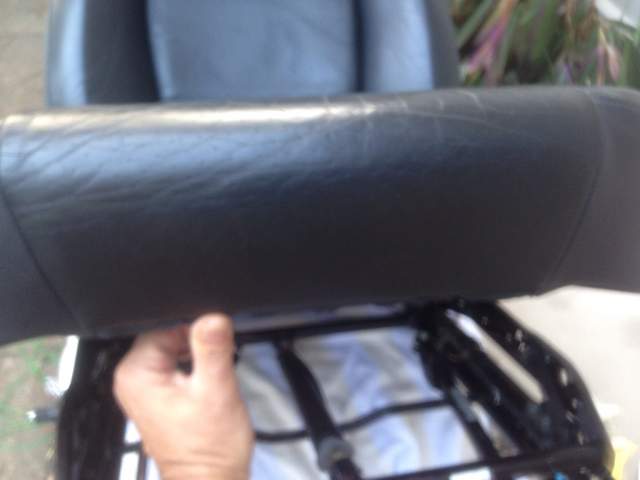
2. Place seat on it's back to access the underside of the seat cushion.


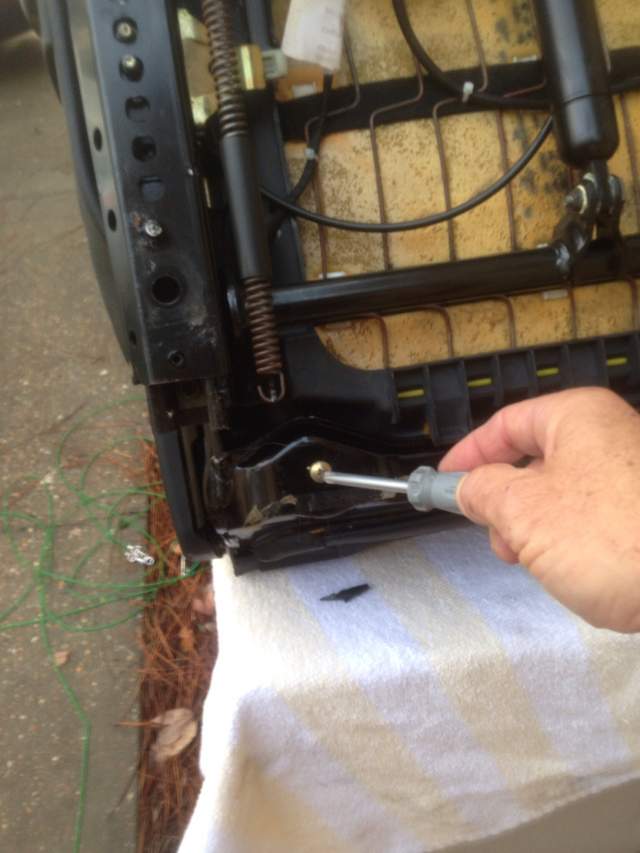
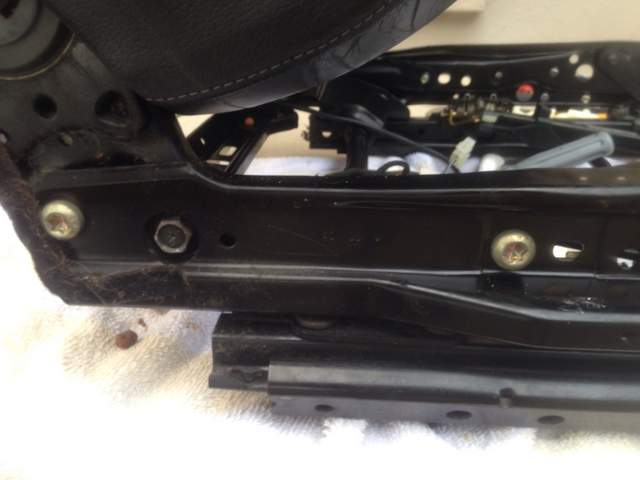
3. Remove Phillips head screw located toward the back of the seat cushion.


4. There are two electrical connectors to disconnect. The first connector is the white two conductor cable beside the large connector.


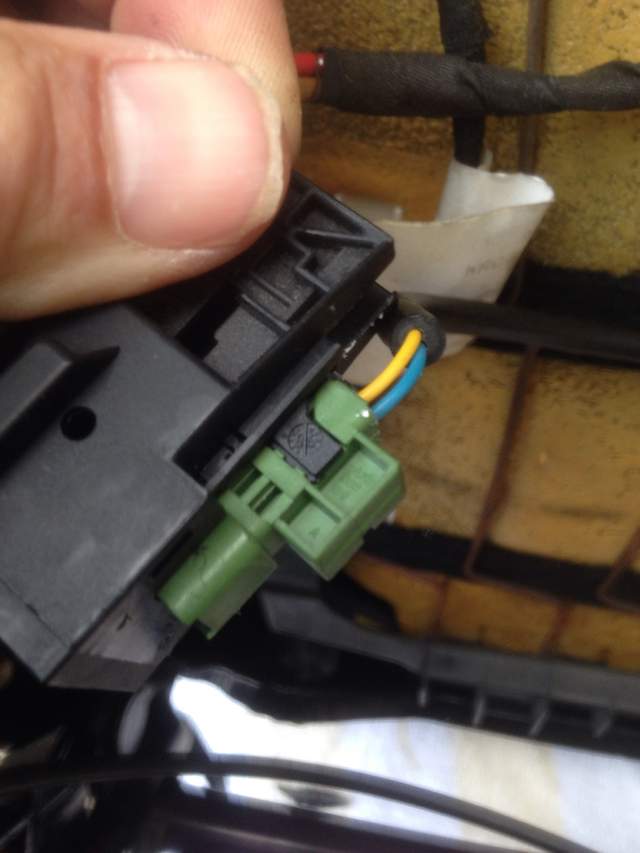
5. The second is a smaller colored connector contained in the large rectangular connector. My smaller connector was green. To remove the green connector, slide the black clip on the side of the large connector rearward. The green connector will slide out of the large connector.


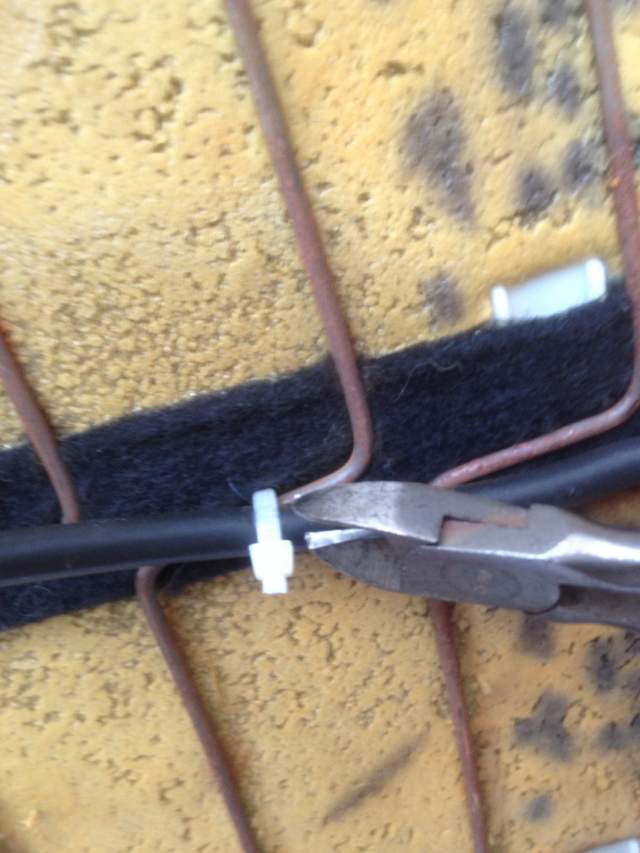
6. With connectors removed, unclip them from the seat bottom. There may be a couple of wire ties to remove as well.


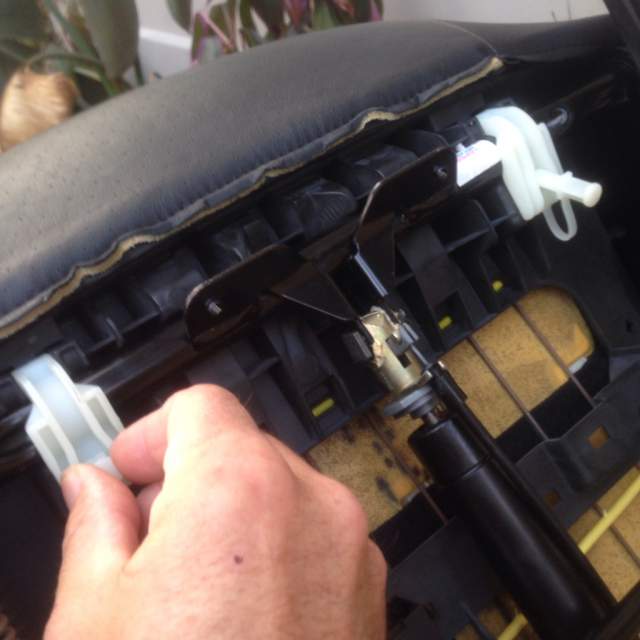
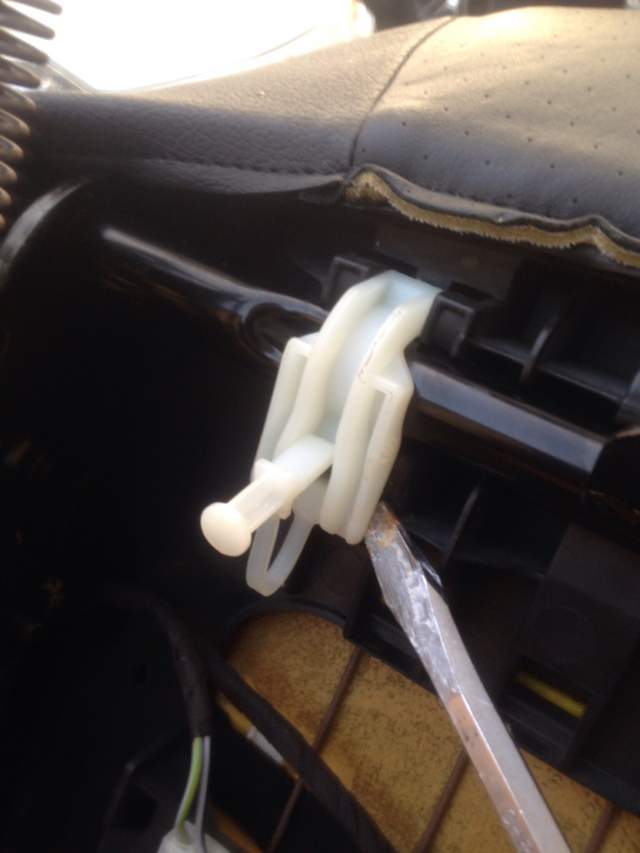
7. Unclip white plastic clips from front of seat cushion.


dghii is offline   Reply With Quote
Old 01-11-2014, 07:21 PM   #2
Registered User
 
Join Date: Sep 2008
Location: Florida
Posts: 2,492
Part 2 of 2

7. Pull Seat cushion up from the front. You will have to pull out on the side of the cushion to have it clear the seat height adjuster.


9. Now al that is left to remove the seat back from the seat rail. Remove the plastic retainer from the decorative plastic side piece on the outside edge of the seat (side with controls). The decorative plastic piece just unclips after the retainer is removed.


10 Remove the three bolts on each side of the seat back and the seat back will come free of the seat rail. Done!
dghii is offline   Reply With Quote
Old 01-12-2014, 12:08 PM   #3
Registered User
 
Porsche9's Avatar
 
Join Date: Sep 2013
Location: Chandler, AZ
Posts: 1,796
Thanks for the write up. I'm sure many will find it useful.
__________________
03 Carrera
02 Boxster S Guards Red, black interior with matching hardtop
89 Carrera 4
89 944 S2
78 911SC
Porsche9 is offline   Reply With Quote
Old 01-26-2014, 01:06 PM   #4
Registered User
 
Join Date: Jan 2014
Location: Fort William - Scotland
Posts: 6
Great writeup... looking into heated seats to retrofit in
cam_d_ is offline   Reply With Quote
Old 01-28-2014, 11:30 AM   #5
Registered User
 
Join Date: Sep 2008
Location: Florida
Posts: 2,492
Best of luck with the heated seats!

The write up was out of necessity. A year or so ago I bought a set of seats off of _bay. When they arrived, they had been disassembled for shipping (great idea for saving $$). All the hardware was in a baggie, with no instructions.

I removed one of my seats and disassebled it, knowing I was not going to reuse it if I screwed up. Anyway, it wasn't that tough to disassemble and it allowed me to assemble the new (to me) seats.
dghii is offline   Reply With Quote
Old 04-08-2014, 09:10 PM   #6
Registered User
 
Ckrikos's Avatar
 
Join Date: Sep 2002
Location: Northern NJ
Posts: 633
I am planning on doing the same if I can find a pair of sport seats. I want to remove the seat back and attach it to my full power seat bottom and then also replace the top center cushion with my old heated seat cushion. Then reupholster and paint the seat backs. It sounds expensive but I may have sourced a pair of messed up seats I can use as donors.
__________________
LB/GG/MB 02 2.7 sold
MB/GG 02 996TT
Ckrikos is offline   Reply With Quote
Old 02-22-2018, 12:05 PM   #7
Registered User
 
Join Date: Jan 2010
Location: Northern NJ
Posts: 51
Thank you for posting this tutorial and the pics! After spending way too long trying to remove the seat belt plug from the harness, I found your thread and was able to remove it in 2 minutes! Photo from Step 5 (invaluable)!!!!
__________________
Boxzilla
2001 Black "S"
De-badged
DRL hack
boxzilla is offline   Reply With Quote
Old 02-22-2018, 06:15 PM   #8
Registered User
 
Join Date: Sep 2008
Location: Florida
Posts: 2,492
Glad it helped.
Gotta tell you, when I received my seats in pieces I was pissed! Once I figured out how to assemble them, it made sense that it's the perfect way to ship these things, especially if you can buy the seat cushions without purchasing the seat mount assembly (heavy and rarely breaks).
dghii is offline   Reply With Quote
Old 01-23-2021, 12:14 PM   #9
Registered User
 
Join Date: Jul 2020
Location: MPLS MN
Posts: 9
Thank you. this was a big help.
KIWI3333 is offline   Reply With Quote
Old 01-23-2021, 03:02 PM   #10
Registered User
 
Join Date: Sep 2008
Location: Florida
Posts: 2,492
I would not own my P-cars over the last 15 years without this board. Glad I could contribute something to help someone else.
dghii is offline   Reply With Quote
Old 02-14-2024, 12:18 PM   #11
Motorist & Coffee Drinker
 
78F350's Avatar
 
Join Date: Jul 2014
Location: Oklahoma
Posts: 3,653
Garage
About once a year, I take apart a seat or two. I always go back to this for a quick refresher, so ...bump.

Thanks dghii for posting.
__________________
I am not an attorney, mechanic, or member of the clergy. Following any advice given in my posts is done at your own peril.
78F350 is offline   Reply With Quote
Old 02-24-2024, 05:15 PM   #12
Registered User
 
Join Date: Sep 2008
Location: Florida
Posts: 2,492
I had to reference it last year myself when I swapped the leather on my seats! Couldn't remember how I'd done it for crap!

dghii is offline   Reply With Quote
Post Reply


Thread Tools
Display Modes

Posting Rules
You may not post new threads
You may not post replies
You may not post attachments
You may not edit your posts

BB code is On
Smilies are On
[IMG] code is On
HTML code is On
Trackbacks are On
Pingbacks are On
Refbacks are On


All times are GMT -8. The time now is 04:18 AM.


Powered by vBulletin® Version 3.8.7
Copyright ©2000 - 2024, vBulletin Solutions, Inc.
Content Relevant URLs by vBSEO 3.6.0
Copyright 2024 Pelican Parts, LLC - Posts may be archived for display on the Pelican Parts Website -    DMCA Registered Agent Contact Page