Go Back   986 Forum - The Community for Porsche Boxster & Cayman Owners > Porsche Boxster & Cayman Forums > DIY Project Guides

Post Reply
 
LinkBack Thread Tools Display Modes
Old 03-13-2010, 10:22 AM   #1
Registered User
 
Join Date: Jun 2009
Location: Central Ohio
Posts: 526
DIY: How to Change your Alternator

Pretty straight forward project. No need to remove top engine cover or seats. All access is through compartment behind the seats.
First Test your battery/alternator with car off and then car running. You should see a drop in voltage when you start your car. Mine was 12.x then dropped to 11.xx. Take your alternator in and have it tested. Also have them test the new Alt before you take it home.

Difficulty: 4.5 out of 10 *(only 2 scews and 3 wires)
Cost: $204 +tax from Oreily's auto parts with lifetime warranty.
Time: 45 minutes to an hour for removal, 30 minutes to install

Procedure: 10 steps
.5) Disconnect Battery before doing this.(almost forgot that one)
1.) Put both seats in forward and Remove 4 plastic screws at the top of the carpet behind the seats. take off carpet
2.) Remove access panel(8 or 10 scews) I believe 10mm socket, use extension for the 2 behind the arm rest.
3.) Use 24mm socket(short) and a 1/2 ratchet to loosen tension and remove your serpentine belt(change it if you need to now)http://www.987forum.com/forums/showthread.php?t=21433
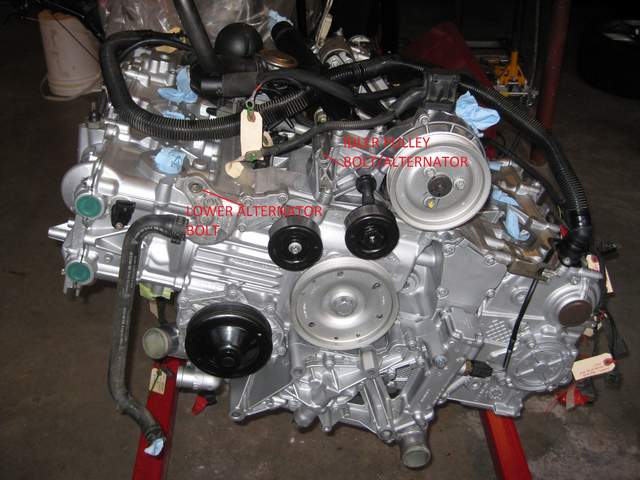
4.) Take off both screws holding the alternator in. The one with a roller will come off after you use a pry bar to move the alt up.
5.) Don't take it all the way out cause you have 3 "short" wires attached in the back of it. The two wires come off once you remove the bolt, the other comes off by pressing the sides of the plastic harness.
6.) Remove your old alternator. Should slide out with a little maneuvering.
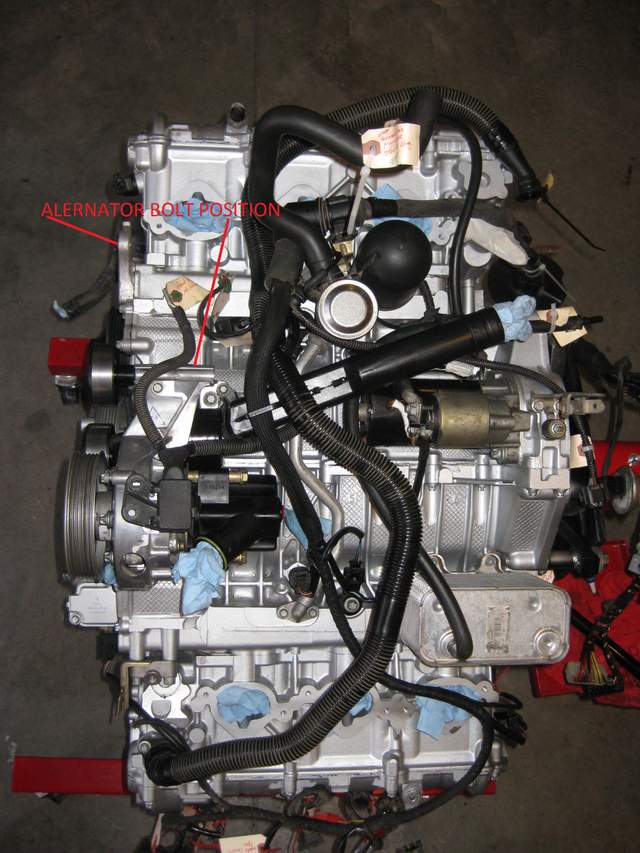
7.) I took the bolt off at the bottom left, right next to the Alt to make more room for it to be re-installed. It really helped.
8.) Connect wires back up and side it back in(really easy with bolt on car removed).
9.) Replace bolt on car before the bolts on the alternator.
10.) Put belt back on and release tension. Attach battery and test everything out before putting access lid and carpet back on.

Thats it, you just saved yourself a small fortune.

Projects completed:
1.) Serpentine belt...........$25 Gatorback w/ac
2.) Sparkplugs..................$42 Ngk-Ix-Iridium
3.) Radio replaced............$225 JVC HD50 (BB install)
4.) Tires............................$700 Sumitomo III Local shop
5.) Oil Change/air filter.....$94 catro syntec 10W40,napa gold,K&N air
6.) Speakers....................$143 Infinity Kappa F=4", R=6x4 plate
7.) Throttle body clean.....$5 Throttle body cleaner
8.) De-snorkel..................$.10 A few paper towels
9.) Alternator...................$221 Various Sockets
10.)Fuel filter...................$30 10mm socket and flat head screwdriver
Projects to do:
fuel filter
Another Oil change

__________________
I'll take my Guns, Religion, and Money; You can keep the "CHANGE" B.O.!!

SO, GROW A PAIR NANCY AND DRIVE IT LIKE YOU STOLE IT!!
http://i826.photobucket.com/albums/z...Main/MyBox.jpg

Last edited by mptoledo; 04-02-2010 at 07:41 AM.
mptoledo is offline   Reply With Quote
Old 03-27-2010, 11:28 PM   #2
Registered User
 
Join Date: Mar 2010
Location: Los Angeles
Posts: 23
New member here. Thanks for this info, came in very handy this week. Not to bad of an removal/install at all. My normal mechanic wanted $840.00.
aztecw is offline   Reply With Quote
Old 03-30-2010, 07:54 PM   #3
Registered User
 
Join Date: Nov 2007
Location: Chicago suburbs
Posts: 1,675
My normal mechanic wanted $840.00

And yet we still send our children to law school!

Have a friend that's quite well to do...he owns a plumbing company.

Sure is nice to be able to work on these cars without too many difficulties and leave the hard stuff to guys like Jake.
__________________
JGM
2002 Boxster S
1973 911 Green FrankenMeanie
PCA DE Instructor circa '95
jmatta is offline   Reply With Quote
Old 04-01-2010, 08:02 PM   #4
Registered User
 
Join Date: Jun 2009
Location: Central Ohio
Posts: 526
Yep, how do those baztards sleep at night? I know everybody needs to make some money, but that is borderline criminal.
__________________
I'll take my Guns, Religion, and Money; You can keep the "CHANGE" B.O.!!

SO, GROW A PAIR NANCY AND DRIVE IT LIKE YOU STOLE IT!!
http://i826.photobucket.com/albums/z...Main/MyBox.jpg
mptoledo is offline   Reply With Quote
Old 08-02-2010, 02:34 PM   #5
Registered User
 
Join Date: Aug 2010
Location: usa
Posts: 2
Re: Transfer Cases

automotion is a good place to get http://www.99parts.com , to get the best price I would try ebay

Last edited by litterfisher; 08-10-2010 at 02:26 PM.
litterfisher is offline   Reply With Quote
Old 12-05-2012, 05:49 AM   #6
Registered User
 
supersparker's Avatar
 
Join Date: Jan 2007
Location: Austin, Tx
Posts: 110
Yes, no need to remove the top engine cover or seat.

Took me 1.5 hrs + $400 for rebuilt Bosch unit

Dealer wanted $1,600 P&L!

Thanks!

Last edited by supersparker; 12-05-2012 at 05:52 AM.
supersparker is offline   Reply With Quote
Old 12-13-2012, 05:46 PM   #7
Registered User
 
Join Date: Mar 2011
Location: Orange County, CA
Posts: 316
Good to know for future repairs. Thanks
SF-Rockster is offline   Reply With Quote
Old 09-23-2014, 07:27 AM   #8
Registered User
 
Join Date: Jun 2014
Location: Northeast Ohio
Posts: 67
Bump for a good DIY.

After spending about 10 minutes banging on the bushing per other descriptions, I figured there had to be a better way. I looked at the schematic and sure enough, this way made perfect sense. Tried it and the alternator was out in 15 minutes between conference calls. Thanks!!
eddy is offline   Reply With Quote
Old 09-25-2014, 08:32 AM   #9
Registered User
 
Join Date: Jul 2014
Location: Hamilton, ON
Posts: 27
Has anyone else had issues moving the alternator once the bolts have been removed?

Once I remove the lower left bolt, and loosen the one with the pulley, I'm only getting a little play when I try to pry the alternator up -- it's rotating (maybe) a 1/4 inch clockwise on the pulley side. If i leave the lower left bolt in, and "loosen" the pulley side, I can't get it to rotate at all.

Any suggestions?
MacGrad is offline   Reply With Quote
Old 09-25-2014, 09:44 AM   #10
Registered User
 
Join Date: Apr 2013
Location: Springfield, Oregon
Posts: 62
The back side of the pulley side is a slip-fit threaded insert that clamps down on the mount when tightened. Loosen the pulley bolt 1/8-1/4 inch, then give it a few good thwacks with a hammer. Use a metal hammer, not a dead-blow or soft mallet. It needs the impulse from a metal hammer to move. You want hard enough of a tap to move the insert back, but not so hard of a tap to dent/mushroom the bolt. It'll open up the gap and free the alternator.
Polaris is offline   Reply With Quote
Old 09-25-2014, 12:40 PM   #11
Registered User
 
Join Date: Jun 2014
Location: New Jersey
Posts: 230
I had to perform an additional step, may i add(not a 100% sure if its necessary or not):

2.5) Unscrew engine lead cable in the engine bay by removing the engine cover and prying open a little plastic cover using a flat head screwdriver to expose it.

Here is an image I found on the Pelican site: http://www.pelicanparts.com/techarticles/Boxster_Tech/82-ELEC-Alternator/images_large/Pic2.jpg

Good write up for reference. Thanks.
Amit
__________________
2001 Seal Gray Boxster (Hair Salon on wheels)
2013 Audi Q5 (Family Mover)
2006 Yamaha R1 (Adrenaline Machine)
amitmishra4 is offline   Reply With Quote
Old 09-25-2014, 06:43 PM   #12
Registered User
 
Join Date: Sep 2008
Location: Florida
Posts: 2,492
Quote:
Originally Posted by amitmishra4 View Post
I had to perform an additional step, may i add(not a 100% sure if its necessary or not):

2.5) Unscrew engine lead cable in the engine bay by removing the engine cover and prying open a little plastic cover using a flat head screwdriver to expose it.

Here is an image I found on the Pelican site: http://www.pelicanparts.com/techarticles/Boxster_Tech/82-ELEC-Alternator/images_large/Pic2.jpg

Good write up for reference. Thanks.
Amit
I did the same when replacing the voltage regulator.
dghii is offline   Reply With Quote
Old 09-26-2014, 09:56 AM   #13
Registered User
 
Join Date: Jul 2014
Location: Hamilton, ON
Posts: 27
Quote:
Originally Posted by Polaris View Post
The back side of the pulley side is a slip-fit threaded insert that clamps down on the mount when tightened. Loosen the pulley bolt 1/8-1/4 inch, then give it a few good thwacks with a hammer. Use a metal hammer, not a dead-blow or soft mallet. It needs the impulse from a metal hammer to move. You want hard enough of a tap to move the insert back, but not so hard of a tap to dent/mushroom the bolt. It'll open up the gap and free the alternator.
I think my big question is how I can tell if I've moved the insert back enough -- I've used a punch directly on the insert and, like I mentioned, I do get some clockwise rotation around where the pulley bolt sits in the mount. This is leading me to believe that I should have enough freedom of movement on that insert.

However, when I try to lift up on that side, I can't get the alternator to rotate counter-clockwise (around the other bolt as a pivot). Obviously, I'm missing something with the pulley bolt/mount. Do I need to completely remove the pulley bolt from the insert to have the best chance at freeing the alternator from the mount? Or should I be able to lift the bolt out of the mount while it is still engaged (but loose) in the insert?

(For something that's supposed to be relatively easy, I'm having a hell of a time with it... which is why I think I must be missing something.)

Last edited by MacGrad; 09-26-2014 at 12:23 PM.
MacGrad is offline   Reply With Quote
Old 09-26-2014, 10:04 AM   #14
Registered User
 
Join Date: Jul 2014
Location: Hamilton, ON
Posts: 27

Last edited by MacGrad; 09-26-2014 at 12:02 PM. Reason: combining posts
MacGrad is offline   Reply With Quote
Old 09-26-2014, 01:50 PM   #15
Registered User
 
Join Date: Apr 2013
Location: Springfield, Oregon
Posts: 62
I get 1/16" to 1/8" gap after a couple good thwacks on the head of the bolt. I then pull the pulley/bolt completely out to get it out of the way.
Polaris is offline   Reply With Quote
Old 09-28-2014, 09:23 PM   #16
Registered User
 
Join Date: Jul 2014
Location: Hamilton, ON
Posts: 27
I'm beaten. :-(

Nothing seems to be moving that insert: I've tried a punch on the bolt, tried a punch directly on the bushing, and no movement whatsoever. Spent an hour today hammering, and I've come to the realization that it's beyond the scope of my PB Blaster and hammer/punch.

Going to see if I can get a mechanic to remove the old alternator so I can install the new one myself.
MacGrad is offline   Reply With Quote
Old 10-03-2014, 11:11 AM   #17
Registered User
 
Join Date: Aug 2014
Location: Northern California
Posts: 129
Are using a metal hammer with the punch? I made the mistake of using a rubber mallet at first.
Cebu is offline   Reply With Quote
Old 10-21-2014, 08:15 AM   #18
pjq
Registered User
 
Join Date: Dec 2010
Location: Eastern canada
Posts: 262
2004S
Hopefully these pic's will shed some light on what your dealing with. I don't have a photo of the alternator and its bushing your trying to free.
I remember even when I had the engine in front of me on a stand, the alternator was a pain to remove, it did come free.


pjq is offline   Reply With Quote
Old 05-11-2015, 04:33 AM   #19
Registered User
 
Join Date: Aug 2010
Location: Switzerland
Posts: 11
Just removed my alternator!

Couldn't get the rear busing to move at first, even with a chap from a big hammer but sprayed WD-40 on the bushing and left it overnight. When I came back to it, half a dozen taps with a regular hammer (with a drift, on the bolt head, with a regular hammer) moved it 1-2mm and I got it out through the firewall quite easily after that.

Just wondered if anyone has any insight regarding the pools of engine oil that I then found sitting on the block directly behind where the alternator is fitted as per this image!?

The result of a previous overfill or something more sinister??

MogulBoy is offline   Reply With Quote
Old 02-14-2016, 12:09 PM   #20
Registered User
 
Join Date: Jul 2007
Location: Seattle
Posts: 94
The oil is most likely from a leaking oil fill tube, located directly above it.

__________________
K Brandsma
98' Porsche Boxster
kbrandsma is offline   Reply With Quote
Post Reply


Thread Tools
Display Modes

Posting Rules
You may not post new threads
You may not post replies
You may not post attachments
You may not edit your posts

BB code is On
Smilies are On
[IMG] code is On
HTML code is On
Trackbacks are On
Pingbacks are On
Refbacks are On


All times are GMT -8. The time now is 08:49 PM.


Powered by vBulletin® Version 3.8.7
Copyright ©2000 - 2024, vBulletin Solutions, Inc.
Content Relevant URLs by vBSEO 3.6.0
Copyright 2024 Pelican Parts, LLC - Posts may be archived for display on the Pelican Parts Website -    DMCA Registered Agent Contact Page