 06-18-2022, 05:02 PM
|
#61
|
|
Registered User
Join Date: Feb 2006
Location: Virginia
Posts: 1,754
|
Quote:
Originally Posted by Stl-986

What? Dont understand this (and never use something made to be used in a house in a car. lol).
|
Definitely not one of my better ideas.
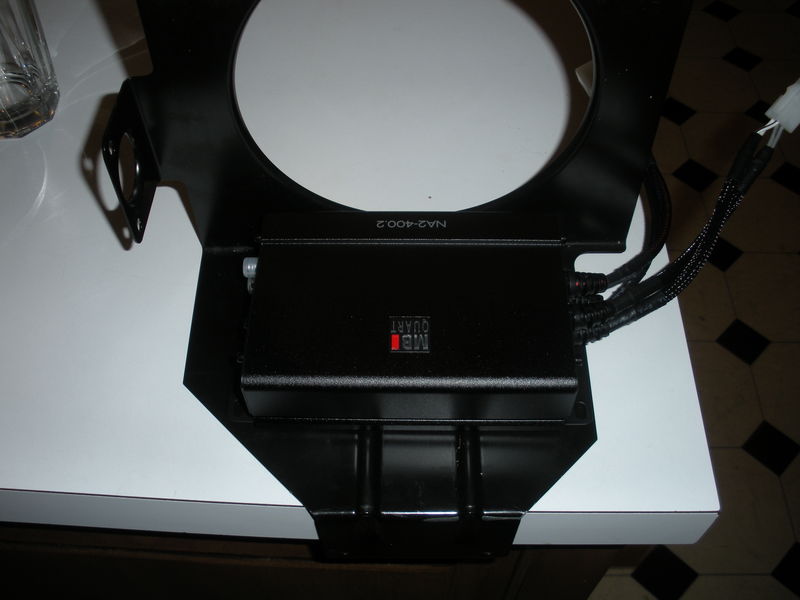
If the CD-player bracket is attached to the bulkhead like the Hase amp, it looks like the OEM technology uses a piece of rubber with a hole in the middle to receive a fastener. The rubber piece has a groove in the middle of its outside edge. The two outer lips are larger than the opening in the sheet metal and the rubber piece is wedged into place.

I may have trouble hunting down the OEM part and will need to develop another option. The bottom of the CD-Player bracket has a large tab that inserts into a slot in the frunk floor. You can see it at the bottom of this photo:

That holds it fairly securely especially since the amp is small and mounted low. I may not need the upper fasteners.
__________________
2000 Arctic Silver/Black, Hard Top, On Board Computer
PNP Rear Speakers, HAES 6-Channel Amp, Avic Z140BH,
Painted Bumperettes, 2004 (OEM) Top, Homelink integrated in dash with Targa switch, 997 Shifter, Carrera Gauge Cluster with silver gauge faces, heated 997 adaptive sports seats, Litronics, silver console
|

|

|
 06-19-2022, 02:27 AM
|
#62
|
|
WALDMEISTER
Join Date: Sep 2013
Location: Germany
Posts: 1,381
|
Excourse:
I recently noticed not so much "umpf" from my audio system. Luckily the faulty part gave me a hint, where to search. I could barely tell the difference, but something wasn't right. So I pin pointed the missing audio power via the setup/equalizer. Long story short: I had a bad ground crimp connection for my sub. It did not supply enough "juice" for its full potential and was slowly giving in.
I did a professional crimp job this time and VOILA...the sub is back at its full potential.
Easy to solve, but not obvious. Luckily, I checked the ground wiring first.
__________________
Original Owner | PORSCHE Boxster 2.7L (MY01) | Seal Gray
|

|

|
 06-19-2022, 02:37 AM
|
#63
|
|
WALDMEISTER
Join Date: Sep 2013
Location: Germany
Posts: 1,381
|
__________________
Original Owner | PORSCHE Boxster 2.7L (MY01) | Seal Gray
Last edited by BRAN; 06-19-2022 at 02:43 AM.
|

|

|
 06-19-2022, 06:09 AM
|
#64
|
|
Registered User
Join Date: Oct 2020
Location: KY
Posts: 1,213
|
That amp is small enough to fit inside the bulkhead next to the battery. That's where mine lives. It's a tight space in there so no mounting required. Just position it where it's happy and move on.
Sent from my SM-G970U1 using Tapatalk
__________________
2000 Box Base, Renegade Stage 1 performance mods complete, more to come
When the owners manual says that the laws of physics can't be broken by this car, I took it as a challenge...
|

|

|
 06-19-2022, 10:52 AM
|
#65
|
|
Registered User
Join Date: Sep 2008
Location: Florida
Posts: 2,497
|
[QUOTE=KevinH1990;647206]Definitely not one of my better ideas.
If the CD-player bracket is attached to the bulkhead like the Hase amp, it looks like the OEM technology uses a piece of rubber with a hole in the middle to receive a fastener. The rubber piece has a groove in the middle of its outside edge. The two outer lips are larger than the opening in the sheet metal and the rubber piece is wedged into place.

I may have trouble hunting down the OEM part and will need to develop another option. The bottom of the CD-Player bracket has a large tab that inserts into a slot in the frunk floor. You can see it at the bottom of this photo:

That holds it fairly securely especially since the amp is small and mounted low. I may not need the upper fasteners.[/QUOTE/]
The rubber pieces that secure the bracket to the bulkhead are called 'well nuts'. They are available at most decent hardware stores.
|

|

|
 06-19-2022, 12:07 PM
|
#66
|
|
Registered User
Join Date: Feb 2006
Location: Virginia
Posts: 1,754
|
Quote:
Originally Posted by BRAN

Excourse:
I did a professional crimp job this time and VOILA...the sub is back at its full potential.
Easy to solve, but not obvious. Luckily, I checked the ground wiring first.
|
I solder and shrink tube my connections. I haven't had any trouble with connections coming apart. On this project, it was difficult to obtain access to the spot where I needed to solder the speaker wire connections. With some minor contortions I was able to make strong solder joints.
I've had to solder together some heavy gauge wire for other projects including this one on my 2005 Mercedes C230: https://mbworld.org/forums/c-class-w203/820479-memory-seat-retrofit.html
I have the Porsche to be less complicated to work on than a newer Mercedes.
I found that this device was indispensable for applying sufficient heat to the joint:

I need to exercise caution when using this to avoid setting anything on fire.
__________________
2000 Arctic Silver/Black, Hard Top, On Board Computer
PNP Rear Speakers, HAES 6-Channel Amp, Avic Z140BH,
Painted Bumperettes, 2004 (OEM) Top, Homelink integrated in dash with Targa switch, 997 Shifter, Carrera Gauge Cluster with silver gauge faces, heated 997 adaptive sports seats, Litronics, silver console
Last edited by KevinH1990; 06-19-2022 at 12:14 PM.
|

|

|
 06-19-2022, 12:12 PM
|
#67
|
|
Registered User
Join Date: Feb 2006
Location: Virginia
Posts: 1,754
|
Quote:
Originally Posted by dghii

The rubber pieces that secure the bracket to the bulkhead are called 'well nuts'. They are available at most decent hardware stores.
|
Thanks - Now I will know exactly what to request at the hardware store.
I hope that no one objects to me working out the details of my projects on the forum. I think I start with 70-80 percent of the knowledge I need to complete a job and it seems like someone on the board always comes through with the remaining information.
__________________
2000 Arctic Silver/Black, Hard Top, On Board Computer
PNP Rear Speakers, HAES 6-Channel Amp, Avic Z140BH,
Painted Bumperettes, 2004 (OEM) Top, Homelink integrated in dash with Targa switch, 997 Shifter, Carrera Gauge Cluster with silver gauge faces, heated 997 adaptive sports seats, Litronics, silver console
|

|

|
 06-20-2022, 08:35 PM
|
#68
|
|
Registered User
Join Date: Sep 2008
Location: Florida
Posts: 2,497
|
Don't rework but there's a reason that wired connections are not soldered in cars, or ships, or planes......vibration.
The weak point of your connection becomes the point the wire and the soldered connection meet as the wire is typically not secured. Again, not suggesting going back but just understand that a well crimped connection is best in transportation environments.
|

|

|
 06-21-2022, 07:10 PM
|
#69
|
|
Registered User
Join Date: Feb 2006
Location: Virginia
Posts: 1,754
|
I did a search on "Should I solder car audio connections?" I reviewed a number of posts on several forums. Most of the posts indicated that crimping with a high-quality crimp tool was a good method. There were some posts advocating for solder. The only caution I saw about soldering was a warning about putting too much heat near a factory connection that was soldered.
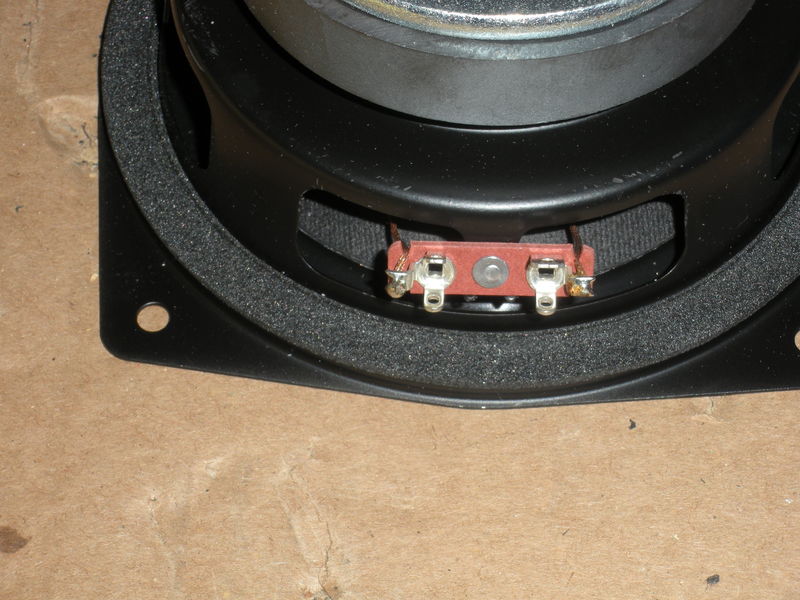
I note that the OEM woofers have a spot of solder connected the wires from the voice coil to the terminals:

For what it's worth, I've also seen technicians on auto restoration shows such as Wheeler Dealers use soldered connections including Ant Anstead soldering connections after he swapped an alternator in to replace the generator on a TR4.
I am concerned that a soldered wire is more brittle and could crack. I'll research more thoroughly before my next project.
__________________
2000 Arctic Silver/Black, Hard Top, On Board Computer
PNP Rear Speakers, HAES 6-Channel Amp, Avic Z140BH,
Painted Bumperettes, 2004 (OEM) Top, Homelink integrated in dash with Targa switch, 997 Shifter, Carrera Gauge Cluster with silver gauge faces, heated 997 adaptive sports seats, Litronics, silver console
Last edited by KevinH1990; 06-21-2022 at 07:21 PM.
|

|

|
 06-22-2022, 07:44 AM
|
#70
|
|
Registered User
Join Date: Nov 2006
Location: In the garage...
Posts: 1,739
|
I would NOT solder the wire to speaker connectors. However, many people including me, will solder lead wires into "crimp" connectors and then heat shrink tube for a professional look. Def not necessary so long as you make a solid crimp.
Good luck 
__________________
"Cool Prius!" - Nobody
|

|

|
 06-25-2022, 07:37 PM
|
#71
|
|
Registered User
Join Date: May 2017
Posts: 1,180
|
Dont put an amp by the battery. Bad idea. That area isn't sealed to the outside and is where water is designed to get in.
Yes, a soldered connection will absolutely crack. Depends on how good it is, the solder & time. Just do a search for 944 Cold Solder and read.
Dont over think this or over engineer it. It's just an amp and it's just a bracket. It's not a competition car for audio after all. Keep it simple and things will be just fine.
__________________
2000 Boxster Tiptronic
2003 Boxster
2003 996 C2 Cab
2002 996 (SOLD)
1986 944 (gone but missed)
|

|

|
 Posting Rules
|
You may not post new threads
You may not post replies
You may not post attachments
You may not edit your posts
HTML code is On
|
|
|
All times are GMT -8. The time now is 06:03 AM.
| |