 01-21-2020, 11:31 PM
|
#1
|
|
Registered User
Join Date: Jan 2019
Location: San Luis Obispo
Posts: 2
|
Pieces of a foam blowing from the air vents
'01 986. I have pieces of disintegrating dark gray foam insulation blowing from my dash air vents. Where is it coming from and what should I do about it?
|

|

|
|
01-21-2020, 11:41 PM
|
#2
|
|
Registered User
Join Date: Oct 2017
Location: Seattle area
Posts: 174
|
It is coming off of the airbox doors behind the center of the dash. It's a common issue and if you do a search on this forum you'll find lots of posts and instructions on the repair. Its not hard to fix.
__________________
1998 Boxster
1991 Carrera
|
|
|
|
|
01-21-2020, 11:44 PM
|
#3
|
|
Registered User
Join Date: Oct 2017
Location: Seattle area
Posts: 174
|
Check out the post from Patssle on 11-9-2018 the instructions are in there.
Or the post on 12-8-2019 from 78F350
__________________
1998 Boxster
1991 Carrera
Last edited by A8ked; 01-21-2020 at 11:47 PM.
Reason: typo
|
|
|
|
|
01-22-2020, 05:54 AM
|
#4
|
|
1998 Boxster Silver/Red
Join Date: Sep 2017
Location: 92262
Posts: 3,103
|
Whatever you do: Do not drive the car until every last bit of foam has been removed. If the foam makes it into the intake, you're done.
Do the repair, and then drive it like you stole it.
__________________
1998 Porsche Boxster
|
|
|
|
|
01-22-2020, 06:17 AM
|
#5
|
|
Registered User
Join Date: Apr 2013
Location: Lincolnshire, IL
Posts: 570
|
Drive it and ignore it. My 98 has been shooting tiny foam at me for years...lol. I carry a small tweezers in the arm rest for those bits that get caught by the plastic vent louvers. I'm sure no damage can be done. There's no way the foam could make its way to the intake. As others have said, there are threads to read IF you want to take things apart and make it a DIY project....but for me and my 98' w/87,000 miles a tiny piece flying out is to be ignored.....DRIVE ON!!
|
|
|
|
|
01-22-2020, 06:34 AM
|
#6
|
|
Newbie
Join Date: May 2019
Location: Atlanta Area
Posts: 98
|
Quote:
Originally Posted by Rob175

Drive it and ignore it. My 98 has been shooting tiny foam at me for years...lol. I carry a small tweezers in the arm rest for those bits that get caught by the plastic vent louvers. I'm sure no damage can be done. There's no way the foam could make its way to the intake. As others have said, there are threads to read IF you want to take things apart and make it a DIY project....but for me and my 98' w/87,000 miles a tiny piece flying out is to be ignored.....DRIVE ON!!
|
When the foam is gone completely (like mine was), your heat doesnt work too well or at all.
Sent from my SM-G965U using Tapatalk
__________________
1998 Porsche Boxster Base - 2005 Volvo S60R AWD - 2003 Subaru Wrx Wagon - 2003 Jeep Wrangler Rubicon - 1992 Subaru Loyale Wagon w/4in Lift - 2004 Dodge Ram 2500
|
|
|
|
|
01-22-2020, 09:44 AM
|
#7
|
|
Registered User
Join Date: Jan 2019
Location: PA
Posts: 1,726
|
Quote:
Originally Posted by GLImages
When the foam is gone completely (like mine was), your heat doesnt work too well or at all.
Sent from my SM-G965U using Tapatalk
|
Same with A/C, you pretty much end up getting mostly unheated/uncooled outside air. Or combined heated & cooled air at the same time without the ability to control the blend.
Quote:
Originally Posted by Rob175
...There's no way the foam could make its way to the intake. ...
|
I'm pretty sure Starter was being more than a bit sarcastic there. 
Last edited by piper6909; 01-22-2020 at 10:12 AM.
|
|
|
|
|
01-22-2020, 03:12 PM
|
#8
|
|
Motorist & Coffee Drinker
Join Date: Jul 2014
Location: Oklahoma
Posts: 3,954
|
Quote:
Originally Posted by Rob175
Drive it and ignore it. My 98 has been shooting tiny foam at me for years...lol. ... but for me and my 98' w/87,000 miles a tiny piece flying out is to be ignored.....DRIVE ON!!
|
I find it absolutely disgusting that someone could have a known deficiency with their 986 and not only flaunt the fact that they are doing nothing about it, but also encourage others to do so. Shame on you Rob175. Shame on you.
:ah:
__________________
I am not an attorney, mechanic, or member of the clergy. Following any advice given in my posts is done at your own peril.
|
|
|
|
|
01-23-2020, 07:22 AM
|
#9
|
|
Registered User
Join Date: Apr 2013
Location: Lincolnshire, IL
Posts: 570
|
Actually the foam that is blowing out is so thin it resembles cellophane not foam since there is no thickness to it. Perhaps it's the first layer of clear that covers the foam itself?? Perhaps others who have done the fix can tell me. Honestly it looks more like clear cellophane very translucent in fact almost transparent. BTW.......heater and AC work perfectly blowing very hot and very cold when needed over the last 15 years of ownership. Obviously, it's always best to "fix" any and all issues....but I wait till I have to on items that don't affect much. (....and since mine is a "summer driver" I seldom use either heat or AC.......just top down fun.)
|
|
|
|
|
01-24-2020, 11:23 PM
|
#10
|
|
Registered User
Join Date: Feb 2017
Location: CO
Posts: 989
|
Mine too. When I loose the function I will fix it, and replace my double din receiver while I’m in there. Just not motivated to tackle that one just yet.
|
|
|
|
|
01-25-2020, 12:38 PM
|
#11
|
|
1997 Tip, 2018 Macan
Join Date: Aug 2015
Location: Upland, CA
Posts: 1,338
|
So here is an 'over-thinking it a bit' question that comes to mind. If we do the radio access hack to repair our blend doors with tape, are we obligated to disclose this non OEM hack/repair when we sell our vehicles?  It won't show up on a Carfax report or during a proper PPI. You know how particular Porsche owners can be.
|
|
|
|
|
01-25-2020, 04:28 PM
|
#12
|
|
Motorist & Coffee Drinker
Join Date: Jul 2014
Location: Oklahoma
Posts: 3,954
|
Quote:
Originally Posted by rexcramer
... are we obligated to disclose this non OEM hack/repair when we sell our vehicles? ...
|
Of course, advertise it with "Upgraded Blend Doors". Anyone who hasn't done this or the original 'Meir fix' has a lesser car.
__________________
I am not an attorney, mechanic, or member of the clergy. Following any advice given in my posts is done at your own peril.
|
|
|
|
|
01-26-2020, 08:01 PM
|
#13
|
|
Who's askin'?
Join Date: Mar 2018
Location: Utah
Posts: 2,448
|
Quote:
Originally Posted by rexcramer
So here is an 'over-thinking it a bit' question that comes to mind. If we do the radio access hack to repair our blend doors with tape, are we obligated to disclose this non OEM hack/repair when we sell our vehicles? It won't show up on a Carfax report or during a proper PPI. You know how particular Porsche owners can be. |
How long should I plan for this behind- the- radio approach to take me?
Im trying to weight the cost/ benefit.
Sent from my SM-G970U using Tapatalk
|
|
|
|
|
01-26-2020, 09:34 PM
|
#14
|
|
Registered User
Join Date: Sep 2008
Location: Florida
Posts: 2,497
|
Quote:
Originally Posted by maytag
How long should I plan for this behind- the- radio approach to take me?
Im trying to weight the cost/ benefit.
Sent from my SM-G970U using Tapatalk
|
You'll fret about it longer than it will take! All in all, I'd say less than an hour, including R/R of the radio.
I used an oscillating tool to cut the flap and a decent quality duct tape to cover the flaps. The tape takes a little playing with to get it in place. I cut multiple pieces for each flap. There may be a better choice for covering material but doing any of them will be a huge improvement in heater performance.
I also used the same duct tape to reseal the flap I'd initially cut. I done this procedure in a 986 and 996 and appreciate the original post that let us all in on the secret!
Disclaimer: I live in NW FL...our winters are mild, yet we do need heat in our cars off and on for a few months. I can't say for sure the heater is effective as it was when new, or repaired by other methods. I can say it sure is good enough for temperatures down to freezing.
|
|
|
|
|
01-28-2020, 09:19 PM
|
#15
|
|
Who's askin'?
Join Date: Mar 2018
Location: Utah
Posts: 2,448
|
Quote:
Originally Posted by dghii
You'll fret about it longer than it will take! All in all, I'd say less than an hour, including R/R of the radio.
I used an oscillating tool to cut the flap and a decent quality duct tape to cover the flaps. The tape takes a little playing with to get it in place. I cut multiple pieces for each flap. There may be a better choice for covering material but doing any of them will be a huge improvement in heater performance.
I also used the same duct tape to reseal the flap I'd initially cut. I done this procedure in a 986 and 996 and appreciate the original post that let us all in on the secret!
Disclaimer: I live in NW FL...our winters are mild, yet we do need heat in our cars off and on for a few months. I can't say for sure the heater is effective as it was when new, or repaired by other methods. I can say it sure is good enough for temperatures down to freezing.
|
Yeah, so...... I did this procedure tonight. I think I was closer to 3 hours, than 1. But most of that can probably be attributed to my banana hands. [Edit] I just realized I'm being too hard on myself; in that three hours I also removed the shifter assembly and disassembled it, because I found one of the bearings from the new side lever for my Ben's short shifter on the carpet. Reassembled, reinstalled, adjusted, and then went to work on the A/C door project.[/edit]
The flap broke off as I was bending it backwards. And I ended- up tearing the crap out of my hands and forearms, just trying to get the tape onto the doors.
All in all though, it works really, really well now. Pretty happy with that.
Last edited by maytag; 01-28-2020 at 09:54 PM.
|
|
|
|
|
01-26-2020, 07:32 PM
|
#16
|
|
Registered User
Join Date: Dec 2018
Location: Tokyo Japan
Posts: 33
|
I have successfully fixed this on 2 cars, one this past weekend while swapping out a heater core for a friend. Minus the prep work to R&R the heater core, Repairing the flap door took less than an hour.
I saw this method online years ago and it works well. While the heater core is out, you can clearly see the flap door and all the foam bits just waiting to blow through your vents, easily removed by hand or with a shop vac.
If you follow the heater flap door to its top pivot point you will a circular area that houses a plastic bushing connector the flap door. Carefully cut the top off as close to the top as you can. I used a short hacksaw blade and a strong utility knife. Be careful! You can then pull the bushing from the top releasing said flap door after the next step.
Move into the cabin and pull the foam cover down from under the dash on the passengers side. Towards the center console you will see the actuator that opens and closes the flap. Its easy to see as it has a pink actuator arm. Now there are a couple of ways to handle this. You can remove the actuator or separated the joints and arms. Youll understand when you see it. At the of the arm is where the lower pivot bushing is. No need to remove the small bolt, just wiggle it down and it will come out.
Go back to the top by the heater core and pull out the top bushing. The flap door can then be pulled through the area where the heater core sits.
I wrapped the flap door on each side in thin but strong aluminum duct tape with a continuous piece trimming as necessary.
Reassembly is the reverse. This is where it can get a little tedious. You have to align the flap and the bushings. An extra set of hands is helpful, but I managed on my own. Put the top one in first then the bottom. Button everything back up.
The heater is nice and toasty. Made a huge difference.
I dont have too many pics as I just didnt think of it, but its not too difficult.
|
|
|
|
|
01-26-2020, 10:42 PM
|
#17
|
|
Registered User
Join Date: Feb 2017
Location: CO
Posts: 989
|
For those that have done the flap from the radio access, what about using an automotive panel adhesive to reseal the housing? The problem with duct tape is it degrades over time as well. Same issue with using duct tape on the flap itself. Particularly with heat. Would there be a better more permanent solution?
|
|
|
|
|
01-27-2020, 12:31 AM
|
#18
|
|
Newbie
Join Date: May 2019
Location: Atlanta Area
Posts: 98
|
I used a flue tape (aluminium tape) to cover the flaps and cut made. I got it at the hardware store, they had a couple types. I choose the highest temp that was in stock. I had to cut strips like mentioned previously and fish them down the vent to cover the doors. It takes a bit of patience since you will be placing the tape by feel. You can't see ******************** once you stick a hand down there. Haha.
Sent from my SM-G965U using Tapatalk
__________________
1998 Porsche Boxster Base - 2005 Volvo S60R AWD - 2003 Subaru Wrx Wagon - 2003 Jeep Wrangler Rubicon - 1992 Subaru Loyale Wagon w/4in Lift - 2004 Dodge Ram 2500
|
|
|
|
|
01-29-2020, 08:23 AM
|
#19
|
|
Registered User
Join Date: Aug 2015
Location: Fulshear, TX
Posts: 268
|
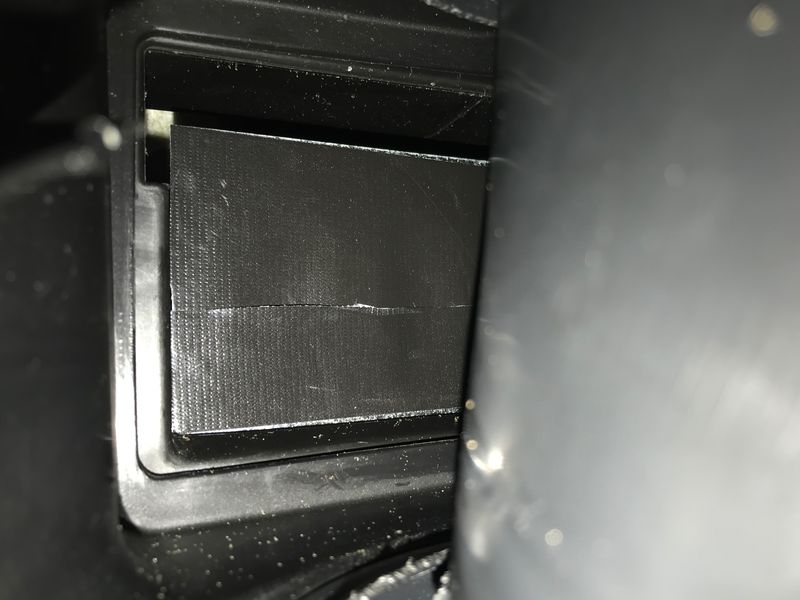
Took a few weeks for my hands and forearms to recover from the beating they took getting this done, but it works great now and no more foam! I did this front one and they one behind it. Many thanks to this forum for the guidance.
|
|
|
|
 Posting Rules
|
You may not post new threads
You may not post replies
You may not post attachments
You may not edit your posts
HTML code is On
|
|
|
All times are GMT -8. The time now is 04:33 PM.
| |


 1998 Porsche Boxster
 1991 Porsche Carrera 4
 Parts Car, car parts
 Honda Del Sol(s)
 "Hers"
 My Original '99
 The 78 F350
 This
This That
That The S 2.5
 Other
Other 1997 Porsche Boxster
 2018 Porsche Macan
 Hybrid Mode


