 05-20-2014, 07:07 PM
|
#1
|
|
Beginner
Join Date: Mar 2013
Location: Houston
Posts: 1,659
|
Pull the valve back while pressurizing (be the spring). If the valve does not seal under pressure it's very likely damaged. If you put the motor back together and run it you stand a good chance of dropping the valve. As you have a very understanding customer, that may be an ok gamble for you, because there is a chance it could be fine. It really depends on your level of risk acceptance. Me? If the valve did not seal perfectly I'd drop the head. listening to the motor crump after all that work would be just too painful. Keep us posted 
__________________
2003 S manual
|

|

|
|
05-20-2014, 07:21 PM
|
#2
|
|
Registered Boxster abuser
Join Date: Oct 2011
Location: socal
Posts: 1,014
|
What James said, sorry I assume a lot things when diagnosing and giving advice at times.
Sent from my SAMSUNG-SGH-I317 using Tapatalk
|
|
|
|
|
05-20-2014, 07:34 PM
|
#3
|
|
Engine Surgeon
Join Date: Aug 2008
Location: Cleveland GA USA
Posts: 2,425
|
I assume nothing and quantify everything. Its instinct at our level.
__________________
Jake Raby/www.flat6innovations.com
IMS Solution/ Faultless Tool Inventor
US Patent 8,992,089 &
US Patent 9,416,697
Developer of The IMS Retrofit Procedure- M96/ M97 Specialist
|
|
|
|
|
05-20-2014, 08:56 PM
|
#4
|
|
Registered Boxster abuser
Join Date: Oct 2011
Location: socal
Posts: 1,014
|
Quote:
Originally Posted by Jake Raby

I assume nothing and quantify everything. Its instinct at our level.
|

However I think some things must be assumed, otherwise we would pages just in each post.
Last edited by healthservices; 05-20-2014 at 09:11 PM.
|
|
|
|
|
05-21-2014, 04:22 AM
|
#5
|
|
Beginner
Join Date: Mar 2013
Location: Houston
Posts: 1,659
|
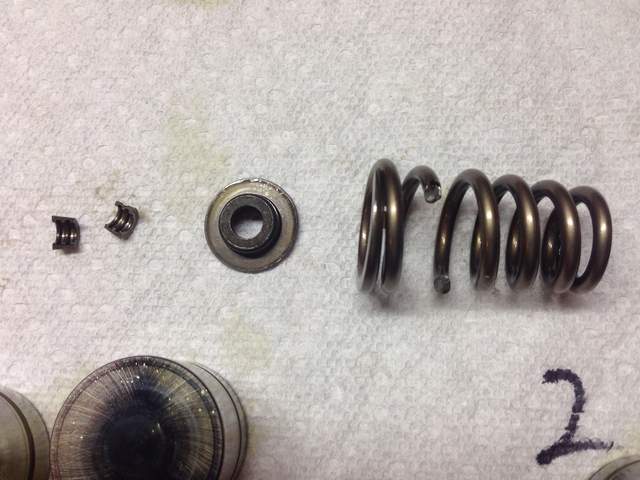
One of the few things I did not take apart on my Box engine, but I'll assume it is typical. To get it apart you'll need to pressurize the cylinder and pull the valve back until the pressure seats the valve. That is what will hold the valve in place so you can work on it. Then you have to depress the disk at the top of the spring. Chances are it is jammed over the valve keepers (two little half shells between the disk and the valve stem). To break it free I put a large socket on the disk and tap the socket with the hammer. Take care the socket can not contact the valve stem. As the spring is broken chances are the valve keepers will fall out when you do this, so expect it and have something in place to catch them. Now that the disk is no longer jammed you have to push it to compress the spring while not moving the valve and while maintaining access to the area where the keepers are so you can pop them out with a dental pick or small screwdriver (assuming hey did not fall out already). As you have the new spring there for this procedure you put in the new spring, put the disk back on the valve stem, depress the disk to reveal the keeper grooves in tsh valve stem, re-install the keepers and release the disk allowing the valve spring to expand. You're done!
You'll find having the proper tool to do all of the valve spring compressing will be critical. I'll bet someone reading this has insight into what works best.
Needless to say, if the valve does not seat the head needs to come off.
__________________
2003 S manual
|
|
|
|
|
05-20-2014, 07:40 PM
|
#6
|
|
Registered User
Join Date: May 2014
Location: Lake St. Louis, MO
Posts: 92
|
Sounds good guys! This has been a great learning experience for me. I'm extremely appreciative of all the advise! I'll definitely keep you guys posted! I'll try another leak down without the spring/pulling up.
Does anyone have a good exploded view of the valve/spring/clip? Or even a good pic of how the spring/valve goes together? Can't find a good pic of it anywhere, just wanting to see what I'm getting into and how to take the spring out.
|
|
|
|
|
05-21-2014, 04:53 AM
|
#7
|
|
Registered User
Join Date: May 2014
Location: Lake St. Louis, MO
Posts: 92
|
Perfect! That makes sense.... placing the order at pelican parts today.
|
|
|
|
|
05-21-2014, 04:22 PM
|
#8
|
|
Registered User
Join Date: May 2014
Location: Lake St. Louis, MO
Posts: 92
|
So before removing the spring I did a leak down test while trying to physically pull up on the valve. Success. It stopped leaking and appeared to seat well and passed the leak down test. Now to figure out how to get the spring compressor on the broken spring. ???
|
|
|
|
|
05-21-2014, 06:38 PM
|
#9
|
|
Beginner
Join Date: Mar 2013
Location: Houston
Posts: 1,659
|
The "spring compressor" pushes on the disk at the top of the valve to compress the spring As your spring is broken it may be partially "compressed" already. Here is a you tube with one possible solution. Note in this you tube the head is off and a table top is used to stop the valve from moving. In your case you'll be using air pressure to stop the valve from moving. Congratulations on figuring out it was a broken valve spring. If it were me - I'd swap the spring and get it back on the road, but then again I'm given to drilling holes in my IMS and running the engine up to 7K RPM daily.  how to remove/install valves with household tools - YouTube
All the best!
__________________
2003 S manual
|
|
|
|
|
05-22-2014, 04:53 PM
|
#10
|
|
Registered Boxster abuser
Join Date: Oct 2011
Location: socal
Posts: 1,014
|
Quote:
Originally Posted by aneal000
So before removing the spring I did a leak down test while trying to physically pull up on the valve. Success. It stopped leaking and appeared to seat well and passed the leak down test. Now to figure out how to get the spring compressor on the broken spring. ???
|
Great deal!
|
|
|
|
|
05-21-2014, 07:14 PM
|
#11
|
|
Registered User
Join Date: May 2014
Location: Lake St. Louis, MO
Posts: 92
|
Game on!
|
|
|
|
|
05-21-2014, 07:18 PM
|
#12
|
|
Beginner
Join Date: Mar 2013
Location: Houston
Posts: 1,659
|
So did you pay for express postage from Pelican? 
__________________
2003 S manual
|
|
|
|
|
05-21-2014, 07:24 PM
|
#13
|
|
Registered User
Join Date: May 2014
Location: Lake St. Louis, MO
Posts: 92
|
Quote:
Originally Posted by Jamesp
So did you pay for express postage from Pelican? |
^^^^ duh!!!!
My $19 valve spring cost me almost $600 by the time they were done with me!
|
|
|
|
|
05-21-2014, 07:44 PM
|
#14
|
|
Registered User
Join Date: Jul 2008
Location: austin
Posts: 825
|
Quote:
Originally Posted by aneal000
^^^^ duh!!!!
My $19 valve spring cost me almost $600 by the time they were done with me!
|
Ohh but the enjoyment and story you will have when you are done -- nice find!
Mike
__________________
Drivers: '15 Panamera Hybrid (wife's), ' 01 996 GT2, 00 Boxster S, '96 993 Çab/Tip (wife's)
Race Cars: '75 911 RSR Replica & '99 Spec Boxster
mike@lonestarrpm.com
|
|
|
|
|
05-21-2014, 07:55 PM
|
#15
|
|
Registered User
Join Date: May 2014
Location: Lake St. Louis, MO
Posts: 92
|
Quote:
Originally Posted by seningen
Ohh but the enjoyment and story you will have when you are done -- nice find!
Mike
|
Seriously. I'm not complaining. This has been awesome. I have very little I to the entire project and couldn't be more thrilled with the condition of the car. So pristine.
|
|
|
|
|
05-21-2014, 07:22 PM
|
#16
|
|
Registered User
Join Date: May 2014
Location: Lake St. Louis, MO
Posts: 92
|
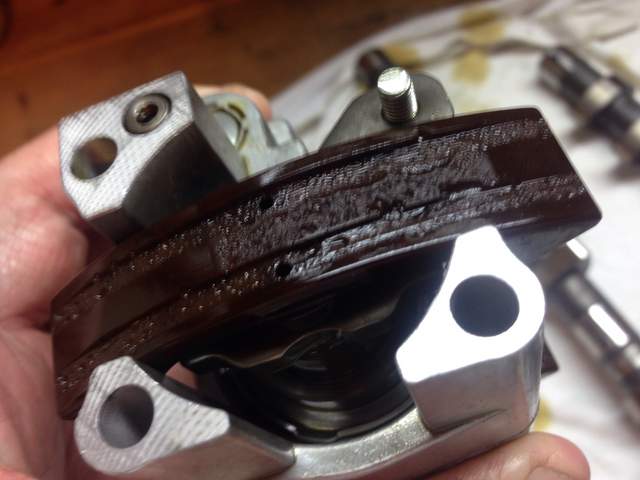
Ok, I'm going through everything tonight waiting patiently for my delivery tomorrow. After reading about the timing, I know you are supposed to line up the silver links with the dots on the camshafts. I pulled these out like this. I realize that technically they are still synced, but is this typical for porsche to assemble them like this? Is it wrong that I'm so anal I want to change it? 
|
|
|
|
|
05-21-2014, 08:22 PM
|
#18
|
|
Registered User
Join Date: May 2014
Location: Lake St. Louis, MO
Posts: 92
|
Ok, motor guru's... I know that I already know the answer, but I think I just wasted all that next day air shipping $$$.
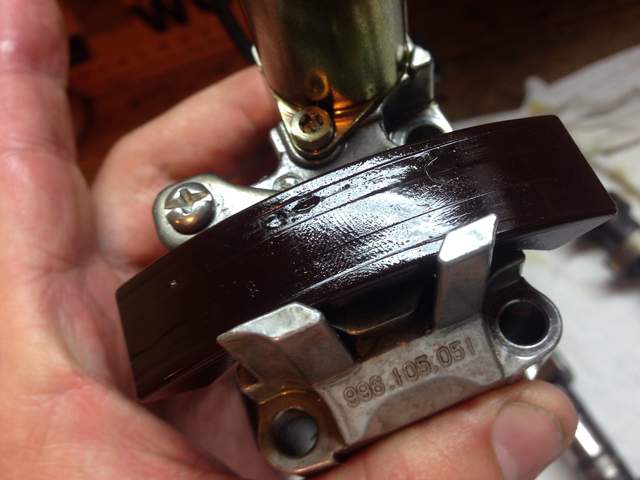
Playing with the camshafts I was checking out the solenoid and noticed that this looks like wear and not design. Motor has 80k. I'm thinking I should replace these chain guides instead of putting this back together like this. I think it was Wayne that pointed this out in one of the instruction guides. Thoughts?
Bottom
Top
|
|
|
|
|
05-21-2014, 08:51 PM
|
#19
|
|
Engine Surgeon
Join Date: Aug 2008
Location: Cleveland GA USA
Posts: 2,425
|
Yes, those cam brakes are toasted.. Guaranteed that you have at least 6* of camshaft deviation from that.
Yes, broken sting, now to ensure there's no collateral damage and move forward.
__________________
Jake Raby/www.flat6innovations.com
IMS Solution/ Faultless Tool Inventor
US Patent 8,992,089 &
US Patent 9,416,697
Developer of The IMS Retrofit Procedure- M96/ M97 Specialist
|
|
|
|
|
05-22-2014, 12:04 AM
|
#20
|
|
Registered User
Join Date: May 2013
Location: North Alabama
Posts: 2,079
|
Quote:
Originally Posted by aneal000
Ok, motor guru's... I know that I already know the answer, but I think I just wasted all that next day air shipping $$$.
Playing with the camshafts I was checking out the solenoid and noticed that this looks like wear and not design. Motor has 80k. I'm thinking I should replace these chain guides instead of putting this back together like this. I think it was Wayne that pointed this out in one of the instruction guides. Thoughts?
Bottom
Top
|
So this device is the same thing as the Vanos in my BMW...just works a little different and looks a lot different
|
|
|
|
 Posting Rules
|
You may not post new threads
You may not post replies
You may not post attachments
You may not edit your posts
HTML code is On
|
|
|
All times are GMT -8. The time now is 11:00 PM.
| |


 Hybrid Mode


