 05-18-2014, 01:17 PM
|
#21
|
|
Registered User
Join Date: May 2014
Location: Lake St. Louis, MO
Posts: 92
|
|

|

|
|
05-18-2014, 04:21 PM
|
#22
|
|
Registered Boxster abuser
Join Date: Oct 2011
Location: socal
Posts: 1,014
|
leak down, and listen to where the air is going...
|
|
|
|
|
05-18-2014, 07:14 PM
|
#23
|
|
Registered User
Join Date: May 2014
Location: Lake St. Louis, MO
Posts: 92
|
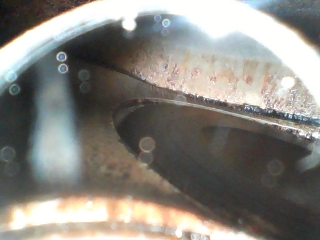
I have never done a leak down test before... extremely logical suggestion. Tool shop was closed for the day before I had a chance to go grab a tester.
New development: A buddy came over and I was showing him what the inside looks like and I had him spin the motor by hand to watch the valves open and close. The exhaust valves are not in sync. It looks like one is seating all the way into the head but the other does not go as flush. I've attached a pic I snapped with the borescope. The pic is using a 90 mirror looking down (small amount of oil sitting in the bottom of the cylinder) and the two exhaust valves. The one toward the top of the image is not seated flush like the one on the bottom of the image. If one of the exhaust valves is not seating all the way, could that be a broken valve spring? Any other thoughts?

|
|
|
|
|
05-18-2014, 07:48 PM
|
#24
|
|
Engine Surgeon
Join Date: Aug 2008
Location: Cleveland GA USA
Posts: 2,425
|
Broken valve springs are common, so are failed lifters and both can lead to these conditions you have observed. You need to ensure the valve hasn't gotten bent from operation like this. I have a TON of good used 2.5 parts, including heads and etc, if you need them.
__________________
Jake Raby/www.flat6innovations.com
IMS Solution/ Faultless Tool Inventor
US Patent 8,992,089 &
US Patent 9,416,697
Developer of The IMS Retrofit Procedure- M96/ M97 Specialist
|
|
|
|
|
05-18-2014, 07:59 PM
|
#25
|
|
Registered Boxster abuser
Join Date: Oct 2011
Location: socal
Posts: 1,014
|
When looking at the top of the piston, a telltale sign that the valves have touched the pistons is a small shiny crescent shape, where the valves touch.
While not a Porsche piston this will give an idea what the mark may look like.

Last edited by healthservices; 05-18-2014 at 09:50 PM.
|
|
|
|
|
05-19-2014, 06:55 AM
|
#26
|
|
Registered User
Join Date: May 2014
Location: Lake St. Louis, MO
Posts: 92
|
Jake, thank you so much for your input. I did take a close look at the top of the piston and did not see any marks from the valve.
Is this a project I am foolish to try and tackle while the motor is in the car? The 101Projects says you can (not pretty) change the cams while in the car. Assuming I don't have to replace the valve/head? Is it realistic to think that I can just pull the camshaft cover, camshafts, cam follower housing and have access to the valve hardware? Replace a valve spring or lifter and put it back together?
|
|
|
|
|
05-19-2014, 07:50 AM
|
#27
|
|
Engine Surgeon
Join Date: Aug 2008
Location: Cleveland GA USA
Posts: 2,425
|
I am biased, because we do everything out of the car.. I don't like fighting with space constraints and dealing with a debris enriched workspace. I'd much rather pull the engine and do my work in a clean environment. Thats just me.
__________________
Jake Raby/www.flat6innovations.com
IMS Solution/ Faultless Tool Inventor
US Patent 8,992,089 &
US Patent 9,416,697
Developer of The IMS Retrofit Procedure- M96/ M97 Specialist
|
|
|
|
|
05-19-2014, 08:38 AM
|
#28
|
|
Registered User
Join Date: May 2014
Location: Lake St. Louis, MO
Posts: 92
|
Fair enough.
I plan on trying this one in the car, I think I have my head wrapped around the entire project. Not around removing the engine yet.
Regarding timing, it looks pretty basic and I'm sure I'm oversimplifying this here but as I see it the two cams shouldn't need addressed, but you just line up the marks on the sprocket with the colored links on the chain. And then timing for the cams with regards to the motor is simply using the tool (P253) to hold the exhaust valve parallel with the edge of the head/cam cover while you tighten down the 4 bolts that hold the sprocket/chain to the exhaust cam, all done while the motor is at TDC for the respective cylinder bank?
|
|
|
|
|
05-19-2014, 08:38 AM
|
#29
|
|
Registered User
Join Date: May 2013
Location: North Alabama
Posts: 2,079
|
?
Just curious , I have pulled a 3 series BMW engine....how long does it take to pull one of these engines ?
|
|
|
|
|
05-19-2014, 08:50 AM
|
#30
|
|
Registered User
Join Date: May 2014
Location: Lake St. Louis, MO
Posts: 92
|
According to 101Projects about 10 hours. I'm guessing Jake could probably do it in about 30 minutes? 
|
|
|
|
|
05-19-2014, 10:11 AM
|
#31
|
|
I am my own mechanic....
Join Date: Feb 2013
Location: Salt Lake City, UT
Posts: 3,432
|
Just noticed your location. My dad is in Waynesville. Haven't looked to see how far you are from him. May be out there this summer.
__________________
'04 Boxster S 50 Jahre 550 Spyder Anniversary Special Edition, 851 of 1953, 6-sp, IMS/RMS, GT Metallic silver, cocoa brown leather SOLD to member Broken Linkage.
'08 VW Touareg T-3 wife's car
'13 F150 Super Crew long bed 4x4 w/ Ego Boost
|
|
|
|
|
05-19-2014, 10:29 AM
|
#32
|
|
Engine Surgeon
Join Date: Aug 2008
Location: Cleveland GA USA
Posts: 2,425
|
Its not just aligning the marks on a 5 chain engine. You will have cam deviations unless the proper tool and procedure is used. Yes it will run, no it will not run without compromise.
__________________
Jake Raby/www.flat6innovations.com
IMS Solution/ Faultless Tool Inventor
US Patent 8,992,089 &
US Patent 9,416,697
Developer of The IMS Retrofit Procedure- M96/ M97 Specialist
|
|
|
|
|
05-19-2014, 10:54 AM
|
#33
|
|
Registered User
Join Date: May 2014
Location: Lake St. Louis, MO
Posts: 92
|
I've ordered the Bentley manual. I suspect timing will be addressed in there? Where is the best place to find the correct timing procedure for this motor?
Waynesville is a couple of hours from me, I went to prom with the mayor's daughter from there years ago...
|
|
|
|
|
05-19-2014, 11:28 AM
|
#34
|
|
Registered Boxster abuser
Join Date: Oct 2011
Location: socal
Posts: 1,014
|
Careful, if you stay on this forum much, you will may catch the habit of "well while I'm in here I may as well change the...
As well as the....
Then the....
And that don't look so good...
")
|
|
|
|
|
05-19-2014, 01:14 PM
|
#35
|
|
Certified Boxster Addict
Join Date: Nov 2010
Location: Los Angeles
Posts: 7,669
|
At this point, you know that the engine has some type of serious internal damage consistent with the original diagnosis (FOUND CYLINDER 3 WITH LEAKAGE, INTERNAL ENGINE DAMAGE).
The $64K question is how much damage and how bad is it?
I would suggest that any amount of internal engine damage warrants removal of the engine to start a logical and methodical tear down to find what broke, where ALL of the broken parts went, and if there was any collateral damage. This thinking isn't unique to a Porsche, this is Engine Building 101.
The question you need to ask yourself is if you want to take the time and invest the money to learn how to re-build your engine? Or do you simply want to buy a replacement engine, sell the broken motor to someone else to re-build, and get the car back on the road?
Only you can answer those questions but it appears that the expectation or hope of a quick and easy engine repair may not be reality in this situation.
__________________
1999 996 C2 - sold - bought back - sold for more
1997 Spec Boxster BSR #254
1979 911 SC
POC Licensed DE/TT Instructor
|
|
|
|
|
05-19-2014, 01:20 PM
|
#36
|
|
Registered User
Join Date: Jul 2008
Location: austin
Posts: 825
|
Quote:
Originally Posted by mountainman

There just happens to be a 2005 3.2 S engine with 18K miles on it for $8,000 or best offer with free shipping. It is at quality Porsche parts and I have bought several things from them and always been satisfied. Be a good buy if you find out you need one before it is sold.
|
Not easily useable in a 98 due to many reasons, DME, E-gas, fuel system.
m
__________________
Drivers: '15 Panamera Hybrid (wife's), ' 01 996 GT2, 00 Boxster S, '96 993 Çab/Tip (wife's)
Race Cars: '75 911 RSR Replica & '99 Spec Boxster
mike@lonestarrpm.com
|
|
|
|
|
05-19-2014, 01:24 PM
|
#37
|
|
Registered User
Join Date: Jul 2008
Location: austin
Posts: 825
|
Quote:
Originally Posted by Jake Raby
I am biased, because we do everything out of the car.. I don't like fighting with space constraints and dealing with a debris enriched workspace. I'd much rather pull the engine and do my work in a clean environment. Thats just me.
|
+1 -- drop the engine -- then you can much more easily access everything.
m
__________________
Drivers: '15 Panamera Hybrid (wife's), ' 01 996 GT2, 00 Boxster S, '96 993 Çab/Tip (wife's)
Race Cars: '75 911 RSR Replica & '99 Spec Boxster
mike@lonestarrpm.com
|
|
|
|
|
05-19-2014, 03:51 PM
|
#38
|
|
Registered User
Join Date: May 2014
Location: S.California
Posts: 2,029
|
aneal,
I am a few steps ahead of you in this project(unfortunately)and perhaps may be able to give a few practical hints based on my mistakes.
1. Before removing the engine ,do all the tests you can because it takes a very long time to remove this engine the first time you do it. The reasons are access and unfamiliarity . I am using a full height lift ,have an almost pro selection of tools and equipment some Factory training and it is embarrassingly slow progress. Yes, I have Waynes book and Bentley.
2. Before removing the engine I suggest you find the inspection,repair and reassembly instructions book. That will take a long time because until Jake publishes his M96 book - there isn't one !Sadly ,Bentley is quite inadequate the experts say.And WAyne does not cover it completely.
Fortunately I am in no rush so am patiently waiting for Jake Raby's book "The M96 Definitive Guide". I'll even be a guinea pig and test a galley proof if that would help Jake?
If this was a simple engine the lack of instructions would be just an inconvenience. I'm not trying to discourage you, just a heads-up and a general plea to this Forum for a reference to any helpful information on inspecting and reassembly.Once Jake publishes it will be a simple matter of buying his book but until then....
With the old air cooled engines ,if you made a mistake it was quick & easy to just remove the engine and rectify your error.With the M96 in the Boxster it is a very different issue. Wayne rates removal/tear down as a '4' I think and the reassembly is '10'. I suggest he underestimates the removal time for anyone unfamiliar with the Boxster so I am apprehensive about the rest of the task!
Good Luck and let us know how it goes.
|
|
|
|
|
05-19-2014, 09:06 PM
|
#39
|
|
Registered User
Join Date: May 2014
Location: Lake St. Louis, MO
Posts: 92
|
Spent the night making a tool and removing the camshaft cover. I'll say right now I know why you guys don't want to do this in the car. I'm not saying it's impossible, but I'm dang jealous of all the pics I'm seeing online of motors where you can use a standard socket to remove bolts - instead of the slippery end of a box wrench over and over and over. Long story short, I got the tool made and the camshaft cover removed and I'm calling it a night. Next up, removal of the camshafts and carrier to see what's going on with the valve. My biggest concern at this point is getting the camshaft cover back on when there is a small bead of loctite on it... Gonna have to ponder on that one!
Couldn't have done this without all the information I've found online! Thanks again for everyone's input on this!
|
|
|
|
|
05-19-2014, 09:11 PM
|
#40
|
|
Registered User
Join Date: May 2014
Location: Lake St. Louis, MO
Posts: 92
|
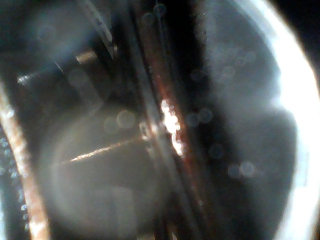
Tool made and installed. Camshaft cover removed with motor still installed.

|
|
|
|
 Posting Rules
|
You may not post new threads
You may not post replies
You may not post attachments
You may not edit your posts
HTML code is On
|
|
|
All times are GMT -8. The time now is 03:33 PM.
| |


 Linear Mode


