 10-01-2015, 01:25 PM
|
#81
|
|
Registered Abuser
Join Date: May 2015
Location: Lake Orion, MI
Posts: 55
|
Quote:
Originally Posted by BoxsterLS376

It took pulling some teeth from Renegade but apparently someone who did this conversion ran into this problem as well and created the solution I had envisioned~
All your tachometer worries can be solved by spending a few more bucks... about $80 of them I believe...
Check out Ashlock Technologies~
Home |
I'm pretty sure you can achieve the same results by re calibrating the GM PCM.
This is how I plan on doing it:
Quote:
|
Originally Posted by http://www.hptuners.com/forum/showthread.php?15112-V8-tach-output-for-6-cylinder-tachometer
I did a search for this information and could not find it using keywords Tachomter and Tach.
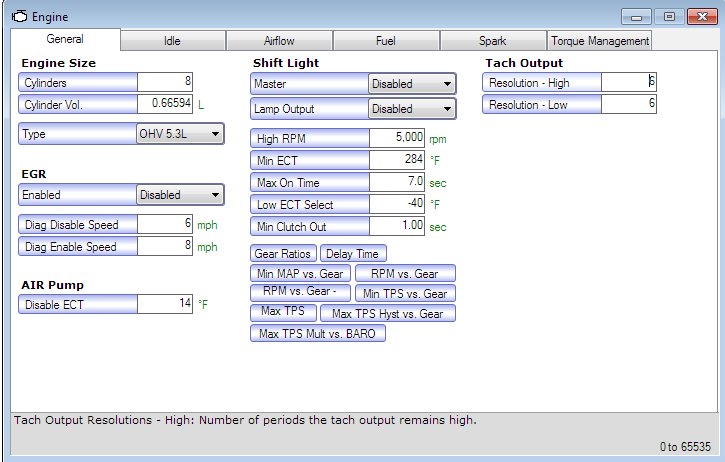
I am looking into adjusting the tach output for my 98 VCM due to putting the motor into a 6 cylinder BMW. The stock setting for high & low resolution is 6. What is the proper adjustment to make the tach output the same as a 6 cylinder motor? I know the LSx output is seen as a 4 cylinder by tachometers. Nothing else on the car uses the tach output.
EDIT
Did some math & research & some more math, this looks to be correct:
The number of crankshaft medium resolution pulses (24x pulses) to hold the tach output high (should match {G1205} "Tach Pulses Low").
The number of output pulses P is calculated as P=24/(N*2) where N is the value of this calibration.
Sample values for this calibration:
For 12 pulses, use N= 1
For 6 pulses, use N= 2
For 4 pulses, use N= 3 (Note- 8 cylinder tach setting)
For 3 pulses, use N= 4 (Note- 6 cylinder tach setting)
For 2 pulses, use N= 6 (Note- LSx 8 cylinder & 4 cylinder tach setting)
For 1 pulse, use N=12
N=6 same as you see in HPT (for Gen 3 motors)
Pulse Calculator: V8 tach reads 4 pulses per revolution, so 24/8=3. 6 cylinder reads 3 pulses per revolution, so 24/6=4. 4 cylinder reads 2 pulses per revolution, so 24/12=2. These are the "N" numbers for above that are plugged into the HP Tuners Tach Output fields.
|
|

|

|
|
11-11-2015, 12:32 PM
|
#82
|
|
Registered User
Join Date: Dec 2014
Location: SF Bay Area
Posts: 246
|
Sorry for the lack of updates, Ive been a little busy the last few weeks with jobs interviews. Looks like I will be moving to San Francisco at the end of November to take a dream job with Tesla Motors. Unfortunately, there is no way the Porsche will pass Cali emissions, so its staying behind with my roommates. I still have a few things to finish up, and Im hoping to post a couple more updates.
The doors have been letting in quite a bit of water at the sills, which I'm guessing is due to lack of door membranes. I'm going to pick up some string caulk and plastic sheeting tomorrow and get that fixed. I also got some new door harnesses and passenger locking mechanism (thanks Woody!) that will go in at the same time. Other things on the list are tie rods, seat covers, wheel spacers, random electrical stuff, tach, water temperature sensor, and alternator belt.
The water temperature sensor has been a huge pain in the butt. The parts diagrams all say that I need a two pin connector, but based on wiring diagrams and google images, it looks like I actually need a 4 pin sensor. Two outputs for the ecu, and two for the cluster. I will probably leave this one for my roommates to fix next season once I can get my hands on a proper connector.
I really wanted to get the tach working with an arduino, but I don't have time to deal with the electrical interference I'm getting from the engine. I just picked up a Dakota Digital converter to make my life easier.
|
|
|
|
|
11-11-2015, 03:43 PM
|
#83
|
|
Registered User
Join Date: Jan 2014
Location: Albuquerque, NM
Posts: 503
|
Drop it off with me, I'll finish the swap for ya before starting mine hehe
Sent from my SM-G925T using Tapatalk
__________________
-Josh
2001 Porsche 986 Boxster RS2.7 Bi-Turbo
|
|
|
|
|
11-11-2015, 07:31 PM
|
#84
|
|
Registered User
Join Date: Dec 2014
Location: SF Bay Area
Posts: 246
|
Quote:
Originally Posted by DarkStar
Drop it off with me, I'll finish the swap for ya before starting mine hehe
Sent from my SM-G925T using Tapatalk
|
Sorry, the water temp sensor isn't working, so it'll definitely overheat by Albuquerque 
Funny story about Albuquerque... I was on a road trip with my girlfriend and my brake pads wore out to the bare metal in NM. Had to camp out in Albuquerque and change my brakes in the middle of Walmart parking lot. Of course, I returned all the tools right after I was done
|
|
|
|
|
11-11-2015, 07:33 PM
|
#85
|
|
Registered User
Join Date: Jan 2014
Location: Albuquerque, NM
Posts: 503
|
Boxster Brakes are too easy to do. I wish I was that lucky. I've had an alternator go out on my old DSM, but it was a matter of time, 62mm turbo sitting next to it, it always died. But ended up doing it in some Albertsons parking lot in Santa Fe on my way back to Abq.
Sent from my SM-G925T using Tapatalk
__________________
-Josh
2001 Porsche 986 Boxster RS2.7 Bi-Turbo
|
|
|
|
|
11-13-2015, 05:29 AM
|
#86
|
|
Registered User
Join Date: Jul 2013
Location: Bastrop, Tx
Posts: 2,644
|
Congratz on the job with Tesla. I think I heard that they're going to build a plant down here in Texas. I'm pretty sure Elon Musk has a rocket building facility around here too. Most of Texas doesn't have any emission testing. Transfer down here and you can bring your Boxster with you. Think of all the money you'll save on shipping! lol
__________________
Woody
|
|
|
|
|
11-13-2015, 08:31 AM
|
#87
|
|
Registered User
Join Date: Dec 2014
Location: SF Bay Area
Posts: 246
|
Quote:
Originally Posted by itsnotanova
Congratz on the job with Tesla. I think I heard that they're going to build a plant down here in Texas. I'm pretty sure Elon Musk has a rocket building facility around here too. Most of Texas doesn't have any emission testing. Transfer down here and you can bring your Boxster with you. Think of all the money you'll save on shipping! lol
|
Haha you are right about the damn shipping... I could have finished the build months ago if I was living anywhere in the states. Not to mention being thousands of dollars richer.
I don't think I've heard about them opening a plant in Texas, but I'd love to stop by at your place if I ever go on a road trip that way. I drove through last fall, but unfortunately I didn't know about your operation at that point.
|
|
|
|
|
12-13-2015, 05:40 PM
|
#88
|
|
Registered User
Join Date: Jul 2013
Location: Bastrop, Tx
Posts: 2,644
|
Quote:
Originally Posted by martsink
I had a little downtime waiting on parts, so I made these RS style door cards. You can see more pics of the process on the blog.
|
I'm curious how you built your rs door panels? Mostly what modifications you had to make to the door itself. I'm in the middle of making my own RS door panels and would love to see if you have anymore pics of that process. I've already drilled the spot welds out on the pull handle mount and it looks like i'll have to make some small sheet metal modifications on the top for everything to sit flush.
__________________
Woody
|
|
|
|
|
12-13-2015, 06:11 PM
|
#89
|
|
Registered User
Join Date: Dec 2014
Location: SF Bay Area
Posts: 246
|
Quote:
Originally Posted by itsnotanova
I'm curious how you built your rs door panels? Mostly what modifications you had to make to the door itself. I'm in the middle of making my own RS door panels and would love to see if you have anymore pics of that process. I've already drilled the spot welds out on the pull handle mount and it looks like i'll have to make some small sheet metal modifications on the top for everything to sit flush.
|
Hey Woody,
Whatever extra pics are on my blog, is all I have. Unfortunately my car is back in Toronto, otherwise I'd pull it apart for you. The bottom part is pretty easy to do, as its all fairly flat, but the top piece is more of a pain. To be honest, what I put together for the top trim is temporary, I was thinking about eventually using some shaping foam to fit the contours.
Some other tips that might help:
- Thin particle board from home depot works great for prototyping. I was going to redo it with a plastic sheet eventually, but I'm happy with it.
- use plastic bumper rivets in the existing door holes. This atuall looks really good and easy to remove.
- You need some thin high density foam under the vinyl. I initially used some 1/4" upholstery foarm, but it was way too thick and soft. I ended up finding some sheets of 1/8" poly foam at my friends shop that I tiled together.
- Hi-strength 90 from 3M is a great adhesive
- make suret to add a vapor barrier behind the door card. I was getting a lot of water in the interior without it. A regular plastic sheet and some rolled up poster tack putty works well for this.
- for the door handle, I got a 1" strip of buffalo leather on ebay. You can use some pop nuts (rivet nuts) in the door sheet metal to bolt it down. I put the handle right under the airbag opening
|
|
|
|
 Posting Rules
|
You may not post new threads
You may not post replies
You may not post attachments
You may not edit your posts
HTML code is Off
|
|
|
All times are GMT -8. The time now is 07:22 PM.
| |


 Ahnold
 Mirada
 2001 Porsche Boxster S

 Linear Mode


