 02-19-2014, 04:38 PM
|
#21
|
|
Registered User
Join Date: Jul 2013
Location: Corvallis Oregon
Posts: 30
|
[IMG][IMG] 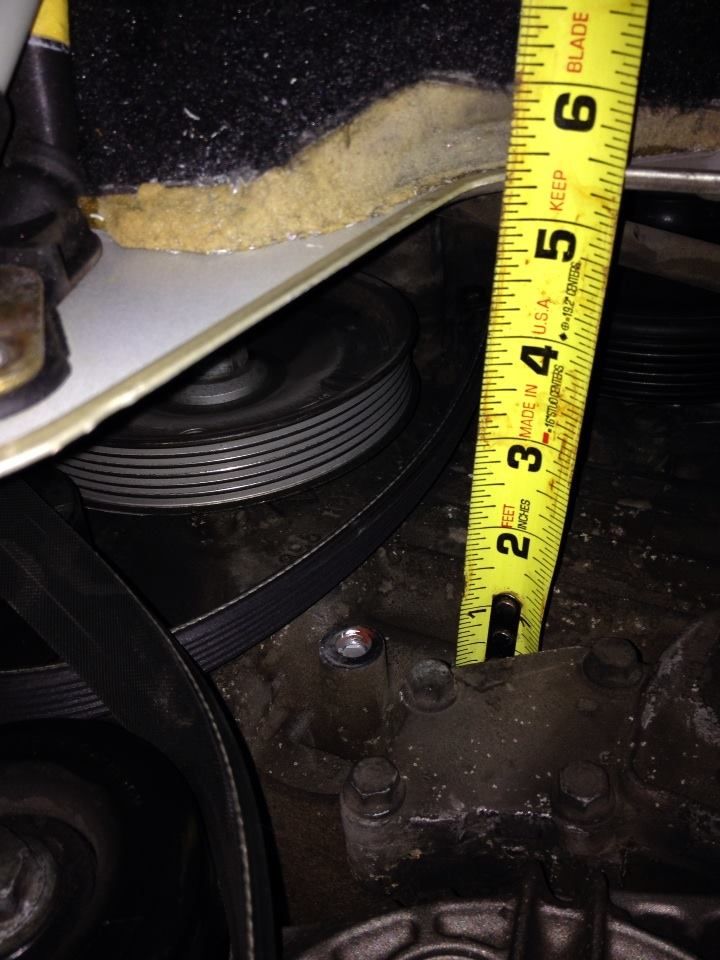 [/IMG][/IMG]
|

|

|
|
02-19-2014, 04:40 PM
|
#22
|
|
Registered User
Join Date: Jul 2013
Location: Corvallis Oregon
Posts: 30
|
|
|
|
|
|
02-19-2014, 04:41 PM
|
#23
|
|
Registered User
Join Date: Jul 2013
Location: Corvallis Oregon
Posts: 30
|
|
|
|
|
|
02-19-2014, 04:45 PM
|
#24
|
|
Registered User
Join Date: Jul 2013
Location: Corvallis Oregon
Posts: 30
|
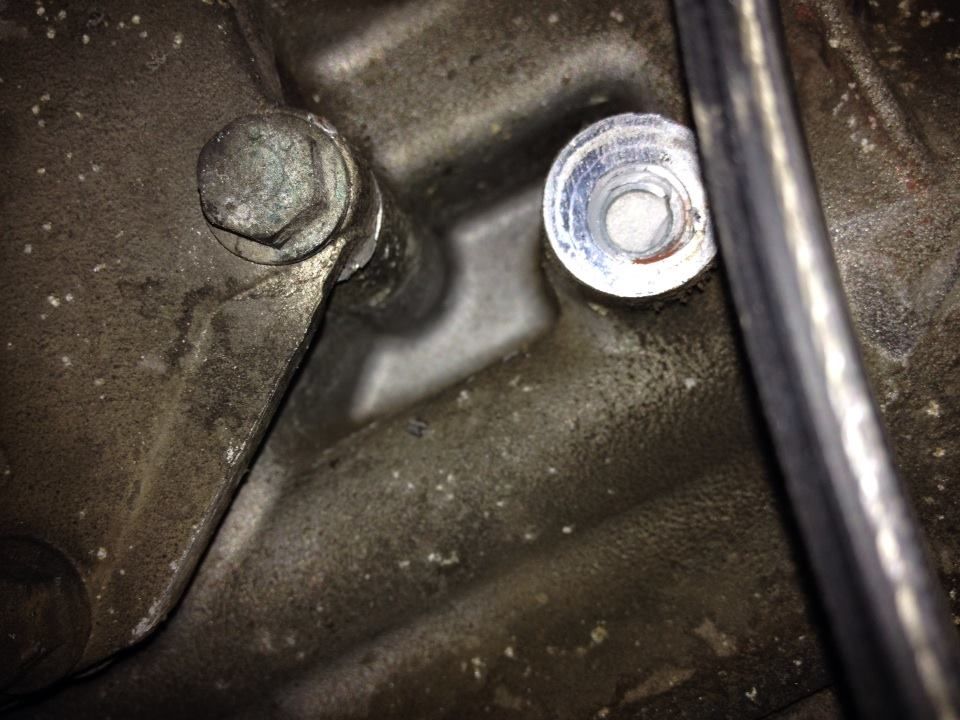
About 4" for a right angle drill, chuck and drill bit.
It does look like the spacer may have spun, before the bolt broke?
I might have to rent a dental drill?
About 11 hours of shop rate to pull the motor. :-(
|
|
|
|
|
02-19-2014, 05:08 PM
|
#25
|
|
Registered User
Join Date: Jul 2013
Location: Corvallis Oregon
Posts: 30
|
|
|
|
|
|
02-19-2014, 05:11 PM
|
#26
|
|
Registered User
Join Date: Jul 2013
Location: Corvallis Oregon
Posts: 30
|
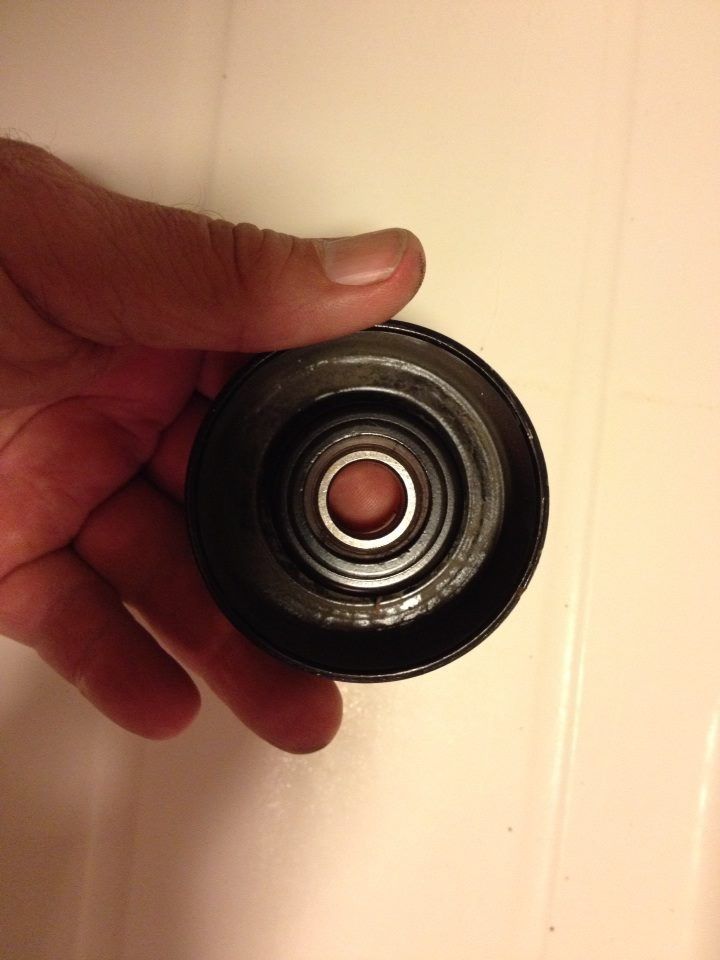
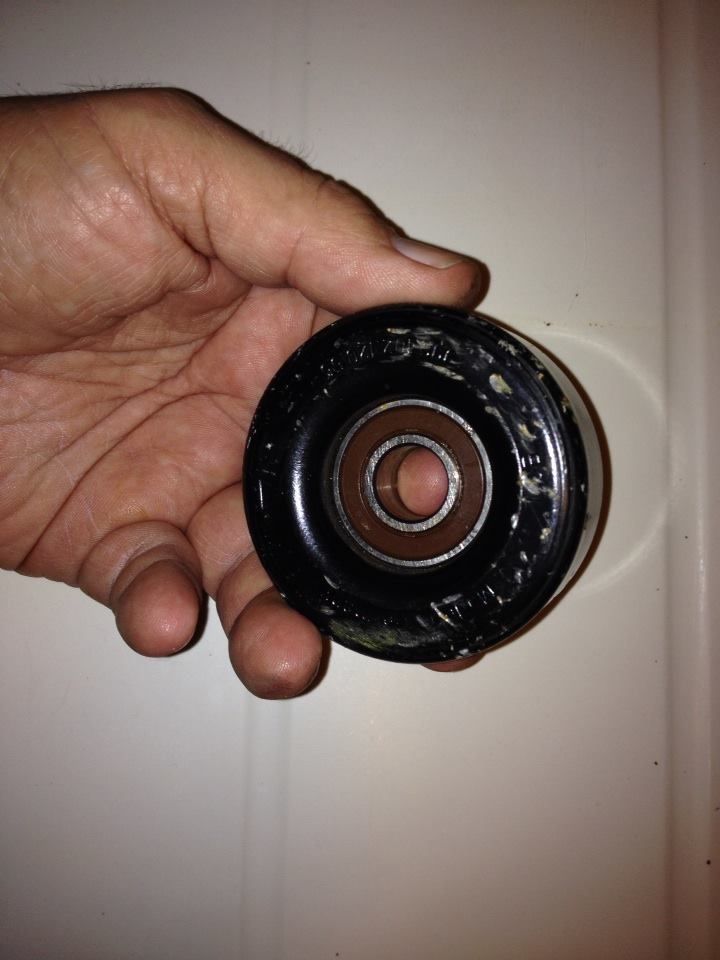
The pulley I found on the road.
The bearing still works well, but it has a little road rash. It might have been run over too? The paint is still on the belt's contact surface. Very perplexing?
the underside of the pulley.
shows no sign of bearing damage.
|
|
|
|
|
02-19-2014, 05:31 PM
|
#27
|
|
Registered User
Join Date: Dec 2007
Location: Seattle
Posts: 735
|
In your first post, you state that you have only had the car for four months. Seeing that there is still paint on the pulley surface, I would think that it is more than likely a new pulley, otherwise all the paint would have been worn off by now. Sounds like the previous owner had a problem and replaced the pulley with a new one. Might have over tightened the bolt and lead to the failure. A lot of people think they have to tighten every bolt as tight as they can.
__________________
2000S Ocean Blue Metallic- 116K
3X Water Pump, Clear side markers, Crios Mod, Front engine mount, Flywheel, clutch, RMS, AOS, MAF, serpentine belt, power brake vacuum line, battery, 2X CV boots, Fuel filter, Oil filler tube, 3X ignition switch, 90K service, gas cap, Coolant tank
|
|
|
|
|
02-19-2014, 06:04 PM
|
#28
|
|
Registered User
Join Date: Nov 2009
Location: Winnipeg MB
Posts: 2,485
|
I recall seeing pictures a while back of a portable EDM tap remover. I wonder if that would be something you could use on this problem.
__________________
'99 black 986
|
|
|
|
|
02-19-2014, 07:45 PM
|
#29
|
|
Registered User
Join Date: Jul 2013
Location: Corvallis Oregon
Posts: 30
|
Just got this advice from a friend who races motor cycles.
More than likely he's had broken bolts in Aluminum a few times.
Sounds doable.
SMAW process 6013 x .1875 rod at 100 amps. Set source to straight polarity at .5 pulse or so. Touch the electrode to the end of the broken off bolt. After welded cut off the rod long enough to get a pair of vice grips on it and remove. Practice on a scrap bolt and nut a few times first if you have never done this before. Adjust power source accordingly.
I think you may be right about the pulley being new.
The belt looks totally new too.
|
|
|
|
|
02-19-2014, 08:00 PM
|
#30
|
|
Registered User
Join Date: Jul 2013
Location: Corvallis Oregon
Posts: 30
|
Quote:
Originally Posted by Spinnaker

In your first post, you state that you have only had the car for four months. Seeing that there is still paint on the pulley surface, I would think that it is more than likely a new pulley, otherwise all the paint would have been worn off by now. Sounds like the previous owner had a problem and replaced the pulley with a new one. Might have over tightened the bolt and lead to the failure. A lot of people think they have to tighten every bolt as tight as they can.
|
The pulley still has ALL of it's paint except where it has road rash.
The bearing's rubber looks new too.
The belt show no signs of use.
I think you called it correctly.
|
|
|
|
|
02-19-2014, 09:46 PM
|
#31
|
|
Registered User
Join Date: Dec 2008
Location: Queensland, Australia
Posts: 1,522
|
Bulldog...
I feel for you, as 3-4 years ago I replaced my belt rollers and having just bought Wayne Dempsys 101 Projects for your Boxster, I followed the procedure as described in the Projects book.
Unfortunately, there was an error in the installation torque value of the lower roller retaining bolt (now updated I believe) and the result was that the new bolt sheared off and I was left with the same problem as you have.
I guess I was a little luckier as the remains of the broken bolt was flush with the block, but no way could I get a right angle drill in there without cutting out part of the bulkhead or removing the engine.
After sleeping on it, I bought a long very thin needle punch and after punching a small indentation in the bolt, slowly started tapping the bolt out of the block. Even though I had used Locktite on the threads when I installed the new bolt, it slowwwly came out - even though there was minimum manouvering room, & I cried with relief when enough of the bolt was out and I could grasp it with pliers......
Looking at your pictures, your bolt is a long way in the block, and I don't know if the long punch method will work for you. Trying to drill it out is fraught with danger as its difficult to get the drill strait even if you have the room to get one in there, plus if the drill runs off the old bolt, theres a good chance it will damage the thread & soft alloy block.....
Cutting, removing and re-welding the bulkhead so you can get a drill / easyout in there may be easier than removing the engine, depending where your expertise lay....
Whatever method you use, best of luck - its a nasty situation to be in and I sympathise with you.
Please keep us all informed of the outcome.
__________________
2001 Boxster S (triple black). Sleeping easier with LN Engineering/Flat 6 IMS upgrade, low temp thermostat & underspeed pulley.
2001 MV Agusta F4.
|
|
|
|
|
02-20-2014, 03:12 AM
|
#32
|
|
Registered User
Join Date: Apr 2008
Location: Southern New jersey
Posts: 1,054
|
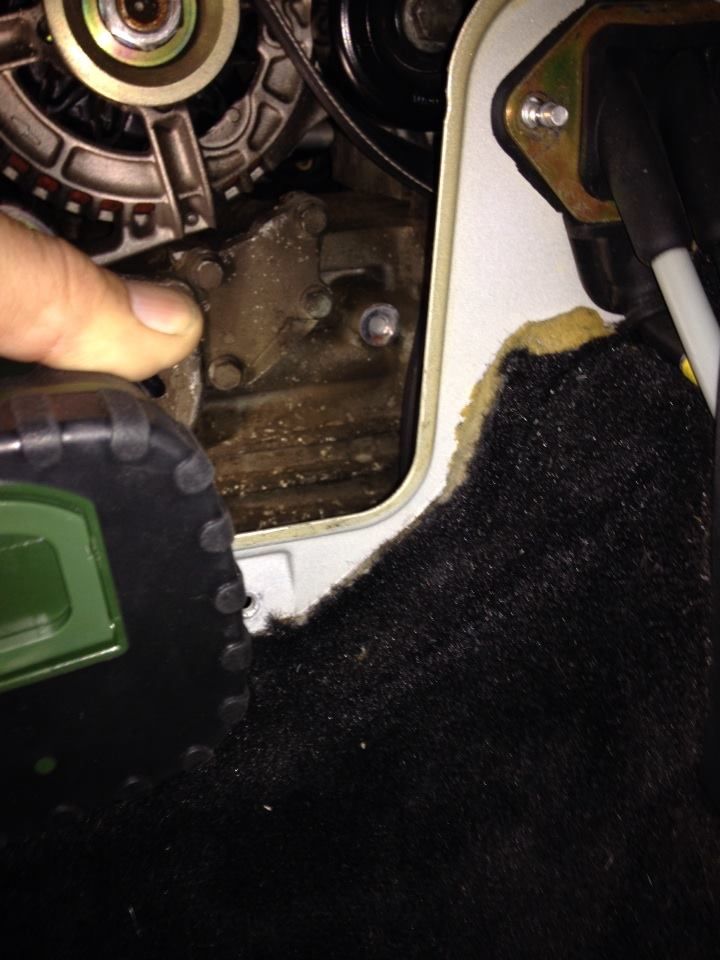
It almost looks like you could get an extra-long drill bit straight in? Hard to tell from pictures. Definitely center punch first, and use a left-handed bit.
|
|
|
|
|
02-20-2014, 09:11 AM
|
#33
|
|
Registered User
Join Date: Jul 2013
Location: Corvallis Oregon
Posts: 30
|
the picture with the tape measure on a strait path shows that strait on is not possible.
Also the idea of cutting away an access opening would involve the inside corner of the console tunnel.
I'm researching the Tack welding method.
Just need to find someone willing?
I'll post my results, but this may be a slow repair.
|
|
|
|
|
02-20-2014, 10:45 AM
|
#34
|
|
Registered User
Join Date: Feb 2013
Location: Land of naught
Posts: 1,302
|
I'd suggest taking it to a machine shop. It really is a tough situation but I don't think you'll need to pull the engine. The broken bolt may have been too long or the threads didn't go down as far as they should and the bolt may have been flexing as a result. If it were me I'd probably try tacking on a small rod and twisting it out, first.
__________________
Death is certain, life is not.
|
|
|
|
|
02-20-2014, 12:52 PM
|
#35
|
|
Registered User
Join Date: Dec 2008
Location: Queensland, Australia
Posts: 1,522
|
The real problem with "tacking on" or drilling is the lack of space and no strait path to the bolt. Just getting a welding rod (bent or otherwise) into the tapped hole without touching part of the chassis or engine will be a delicate operation.
In my case, if the engine had been out of the car, it would have taken me 10 minutes to remove the broken bolt - as it was, it took over an hour of sweat (its tight even with the seats removed), lots of bad language and split knuckles to get the damned thing out. Bulldogs bolt is even more difficult to remove as it snapped deep in the threaded hole.
__________________
2001 Boxster S (triple black). Sleeping easier with LN Engineering/Flat 6 IMS upgrade, low temp thermostat & underspeed pulley.
2001 MV Agusta F4.
|
|
|
|
|
02-20-2014, 06:13 PM
|
#36
|
|
Registered User
Join Date: Feb 2013
Location: Land of naught
Posts: 1,302
|
mig weld some flat stock onto the bolt, just right of the center
__________________
Death is certain, life is not.
|
|
|
|
|
02-28-2014, 05:16 AM
|
#37
|
|
Registered User
Join Date: Apr 2013
Location: Saratoga, NY
Posts: 172
|
If the bearing in the idler looks good I would take a very thorough look at ALL the other pulleys and accessories. You may find that a P/S pump, alternator, or AC comp. clutch bearing failed and the idler bolt was the weakest link.
__________________
2001 Boxster S 6speed- weekend warrior
2015 Explorer Sport- New DD
2011 Taurus SHO- Sold
2010 CBR1000RR- Sold
|
|
|
|
|
02-28-2014, 05:49 AM
|
#38
|
|
Registered User
Join Date: Apr 2011
Location: florida
Posts: 487
|
what happened
outcome? did the bolt come out?
|
|
|
|
|
03-03-2014, 08:12 AM
|
#39
|
|
Registered User
Join Date: Jul 2013
Location: Corvallis Oregon
Posts: 30
|
I had a friend drop off some easy-out kits this weekend.
One set has square posts that pound into a sized drill hole. Then there is a hex head that slides over the square post for a wrench or socket.
I might start with that set.
I was a little too busy to start. but I hope next weekend I will.
|
|
|
|
|
03-12-2014, 05:48 PM
|
#40
|
|
Registered User
Join Date: Jul 2013
Location: Corvallis Oregon
Posts: 30
|
Hooray!!!!
I got it out tonight.
It took a reversing right angle Air Drill, and a VERY short LH Drill bit.
(I had to shorten it to about 3/4 of an inch beyond the tip of the chuck.)
Feeling happy now. Just need a new bolt, washer, and spacer.
I did drop the bit of broken bolt onto the bottom engine skid-pan.
Hopefully it will find a way to fall out.
|
|
|
|
 Posting Rules
|
You may not post new threads
You may not post replies
You may not post attachments
You may not edit your posts
HTML code is On
|
|
|
All times are GMT -8. The time now is 01:51 PM.
| |


 Linear Mode


